Browsed by
Month: October 2023

Fabric folder.

Fabric folder.

I needed something to keep my various sample pieces in one place, and that I would know without much head scratching or searching around for any particular piece of work. Of course, I would need to not misplace this folder too!

I had a fabric tote bag that had become a little frayed at the edges of the straps; the pieces of tweed used to make the bag were fine, with no damage or fraying. The bag just needed a wash.

The bag had been a Christmas present to me from my daughter several years ago, and I used it daily. I am not a ‘bag’ person, that is, having a bag for every and any social occasion, or day of the week for that matter. This bag was made at Garvald Textiles, this is a textile studio offering creative opportunities for adults with various learning disabilities, and the studio sells many of the items made by the artists there. My daughter worked for this registered charity in Edinburgh when she lived there some years ago, and much of her present buying that year was made from this source. Leonor may be aware of them, I think she lives in Edinburgh? Photo of the label attached, and remaining leftover bag pieces.

I have made another bag for myself from scrap pieces of tweed fabric bought when I visited Harris in the Western Isles.


To make the folder, I cut the body of the bag into smaller pieces and the stitched them onto a shaped piece of spare calico. I was hoping that I would have enough squares, but I did use another spare piece of tweed to complement the colours. I used my sewing machine to zig zag each piece together onto the calico. The size I was aiming for was an open A4 folder.


For the inside I choose to use up many small pieces of fabric, and to quilt them on to another piece of calico using a ‘crazy’ quilting theme, and also using hand stitching/embroidery. I embellished some pieces with embroidery, a piece of lace, a crinoline lady, and a couple of heart shaped pieces of fabric. I had 2 vintage hankies, and these I folded into ‘butterfly’ shapes and stitched them down

Both the inside and outside were completed separately, and then stitched together, inside out, before turning the right way out and securing the opening. I did think of adding some bias binding to the outside edge, but in the end I just stitched all around the edge with a blanket stitch.

I added a few felted leaves to the front of the folder, I had made these ?last year, and I think they complete the folder front very nicely. I added 2 pieces of ribbon to use for closure, but I will review this in time for my next post, and I will add some ‘pages’ to my folder to attach my work to.

I am very happy with this piece. I have reused some items, and other pieces I used were already in my fabric scrap box.


I’ve been spinning a little in the past month

I’ve been spinning a little in the past month

You know how when you get excited about one hobby, the other ones get left behind? Well, for some reason I’ve been bitten by the spinning bug in the last month, and I’ve a few skeins to show for.

Let’s start with the green-blues.

Four skeins of hand spun yarns by Eleanor Shadow

The big green skein was spun using some Leicester Longwool locks I dyed for this purpose, since I wanted to make a super Halloween-y textured art yarn; I plied it with some commercial yarn (also dyed by me) that I had to over twist in my wheel so it would un-twist as I paired it with the textured ply.

The smallest skein is baby llama, my very first time spinning such a fibre. I’m a fan! I’d love to spin more of this in the future. It’s very soft and warm.

To the right there’s a fun Blue Faced Leicester (BFL) and bio-nylon yarn that I tested for my own shop (got to know what I’m selling, right?) and I can say I love this fibre combination. The BFL is very soft and lofty, and the bio-nylon increases the strength of the wool without harming the environment since it’s as fully compostable as the natural animal fibre. I’d have no problems knitting some socks using this yarn.

At the bottom, a rather fun jewel tones Shetland and Tussah silk combo (70/30) that just glided off my hands effortlessly.

But wait, there’s more!

I was perusing World of Wool’s website a while back and came across their taster package in shades of pink, and was tempted. Each resulting mini skein is 25g and very squishy.

Six hand spun mini skeins in different shades of pink and in different fibre combinations

From left to right: merino and nylon sparkle; merino and silk; merino; wool and viscose; merino, alpaca and mohair; merino and bamboo.

My favourite to spin was the (mysterious) wool and viscose. Those tweedy bits kept me very engaged and wanting to keep treadling! The merino/alpaca/mohair blend to its right was also rather lovely. Although these all came from the same pack, I don’t feel the shades complement each other too well, so I might not try to add them to the same project in the future.

You’d think I’d be done by now, but… there’s more.

Three hand spun yarns by Eleanor Shadow

If my goth self in my 20s would’ve guessed I’d be spinning this much pink, I’d be appalled! But yes, those colours were all my choice. The pink of the left was a particularly bouncy merino and soy fibre combo, the middle one is a merino/alpaca/camel/silk blend (40/20/20/20) and the right skein is anyone’s guess (it’s a mix and match of several different wool nests a friend gave me to spin that I decided to merge together. I wish I had a jumper quantity of this!)

Lastly…

A merino hand spun skein in jewel tones by Eleanor Shadow

I dug into my own shop’s stash for this one. The colours were super well defined in the fibre braid, but I decided to spin them in a way that would blend everything and I don’t regret it one bit. This would knit up rather nicely, I’d say. If my knitting mojo comes back anytime soon I might give it a try…

There’s actually one more skein, but it’s a white one and it didn’t photograph well…

So, do you think my wheel was busy, or do any of you spin more in any given month? Let me know below.

Bat on a stick…..

Bat on a stick…..

One of the things that I have enjoyed doing over the last few years, is watching and chatting during live YouTube felting tutorials from Sara (Sarafina Fiber Art) and Marie (Living Felt). I have been inspired by projects shown by both felters.

As you probably have noticed, when seeing my adventures with the four-person Mer-family and their Mer-family pets, I don’t always follow the instructions exactly as suggested. In fact, I tend to fall off the rails…., wander off into left field, or was that right field?… ok, I tend to get distracted part way through a tutorial and wind up doing my own possibly completely different thing.  I am not saying that is a bad thing. It can open new options and create something that is vastly different than the original tutorial goal.

For Sara’s Mermaid project (google You Tube “Mermaid Felt Along 1: Armature”, “Mermaid Felt Along 2 – Body Shapes”, “Mermaid 3: Wet Felted Tail” and “Mermaid 4: Finishing” to see what I was supposed to do), I deviated first by wanting to do a merman but felt he needed a family. Instead of using both wet and dry felting, I used only dry felting.  With the change of scale and shape, I needed to augment the armature strength. Lastly, I made them Fish-People (Pike, Koi, Shark, and Arctic Char) rather than the more traditional mermaid shapes Sara was creating. I created some accessories for them and more will be needed. For the Mers themselves, I wandered off into thoughts of what kind of family pets would a Mer family have.  So the addition of family pets was created, Miss Manta and Sharkette. This could continue to spiral outwards from the original tutorial with Mer-Nabours and other yet unthought-of Mer-friends and accessories! Years of enjoyment even for someone who really would rather not get wet.


Two weeks ago Marie, from Living Felt, out of Texas, sent me off on another spiral with her “Needle Felt Simple Animals: Bat, Owl, and Red Panda Forest Friends!”.  This is a very beginner-friendly project, with simplified shapes and lots of explanations of tight wrapping to build up the core understructure. She did examples of blending and layering colours of fibre. All three projects were extremely cute. I am not sure I do cute, especially extreme cute, well not as cute and friendly as Marie can do at least.

Marie started by using a wooden skewer to tightly warp her layers of core wool, creating the basic shape. This got me wondering about other skewer like objects that you could use which I had on hand *actually I looked as far as the shelf beside my desk to find 3 options. I had also purchased at the Almonte Fibre Fest in early September, some short fibre Maori batts, one of which was white and another was charcoal. I had wanted to investigate working with short, somewhat springy, fibre and this seemed to be an excellent opportunity.

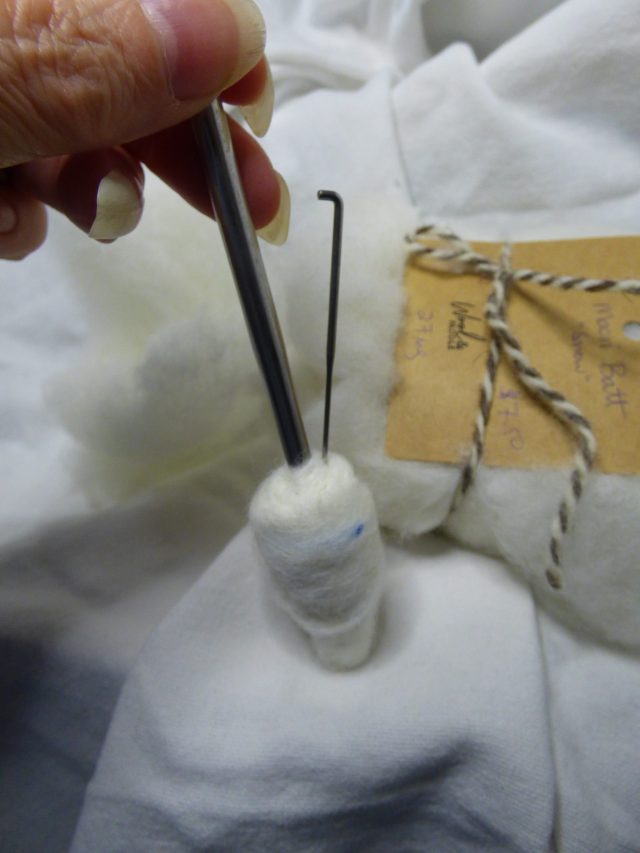
1) White Maori Batt, wooden skewer, knitting needle, one mettle chopstick

I decided to try the chopstick. It doesn’t have quite as much grip as the wood, but it’s not quite as slippery as the knitting needle.  I like the slight taper,  it was comfortable in my hand and oddly like the single knitting needle it happened to be sitting in a cup with my pens, markers, small files and metal pick set (that was for cleaning my drum carder, I don’t know why it’s here) by my desk.


one mettle chopstick on white batt of Maori short stale lenght fiber 2) selected a chopstick and Maori batt

using a chopstick to wrap fiber around and build up the core structure.3) using a chopstick to wrap fibre around and build up the core structure.

Adding thin layers of roving, wrapping tightly and tacking down, then poking from the base to further firm core layer.

Tearing off thin strips from the batt then drafting them to a narrow roving. This shows the VM and makes it easy to remove.4) Tearing off thin strips from the batt then drafting them to a narrow roving. This shows the VM and makes it easy to remove.

I found the white short-fibre Maori batt had more bits of VM than most of my spinning fibre. It was not a large problem and easily picked out before wrapping it to the core. It compacted to a firm core shape and was easy to work with.

Looking at Marie’s bat she used commercial felt to make the wings. While extremely cute you can’t pose or position the wings. Ok, I am going off instructions already!  There are a few ways to add an appendage with wire to a body. This time, since I was adding a symmetrical structure, I chose to pierce the body with a floral wire (unlabeled but suspect it is 22g). I centred the body on the wire then folded each wire up at the point it pierced the body on each side. I then folded each half, in half, twisting to create the leading edge of the arm, leaving a loop to add the “fingers” at the end of each wing.

wire piercing body, center body on wire and bend the wires5) wire piercing body, centre body on wire and bend the wires

folding each wing wire in half6)folding each wing wire in half

Next, I needed to add the “fingers”  to the end loops.

wing one armature with fingers added and wire bent ready to add to bats right palm loop.7) wing one armature with fingers added and wire bent ready to add to bat’s right palm loop.

both wings have full arm armatures. note that the fingers have 3 different lengths.8) both wings have full arm armatures. note that the fingers have 3 different lengths.

I often make very thin wings for the little dragons I’ve been making. I usually wind up using a fine fibre combed top laid in thin wisps in various directions. I have also used hand-carded fibre such as on Mrs Mer’s Finns effectively.  I was curious how the short fibre of the Maori batt would work for a top coat as well as for thin wings.

The Charcoal coloured Maori batt beside the small white Maori batt9) The Charcoal coloured Maori batt beside the small white Maori batt

I started with wrapping the body and armature.

wing/ arm armature and body covered in the short staple Maori10) wing/ arm armature and body covered in the short staple Maori

It was a bit fuzzy, but with further poking the surface became smooth and firm.

At this point, I again became quite distracted with another thought. Those scrawny arms are not going to be able to move those wings!!! So I had to add deltoids and bicep muscles, now he could try out his arms as we went to enjoy hamburgers at the butcher shop in Bell Corners (he did not have any since he doesn’t have a mouth or eyes yet it could get messy.)

You Tube Video link  

11) Video: bat on a stick in KIA trying out his muscles before he gets his wing membranes

Ann checks out Bat in progress12) Ann checked how firm he was and laughed at his fabulous physique.  (don’t tell bat!)

I made a couple of attempts with just the Maori but was finding I was not getting as firm and thin as I would like, so added a longer fibre in a thin web to let the Maori attach to it. when I had a thin layer of felt  I carefully attached it to the fibre wrapping the wing armature. I bent the armature and then sculpted the wing membrane further.  Once I had the wings looking more wing-ish, I made quick ears and added them.

I decided I wanted a more three-dimensional face (oh no deviating again!) so added a small nose and eye sockets which I filled with small beads for eyes.

Marie’s Bat only had its stick stuck in while she was creating the core shape. It kept your fingers and the sharp end of the needle well away from each other. She then removed it and added the layers of colour to make her cute bat. I like the bat-on-a-stick look and have kept it so far. Bat on a stick may be a cool Halloween hair ornament or a felting supervisor in a demo basket.

I have not had time to finish off the last bits for Bat on a stick he still needs his teeth, I tried to make them with the Maori white but was not happy with the first attempts. Next, I resorted to wet felting but I was still not happy.  I have a couple more options to try to make tiny teeth. I am also considering feet or legs and feet, so I may be adding another part armature to finish him off.

In the meantime, I have been taking him with me to the OVWSG guild library. I am working through the last few years of donations, sorting ones to keep in the collection and getting the rest ready to sell. Bat has supervised as I wrote the database for the sale books. I am almost finished with the data entry for the books. The magazines that are extra I have sorted by title and year ready for shopping! (it was a big job)

box of magazines sorted by year 13)just a few of the magazines being prepped for sale.

He also watched as I had my last of 4 evenings of nalbinding workshops which has been fabulously fun. I now know I can’t count since I keep losing track of where I am in my increases for my hat. I am off to find a stitch counter so I have a hope of getting the mythical (in my case) flat starting disk to make my hat. For this workshop, I do want to follow the instructions. (I have had a blast wandering off instructions for the felting though)

Felt Bat on a mettle chop stick with articulated wings  14)Thumbs up!  Bat on his chopstick supervising from the shelf above the desk at the OVWSG Library.

Each trip to work on the library bat has accompanied me. He has found a spot on the shelf above the desk where he can sit in a clip on the extending magnet. He is giving me a thumbs-up on all the work! Even without his teeth or feet, he is very supportive.


I hope you too get a chance to watch some of the various online felt-alongs. You may also find inspiration in previous blog posts by all the fibre artists here. You never know what might inspire your next project, maybe you too will find a multi-year project! Or maybe just a quick little bat! (with or without a stick).

On to the stitching

On to the stitching

It is time to do some stitching on my visor cover. Stitching on felt is something I really enjoy. It feels nice to stitch on felt, It has texture even when it is smooth. You can feel the needle pass through the thickness of it.

I had people at my guild comment that the actual piece looked a lot more vibrant than it did on the screen. I fiddled with the colour a bit so I hope it looks a little better this time. It looks very bright on my screen. The crazy thing is it is sitting on the black, top of my laptop. I am getting some serious light bounce off the black.

I picked out some threads I think go with the colours. I need to find a “greener” green something in the middle I think but that requires digging in the mostly unpacked studio so it will have to wait.


I am a slow stitcher. I know I am not alone in this. There’s a whole movement called slow stitch. It suits me, stitching when I have a bit of time but with no deadline in sight.

I started with the turquoise green on the forest green part of the leaf. I thought it looked like a nice contrast even if it was still green. then I forgot to take a picture of just that stitching or rather I was probably intending to take a picture of just the stitching and forgot what I was doing.  So you get to see the contrasting orange I picked for the next part too. It’s a deep orange leaning towards burnt orange.

I did the first part in rice stitch. It’s fun to do but harder than you think to make it look random.

I tried an uneven long stitch for this part and didn’t like it. It was messy but not messy enough to seem like I did it on purpose just unpractised. Of course it was but we don’t want to advertise that too much, so I removed it.

The other nice thing about stitching on felt is when you take out stitches, it doesn’t show like it would on muslin or cotton fabric. I decided to do something else with the dark orange and a lighter orange for the cross stitching. I am not sure it is busy enough. I will leave it for now. I am also not sure it was worth changing oranges either.

Now I am onto wonder woman. I am hoping to stop it from looking like wonder woman and more like a flower with the stitching. However, I started with the “cape”. I am using the lighter orange. I am adding X’s as I liked the way they looked on the leaf. I tried looking online for open background or filler stitches but I am calling it the wrong thing, I think. Everything that Google gave me, were stitches to completely cover a space. I know I have seen them before. Does anyone know the right term?

That’s as far as I am. Well maybe a bit farther as I am writing a bit ahead as I will be busy baking for the Thanksgiving Day farmers market. In Canada, we celebrate earlier than our American friends and this year is earlier than usual on October 9th. with any luck, I will have a little time to do some stitching.

2023 Fourth Quarter Challenge

2023 Fourth Quarter Challenge

The fourth quarter challenges are for all fibre lovers – felters, sewists, knitters, crocheters, weavers and mixed media enthusiasts – so let’s get creative!

One of the challenges for this quarter is a bit predictable – but hey it’ll still be fun 😊

Make a Christmas decoration!   Here are a few ideas: something to hang on a tree; a table centre or runner; ear-rings; hats; window display; door wreath … but there are many more.

This tree hanging decoration is a crocheted snowflake stiffened with dilute pva.

crocheted snowflake tree decoration

Textile wreaths don’t have to be traditional.

Textile wreath

This holly wreath, plant stars and decorative pudding are all made from handmade felt and embellished with free motion stitching.

Holly wreath, plant stars, textile christmas pudding

This knitted stocking was hung in the fireplace just waiting to be filled with little gifts.

knitted christmas stocking hanging in a fireplace

It’s a magical time of the year for trees – any that are not evergreen will give a dazzling display of colour.

So continuing the tree challenge for this year, use the autumnal inspiration to make a piece of textile art of your chosen tree – or a different tree if you’ve had enough of the one you’ve been working on 😊 and of course it doesn’t have to be the whole tree!

Recently Karen Lane showed us some ‘Lutradur’ leaves made by her students – see her post here: https://feltingandfiberstudio.com/2023/09/24/melting-felting/

lutradur leaveslutradur leaves

Our ‘Autumn Leaf’ bowl is made of handmade felt embellished with free motion stitching.  Here it is laid flat after stitching…

Autumn leaves of handmade felt and free motion stitching

… and here it is after being stitched into a bowl.

autumn leaves textile bowl handmade felt and free motion stitching

We hope you can find something in this quarter’s challenge to make you want to have a go 😊

Please share your entries on https://feltandfiberstudio.proboards.com/board/18/studio-challenges

If you need help with posting a photo please see here:

https://feltingandfiberstudio.com/community-photo-submissions/