Guild Sale and Exhibition this Weekend.
Taking place in Ottawa Ontario Canada. If you’re in the area I hope you can join us.

Taking place in Ottawa Ontario Canada. If you’re in the area I hope you can join us.
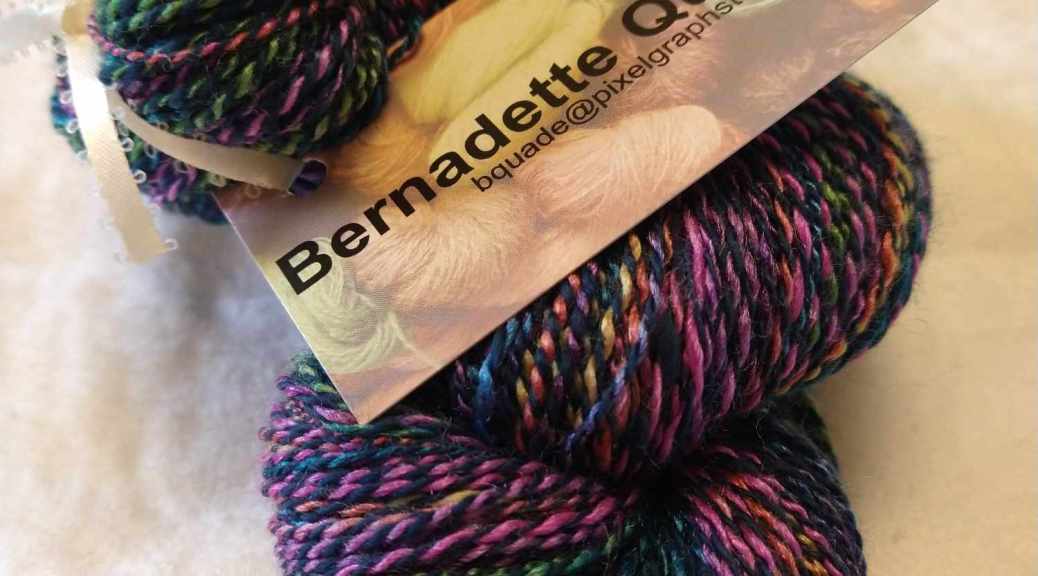
The Guild show is looming and a real challenge is to price the final product. Producing everything is usually accomplished slowly, over several months; it accumulates in boxes and bags, then suddenly you realize the shows are upon you and you now have to price ALL this material! There are lots of discussions on-line and at meetings about competitive pricing in the arts and crafts community. We don’t want to undersell ourselves or price ourselves out of the market. We don’t want to be ‘greedy’ or foolishly inexpensive. Hand spun yarn is very fiber dense, very heavy when compared to factory spun yarn. So a hand knit scarf of hand spun yarn is going to weight more than one from commercial yarn. The benchmarks don’t apply.
But first you have to have a price, for that you need to measure and weight your products. The decision on what to charge is really difficult, but I search on-ine for hand-spun yarn of similar grist, similar fiber content, weight, etc, etc and see if I’m comfortable charging a similar price.
I was fortunate to find a tiny scale that weights from 1000g to .01g. It can be re-calibrated if I have a true weight of 1000g. I’ll look into getting one later this year. This is the only scale I’ve found that can weigh minuscule amounts of silk and cashmere.
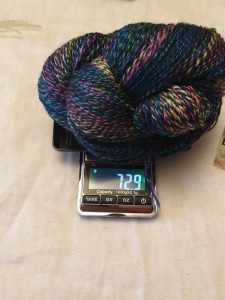
The scale weighs in both metric and imperial on the fly, I just have to change the configuration.

So I don’t have to change the position of the fiber and can write the weight on the label right away.
Second I have a voice response computer to convert from imperial to metric and do math so I can keep working with labelling. Google is my friend.
And third, I have a yarn measuring device to measure the length of a specific diameter of yarn. This is the best thing to come my way in ages.

I can set the wraps/inch, mount the skein on the umbrella swift, start winding the yarn onto the niddy noddy and when I’m done the yarn measuring device shows how many yards or meters I have. When I want to convert to meters or yards, I use the voice activation on my computer to do the switch and its all done.

This skein is 20 wraps per inch

There is a plastic card included with the yarn measurer to check the wraps so you can set the device

The viewing screen is very clear and very easy to use.

Admittedly neither the scale nor the yarn measuring device perfectly accurate, the client gets more from both and that’s fine with me.
But the bottom line is to find what both you and the market will bear. We are in a unique position to negotiate with clients who come to our booths, to explain our products and discuss their needs. Pricing is more flexible at the guild sale and if this year looks like its a tough one for clients we can choose to be more willing to negotiate, or not. I will be more confident with my pricing decision once I get to the sale.

Today I wanted to have a chat again about needles. After searching “locally” (ok I looked within a couple hours driving distance) with no luck, I looked online and have got my hands on 5 at 42g needles that are new to me. Before we get into checking them out with fibre, I think we should have a quick review of the two main categories of felting needles as they are used in Industry.
 1) A new needle style to add to my needle collection. (Unlike Pokémon you don’t need to catch them all, but it’s fun to try. I do want to acquire an example of each variation of shape. If I can I may try to track down some of the different barb types and placements to compare.)
From previous posts, I am sure you will remember there are two types of needles. The first group that creates the felt, which is quite reasonably called “Felting needles”. (This group encompass most of the needles in industry and are the ones we use most.) These needles are set in the needle beds of the felting machines and are repeatedly inserted into the non-woven web of fibre to create the felt. In industry, this is all very fast-moving and noisy, for us it is less noisy and hopefully more carefully considered insertion of a needle into fibre (ok, stabbing!) In industry, the different working part shapes, as well as barb type and spacing and even the tip chosen will affect the type of felt produced. Some of the factors that the different needles can affect are the tensile strength, uniformity, low damage to fibre within the web and carrier material (ground fabric as well as longevity of the needles in the machines. With the variations of gauge, working shape, barb shape and location as well as tip types, the needle manufacturer Groz-Beckert (Germany) says it has thousands of different felting needles to choose from.
The second type of needles, “structuring needles”, are used after the felt has been made by the “felting needles”. Groz-Beckert describes their purpose as “structuring previously bonded nonwoven fabric”. This means they will be adding a surface texture (velvety, ribbed or grainy) or pattern (geometric or linear) to the nonwoven fabric (felt). They do this in a different machine than the one that made the felt. The structure machine usually has a brush conveyer, which holds the fibres in place during the needle insertion process so the velours fabric does not distort the uniform loops. This may be where the concept for the clover brush tool came from. It allows the crown needles to make a loop structure.
 2) Crown needle interacting with felt on brush conveyor surface creating loops Watch the video here; https://www.youtube.com/watch?v=aWE4tvHF0xU
 3) Fork Needle interacting with non-woven fabric Watch the video here; https://www.youtube.com/watch?v=LU7tZSy9vOE
There are two Structuring needles in Industry, the Crown and Fork needles. when they are used together they will “produce very dense velour fabrics with a uniform surface quality.” Structuring needles make products for the automotive industry, such as floor coverings, foot mats, rear shelves, door and luggage-compartment panels, and headliners.
The first I have discussed previously is the Crown needle. It has a triangular working shape and has one barb per side located close to the tip. In industry a bed of crown needles, with their shallow barb placement, creates an even and uniform engagement with the fibre, resulting in a homogeneous surface. They are intended to pierce the felt and push a bit of fibre (loop) to the opposite side the needle entered from, producing the textural element. This is not the way we usually use them, but may be helpful when pushing a colour from one side of a thin structure to another. Since we are using the needles by hand we can adjust the angle of penetration (shallow) as well as the depth of insertion (just enough to engage the barbs) to isolate the entanglement (felting and insertion of fibre) to one side of a very thin structure. As an example do you remember the iris flower peddles I made? I was able to add blue to a white petal. Where I wanted I could keep the blue from showing on the other side.

 4 -4.1) Iris petal, and finished Iris
This is also helpful if you are making ears that have a different colour on the inside and outside of the ear. (As found on mice and other cool creatures)
Although the Crown needle is considered a structuring needle, it is still useful as a speciality needle and worth having in your collection for the occasional time it will be just right. (Now I am thinking about Porridge!)
The second type of structuring needle is called a Fork it again is used after the felting needles have created the nonwoven fabric. In this case, Fork needles are used, in industry, to create what is described as “grainy structure”. Fork needles are manufactured in gauges 17–43(Groz-Beckert), although we tend to use a smaller range of gauges in our felting needles. Online I was able to find Fork needles in gauges 38 to 42, most were on Etsy but I did also check other spots. Heidifeathers had the good price when I considered the shipping, but at the time only had them in the extra fine 42 gauge. I would have liked to have found a course one to photograph so you could see the working end clearly.
Fork needles are not like other felting needles. Let us compare and see what makes them so strange.
 5) Comparing a Felting needle with a fork-structuring needle
I am sure you will have noticed 2 changes in the Fork needle. First, the point has been replaced by the fork and second that there are no barbs. The working area is smooth and cylindrical. GB said this would give better strength and less breakage but for hand felting the finer gages should still be used carefully to ensure less breakage. You will probably notice that the fork is directional. It is not the same on all sides.
So far, this doesn’t sound too promising for most needle felters. So who is buying these needles (other than industry)? There are doll makers who make life-like “Reborn” dolls. They need the needle to make a hole, grab a hair then force it into the vinyl head, (Sounds painful). They are using Crown, Triangle and Fork needles. Some of their resellers have renamed the needles; Crowns are now Ultras, Triangles are Regulars and forks are just forks. (poor things, not getting a fancy second name.) Fork needles have a notch in the pointed end and have to be aligned correctly with the hair to grab it. For micro-rooting technique, the forked needle at the correct gauge for the fibre being rooted will tend to grab only one hair per insertion. Different gauges or an increased number of barbs for the crown to triangle needles will determine how many hairs you grab as well as the size of the hair.
Doll makers are using either Human hair ranging from 40 to 80 microns, or Mohair and wool ranging from 18 to 39 microns diameter. As we know from needle felting, the depth of the barb determines what size of fibre a needle can grab. The finer the needle, the smaller the barb depth, so, a fine needle had trouble grabbing a fibre that is larger than the depth of its barb. Remember that feeling of “I’m not getting anywhere with this felting needle”, try going to a larger gauge needle so the barb will also be bigger and can grab the fibre more effectively.
 6) Doer 42g Forked needle. This will be similar to the ones I purchased online.
Here is another view of the working end of the Fork needle from the Doer needle company.
 7) more info from the working end of the Fork needle, from the Doer Needle manufacturers
So far, we know that the fork needle is a structuring needle, used to create texture on a non-woven fabric (felt). It is a directional notch at the end of the needle. The doll makers have suggested that it will require a specific orientation of the needle to engage the fibre if the fibres are all running in the same direction, as you would see in combed top (or rooting hair). Fibre engagement due to needle orientation should be a little less important if you are using carded roving or batts due to the disorganized nature of the fibre alignment in a carded format some of which should align with the fork orientation. The gauge and thus size of the fork will determine the number of and the size of the fiber it will hold and then transfer into the felt or for the Doll makers the doll’s head. (see table on the diagram above)
Next week will be very busy (but also fun) leading up to the local Weavers and Spinners Guild Show (OVWSG) so I am not sure if I will get a chance to do the hands-on investigation of the fork needles before the next blog post, but I will try. I am particularly curious about the descriptions of orientation to engage fibre but also about the security of the embedded fibre. I hope you will share your experience if you have had a chance to try these odd needles. If, as I suspect I am run off my feet next week, I may give you a quick tour of the sale for those who can’t make it to Ottawa!

Hi folks. It seems I am running behind as I didn’t know it was Tuesday already. So lots of pictures and not much text today.
My guild Sale and Exhibition is in a couple of weeks and I promised a door prize of a lantern. In reality, it is a glass vase with a cover and fairy lights inside. They are very pretty. You want them to look interesting when they are not lit as well as when they are lit.
So I started out to make a scene. I used bats to save layout time.
water

ground

sky

And then wrap it around

and then I decided it was still boring so I should add a little village.

I thought the white was too bright so I went will black. I want a hint of a village in the distance. I did one on each side.

In retrospect, I should have gone with white. There would probably have been enough migration of fibres to dull it down a bit. As was predictable if I had thought about it they disappeared. I will shave it later to see if I can get a hint of where they are and add them back. but it can wait as after felting I decided it was way too thick for a lantern. I am definitely out of practice felting. I do like the scrunched-up water and flared sky though.

Try again. this time I am using a nice blue merino top and some orange and gold silk lap. the silk should be interesting enough on its own.

A nice thin layout

and some lovely silk lap


and done, here they are together, silk never shows as nice as it is in a picture.

The light forme the fairy light shines through nicely even with the light on

Much better than the first one
 so that’s my adventure in felting this week. I hope you like it, I hope the winner likes their prize.

My local group of artists has started back onto our regular schedule of monthly meetings. This month, we folded books. In the past we have created lots of paper with various methods of surface design, so one of our goals this year is to use paper from our stash.

We have been working through this book to learn more about folded book techniques. This shows the supplies and tools that we used to create the books.


Thanks Paula for hosting and here we are getting ready to start. We have our cups of tea and snacks too! And we have already chatted and had show and tell before we start our project for the month.


This time, we were folding a set of “tree fold” pages with a “diagonal pocket” cover.

Here are the four books that we made. There are a couple of pieces of double stick tape on the tree fold pages but the cover holds together with just the folds. We then used pamphlet stitch to attach the pages to the cover.


Here is a little closer look at the books.

And an inside view from the top of my book. The pages form a tree shape with graduated branch pages. My book was made from paper given to me by my friend Nanci. She has had this paper for over 30 years and she said it was probably closer to 40. So I used vintage hand made paper to create my book.

After our book making session, we went for a short walk. Here’s the group in front of a small pond.
I have really been enjoying creating different book forms. It’s interesting to see how each book comes together. It’s similar to origami but with a variety of sizes of sheets of paper to create different books. I’m sure we will be creating more books this year as there are quite a few in the book that we haven’t tried yet.
September has been a busy and exciting month in contemporary textile art (specifically felting art) in Ireland so I thought I would feature what I got up to, I will call it my September Adventures.
Weather wise, the month started as we hoped it would continue (it didn’t by the way) with a return to fine warm weather – something we had not seen since last June. So I took the opportunity to visit our National Botanical Gardens (https://www.botanicgardens.ie/) which are situated on Dublin’s north side. The gardens (there’s free entry, if you ever visit Dublin, Ireland) opened in 1800 and are an oasis of calm with restored glass houses, magnificent specimens, bee hives and, of course, a tea room. There’s also a pedestrian access to the historical cemetery next door which I suspect is not seen too often. Glasnevin Cemetery also houses a genealogical archive for anyone wishing to trace their Irish ancestors (https://www.dctrust.ie/genealogy/home.html).
But, I digress. Let’s go back to the gardens. My visit coincided with their annual exhibition ‘Sculpture in Context’. The exhibits feature artworks in various media including ceramics, wood, metal. I decided to focus purely on the textile element of the exhibition and to photograph any pieces I came across as I wandered around. I was aware that some of the members of Feltmakers Ireland had pieces accepted for the exhibition; Clare Merry (http://www.merryland.ie/index.htm) an exceptional artist who quietly creates her pieces was featured. If you would like to see some of Clare’s work please check out her website, which, she tells me, is not really up to date, or Google her and feast over the images; Fiona Leech (https://www.instagram.com/feltathome/?hl=en) had three beautiful pots which were originally housed in the cactus house. Annoyingly two of the three pots were stolen within a matter of hours of their arrival and the remaining one was moved to a safer spot in the garden’s gallery. I thought I would show you the three pots as they were originally grouped together.

I searched but could not find Leiko Uchiyama’s beautiful work but here is a link to her website if you would like to check her out: https://www.leikofelt.com/my-felt-work/ I found two other exhibits from members of the guild. Their featured work while not through the medium of felt were equally stunning. Congratulations Mel Bradley (https://melbradleysilks.ie/) and Mette Sophie Roche (https://metteroche.com/)
I put together a slideshow of my textile finds in the gardens which I hope you enjoy.


We had our first meeting after summer in Feltmakers Ireland and as usual the committee put an incredible amount of preparatory work into making it successful. It was a busy morning as everyone beavered away felting flowers to create a tapestry as part of the 20th anniversary celebration for the guild. Much to everyone’s delight, the guild’s founder Elizabeth Bonnar joined us. I thought I would feature Elizabeth here as without her it is doubtful that there would be such a vibrant community of feltmakers today. Here she is with her granddaughter and with the committee.


Here are some photos taken on the day.
The finished tapestry was revealed at Feltmakers Ireland ‘Bountiful’ juried exhibition which opened on 30th September.

The exhibition also saw the launch of the new book “Exploring Irish Wool for Feltmaking” The book is the product of a collaboration between many members of Feltmakers Ireland guild, sheep farmers, shepherds, shearers and suppliers and not forgetting the various washers and carders who took the raw fleeces, converting them into usable fibres for testing. I think this approach was quite unique and it will certainly be a worthwhile and useable addition to any textile maker’s reference library. Understandably it was a huge project so congratulations are due to all, especially Annika (Berglund), Breda (Fay) and Sinead (Doyle) who collated all of the findings into an invaluable resource on Irish wool. It’s so full of well written practical advice and it was made extra special by the presence of one of our Government Ministers, Pippa Hackett an ardent supporter of the project, who officially launched the book and the exhibition . Here is a quick look at the contents page to give you an idea of the scope of the book:

An added bonus is that feltmakers/wool artists can now make direct contact with numerous artisanal suppliers so there is no excuse for any of us not buying closer to source and of course for anyone overseas who wishes to use Irish wool fibre in their work purchasing from source.
It is available to purchase from the following link and I understand will also be available in eBook format shortly: https://feltmakersireland.com/exploring-irish-wool-for-feltmaking/
I hope you have enjoyed my September adventures. It has been an exciting month. Once again I would like to thank Feltmakers Ireland and their hard working committee who work tirelessly to maintain this vibrant community – it makes such a difference that, as textile artists, we can gather together and create regularly. I take my hat off to Elizabeth Bonnar and her decision to found Feltmakers Ireland twenty years ago; the catalyst for lifelong friendships, masterclasses, collaborations, exhibitions, networks and travel.
To complete September’s birthday celebrations, I thought I would produce a slideshow of the Bountiful exhibition which is running for the month of October in Phoenix Park, Dublin Ireland. I took photos on the day so I apologise where the light may be shining on the artwork. There are over 30 pieces of art and it will give you an indication of where Ireland’s vibrant felting community is at in its journey. I hope you enjoy it!


Ever since I had visited Kew Gardens as a child and seen the statues of the Queen’s Beasts lined up outside the great Palm House, I have been fascinated with heraldic animals and heraldry generally. [https://www.kew.org/read-and-watch/the-queens-beasts]
When we moved to Sturminster Newton, every day I came home over the mediaeval bridge I saw the Town’s Coat of Arms. We have a large (about 10ft high) coloured display of these Arms marking the entrance to the town.
In 2007, when I’d reached the age of 60 and reduced my working days to just 3 days a week, I was looking for something to keep me occupied. By that time, I had met our Town Crier, who when not Crying worked in a local store. Kevin Knapp was a popular figure, regularly opening events and leading processions in the town. He had also won numerous Crying competitions.

Having inspected Kevin’s Crying uniform, I realised that he had lots of different badges, most relating to awards he had won but also the County Arms, but not the Town’s. I thought that this could be a project to keep me busy, having consulted Kevin who said he’d be pleased if I could make a badge of the Arms for him.
After a visit to the Town Council offices, where I had discovered that the original Letters Patent – the deed granting the right to use the Arms – were held, I asked the Council formally for permission to photograph the Deed and to make the badge for Kevin. Once I had received permission, I went, with my husband, to the Offices and we photographed the Deed. That wasn’t easy as the Deed was housed in a purpose made, glazed, cabinet which hung on the wall in the Council Chamber. Eventually we managed to get a reasonably clear picture without too many reflections on the glass.

The Letters Patent, couched in the archaic style of the Norman French which characterised early English deeds (though thankfully not totally in that actual language) was dated 1st September 1961. It evidenced that three English Kings of Arms – Garter Principal King of Arms, Clarenceux King of Arms and Norroy & Ulster King of Arms. authorised by the Duke of Norfolk – Earl Marshal and Hereditary Marshal of England – granted to the then Sturminster Rural District Council “such Armorial Assigns and in the same Patent such Device or Badge as may be proper to be borne and used by the Sturminster Rural District Council and by its successors constituting each for the time being the local authority for such place and district on Seals or otherwise according to the Laws of Arms” (note the lack of punctuation – typical of legal documents in this country even today); hence the right of Sturminster Newton Town Council to use the Arms and also the Bull’s Head Badge. The Badge’s primary use would be to mark the Council’s property (including, some 800 odd years ago, it’s serfs, servants and men at arms!)
![]()
The actual words of the Letters Patent describing exactly what was granted are: “Vert [green] a Saltire [diagonal cross on a shield] Wavy Argent [silver] between in pale [one above the other] two Crosses Moline [having jagged ends] and in fess [horizontally] two Garbs [sheaves of corn] Or [gold] And for the Crest [device sitting on a helmet] Out of a Coronet composed of four Ears of Wheat and four sprigs of Oak fructed [with fruits] set upon a Rim Or [gold] a Mount Sable [black] thereon an Heraldic Panther statant [standing on all 4 feet] guardant [shown full face] proper [lifelike colours(!)] Mantled [with cloth on helmet] Vert [green] Doubled Argent [on the reverse silver/white]” and the “Device or Badge”: “Within an Annulet [hollow roundel] Reyonnée [with sun’s rays] Or [gold] a Bull’s head caboshed [without a neck] Gold”. The Arms and the Badge were also drawn on the Deed for further reference.
Having got all this information from the Deed I started to prepare a working drawing indicating what stitches, yarns and cords I would be using.

In doing so, I realised that the Heraldic Panther was a very odd creature: it appeared to have orange flames coming out of its ears and mouth and it was spotted – red, blue and green spots!

So I headed to the library to see if they had any reference books which might throw some light on this. Luckily there were several in the catalogue, but none at our local branch, so I would have to wait for one to arrive. When It did I was able to find that the flames were a mistake made by the artists painting the arms on early Letters Patent. In the book there is a reference to the Garter King of Arms writing in the early 17th century regarding the Heraldic Panther: “this beast … is admired of all other beasts for the beauty of his skyn being spotted of variable colours; and beloved … for the sweetness of his breath that streameth forth of his nostrils and ears like smoke, wch our paynters mistaking corruptly do make fire.” Further reading indicated that the origin of the panther was likely to have been a cheetah, hence the (guessed at coloured) spots. You will note that I was down another rabbit hole!
Well our panther was shown on the Arms as having flames coming from his ears and mouth, so that’s how I’d got to depict him. It was also then that I realised that the Arms as granted were not exactly the same as the Arms currently used by the Council.

You will see that in the current version of the arms, the Bull’s Head Badge appears five times on the mantle, which has been altered to enable the badges to fit. (The mantle represents the cloth which the Crusaders wore over their helmets to ward off the rays of the sun)
Apparently the then Sturminster R.D.C. decided to use it to decorate the actual Arms instead of to mark it’s property (and/or servants!)
After some manipulation of the photograph of the Deed I managed to get a reasonably clear image of the Arms and could make a tracing to use to transfer the design to the background I had prepared
During the time that I’d been waiting for the book, I contemplated the fact that the actual badge would be very much smaller than the original tracing and I’d be lucky to be able to carry out all the various stitches I’d originally envisaged, and I wondered if I might make some of the badge in felt. I needed to make a “sketch”. Using a piece of old blanket as a base, I transferred the design and filled in some of it in needle felt. I thought that this would work.

It would certainly make life a bit easier as I was not very experienced in gold work and doubted that I could do a good enough job in the smaller scale. As it was I managed to lose the “jagged” ends of the two gold crosses and the Saltire was not really “wavy”. It was supposed to be a nod to the river Stour, which divides Sturminster from Newton (which despite it’s name is in general the older part of the town).
In the end I felted the Helm, with the gold Rim and the Panther. I also padded the sheaves of corn. Here’s a progress picture and another with felting needle which will give you an idea of the actual size of the whole thing.


Once I was reasonably happy with the shape of the helm, I painted it with artists’ gesso and then (when it was dry) sanded it as smooth as I could get it. Then I painted it with some of my husband’s metallic enamel paint to represent steel. (Can you imagine what a squire’s life must have been like sanding and polishing a suit of armour and weapons made of steel to get rid of and keep it free of rust? – no stainless in those days.)
It did take some time to complete the badge – some 4 years in fact although I wasn’t actually working on it all the time.
![]()
Oh I nearly forgot – the motto “Quis Metuit?” means Who’s Affeared? It is apparently used by many local authorities – I’m not sure why though and, for once, the question defeated Mr Google.
The Town Council, in the form of it’s Leader, formally presented the badge to Kevin on 30th November 2011.
![]()
Kevin decided that rather than attach the badge to his coat, he would affix it to the back of the roll containing his Cry so that it would be visible when he was reading from it.
Sadly Kevin died on 9th October 2018. His wife donated his costumes (which she herself had made) to the town’s Museum. I’m not sure what happened to the Badge though as the Museum doesn’t have it. The position of Town Crier remains vacant. If you are interested, I’ve found an obituary for Kevin published by the Bournemouth Echo. https://www.bournemouthecho.co.uk/news/16998263.kevin-knapp-died-earlier-month/

Today, which by now is yesterday, was my Intro to Inkle class. I was expecting 6 students, two of whom I knew had done some other types of weaving. after I sent out the last minute instructions (parking, how to get into the building, where local food could be found ) I found out two of my students were very young and would be accompanied by their Mom.
I have had young students before but these were 8 and 10 so the youngest. The eldest was very interested in weaving and had done some simple weaving before.
I got an email reply from one student they would be unable to make it and the last was a young gentleman but definitely quite a bit older than 10. He had not woven before but was quite intrigued to make cloth.
I had a very brief chat about inkle looms, their history and that we had both floor (better for long projects or for sitting in one location and weaving) and table inkle looms (better for shorter length bands but much more portable to weave on) in the class. I discussed what yarn would work best on an inkle Ioom, which is Smooth with a good twist, like a crochet cotton. I had brought one of my looms that had a silk warp on it to show them too.
Since we had weavers in the workshop I made sure I had options that would weave quickly for the new students and a finer yarn that would be a bit slower warping but give more design interest for patterns. The 3 sizes of yarn to work with were; for the advanced students #10 crochet cotton, l also had #3 crochet cotton for a bit quicker warping. For those who wanted to warp the loom very quickly, I had the less tightly twisted mop type cotton. it is much faster to warp and weave and gives the opportunity to practice what the process is but unfortunately, it is not as smooth to advance the warp as the two crochet cottons.
I also had extensive notes so if they found an inkle loom at a garage sale in 6 months or a year from now they could go back and review the information we covered today. I also gave them multiple ways to do steps since some people hate the magic knot to start weaving and no matter how many times we try to demo it or say the instructions in a different way it will not stick (sort of like the evil letters for me, so no shame. They may find a eureka moment and be able to make a slip that is solid when pulled to the right some other time.)
We had one student who I know is a good floor loom weaver and likes patterns, she tried the #10 cotton. it took longer to warp but she was a much faster weaver so other than momentarily slowing down to make and use the butterflies to add 2 slits in her band, she was very fast. Butterflies always are slower since you are weaving 3 sections of the warp separately to make the 2 slits.
Everyone got a box of Smarties (an important weaving tool) and finished with a scissors necklace. We chatted about how to improve the class and had the suggestion of breaking it into a couple of evenings, rather than one long day. It is a lot of new information to take in all at once. I think we could do the warping and review a bit more about drafts on one day and return to work on the weaving on the second. If we did a third night we could probably make a second scissors necklace (it is always is easier the second time).
I apologize, two of my students were very eager and turned up before I had finished setting up, so no pre-class shots, and then I got busy with teaching. I did pull out my camera at lunch to get some shots of the looms ready to go but again forgot it when I started teaching again. Luckily Carlene, who also rights on this blog and belongs to the same guild as Ann, Bernadette and I, was there and borrowed my camera. Now I have visual proof I was there!
But first, let me thank and show you my helpful Sherpa husband who brought everything out to the car and then from the car to the studio. After class, he took all the boxes I had packed up and put them back in the car, then disappeared them into the house as I wrote this blog post for you.
 1) My hubby recovering from the Kanata games club then transporting all my teaching stuff.
A few shots from the workshop;
 2) Variegated yarn with a yellow border. (the variation gave an ikat-like pattern.)
 3) This band had a heavier yarn for the border and the #5 cotton for the middle.
 4) the class at work with 2 table inkles and 3 floor inkles.
 4.1) Carlene is as sneaky at getting shots you don’t notice her taking as I am!
 5) A long day of weaving for my second youngest student!
 6) Another band with a solid border and variegated centre. It is fun to watch the colours change.
 7) my youngest student’s Mom helping with cutting the fringe to length.
 8) Carlene and her scissors necklace. *note the new Lee Valley snips! She discovered the scissors open fully so we can just slide the loop from one end of the lanyard into the centre of the scissors, rather than the knotting method the old black scissors required.
 9) There is still some fringe twisting to do but a lovely first inkle band.
 10) A brand new weaver! Still a bit of fringe twisting to go but now has somewhere to keep his scissors.
 11) a bit of sewing up one side and hemming but a great first weaving! and he is almost 11!! (He was interested in the 12 harness countermarch loom in the studio, maybe he will be trying that after the beginning weaving on a table loom in a year or so?) I, unfortunately, did not get a shot of his brother’s scissors necklace or bookmark when it was done.
It looked like the students had fun. Most enjoyed their smarties (or found someone to get rid of the contents for them, so they could use the box.)
Eventually, we will re-run the Inkle Two workshop. We look at 2 harness weaving that you don’t normally consider on an Inkle loom but that it can definitely weave. The workshop contains lots of odd things you can do with an inkle loom such as weaving with wire to make a 3-Trim, or Boutonné weaving with a supplemental weft to make patterns with little loops or adding beads with a supplemental warp or weft thread. It would also likely be better spread over a number of evenings rather than the 2 long days, as we have run it before. You may not use these techniques regularly, but they may spark some great project ideas or maybe inspire a new weaving interest.
Maybe making an inkle band of cotton, wool, silk or wire may inspire you to make a 3-D Felted Vessel with a decorative neckband or maybe a fancy strap to carry it?

Like Leonor, I have been spinning. Unlike Leonor, all I ever make are small skeins. I like to use my drop spindles and make little bits for in my felting.
I’ve been spinning some of World of Wool’s peacock fibre. It is in the process of being played. I think the sparkle shows. It is 87.5% Corriedale Wool and 12.5% rainbow trilobal Nylon.

It has a lovely sparkle and I really like it. Which is a good thing because I have 500 grams of it. I split a kg with Jan but she doesn’t like it, so may have to buy it back from her. Or maybe she will sell it at the upcoming Guild sale. Then she could use the money to buy different wool.
I do most of my spinning these days at guild socials. As long as Jan doesn’t have a giant pile of books for me to put away. This is one I finished plying last Monday. I used the ball winder at the guild and then plyed it and made it into a ball again. It is much faster than doing it by hand but not as zen. Jan made a video of me using the ball winder. I don’t like this one it made a lopsided ball.
I can’t remember what fibre this is, merino and silk I think but I am not sure.


I have a zip lock freezer bag I keep in my basket that I put the finished balls in. This is what else was already in there. You may have seen them before but I can’t remember.
This is one I got at a festival. I think I showed you the fibre but not the spinning. It has lots of bits and bobs in it and some sparkle.

This one is from a World of Wool Bambino sample pack. It is 85% Merino Wool and 15% Bamboo. I think it is called Hickory Dickory It spins very nicely.

Now I have to decide what to spin next. Maybe I will card myself some rolags.

I went through some of my sketchbooks/workbooks from my prior classes recently and found a few pieces that were inspiring. It’s nice to revisit old work and see if there is something there that will inspire new work.

Here’s the forest floor collage that I found. I thought that this would make a nice landscape in fiber/textiles. I can’t seem to find the original photo that I used for inspiration so I’m working from the collage.

Going through my pieces of already made nuno felt, I thought this piece would work. The top right corner made me think of “forest sky” and mottled light, so that’s a good start. The size is 12.5″ wide and 11″ high. Most of you will probably recognize this nuno felt as I have used it for several projects already. But the fun thing with this type of project, is that the background is just the start and the finished pieces will not look alike but would go together well if paired with one of my other pieces.


Next up was to look through my boxes of felt scraps and see if I could find something that would work for the more distant tree trunks. I started with the felt on the left but once I put it down, the value of the tree trunk to the background was too similar and the grey brown wasn’t very “exciting”. The middle felt trunks are actually the opposite side of the trunks on the right. The values were a bit better and I am leaning towards the ones on the right. I am planning on adding some stitched texture to the bark and can add more darkness into the trunks that way. I luckily have enough of this felt to do some sampling and see what kind of stitching will work best. Also, after I uploaded these photos and saw the tree trunks from a distance (smaller photo size), I noticed that it looked like the light was slanting through the trees. I need to remember to leave that lightness in the foreground to give that effect.

I continued to look through my felt scraps and dyed fabric. I found some nice greens, some “fallen trees” or “rocks” and some cheesecloth that will add texture. I kept looking for felt or fabric that would work for the flowers, I couldn’t really find anything that worked. I could felt some small white flowers but I’m not sure it’s worth that effort. The white flower I am showing is cut from watercolor paper (300 pound) and the center is a bit of yellow green cheesecloth. The paper would be simpler as it doesn’t fray and I noticed the contrasting sheen of the paper compared to the matte of the felt. The paper can also be shaped so it is 3D and coming off the surface of the landscape. As you can see in this photo, I have lost that brightness coming through the trees as I have it covered with green. This is just trying out colors and the final layout and shapes of pieces to applique down has not been decided.

Because the nuno felt is thin, I decided I needed to back it with something a bit heavier to hold the weight of the heavier felt I will be stitching to the front. So I cut a piece of rayon wool commercial felt blend to the same size as the nuno background.

Next up was basting these two pieces of fabric together. I don’t always baste but I have found that in general, it’s better to take the time to baste the backing fabric to the background fabric. The integrity of the piece is always better after basting. It holds everything in place and provides support while stitching the foreground items. This is especially true if you are machine stitching as the machine has a tendency to move the nuno fabric in different directions than the backing fabric. Basting rant is now over.
Next, I will be doing some sampling to see how I want to stitch the tree trunks and previewing the green fabrics. More coming soon!


