Browsed by
Tag: silk paper

First Quarter Challenge – Winter Birch

First Quarter Challenge – Winter Birch

I’m always up for getting two things done with one piece. So I decided to create a winter themed tree picture that I could prepare to take to the gallery which has sold three of my pieces. (Yay!)

Blue and white nuno felt to be used as landscape background.

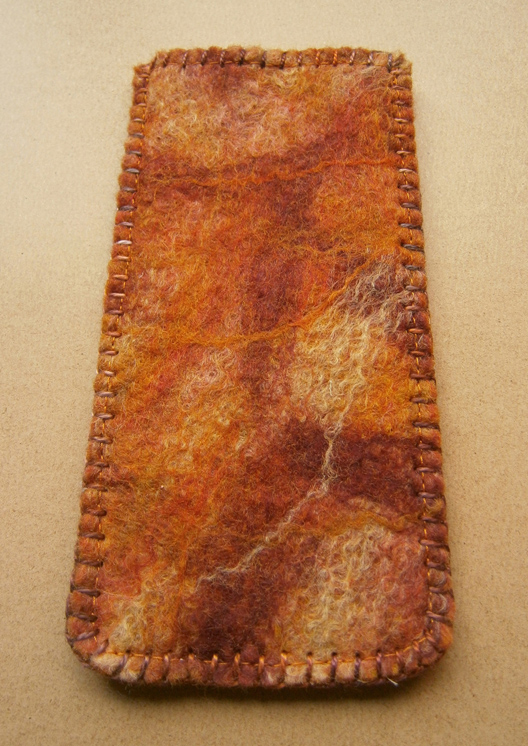
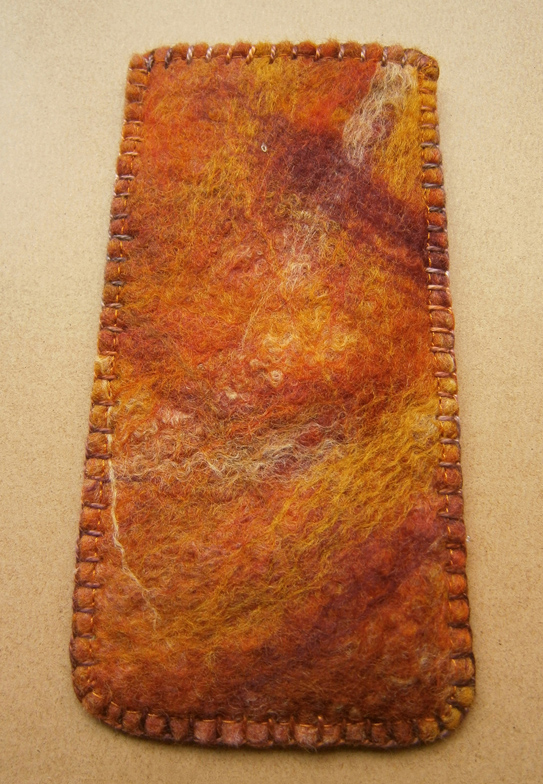
I found a piece of nuno felt in my pile of felted stuff that seemed perfect for a wintry background. Since I had just finished framing The First Leaf, I immediately thought of birch trees again since the years challenge is to create the same trees in different seasons. So birch trees it is.

Blue and white nuno felt background with cut silk paper birch trees.

I cut the birch trees from my remaining silk paper and got the placement how I wanted it. I need to make more silk paper for my spring and summer birch trees. But this seemed a little ho hum. The plan is to add branches with free motion machining but I still thought it needed more. The left background felt like perhaps there were some pine/evergreens in the distance. Perhaps I could enhance that?

Blue and white nuno felted background with tulle background trees (layers of tulle) and cut silk paper birch trees in foreground.

So I added some layers of tulle in vague tree shapes on that side. But it wasn’t enough contrast and the tree shapes were getting lost. What to do?

Blue and white nuno felted background with tulle pine tree shapes on the left and birch trees cut from silk paper on the right.

Here’s the start of the next idea. Burn the tulle into tree shapes with a wood burning tool. This is just one of the colors of tulle I am planning on using. I will still be layering the tulle but hopefully, this will give a bit more emphasis to the shapes of the trees in the background without overwhelming the foreground trees. Once I have the evergreens worked out, then it’s on to some stitching.

Have you created something that works for our 1st quarter or year’s challenge? If so, we’d love to see it. You can upload your photos here.


Remembrance

Remembrance

I promised after I made a small poppy piece for the first quarter challenge repurposing a piece of nuno felt, that I would make a bigger piece in the same style.

This piece is large, somewhere in the 30″ length and 18-20″ width. This is the layout and I have sprinkled the cut up orange nuno felt over the base layer of green wool. I made sure that the orange bits were roughed up so they would stick down better.

Here is the piece after felting. I have pinned some larger poppies in the foreground made out of painted silk paper. I was distracted by the yellow in the direct center in the sky. I decided to add more yellow so that the one area wouldn’t stick out as much.

I needle felted some yellow across the left portion of the lower sky and a few wisps up higher. I also added some lighter/paler silk paper to the poppies as I felt they were too dark in the first try. Then I added some green locks to the foreground for foliage.

And here it is after finishing and “matting” on green fabric. Now Remembrance is ready to go the framer. Now I just have to find a new gallery to carry my work, easier said than done.

On the Swan

On the Swan

Recently, a local woman asked me to create a river view in felt for her. I created several watercolor sketches she could choose from so that we agreed on what the landscape would look like and what to include. The client lives on the Swan River here in Montana and decided she wanted a view similar to what she has behind her home.

After hand carding and blending colors, I started on the layout. I used a commercial prefelt background and mostly short fiber merino batts. Somehow, I wasn’t thinking correctly on shrinkage as I went with the idea that it would shrink 30%. But I forgot that I don’t normally full my wool paintings very hard as they don’t really need intense fulling.

I continued working down the picture laying out the distant trees, the river with the trees and mountains reflections and then into the foreground grass and lupines. At the same time I was laying out the big piece, I also laid out a smaller sample. That way I could try different options with final details and stitching. This shows the birch trees from silk paper that I was trying to decide upon. Luckily, I had made the birch tree silk paper several months ago at one of our local group meetings.

Here’s the small sample that I made. I tried the left tree trunk in prefelt and then used free motion machine stitching for the dark areas. The right tree trunk used silk paper which was painted for the dark areas. I also tried out some FME for the branches and the lupines. I didn’t feel that the FME was what I wanted for this piece and opted for the silk paper birch trunks. I had also used some brown/tan wool for the distant shoreline which was way too much if included in the original wet felting process. I ended up cutting out a portion of this sample so that the brown wool was showing much less. I then stitched the two pieces of the sample back together to give the feel of what I wanted in the large piece. This sample really saved me from making some big mistakes!

Here is what I had after wet felting. I had to full this piece very hard as the request was for a certain size. I don’t normally worry about size on my wet felted landscapes and I ended up cutting the edges because I had not figured the shrinkage correctly.

Next I started adding in needle felt details. I added more definition to the distant tress, added a shoreline and added some lines in the water to simulate movement.

Then I stitched some grass in the foreground and stitched down the silk paper tree trunks.

I continued on with details. I added some paint to the tree trunks, I couched down branches and added leaf details with needle felting. I added hand stitching in front of the trunks and some leaf details for the lupine.

Here’s a close up so you can see a bit of the detail in the foreground.

Then I found I already had enough green fabric that worked to finish the piece. My client is getting it framed with barn wood, so this is how I delivered the piece. And the wonderful thing is that she loved it. I’m so happy it worked out the way that she wanted.

Tree Fragments

Tree Fragments

I posted about felting in silk paper with real leaves here. Now the question was, what to do with it? I decided to create another fiber collage similar to this one.  I still had more of the green background material and another piece of silk paper so I decided to combine those elements.

Here’s the silk paper. It was made with natural silk color and you can see the silk still had some vegetable matter in it. No worries, I had plans to make it more spotty!

I found the green background fabric and here is the felt on top of the fabric. I like that there is some of the orange color in the green background to tie it together. I then decided to cut the grey edge away from the felt and just have the silk showing on top.

I sketched a tree on to tracing paper and made sure that it was the right size for the piece. I wanted the tree to overlap the leaf piece. Sorry about the quality of the photos but tracing paper doesn’t like to have its picture taken.

I then painted the silk paper with acrylic paint and let it dry.

Then I hand stitched the felt down to the background fabric. You can see how it looks here with the edge of the felt cut away.

Then I cut out the tree and glued the branches on that needed to be glued down. So the tree is in one piece but hasn’t been attached yet. I am trying to decide how to attach the tree. I am leaning toward gluing it on at the moment. I think stitching it will be difficult but I could hand stitch it down. What do you think? How would you attach the tree? I could fuse it down with fusible too but if I was going to do that I should have already added the fusible before cutting the tree out. Hmmmmm….


Silk Paper with Leaves on Felt

Silk Paper with Leaves on Felt

The original idea for this post was to create something for the 3rd Quarter Challenge. I also wanted to use up some silk paper I had made ages ago. We had been talking about using silk paper in felting on the forum a while ago and I thought it would be a good surface design.


Here’s the silk paper. I made it with leaves and stretched silk hankies. These were then glued together with fabric medium. The leaves have held up amazingly well since this is 3-4 years old at least.

A friend gave me some merino batt that was cut up into a variety of pieces. I placed them all together to make the wool base.

It was pretty thick which didn’t bode well for the “Beneath the Surface” part of the challenge.

Here’s the silk paper on the wool before felting.

I then added some coarse wool underneath the batt thinking it would migrate through and show on the surface. I don’t remember the breed but it’s coarser locks.

I then carefully felted the piece. Trying to avoid crushing the leaves but getting everything to attach. The merino was surprisingly hard to felt. I’m not sure why that was but it took a while. The coarse wool on the back didn’t migrate through hardly at all. So much for “beneath the surface”.

Here’s the end result. The silk paper felted in nicely and the leaves are entirely intact. They didn’t break or crack at all.

Here’s a closer look and you can see the surface texture here too. Now what to do with it? It’s about notebook cover size but I’m afraid that would be too hard wearing on the leaves. I took it back to my studio room and ended laying it on top of one of the canvases that I am working on for a different project.

It looks pretty good. Hmmm….. I think it would look good if I trimmed off the felt edges and then added some either stitched, tyvek or lutradur leaves. Perhaps a few viney bits too. As you can probably tell, I haven’t quite decide what to do with this yet. And I need to do something else for the third quarter challenge.


Pandagirl’s Year in Review 2016

Pandagirl’s Year in Review 2016

I hope everyone had a nice holiday and are ready for the New Year.

It’s almost the end of 2016 and looking back on the things I’ve done, there seems to be a few themes.

I did a lot of natural dyeing.  Avocado skins, pits and the combo.

20160125_113312

Cochineal

20160701_155219

Alkanet/Logwood20160701_154915

logwood iron top wo bottom

Osagealkanet with iron

Madder

20160622_123212

Cutch, Rhubarb and Indigo

20160703_115005 20160701_155539 20160907_124311-1


Eco printing

img_7161

Resists

20150501_152541

20160301_164851

20160326_121301

20160322_113050

20160506_142241

Under the sea theme20160429_160634a_edited-1 20160526_155222

2nd Quarter challenge working with scraps – the former credit card case turned into an ear bud case.

20160506_122938

Then the cityscape with scraps.

20160523_142107

A scarflette with locks

20160125_111403

Ginkgo stitching

20160123_152812

Crochet piece felted and embellished with stitching

20160823_134235-1

Felting wit my grandsons

20160807_152216_001

Silk scraps into a free motion stitched vase

20160708_142758

3rd Quarter challenge adding dimension from Kristy Kun’s class

20160924_155325-1 20160924_155038-1

Ruth’s Paper Lamination class

20160614_153320 20160720_173749

20160609_122027

Teri’s hat class

20161012_152103 20161012_151800

Mini weaving wall hanging

20161113_151758

More work with scraps for a sewing machine case

20161204_142831

4th Quarter Challenge with embellishments for a coupon case.

20161107_164205

And blue booties for a shower

20161208_165948

Of course, there were also plenty of samples during the year including using the needle felting machine to felt some unfeltable fabrics.

A big thank you to Cathy Wycliff for her post on weaving and felting; my sister Carol Olson for sharing her new sheep with us;  Nada for sharing her workshop experience in Slovenia; Zara for her posts on Felting on a Trampoline and her Yak, Mongolian, Churro and Zwartables samples; Leonor for her soap tutorial and Terri Simon on sharing her projects from Kristy Kun’s class.

It was a great year for me in terms of learning new things and doing some recycling.  How was your 2016 year of fibers?

Happy New Year and Happy Felting in 2017!


Resurrecting Silk Paper Bowl

Resurrecting Silk Paper Bowl

Last month I wrote about doing more experiments with UFOs and my silk paper bowl disaster.  https://feltingandfiberstudio.com/2016/06/20/more-experiments-with-ufos/

20160429_160708

Fortunately, Lyn suggested I try Ruth’s Felt Scrap Bowl method.  https://feltingandfiberstudio.com/2011/12/11/felt-scrap-bowl-tutorial/

I was hesitant at first because it required free motion stitching. Something I haven’t mastered. But I needed the practice, so this was a good opportunity to do just that.

The first thing I did was to tear it apart.

20160430_112154

Then I laid it out in a round shape.

20160623_151719

I could have left it plain, but decided I had some hand dyed yarns that would add some texture and interest and complimented the silk.

20160623_153215

I proceeded to cover it on both sides with the Sulky water soluble stabilizer on top before pinning and stitching.  I know I should have put down the Sulky before designing, but I’m getting good at flipping projects.

Then came the fun part — stitching it.  I had a lot of trouble with the thread breaking, the tension being picky and a lot of stops and starts but I finally got it finished.  Although I didn’t use fancy designs, it’s pretty much straight lines up and down and around.

Following Ruth’s directions, I wet down the package leaving it a little sticky and draping it over a jar then adding folds.

20160707_150652 20160707_151147

It looks a little droopy and sad. I let it dry overnight and was surprised in the morning to find a very pretty textured and dimensional vase.

20160708_142732 20160708_142758 20160708_142742

While it’s not strong enough to hold anything, I could put in a glass or clear plastic to be able to set something inside.  I even toyed with getting a small battery type light and making it a little lamp.  There are plenty of holes and it’s very thin.  It might work.  If I can find such a light, I’ll post pictures on the forum.

Thanks Lyn and Ruth!  I’m pleased with the results and the fact I was able to reuse the silk. Oh, I have some left but not enough for a vase.  I’ll have to find something else to make with it and get more free motion practice.


More experiments with UFOs

More experiments with UFOs

A couple of years ago, I was making silk paper just for practice.  I decided to try to cover a bowl and make some ruffle edges.  But it was a disaster. I used an acrylic medium to help give it substance, but all that did was make it stiff and unmanageable.  I tried soaking it in soapy water for a couple of days, but that didn’t do anything either.  So it went into the “pile.”  I’ve picked it up a couple of times thinking I could use it for something, but nothing came to mind. Sorry about the fuzzy picture.

2014-01-25 16.21.59

Recently, with the Second Quarter challenge to revisit our UFO stash, I pulled it out again. This time as I thought about it I started pulling it apart, peeling off layers.  I wondered if it would still felt, so I looked through my stash and found some yellow batts with unknown fibers.

20160615_121049

It felted just fine, some parts are still stiff, but most of the thinner areas still had the silk shine. This piece will probably be made into a coin purse.

20160617_160642 20160617_160744 20160617_160713

But what to do with the rest?

20160617_161216

Another UFO was a piece of prefelt I had cut for “lace” in Fiona Duthie’s Surface Design class.  I put a piece of habatoi silk under it and felted them together.  I’m not sure what I’ll do with it.  But I like the bubbly effect of the silk through the holes.

20160614_15374220160615_114213 20160615_114326 20160615_114333

Then I found a frame for the cityscape.

20160615_114129

While I haven’t made a big dent in the scraps and UFO pile, I feel good about trying some new things.

Finished Pieces

Finished Pieces

I’m still going through some unfinished projects at the moment, mostly blanket stitching, hand-sewing buttonholes and fighting with my machine 🙂 I used one of the pieces of felt I’d made for the Australia Challenge to make a glasses case. I lined it with some orange cotton fabric and stitched around the edge with the machine before blanket stitching. Side one:

australiaSide Two:

AustraliaEarlier this year, when I made my coppery bronze felt, I had some pieces of commercial art yarn left over. I made a couple of small pieces of felt to use the pieces up. One of them just had pieces as embellishment just below the top layer of merino and they extended out of the sides. For texture on the top of the other piece, I made twists of merino and yarn. The felt pieces didn’t look big enough or thick enough to make anything practical out of them, they weren’t even the same size, so I thought it wouldn’t be a waste to sew them together to make a funky camera case. It turned out better than I expected really 🙂

camera caseI used the piece made with twists as the back as it was smaller.

 CAMERA caseI did manage to finish off another small coin purse that I started a while ago, another one made from felt and silk paper. I kept the natural edges for the front flap:

purseI was glad the felt piece was big enough to use the same felt for the inside pockets, I know only a little part of the back one is seen, but I think it’d look wrong with a plain piece.

purse openpurse backIn case you haven’t noticed, we now have a ‘Community‘ section to the website. If you hover over the tab, you can see from the drop down menu that we have pages for the Studio Challenges where you can find links to the original challenges, and also gallery sub pages to see all the art work created for the challenges from everyone who took part. If we’ve missed you off, we do apologise, there were quite a lot of posts here and on the forum to go through to find them. Send us a message via the Contact Us page if you want us to add your entry. There are also pages for finding links to interviews with guest artists and suppliers and also articles by guest writers. We have a really great article coming up this week from Terriea Kwong showing us how she gets her excellent results using plants for eco printing.

2012 Review

2012 Review

It’s hard to believe it’s almost a year since we posted about our plans for 2012! Looking back over what I’d hoped to achieve I didn’t expect to have done many of them, as the year panned out a lot differently than I expected. One thing I really wanted to do was learn some stitches by taking part in Take a Stitch Tuesday (TAST). I did try my hardest, but I found the instructions really hard to follow and gave up after about 13 weeks. I never got the chance to explore direct dyeing felt any further, which is probably a good thing, since I’d hoped to combine the results with stitches I learned from TAST 🙂  I did dye some fabrics for using in felting, though. And I did actually get around to trying out a Suri Alpaca sample, but I’d hoped to try a few more ‘controlled’ samples so never had enough to make a post about it.

suri alpacaOne thing I was really looking forward to spending time on in 2012 was working more with other felting fibres and fabrics, and writing some tutorials for the studio site. Early in the year I did make quite a few pieces exploring natural fibres with natural wools, which I really enjoyed. Some of the results were quite interesting, like this Suffolk wool and banana fibre piece, a photo of which ended up being used by a Lecturer at RMIT (Royal Melbourne Institute of Technology) for a book.

suffolkI did write a few tutorials for the blog this year, but they weren’t about fibres. It seems like I spent a big portion of my time in 2012 on the phone to various government departments and agencies trying to get onto a scheme to become self-employed. I thought I had all the information I needed until it came to writing my business plan and realised I (along with everyone else, it seems) have no idea whether the scheme lasts 6 months or 12, which is quite a problem if you’re trying to forecast things! But hopefully that will all be sorted out in the new year.

I enjoyed taking part in the Studio Challenges this year, I haven’t done a piece for Karen’s weather challenge yet, but I do have some wool and fibres blended and around 40 photos of storm clouds to work from in the next few days 🙂 Another thing I enjoyed this year was finally learning how to make silk paper. I did intend to try a few more methods, but that was another thing I didn’t get around to, though I did buy a book about it!

silk paperA couple of my favourite things from this past year are the bird pods I made and using the electric sewing machine my mum gave me to make collage notebook and diary covers. I still haven’t mastered the speed pedal on the machine, but I can wind a new bobbin really well 🙂 The bird pods were great to do, I haven’t had much success previously making 3d felt from flat resists, but they all turned out really well. This is my favourite.

bird pod whiteI’m looking forward to 2013, all the challenges and exciting new things yet to come. I hope you’ve had nice holidays and if you’ve done your own 2012 review, post a link in comments, we’d love to read them 🙂

%d bloggers like this: