This blog talks about my attempts to knit the Memories Sweater pattern by Sally Melville. I will start by sharing the project photos of Sally’s inspiring sweater. As you can see, this is a neat pattern and a great way to use up random bits of sock yarn.
Front
Back
Side (sleeve)
My first attempt with the pattern was in May 2022. I dug out some sock yarn and started. After 5 weeks, this is all the progress I managed. I had a few hiccups… one was that the various sock yarns had slightly different gauges. And the bigger problem was the square itself. The mitred square in the pattern had a spine going down the middle of the square. I found making squares in this style to be frustrating. And so the project got put into a bag on a time out. Three years later it has not been retrieved.
First attempt (June 2022)
Now we advance to June 2025. My husband I and were going on a long car trip to visit family. I wanted to find a project that would be good trip knitting and also that would not take too much space. I began to wonder if maybe I should attempt the Memories Sweater again.
To try and avoid the gauge problem, I decided to use a single brand of sock yarn. I had this selection of Patons Stretch Socks, which is a fingering yarn with lots of cotton (41% Cotton, 39% Wool, 13% Nylon, 7% Other). I thought it would be a good match for a summer top like this.
Patons Stretch Socks
Next I decided to look around for another mitred square pattern to use as a substitute. I found the Knitted Patchwork Recipe by Martine Ellis and gave it a try. I was very happy with my first square.
Knitted patchwork recipe and first square
And in late June I started knitting in earnest. I knit steadily from June 30th to mid August.
First panel
First panel modular squares
Starting the second panel
Both panels growing
Along the way I began to worry that I would run out of yarn. I posted an ISO (In Search Of) post on Ravelry and a few people came to my aid and sold me spare balls from their stash. These new colours got added into the panels.
Destash yarn from another Ravelry member
Destash yarn from another Ravelry member
Yarn for my project in a basket
Eventually I had 2 completed panels and then I began to add edging on 3 sides as the pattern instructed.
Completed panels (no edging)
Completed panels (edging in progress)
And here is a view of the panels with edging complete.
Completed panels (edging complete)
I then tried to figure out what to do next. I read and re-read the pattern for the shoulder/sleeve section and was stumped. In the original sweater the designer had more squares in her panels than I had in mine. So after searching through pattern notes and looking online I resorted to emailing the designer for help. Luckily Sally Melville kindly answered my questions and has provided some clarifications to help me move forward. However, I have not yet had the time to devote to implementing her directions and starting the shoulder section of the sweater. But I am hoping to get to that soon. I look forward to sharing my finished sweater in a future blog post.
This is a guest post written by Bobbie Herrick, my friend and level 3 stitch classmate. You can see some of her beautiful work here in my post about our exhibition. Bobbie is from the Seattle, Washington area and recently went to the Shetland Islands for Wool Week. I hope you enjoy her post.
My friend Dorothy and I had wanted to learn how to do Fair Isle knitting as well as visit the Shetland Islands. We thought SWW would be a fun way to do both. We knew our adventure had begun when we met Val, from Cleveland, Ohio sitting beside me on a flight from London to Aberdeen, Scotland. This was her first time to SWW as well.
After a day in Aberdeen we checked in at the ferry terminal in the evening for our ferry to the Shetlands. We found the waiting room full of knitters. Many of them were wearing the 2023 SWW design for the Buggiflooer Beanie. Buggiflooer is the Shetland word for a sea campion which grows around the Shetland coast. The travelers were from a great variety of places including Missouri, Texas, Canada, Australia, Poland, Sweden and Japan. Excitement was only temporarily dampened by the rough overnight crossing of the North Sea!
We arrived in Lerwick in the early morning and walked to our “Introduction to Fair Isle” class taught by a delightful, skilled tutor, Janette Budge. There we were given wool to make a small Fair Isle piece. There were experienced knitters as well as beginners.
Later in the week, I was able to visit open houses of several local guilds and some designer studios. Old and contemporary work was on display. There were spinners, weavers as well as knitters.
We had only selected a couple of events out of an extensive list of exhibitions, talks, tours and classes. Many events were at different locations on the islands. The SWW ‘Hub’ located in Lerwick was a great resource for finding directions, events, and provided a comfortable place to knit and relax. There we were able to find additional sites and studios to visit. It also had a map showing where participants were from.
During our week on the islands, we found the local people resourceful, warm and welcoming. They are proud of their rich Scandinavian and Scottish heritage.
Shetland artists often get their inspiration from the natural environment and incorporate traditional and contemporary motifs in their lovely work. There is much more I would have like to see and explore, so hope to return!
They tell me it’s Summer already. To be honest, I haven’t noticed… I know most of you reading after this post is published might be complaining about how hot it is, but I can inform you I’m currently writing this with a jacket on.
Ah, Scottish Summer…
I had lots of lovely knitting projects in mind for the warmer months of the year, two of which involved making some season-appropriate tops to wear when the sun was out. This would be my first time knitting something Summer-specific and I was very excited about the prospect.
Have I mentioned “Ah, Scottish Summer” yet?
Anyway, since there’s no view to wear these lovely makes anytime soon, I thought I’d share them anyway so you can at least boost my ego and tell me they’re lovely. Ready?
Ripple Halter by Jessie Maed Designs
In another blog post where I mentioned being brave enough to unravel my knitting without a lifeline, this halter top appeared briefly. I finally finished it! Just in time to enjoy it on a hanger instead of on my person… (this is knit in merino wool but it’s still too cool for the current weather, at least for me!)
My other fun knit is not quite finished yet… but my brain being what it is and hating an unfinished project, I can’t move on to another until this one is done – even if I know I won’t wear it anytime soon.
Gelato Tank Top by Gabrielle Vézina
Note the knitting needles on the bottom! The white strip is some leftover yarn I used as a lifeline in case I wanted to frog the whole thing back (which I will, because I want a couple more rounds of stocking stitch before the edging).
I mainly knit this tank top for the front lace panel, which I thought looked fun. The yarn I knit it with is a linen blend, very soft and perfect for warmer weather.
Some of you might be reading this and saying, “But Leonor, you can wear these with a jacket, what’s the problem?” And you’d be right, that’s definitely an option. However, considering how windy it’s been in Edinburgh, I’ll want to button up the jacket, which will hide the layer underneath.
I guess I’m just grumpy this Summer has been nothing like I planned and want some commiserating 🙂
What about you, any fun plans for the season? Share them with the in the comments section so I can live vicariously! And, thanks for reading.
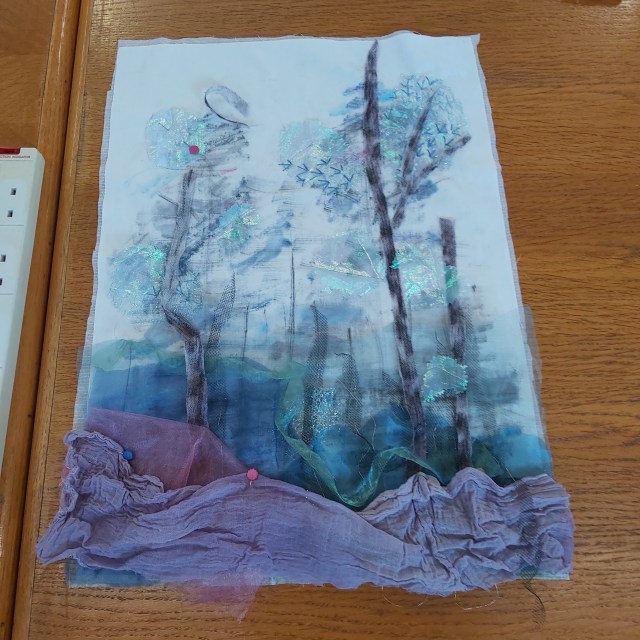
Last week I was invited down to Leicestershire to visit the Cosby Quilters to give a talk on the Tuesday evening and run a textile workshop on the Wednesday. The workshop they chose was “Tall Trees”, based on one of my early art quilts, which involves painting fabrics such as cotton, interfacing and muslin which are then layered with organza and free motion stitched.
Normally this is a two day class but occasionally, as with Cosby, it’s booked for one day with the students happy to finish in their own time. The ladies have made a great start with their pieces and I’m looking forward to receiving photos as and when they get finished.
Pat Screaton, one of the Cosby Quilters, lives in the village and is also heavily involved with the Cosby Yarn Bombing. It’s a joint effort by members of the Cosby Crafters & the social enterprise Gather Create Grow, which uses arts & crafts to improve wellbeing & reduce isolation.
When the workshop ladies stopped for lunch Pat said she needed to pop out for a few minutes to go round to “the barn” and suggested I go with her to get an idea of the scale of their yarn bomb activities.
The barn itself was crammed with box after box of knitting/crochet wool and there were ladies sitting on the grass all around knitting, crocheting or sewing granny squares together…..it looked a proper cottage industry! It turns out that there are regular sessions for folk to attend as well as the group reaching out to the wider community, including schools, to get everyone involved. What a fantastic enterprise!
They don’t appear to do anything on a small scale, all the characters, animals, plants, etc, etc, that they create are life size.
Everything is carefully stored between events and everything gets recycled over and over again, being reincarnated as something, or someone, different the following year.
This is their life size model of our Queen, complete with Corgi’s, made to celebrate her Platinum Jubilee…….I love the detail they include such as the Queens monogrammed gloves and the royal “posh poo” bag!
…..and a few photos from last years Nativity Scene……
The local community are currently well on the way with their 2022 ‘Make a Splash’ themed installations which will be decorating the beautiful village of Cosby this August. Back at Pats house I was given a sneak preview of a few of the pieces and they are looking impressive…..including schools of fish, a massive crocheted coral reef and a huge wet felted Lochness Monster!
The “Make a Splash” Yarn Bomb will run from 13 August to 4 September 2022 and will stay up for 25 days. It’s all outdoors, it’s going to be spectacular, and it’s completely free so if you are in the Leicestershire area it’s well worth a visit.
As soon as I saw what Lyn was setting as our next Challenge I thought “but I can’t do that”. I have always stumbled when trying to understand Design because, although I can see pattern in a lot of things, I fail entirely in translating what I see into my work. I am very literal in my thinking, and when I see abstract pieces (usually “modern” embroidery pieces) based on images of say, a broken brick, or the reflection in a window, or a rusty piece of metal, or a “fractal”, I think to myself “yes, very clever, but why?” and “what would I do with it?” and “I can’t see that on my wall” (and just occasionally “I wouldn’t give that house room!”). This is why I tend to make my pictures or 3D sculptures as realistic as I can.
I was going to just not bother with this Challenge, and then I remembered that some years ago I had attended a course on Design – I had forgotten all about it and it is relevant to this Challenge.
In August 2015 the Association of Guilds of Weavers Spinners & Dyers included in it’s week long residential Summer School syllabus a course by Alison Daykin – “Design for the Terrified” and I was lucky enough to be allocated a place – most courses were usually over-subscribed. Here is the introductory list of available courses from the brochure for you to drool over!
The course was described as offering “help to ‘painting and drawing challenged’ weavers, spinners, dyers, or other textile practitioners, in understanding Design and using this in their chosen medium”. The brochure went on to say: “This course will provide simple, but effective guidelines in design, without the student feeling overwhelmed by theory. The tutor will also leave plenty of room for participants to express themselves in their chosen medium.
“By the course end students will have at least one sketchbook and understand the basics of: colour studies; textural studies; shape; line/stripes.
“Students are encouraged to make samples appropriate to their own textile skills. They may choose to bring their loom or wheel with them, or to develop further sketchbooks if they prefer.”
Frankly this description of the course frightened the life out of me and I nearly didn’t apply, not least because I would be foregoing the chance to take the offered very interesting felt making course. (It’s headline description was “… an ‘adventure with fibres and fabrics’, combining colour, texture and layering to produce felted fabrics for decorative purposes or garments” and that was what I was most interested in at the time.) However after exchanging a few emails with Alison, and reading the three blogs which she sent out about the course I decided to bite the bullet. The first blog post puts emphasis on your “Inspiration” and resulted in a further flurry of emails with Alison, since I had no idea what it meant or what my “Inspiration” should be in this context. She basically said that I should pick a subject which I found really interesting. I was undecided whether to plump for trees, which seemed a very big subject, or sea shells – almost as big but of which I had recently started a collection. In the end I went with sea shells.
Sea Shell collection with Sea Urchin “ skeletons”
The second and third blog posts and a “round robin” email from Alison encouraged us to bring along as many different types of art media as we might be able to lay our hands on, including different types and colours of paper and “mark making” equipment. In addition we were asked to only bring one image of our inspiration, but as many copies of it as possible. (As I hadn’t been able to choose just one shell my image consisted of most of my collection, which also included sea urchin “skeletons”.) We would also need to take a notice board (if we hadn’t already made a mood board – “Er …. what’s one of them?”) so that we could pin up various bits and pieces as we went through the course. We would also need the equipment and materials required to make samples in our chosen technique. As I didn’t know which shell would be my inspiration the “materials” consisted of most of my stashes of fibres, fabric & yarns! I’m sure you’ve all heard of the saying “everything but the kitchen sink” – very apt, my poor car was groaning when I set off with all this stuff plus clothes etc., and I had yet to fit in the friend I was giving a lift to, plus all her stuff and her walking aid. (She was still a bit frail after an illness.)
The Summer School was based at Moreton Morrell Agricultural College in Warwickshire, where (after we got lost twice on the way) I met Alison and the rest of the class members. There were weavers, spinners, an embroiderer and a felt maker – me. Alison showed us her own work, and took us through her process for designing woven fabrics for specific purposes, showing us her mood boards and pictures of finished fabrics “in situ”. Here is a much abbreviated view of how she followed one inspiration from an image of ancient ruins to cloth samples.
She then started us off on our own design journey. Alison suggested to me that I should pick my favourite shell from the picture of my collection and make an enlarged drawing of the shell, both in monochrome and in colour and using different media. I had a go at this, although my drawing skills are minimal. This was before she had found that we would be able to have access to the college’s print facilities, where we could get photographs printed, and colour and monochrome photocopies made on a copier, which was capable of enlarging. We all made great use of this facility – zeroing in on just part of our inspiration image and having multiple copies made on different colour papers as well as plain white – which enabled us to speed up our progress through the stages of the design processes that Alison had mapped out for us.
One of the “tricks” which Alison showed us was to take two images, cut (or tear) them into strips (leaving one side of the paper still intact, and then to weave the two images. This did produce some interesting results.
We also cut strips across an image and used this to reference yarn (in my case fibre) wraps. Using this method enabled us to achieve a colour swatch giving combinations, quantities and placement of harmonious colours.
Showing the progress from picture strip to felted swatch
Once we had all played around with these ideas for a day, we were encouraged to get on and start creating samples in our chosen techniques, keeping in mind how we might use the finished work. As I was interested in making felt for clothing and accessories, I had brought with me copies of designs from specific sewing patterns and tried to pick the patterns that would best suit. I had by this time branched out to using as inspiration two different Sea Urchin skeletons, one Cone shell (and when no-one was looking I did a bit of crochet based on the end of a Conch type shell).
Large Sea Urchin
Small Sea Urchin
Cone
As you can see, I’m still leaning towards the literal/representational side of designing.
Alison also encouraged us to take our cameras and go out around the college grounds and look for more inspirations for design. At this stage we had all got used to looking beyond the obvious and came up with some unusual images. This was the one I chose to do something with – don’t ask me why – it’s just a picture of the wood surround (and my toes) to a raised flower bed outside the portacabin which was our workshop, where we all congregated for coffee, snacks and chat.
Being full of enthusiasm for the project, I cut down the photograph to a corner and then cut out the image of part of the surround.
which I then had enlarged and with several copies started to develop the design
This is the design I finally ended up with.
There are five versions in this picture, the basic design on top with four colour changes of the small “pops” of colour. And here is the jacket pattern and a tracing of the design.
The last day of the course was mainly taken up with visiting the rooms where the other courses had been taking place for a grand Show & Tell. To this end, we had packed up all our equipment and materials and set up our notice boards and work tables as displays of what we had been doing. Here are mine
And here are some of the displays of other class members’ work. Not all of them I’m afraid, I had camera shake by then so I’ve only included the less blurred ones.
The whole Summer School experience was great, with evening entertainments, a fashion show, a display of entries for the Certificate of Achievement “exams”, a traders’ market (I spent too much money as usual) and a trip to Stratford Upon Avon for a tour of the Royal Shakespeare Company’s Theatre with a chance to see some of their costumes “up close and personal”.
We inhabited a bubble, with little contact with the outside world. (There wasn’t even a signal for our mobile phones, short of climbing a hill and standing in the middle of the road.) A wonderful experience and I’ve enjoyed revisiting it.
I am afraid that by the time I got home again I reverted to type and have not made any fabrics, felted or woven, from any of the designs. I just did what I usually end up doing after returning from a workshop – I put everything away and forgot about it! So I still don’t have a 2nd Quarter Challenge piece to show you; though as a result of writing this post and after seeing some of the pieces which FFS members have posted, I do feel better about the possibility of designing from random observations and images.
I am looking forward to seeing what the next quarter’s Challenge will be.
Usually, when we share work with others, we tend to show the things that we’re proud of, or very happy with. Seldom do we talk about what didn’t go well. Today I’m doing just that (again! Remember my waistcoat? It’s still lingering in my Unfinished pile). Get ready for a couple of mistakes and some possible solutions, maybe…
One: The mannequin
A few months ago, I stumbled upon a website that creates a personalised sewing pattern to make a mannequin after your own body measurements. Since the one I had at the time wasn’t true to my figure, I went ahead and splurged on this.
I sewed the thing and followed the instructions. I was very excited! A true-to-form mannequin would mean I could make sure my patterns would fit me perfectly. In theory, at least. Well… I stuffed it. Literally and figuratively! I had to add stuffing to the thing, and discovered there’s an art to adding fluff and moulding a 3D object in order for it to conform to what you want. Let’s just say my efforts were less than stellar. Attest for yourself!
Not to put a too fine point over the issue, but I’m really not that er, wavy? I think I made a couple of sewing mistakes (note the lower belly, there’s definitely a stitch or two that’s bunched up), but my capital crime was definitely not stuffing the mannequin as instructed, which was to add little bits of fluff at a time. I should know better. Also, there’s another *ahem* area that definitely didn’t get stuffed as needed, don’t ask me why. That pair would not get a job in a Las Vegas show…
The solution
I can either remove all the stuffing and do it all over again, or I can admit defeat and start another mannequin and also correct the sewing mistakes. Removing the stuffing will be an interesting feat, I have this nightmarish idea that it’ll all bounce back in my face and I’ll drown in fluff.
Which one do you vote for: redoing it or re-stuffing it?
Two: The knitted jumper
Remember the cardigan I knit a while back, and hand dyed afterwards? (Sorry for the lack of link, I couldn’t find it). I had liked the pattern so much, I made a few more, then decided to adapt it to create a jumper (that’s a “sweater” for you American folk, although I promise I don’t intend to do much sweating in it! Then again, I don’t intend to do much jumping either.)
Well… I’m a huge proponent of test swatching everything beforehand to make sure it fit, but I’d knit this before in another format, how much different could this new version be? Turns out, quite a bit.
Even though we know the mannequin didn’t quite come out as expected, the measurements are quite correct. See all that extra “fabric” in the chest area? It’s like that on both sides. Argh.
The solution
I can’t really take this apart and re-knit it. Let me rephrase that: because I don’t want to lose the will to live, I’m not going to take this apart and re-knit it. What I can do, however, is take the excess volume away by either steeking (a technique that involves cutting the yarn and putting it back together, it’s very nerve racking!) or I can go the easier way and, using the sewing machine, simply sew it tighter on both sides.
Steeking would afford me the opportunity to learn a new-to-me technique, but it could go horribly wrong and I’d end up with no jumper and a lot of grief. Sewing it would definitely work, but you’d see a line on the upper sides that might look a bit terrible. Which would you choose?
Three: the shawl
Finally, my favourite. This shawl was hand knit during a couple of weeks and I love it. This was a commission, so it’ll be heading off to its new home soon.
If you think beading a shawl is hard work, you’re absolutely right! The edging you see here, with those cute little scallops, was also a very time-consuming affair. The end result is glorious, though.
The problem and the solution
The problem I had with it was, I dropped a stitch and didn’t notice until I was all done binding off, washing and blocking it! Facepalm moment. I immediately put a stitch marker to stop it unravelling and promptly went to work to fix this mistake.
I put the stitch marker over the stitches the dropped one should have connected with so I didn’t lose my place. I then took out my crochet hook and went to work.
After I got the stitches together correctly, I added a tiny string of the same yarn to close it off. I’m sure there are “better” ways to do this out there, but this worked for me. Once I was done, I don’t think you can see where the dropped stitch was. Correct me if I’m wrong.
Here is this beauty in all its glory, ready to become an heirloom in another country very soon.
There you have it, the ups and downs of a maker. I hope you enjoyed going through these with me, and thank you in advance for your suggestions on what to do with the first two.
As ever, here’s a photo of a cute feline to finish the post. Marshmallow was looking all regal and dainty whilst enjoying the sun, but of course once I pointed the camera this happened…
“The paparazzi never leave me alone!”
Enjoy your weekend, and “see” you in my next blog post!
First of all, happy Thanksgiving to everyone reading this in the US! I hope you had a nice celebration.
Today I’m sharing some rainbow-y fibre I created, plus a “throwback” item that I hope you’ll like.
Being an indie dyer means I get to play with dyes fairly regularly, but it had been some time since I adventured into the world of saturated rainbows. I think it was the grey London Autumn that got me inspired, I just needed to get a colour fix. Off to the dye pot I went.
One of the things I’ve been a little obsessed with lately is how yarns look when they’re in skein format – I love it when colours look cohesive and have a certain progression to them when displayed, so I went for a red “bottom” that would change as the eyes look up. Hopefully you’ll see that this was done consciously.
I knit this into a hat (complete with a pompom) that I think looks very cheery. It’s going to be a Christmas present so I hope the recipient likes it.
I hope you’re not fed up with bright colours yet…
Although not technically a rainbow, this wool top came out super bright and happy (to my eyes at least). If you’ve ever dyed wool top or roving you’ll know it can be an adventure to control where the colours go. This is superwash wool (it doesn’t felt) so it wasn’t as difficult to get “right” as non-superwash fibres, but I’m still perfecting my methods. Suggestions are welcome!
This being the Felting and Fiber Studio, there should be some felting, so here is a little Piglet I made a couple of years ago and gifted to a friend. I really loved creating this little guy and think he came out really well. I got to see the sculpture again a few days ago at a friend’s house.
Have you done any hand dyeing or needle felting lately? Share your experiences with me in the comment sections.
Hello, Leonor here guest-writing for this week’s post.
After reading the title, if you’re not a knitter, you’re probably wondering what I’m talking about. What on earth is blocking and why am I writing about it?
Simply put, blocking refers to the act of stretching a knitted item with the aid of specialised wires and pins, with the intention of making it look a certain way. Think of all those airy, lacy shawls you’ve seen people wear – those have been carefully and mercilessly blocked into submission.
Above is my latest project, the Banana Leaf Shawl. It looks nice-ish, but it lacks that finesse that one usually finds in store-bought shawls. The stitches look limp and you can see the differences in my gauge. Let’s make it right.
Firstly, soak the item in room-temperature water (add a nice wool wash if you want; I used Eucalan, a no-rinse Grapefruit-scented one). Let it sit for about 15 minutes and then carefully extract the excess water. Your knit needs to be damp but not dripping.
Now comes the fiddly part. Using blocking wires, you’ll need to catch the edges of your project so it’ll keep the shape you want (in my case, everything’s a straight line, but it can be crescent-shaped, for example).
I decided to do this just before going to bed, thinking it wouldn’t take me long – how wrong I was. After one hour, I was losing the will to live. I’d need another hour to finish getting the wire through all the edges.
Next, you’ll need to pin the wires to a surface. There are special fancy mats you can buy for that, but I got some for home gyms that are a fraction of the price and do the job nicely.
Because I have cats, I couldn’t risk them getting hurt on the blocking pins, so I had to move my blocks vertically for the night. I then used my desk chair to keep everything upright.
Once your finished object is dry, you can take the pins out and because fibre has memory (like the mohair and silk of this shawl), it’ll keep its shape… until you wash it again. Yes, blocking needs redoing every time a knit gets wet! Don’t you have a newfound respect for all the people who knit delicate lacy shawls?
And here’s the finished product. I hope you can see how different my Banana Leaf now looks, comparing it to the first photo – from a slightly misshapen piece to one with sharp, well-defined edges. It’s grown quite a bit, too.
The stitches look so much better, too, neater. They’re suddenly really well defined. This shawl now looks like something one would see in a shop front, if I do say so myself.
Even if you’re not a knitter, I hope you’ve marvelled, like I do every time, over the magic of blocking knitwear. If you fancy reading the technical bits about this particular project, head on over to my Ravelry page.
Have you ever done blocking? Can you think of any ways this technique could be used for other fibre endeavours? I’d love to read (and steal) your good ideas.
Our guest artist is Leonor from Felt Buddies who is sharing a special sock story and process.
Today I’m sharing with you some sock making, from the dye pot to the finished product.
A few months ago, I got a new tattoo from my husband’s co-worker Jim (if you’re guessing my other half tattoos for a living, you’re guessing right). In exchange for his work, Jim asked me to knit him a pair of socks – he’d seen me knit whilst in the studio and was fascinated by the concept of having a garment made especially for someone. I happily obliged!
Because I own my own fibre business, I have a lot of sock yarn available to dye at my pleasure. After talking to Jim about his colour preferences, I got to work. I loved that he asked me for three of my favourite things in socks:
Mismatched colours with contrasting heels and toes;
Bright colours (you can’t get brighter than magenta and purple!)
Socks that glow under UV light.
I had some yarn I was keeping for a special occasion and this was the perfect time to use it. It’s a very soft alpaca/merino/nylon blend.
For some reason, at the time I thought it was a good idea to break down the yarn into four pieces – two for the main body, two for the heels and toes. I’ve no idea why I did this, since I was only using two colours, but hey. I simply weighed the skein and took out 15 grams for each foot to make the smaller parts.
I then soaked the fibre in some water and synthrapol in preparation for dyeing. Synthrapol is a wetting agent and helps the wool absorb more dye. It’s also excellent to rinse out fibres.
After the yarn was thoroughly wet, I made my dye stock using professional-grade acid dyes and to the pots I went.
After adding the colour to the water, I placed one little skein and one big one in the pot and let the fibre sit for a few minutes without any heat. Because this yarn isn’t treated to be superwash (non-felting), the dye takes longer to penetrate the fibre, so I wanted to give it some time to get to every bit of wool.
I then turned the heat on and once the water started simmering, let it be for about 10 minutes, turned it off and let the wool cool completely in the pot. This allows for the remaining dye to be soaked up, and also makes for a brighter finished colour work.
In order to turn my skein of yarn into a ball, I used an umbrella swift (pictured above, on the left) to hold the fibre whilst I pulled it onto a skein winder (above right) to make a neat ball. I have all the cool gadgets!
Once the yarn was dyed, washed, rinsed and dry, it was time for knitting. I had made an impression of Jim’s foot beforehand and used it as my template to make sure they’d fit. If you’re curious, this is a technique taught in a pattern called Fish Lips Kiss Heel that makes for fail-safe sock fitting (and heel-making). It’s available on Ravelry at a very low price and I highly recommend it.
And here’s the finished socks! I still had to weave in the ends in this picture, but I’m happy to report that’s been done since and I have presented this squishy pair to a very enthusiastic Jim.
Now, for a fun little extra: I asked for a photo of him wearing the socks for my social media. Be careful what you wish for! Jim took the picture, alright – he got down to his underwear and struck a hilarious sexy pose for me. If a bit of skin doesn’t offend you and you like a good laugh, hop on to my Instagram @feltbuddies and look for yourself. There’s a black and white photo with a disclaimer about the partial nudity, and after you swipe there’s Jim happily wearing my socks… J
Thanks Leonor! If you’d like to follow more of her fiber adventures, you can see her work here: https://www.feltbuddies.co.uk/
I’m ahead of myself this year, usually I start by planning to be more organised, but I bought some new tubs a few weeks ago and cleared up a few piles off my desk! And yesterday I sorted through a large box of fabric from the well being centre and put it more tidily into different bags and labelled them. One of the bags is lots of ready cut strips for making experimental nuno samplers. There are lots of unusual fabrics in there for beginners to try before they pick up any ideas of which fabrics ‘work’ and which ‘don’t’.
One of the first things I need to do this year is write a constitution for our group. We have our own light hearted rules, such as ‘You’re not allowed to be disappointed, we don’t make failures, we make unintentional discoveries’! but maybe we’ll keep that as our motto 🙂
Looking back at the things I made last year, I saw a lot of things I started to learn, but never really progressed with. One ‘unintentional discovery’ I made was that I quite like freestyle crochet:
I would like to learn how to do it properly though, so I can maybe make something, or at least freestyle a lot better! Another thing I didn’t really progress with is spinning. I did spend a few days practising and made some yarn I liked:
But I think trying to spin some Superwash, which spins about as well as it felts, put me off a bit:
I want to learn to spin on a wheel so I can knit some really cool jumpers, or at least a funky hat, but not being able to do a good job of sewing up is quite limiting:
And only really being able to knit with chunky pencil roving on fat needles is too:
So, I’d like to learn to knit better, or more, or just differently! And I’m really looking forward to the Surface Design challenges this year, I’ve already started thinking about mine for the 4th Quarter. If you missed Ruth’s post the other day, have a look here. Have you made any plans for the year ahead?