Browsed by
Tag: Free motion stitching

Inspired by the Northumbrian Countryside

Inspired by the Northumbrian Countryside

Two weeks ago I took advantage of Covid restrictions being lifted for self catering holidays in England and took off for a weeks holiday in one of my favourite UK destinations. Rothbury in Northumberland is a small, picturesque town nestled in the Coquet Valley.

Looking towards the town centre from south of the river
Heading downhill from my apartment into town

Unfortunately the weather forecast was looking bleak but I was going to make the most of it. I set off with my car packed with as much crafting gear as I could fit in i.e. fibre and felting equipment, fabric, sewing machine, etc, etc the plan being to have a relaxing break, do a little walking and create a piece of work inspired by the Northumbrian countryside. I would return home feeling refreshed, fit and with a finished piece of work…..if I only managed two out of those three (and I did) I wouldn’t have guessed which would have fallen by the wayside!

The view from the patio was pretty good.

Although there were occasional (very) heavy showers and lots of cloud the weather turned out be a bit better than I had expected so it made sense to pack a rucksack and walk during the day and leave the creative stuff to do in the evenings.

Rothbury is a great base for anyone who likes walking with beautiful scenery and lots of trails in the surrounding hills, forests and along the riverbank. Plus it’s only a forty-ish minute scenic drive to Beadnell on the coast, another favourite haunt, with almost deserted beach walks to Dunstanburgh castle heading south or Seahouses and Bamburgh Castle heading north.

Climbing the hill behind my accommodation gave stunning views of the Simonside Hills on the opposite side of the valley.
Crossing the river and heading for the Simonside Hills
A terrific downpour has just passed over!
One of my favourite lunch stops on the riverbank
Harbour at Seahouses
Pace Hill is a tiny spit of land jutting out into the sea just to the east of Seahouses Harbour.
After clambering over the rocks I reached the curious stone construction which turned out to be a Grade II listed building dating back to 1886. It was built to store gunpowder used in blasting when the Long Pier and New Harbour were being built. On the horizon to the left you can just make out one of the Farne Islands.
Lunch stop on the Harbour Wall on my way to Bamburgh Castle
Approaching the imposing Bamburgh Castle from the south on an almost deserted beach.
This is one of my favourite images of the castle and will definitely inspire a textile piece. I’m seeing the background and castle painted and the foreground grasses stitched.

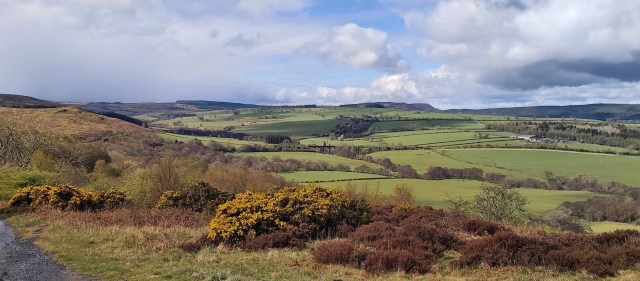
I also came home with lots of dry stone wall images…..as if I don’t have enough already!!

Although I had every intention of being productive in the evenings the combination of loads of exercise, beautiful clean air, wine and a well stocked book shelf in my apartment, meant I didn’t get much creative work done at all while I was there! Who cares!! I had a terrific time and came home with a few of what I refer to as my ‘bacon rashers’ (lengths of abstract felted pieces, often with fabric included) in colours and textures inspired by my walks. Plus all the inspiration I needed to produce a large abstract mixed media piece based on the Northumbrian countryside including those beautiful rolling hills.

‘Bacon rashers’ formed from a variety of fibres and silk fabrics drying in the sun
Pinning together with sheer fabrics to try different layouts.

Since getting home the rashers, plus various other slivers of sheers and painted Lutradur, have been assembled onto a background of painted Lutradur measuring 110cm x 60cm and are now being stitched in position.

So far so good but the top left corner needs some thought.
A few extra pieces of felt have been made to fill gaps while a fine tip soldering iron is used to cut the slivers of painted Lutradur.

Now I’m happy with the placement of all the pieces it’s just a matter of adding more free motion stitching until it tells me it’s done. Lastly I will make a wooden framework to mount it on and then it’s ready to include in the ”Final Show” (of the now defunct CCN group) Exhibition at the Sam Scorer Gallery in Lincoln from the 8th June.

It’s still a work in progress but the end is in sight!
Surface Design and Texture with Machine Lace

Surface Design and Texture with Machine Lace

I took a small break from the differential shrinkage pod pursuits as I wanted to add some surface design and texture. I needed to see what type of free motion machine stitched lace would look the best.

My first attempt looked like this after stitching. I used a variegated brown thread on the top and a black thread in the bobbin.

I then laid it out on a thick layer of the same green wool I have been using for the pods. The photo on the right shows it wet down and already starting to felt.

Here it is after felting. I do like the texture on the surface of the felt but the “pattern” looks too much like a brain and isn’t random enough for me. So another attempt.

This one I tried to be less perfect and had some single lines of stitching running through other lines that were 2-4 stitched lines on top of each other.

Here’s the sample after the machine lace is felted in. I like the randomness of this sample better but I think it needs a little more empty spaces perhaps? Again, I like how the machine lace sits on the surface and gives a rough texture. Then I started thinking about adding some nepps into the mix. What would it look like if I added nepps underneath the machine lace and then felted? Or perhaps some lines of wool yarn to give ridges?

Making samples seems to lead me to making more samples. Perhaps eventually, I will come up with a plan for the final project. Or maybe I’ll just keep enjoying the journey of experimentation and sampling.

How about you? What have you been trying new lately?

Lutradur Leaves

Lutradur Leaves

In my last post I showed some of the brooches I’ve been making out of Tyvek.  This month I thought I would continue with the “man made” fabric theme and show you how I make my Lutradur leaves.

Lutradur is another exciting non woven product which was originally designed for industrial applications including construction substrates, landscaping materials, residential and commercial wallpaper, carpet backings, automotive floor mats and carpeting, and specialized filtration devices.  It is an incredibly versatile material which is available in various weights including 25gsm, 30gsm, 70gsm, 100gsm and 130gsm.  It does not fray, some weights are translucent, it can be painted with any paint medium, dyed, distressed with a soldering iron or heat gun, glued, stitched, layered and embroidered.  In fact, think of an application and you can probably use it!

Lutradur is available in packs of A4 size sheets or by the metre from various suppliers including Spunart in the UK.

My first attempt at using Lutradur was a couple of years ago when I made this leaf using 100gsm…..

I drew the shape directly onto the fabric, free motion stitched over the lines and then painted it with Inktense before cutting out the shape.

You can see how the colour altered once the Lutradur had been zapped with the heat tool.  I was pleased with the result but there was something not quite right which I couldn’t put my finger on…..until recently.

Its staring me in the face looking back at these photos, I shouldn’t have sewn around the edge of the leaf!  This is that same leaf after a little pruning of those edges and another blast of heat to curl the tips, it looks so much more realistic…..

The underside of the leaf

These are some of my more recent Lutradur leaf creations made from 100gsm…..

Lutradur provides a very stable surface for stitching into.

Each one is drawn first using a Frixion pen.  Next I use a heat resistant thread i.e. Rayon, Viscose or 100% cotton to add free motion stitching along the veins.

The fallen leaf which inspired the design.

Shaping with the soldering iron.

Once the stitching has been done the leaf is cut out using a fine tip soldering iron.  I wanted to retain most of the fabric on these particular leaves so I also used the soldering iron, rather than the heat tool, to target specific areas to cut holes.

The finished leaves painted with Inktense.

I wanted a more lacey look for this next leaf so after stitching and cutting out with the soldering iron this one was distressed using the heat gun.  I left it unpainted to suggest a frosty leaf in winter…..

The following photos show a selection of leaves made by students at my recent “forest floor” themed workshop…..

These leaves are fun to make but be warned, as with so many creative projects they can become very addictive once you get started!


Surface Design Techniques on Felt

Surface Design Techniques on Felt

I have been experimenting with a variety of surface design techniques on felt for a long while. I have developed a series of online classes about these techniques. There is a screen printing on felt class running now and I am currently finishing up the last in the series Free Motion Stitching on Felt. This course will give specific free motion stitching techniques that I have developed that can be combined with felting either during the felting process or after the piece is felted. I am planning on offering the course in the spring. I will make an announcement here when the class is posted and open for registration.

Free Motion Machine Stitched Poppy on Felt

In preparation for the class, I have been making samples for the PDF and videos for the course. This is a poppy that I stitched on to a piece of felt that was already screen printed with a deconstructed screen printing technique. I liked the poppy but it just seemed to fade away into the background and I really didn’t want to add in color with thread. So I decided to paint the poppy color in.

Painting on felt isn’t the easiest thing and it’s hard to get fine details because the surface of the felt doesn’t really take paint very well. I used Dye-na-Flo paint to paint in all the color on the petals and stem. Then I added highlights and shadows with liquid acrylic paint.

Painted and Free Motion Stitched Poppy on Felt

You can definitely see the poppy now. It is also a little hard to get a good photo with reds and oranges and this is a little redder than the original. But you get the idea. If you are interested in taking any of my surface design classes, just fill out the contact us form with your information and  which class is of interest. I will put you on the email list to contact when the class registration opens.

Fish 1

Also, there are two spots left in Galina Titova’s Felting Fantasy Fish class that begins January 12, 2017. You can register here. It’s a really fun class and very popular, so don’t miss out!


Pandagirl’s Year in Review 2016

Pandagirl’s Year in Review 2016

I hope everyone had a nice holiday and are ready for the New Year.

It’s almost the end of 2016 and looking back on the things I’ve done, there seems to be a few themes.

I did a lot of natural dyeing.  Avocado skins, pits and the combo.

20160125_113312

Cochineal

20160701_155219

Alkanet/Logwood20160701_154915

logwood iron top wo bottom

Osagealkanet with iron

Madder

20160622_123212

Cutch, Rhubarb and Indigo

20160703_115005 20160701_155539 20160907_124311-1


Eco printing

img_7161

Resists

20150501_152541

20160301_164851

20160326_121301

20160322_113050

20160506_142241

Under the sea theme20160429_160634a_edited-1 20160526_155222

2nd Quarter challenge working with scraps – the former credit card case turned into an ear bud case.

20160506_122938

Then the cityscape with scraps.

20160523_142107

A scarflette with locks

20160125_111403

Ginkgo stitching

20160123_152812

Crochet piece felted and embellished with stitching

20160823_134235-1

Felting wit my grandsons

20160807_152216_001

Silk scraps into a free motion stitched vase

20160708_142758

3rd Quarter challenge adding dimension from Kristy Kun’s class

20160924_155325-1 20160924_155038-1

Ruth’s Paper Lamination class

20160614_153320 20160720_173749

20160609_122027

Teri’s hat class

20161012_152103 20161012_151800

Mini weaving wall hanging

20161113_151758

More work with scraps for a sewing machine case

20161204_142831

4th Quarter Challenge with embellishments for a coupon case.

20161107_164205

And blue booties for a shower

20161208_165948

Of course, there were also plenty of samples during the year including using the needle felting machine to felt some unfeltable fabrics.

A big thank you to Cathy Wycliff for her post on weaving and felting; my sister Carol Olson for sharing her new sheep with us;  Nada for sharing her workshop experience in Slovenia; Zara for her posts on Felting on a Trampoline and her Yak, Mongolian, Churro and Zwartables samples; Leonor for her soap tutorial and Terri Simon on sharing her projects from Kristy Kun’s class.

It was a great year for me in terms of learning new things and doing some recycling.  How was your 2016 year of fibers?

Happy New Year and Happy Felting in 2017!


Resurrecting Silk Paper Bowl

Resurrecting Silk Paper Bowl

Last month I wrote about doing more experiments with UFOs and my silk paper bowl disaster.  https://feltingandfiberstudio.com/2016/06/20/more-experiments-with-ufos/

20160429_160708

Fortunately, Lyn suggested I try Ruth’s Felt Scrap Bowl method.  https://feltingandfiberstudio.com/2011/12/11/felt-scrap-bowl-tutorial/

I was hesitant at first because it required free motion stitching. Something I haven’t mastered. But I needed the practice, so this was a good opportunity to do just that.

The first thing I did was to tear it apart.

20160430_112154

Then I laid it out in a round shape.

20160623_151719

I could have left it plain, but decided I had some hand dyed yarns that would add some texture and interest and complimented the silk.

20160623_153215

I proceeded to cover it on both sides with the Sulky water soluble stabilizer on top before pinning and stitching.  I know I should have put down the Sulky before designing, but I’m getting good at flipping projects.

Then came the fun part — stitching it.  I had a lot of trouble with the thread breaking, the tension being picky and a lot of stops and starts but I finally got it finished.  Although I didn’t use fancy designs, it’s pretty much straight lines up and down and around.

Following Ruth’s directions, I wet down the package leaving it a little sticky and draping it over a jar then adding folds.

20160707_150652 20160707_151147

It looks a little droopy and sad. I let it dry overnight and was surprised in the morning to find a very pretty textured and dimensional vase.

20160708_142732 20160708_142758 20160708_142742

While it’s not strong enough to hold anything, I could put in a glass or clear plastic to be able to set something inside.  I even toyed with getting a small battery type light and making it a little lamp.  There are plenty of holes and it’s very thin.  It might work.  If I can find such a light, I’ll post pictures on the forum.

Thanks Lyn and Ruth!  I’m pleased with the results and the fact I was able to reuse the silk. Oh, I have some left but not enough for a vase.  I’ll have to find something else to make with it and get more free motion practice.


Pandagirl’s Year in Review 2015

Pandagirl’s Year in Review 2015

I really challenged myself the beginning of 2015. I was determined to try free motion embroidery and used Rosiepinks (Lyn’s) instructions for making a round bowl. It turned out nice, but it was a little tense going round and round.

2014-10-28 12.12

My fan has to be the hardest felt project I’ve done so far.  Getting and keeping all those fan blades in place was maddening.

2014-10-31 14.00

Then I began work on making batts and bootie favors for my daughter in law Mari’s baby shower. 60 of them!

2015-02-10 16.00.48

I attempted a felted box.

2015-02-09 11.30.24

A clutch/makeup bag for a new Grandma.

2015-03-12 11.32.24

I gave my drum carder a workout blending colors and making a color wheel for the 1st Quarter Color Challenge.

2015-03-05 15.49.57

Still in baby mode, I felted over a wire baby buggy.

side 2

Cathy and I received our first order from WOW, so the sample making began using wools I hadn’t used before.

2015-04-01 15.55.12

A wine bottle cozy.

back finish

Going back to my roots, I made denim paper, then felted it, and later made a glass case.2015-04-22 15.55.27

2015-07-16 15.25.43


Stepping  out of my comfort zone, I started using neutral colors and some wildly bold combos.

2015-04-14 16.28.52 2015-05-13 15.27

Some wooly fun with my Grandson Luke.

2015-05-31 15.24.41

For a short period, Cathy and had a fish off.

2015-05-21 14.38.37 IMG_1426 2015-06-24 15.13.36

For the 3rd Quarter Challenge I used a color generator, dyed, carded some batts using those colors, then made in Ipad cover.

2015-06-28 15.56.05

My sister invited me to her quilt group for a Trunk Show.

rooster

To keep my earrings organized while I travel I made a jewelry roll.

2015-07-27 14.34.38

I tried getting my work space organized.

20150907_162939

Cathy and I attended the Wisconsin Sheep and Wool Festival.

20150912_132748

Dyeing for special projects.  Some yet to be seen.

20150801_162622

A nuno wall hanging for my daughter in law Lia.PART951442274018055950914151919

A challenge in combining techniques to make an elephant pic for my Sister.

20151014_152350

The 4th Quarter Challenge – monochrome panda with dimension.

20151030_132929

Odds and ends.

20151114_141015_edited-1 20150716_152755

2015-05-21 12.05.29

Making ornaments with my Grandsons.

20151206_132703

I had a lot of help this year and want to thank Cathy Wycliff for posting about making arm warmers, learning to make batts, her artist residency in Breckenridge CO, dyeing with natural plants, and Bengala dyes; Zara Tuulikki Rooke for showing us her process for making batts from raw fleece, shearing sheep, lambing in Sweden,  making a rug from raw fleece and sampling different Swedish wool breeds; Leonor Calaca for giving us a virtual tour of the Knitting and Stitching Show in London; Carol Gascoigne (Craftywoman) for submitting her 3rd Quarter Challenge; Lyn (Rosiepink) for her 3rd Quarter Challenge submission; Mary Stori for her advice on beading; and Jill Chadek for sharing her journey to becoming a felt artist.

Happy New Year!  On to new felting journeys for 2016!


Combining Techniques and Materials

Combining Techniques and Materials

I’ve been planning this picture for a while.  It’s not the first time I’ve combined techniques, but this time I wanted to add more dimension to the picture.

It may seem like an odd choice of subject, but my sister Lorraine has loved elephants all her life and this is a little thank you for the Trunk Show I had at her Quilt Club a few months back.

I started by dyeing some silk and wool, then making batts.  My original intent was to use the silk for texturing on the trunks, but the area was too small and since I wasn’t going to use it over all the elephants I let the idea go.

I built up the trunks, faces and foreground legs with coarser wool underneath, sewed them closed with wool thread and used resists under the ears.  The eyes are garnets.  I don’t know why the pics look brown, the prefelt was shades of gray.

20150918_133453


20150918_142358


20150918_14242320150918_15281820150918_153508

The base was made beforehand with Corriedale.  Before placing the elephants on I used batts for the water, sky, background and tree tops.  The light beige ground is hand dyed silk gauze.  I also used bits of Oussant fiber (from France) sent to me by forum member Aphee.  They are the brown and beige areas in the foreground.

Of course, I had to add a little silk to the water and sky.

The tree trunks are silk/merino mix.

Once the background was all laid out, I added the elephants and needlefelted them down.  This is before  felting and fulling.

20150919_155255

I did get some texture in the elephants, but the picture was a little flatter than I wanted so I added some needlefelting and fiber to the tree trunks and around the legs, hand embroidery on the toes and around the eyes, stitching and free motion stitching in the foreground grasses.  Also the Oussant flattened losing it’s springy texture so I needlefelted more of it to give better dimension.20150926_125059

The treetops in the background were purposely left vague to let the elephants have center stage.  More needlefelting and adding fiber for dimension and texture.

20151007_155604Some detail closeups.

20151007_161007 20151014_152307 20151014_152250 20151014_152243 20151014_152235

20151007_165048

Final hanging on the wall.  I may have fulled it a little too much but I was worried about the thickness of the dimensional parts.

20151014_152350

I sure hope my sister likes it.

Trunk Show

Trunk Show

My sister Lorraine is a quilter and has been involved with the Seams Like Fun Quilt Group for more than ten  years. She recently asked me to do a “trunk show” for the group.

The meetings are held at the Quilt Merchant in Winfield.  When we arrived there was a rectangle of tables.  Rather than rearrange the tables and group, we arranged a round about to let everyone have a chance to look at the pieces I brought as they were passed around.  Peggy Benzin introduced me and so the show and tell started.

I wanted to share a variety of pieces to show the versatility of felt.  First, I explained what felting was and how it’s achieved.

I brought about 35 items, a sample of most everything I’ve done. Many items have been given as gifts so they weren’t available.  The ladies were very gracious and asked a lot of questions.  I tried to give them an overview of each piece and the process and the differences in creating them.  Most of you have seen all of these so this is Marilyn’s felting journey in review for you.

My sister is next to me and is hiding behind the pieces as she showed and passed them. These were last year’s studio challenges.  The quilt group also has challenges.

Monet 2

Monet Pollack Painting with wool.

apopkaroostermoyThree dimensional big and small.

vase wine bottle pod grapes bootiefish - CopyThe ladies really enjoyed the fish.

Nuno felting.

teal gold scarf

Class project at The Fold.

placematChallenges and a variety of embellishments.

handbag

2014-10-31 14.00denim 2 book cover glass case inclusions

ipad

I enjoyed sharing my work and think I enlightened quilters to the wonders of felt.

Thank you Seams Like Fun Quilt Group for giving me the opportunity to share my felting journey! A special thanks to Peggy for taking the photos and sending them to me. And, of course, to my sister for inviting me.

group

Pandagirl’s Year in Review

Pandagirl’s Year in Review

I know I’m late to the party, but I’ve been traveling and have several family affairs looming that need my attention.

I started out in 2014 as a forum member and then in March I was a Global Moderator!  This past year has brought many challenges and delightful learning and wonderful outcomes in terms of felting.

My year started with experiments in dyeing.

2014-01-24 16.29.52

I shared my venture into encaustics.

2014-01-16 11.13.59

Tried my hand at painting with wool.

2014-01-12 12.05.33

Experimented with different wools.

2014-02-07 14.53.01

Participated in the quarterly challenges.

Jackson Pollock - Marilyn

Stewart Stephenson - Marilyn
Stewart Stephenson – Marilyn


Monet 2 after felting
Monet 3rd quarter


2014-10-19 13
Land Art 4th Quarter


Tried framing methods.

burlap 2

I broke down to drum carder envy and began my foray into making batts.  Woo hoo!

2014-11-14 15.15

Cathy and I tried indigo dyeing.

silk and thick n thinMy marketing blogs…

addiction biz cards wool side


I know it’s been awhile, but its more fun felting than marketing…  Sorry.


I taught a felting  class.

Toni
Toni and her placemat


There was a period of obsession with pods and vessels.

After rinsing

I ventured into free motion stitching.

moy layout

Then I experimented with embellishments and making a book cover.

finished front

Designing and making a handbag was a huge accomplishment for me.

hanging

I  experimented with 3D felting – grapes and flowers.

finished 2

2014-10-29 12.29


I learned a lot of new techniques in Fiona Duthie’s class.

2014-06-03 11.07.12

It was a busy year visiting farms, mills and fairs.

susan democarder back


I made scarves including a cobweb scarf.

2014-10-17 13.45

A big project was a 3D free motion stitched bowl, oh my!

2014-10-28 12.12

Felting a rooster, I learned to combine wet and needle felting.

2014-11-10 16.24

Our holiday exchange was an experiment of combining beading and felting.

2014-10-29 11.47.04

All in all, it’s been a very productive and inspiring year felting. Of course, there were many more projects that were completed.  It has been a wonderful year.  I want to thank all of you for teaching, inspiring me and encouraging me to do and try more.  Thank you!  A special thanks to my fellow moderators and Luvswool (Cathy),  Leonor at Felt Buddies and Nada for pitching in and contributing to the blog.  It’s been a terrific, fun journey.  I can’t wait to see what 2015 brings and what I learn and try!


%d bloggers like this: