Browsed by
Tag: fiber

A Few Oddments

A Few Oddments

On looking through my file of possible posts I have found that there are several subjects on the list about which I don’t have a lot to say, so I thought I’d put them all together.

First, my work basket.  You may recall that I told you about the craft basket makeovers that I had done some years ago https://feltingandfiberstudio.com/2023/06/12/craft-basket-makeovers-part-1/  After we moved to Dorset I acquired a marketing basket, can’t remember where from now but at the time it was “in” to be seen wandering around the shops with a basket on your arm.  I didn’t use it for that for long though as I was worried about my purse sitting on top of shopping and being a bit of a temptation.  So I decided that I’d turn the shopping basket into a work basket.  At that time I hadn’t been introduced to felt, I was still spinning, crocheting, tatting, sewing and embroidering so a market basket would be ideal for that.

I used some more of the fabric remnants which I had bought from the same shop in Maidstone where I’d got those which I’d used for the spinning baskets.  I lined the basket, having attached some internal pockets to the lining and made a padded/quilted lid.  That was fixed at one end of the lining and a covered button and loop held it closed at the other end.  I had found a miniature washing basket at a charity shop and I turned that into a pin cushion and I made a small pouch to hold small accessories like cotton reels.  That was fixed to the side of the basket lining with a snap fastener.

The basket got quite a bit of use, as you can probably see from the state of the lining.  One drawback I’ve found to sewing the lining to the basket is that it makes laundering it a bit difficult!

One of the first projects I undertook once I had learned to needle felt was a challenge from a company which used to supply packs of mixed yarns – at least I think it was from them though it might have been a Guild challenge.  It was back in 2002 and as I did not make any notes that I can find, I’m not entirely sure.  I seem to have taken some progress images as I have found lots of these though unfortunately they are not of particularly good quality.

What I do remember is that I had decided that I would make a miniature of a herb knot garden but |’m afraid that my memory of how I found/chose the design is now so hazy that I can’t be precise. I do remember that when I learned to needle felt our teacher gave us pieces of old woollen blanket on which to draw a design that we could fill in with needle felted fibres.  The idea was that we could then wash the work and it would become permanent.  I have amongst the progress pictures images of the design as drawn on a piece of blanket and of the lines becoming “box hedges” and the spaces being filled with “flowers”.  I can also see from the last couple of pictures that I added a “topiary tree” in each corner.

A couple of years later, I acquired a quantity of (I think) Jacob fleece which had been carded all together so that what I had was a sort of grey mixture.  I didn’t really want to spin it as I think I had been duped into buying a bag of really rough fibres.  At about that time I had become interested in stone carvings – gargoyles (water spouts), grotesques, and  heraldic beasts – particularly the Queen’s Beasts which are statues on display at Kew Gardens.  Anyway, I decided that I’d have a go at needle felting some gargoyles using the grotty grey Jacob.  No progress pictures I’m afraid, just finished pieces mounted on fabric covered card or canvas blocks.

Finally  you may remember that Ann M told us about some sheepy key rings that she had made.  https://feltingandfiberstudio.com/2025/06/13/sheep-key-chain/ These looked so good that I’m afraid I stole her idea.  I told you back in December 2024 about the Norwegian Gnomes that I made at our local Museum Shop, for sale there. https://feltingandfiberstudio.com/?s=The+Museum+at+Christmas

Ann’s idea made me think that some miniature gnomes impaled on the metal “spike” could look good as bag charm gnomes to sell in the Museum shop.  I had to change the description from key chains to bag charms because the gnomes were a bit too fragile to sit inside someone’s bag/purse, but should look good dangling on the outside.  Here are photos of the “shaft” on which the gnomes are made, and a few of the gnomes.


FELT SWAPPING

FELT SWAPPING

The International Feltmakers Association has been running an annual Felt Swap – setting a theme and linking members who’ve elected to join the challenge with a “swap partner” from somewhere in the world – since 2020.  I spotted the invitation to join in the 2025 swap on one of the regular emailed Newsletters and decided to have a go.  I started to write this post about the entry and remembered that I’d entered the first Swap and had posted about it.  However, when I trawled back through my posts to find the link for you, I found that I hadn’t actually written the post, let alone published it.  So we’d better start there.

The subject of that challenge was “Light”.  I thought a lot about this as it seemed such a wide subject and I didn’t know where to go with it.

To begin with I listed as many things as I could think of that could have anything at all to do with light and came up with: Light bulbs;   Bright light – dazzling – blurred;   Rainbow;   Prisms and light splitting;   Dark area with light coming in from one side;  Sun beams from behind clouds;   Fire light;   Moon light;   Lighthouse;   Northern Lights.

Clouds and especially stormy skies fascinate me and I thought that I could do something with this idea.  Initially I went for a sun low on the horizon just showing through some dark clouds but with rays going upwards behind the clouds.  For some reason this was not a success so was abandoned.

Then we had a thunderstorm and I had a lightbulb moment!  So I looked through some of Mr Google’s images just to remind myself what forked lightning looked like and then went for a storm over the sea, and used this image for reference.

dark sea, dark stormy clouds with forked lightning running from clouds to sea
Lightning at Sea

I have a collection of fibres, yarns and fabrics in my “stormy” project sack – too big to call a bag – and my first thought was to use some of those in the picture I had in mind.  I had already made a mixed media image of a storm at sea using various textiles and fibres and thought of doing something similar.

Mixed media picture of stormy clouds, rough sea, rocks, spray and wind tossed seagulls
Storm at the Coast

So I looked out some of the fabrics and yarns and other bits and pieces to see what I might use.

But in the end I decided that I wouldn’t use these for a couple of reasons: 1. this was supposed to be a “felt” swap; and 2. using the mixed media would possibly need a larger picture than I was making – we were limited to A5 size – 5.8 x 8.3 inches (sorry I don’t work in “the foreign” if I can help it).  I did use my stormy fibres though.

I was reasonably happy with the picture after it had dried, but decided to do a bit of tidying up and embellishing with some needle felting.

This is the final result

completed felt picture of storm at sea with dark clouds and forked lightning running down into the sea
The swap picture of LIGHTning


My swap partner, from Denmark,  sent me a felt bag, which was really good.  I didn’t want it to get dirty or damaged before I was able to use it and show it off so I wrapped it up and put it in a safe place.  So safe that …..!

Anyway, back to this year’s swap.  The theme for this one is “Inspired by an Artist”.

Again this was a very wide subject, first choose your favourite artist then find a piece of their work that sparks an idea.  I don’t actually have a “favourite” artist, I love the work of many: Constable; Canaletto; Turner; Rowland Hilder; William Morris and most of the Arts and Crafts artists and architects; Rennie Mackintosh….  I could fill up the page with names.  I trawled through works by most of these, bearing in mind the maximum size of the piece I was to make (8″ x 8″) the while.  In the end I decided that I would go with Charles Rennie Mackintosh.

I searched google and found several stained glass windows, one wall carving and a draft fabric design that I liked.

In the end though, I decided to go with a section of the last one, which I squared up and manipulated to make it the right shape and size.  The window is typical of the Art Nouveau period and “attributed to Mackintosh”.  I could not find out if it is actually his design but it is certainly very like his work.

I picked the centre of the window to work on and the enlarged and reshaped (slightly) design was printed off in greyscale and laminated.  I would be able to use the laminated design as a base on which to lay out the fibres.

a monochrome image of the window section covered in polythene sheet and the original image in colour
All ready to lay out the fibres

While I was looking through my stash for suitable fibres and pre-felts for the project I  happened to glance at the design which was inverted.  I immediately saw a face with an extremely runny nose!

the monochrome image rotated 15 80 degrees
This was when I spotted the runny nose!

Nevertheless I thought it would be fun to use the design of the face, since we were to produce something “inspired by” a favourite artist, rather than copy what s/he had produced.  This would allow me to get rid of the runny nose and I also wanted to change the colour scheme.

I had decided to use a piece of pre-felt which I had bought from Wingham Woolwork some years ago, especially as it was slightly moth eaten and I could use what I might otherwise have to throw away.  This was a lovely strong purple colour so I decided that my colour palette should be purple, turquoise and orange.

various fibres, yarns in purple, orange and turquoise, and an orange chiffon scarf
Picking colours and materials

The basic design was laid out in reverse, that is with turquoise knitting/felting yarn “face down” on  the design, with some fillings-in of orange fibres on top and two squares of turquoise where the “eyes” would be.  The purple pre-felt backing was placed on top of that and the whole wet felted.  Unfortunately this resulted in the straight lines becoming distinctly wavy – a good job this wasn’t a straight copy of the original!

After the piece was rinsed, dried and ironed, the remainder of the design was added by needle felting (which, together with the shrinkage during wet felting, had effectively removed the moth holes) and finally some simple embroidery stitches.

The piece has been mounted on foam board for stability.

finished face - orange eyebrows, nose and eyes with turquoise moustache, and facial features on a purple background
Finally – the Swap piece

This is the piece I received from my Canadian (Calgary) swap mate.  It is inspired by “Violet Poppies” by Emile Nolde https://arthur.io/art/emil-nolde/violet-poppy

Isn’t it gorgeous?

3 felted poppies with dark leaves on a yellow felted background, displayed in a circular embroidery frame
Swap piece received from Canada
Experimenting with household/garden stuff …… and fibre!

Experimenting with household/garden stuff …… and fibre!

I think I might have had too much time on my hands a while ago. As we say here ‘What’s seldom is wonderful!’ So I got a little curious about some things. Fibre of course had to be involved.

We don’t drink coffee in our house – my husband was never a fan and I found myself to be allergic to it after going cold turkey in China back in the 80s. I do love the coffee aroma and I can be sometimes found near one of our oldest coffee houses in Dublin, Bewleys, just sniffing the air.  At this point, I really have to post a link to their rather famous cafe in the heart of Dublin.  It’s a haunt of mine, even though I can’t drink it.  It is worth calling in to if you are on vacation (the food is amazing).  There can be queues so it is worth going early.  Besides the food, the original works of art are breath taking.  https://bewleysgraftonstreet.com/

What has this got to do with my post – absolutely nothing – but I just had to share so you have a special spot to add to your itinerary when you visit Dublin, Ireland.

But, I digress. We drink a lot of tea in the house and while I like lots of different flavours, I tend to consume mostly an Irish brand, Barrys. It, along with an Irish brand of crisps (potato chips) called Tayto are two products most requested when visiting ex-pats. We use tea bags rather than leaf tea and we compost the remainder as the bags are now biodegradable.

My first thought during this time of being busy doing nothing was, would the tea bags (without the tea) felt into merino fibre. Before I could experiment I had to empty the tea bags and wash and dry them. I have to admit this was not a favourite job. The smell of the used bags assaulted my nostrils, so I worked quickly (every cloud, silver lining and all that!). Once dry I divided the bags into two groups and I made marks on one group with what I thought was alcohol based walnut ink and let it dry. Then I went to work laying down the ‘marked’ tea bags and adding 10g of merino fibre on top (4 layers) I finished off with the unmarked tea bags, layering them so that I could see how thick it could make them before the fibre would stop permeating them.

It was a successful experiment. The bags fully felted into the fibre and the sample shrank by 45%. The marks, however disappeared, so I will add them again. It turns out the ink was acrylic – note to self: next time, read the label before buying!   

I do like the textural finish on this piece and it is good to see that something as mundane and ordinary as a used tea bag can yield a successful result.  Here’s a very quick peak at the bags and outcome:

Marking on teabags with ink

Felted sample plain tea bag up

Felted sample mark side up – lots of the marks washed out

Recently, I’ve been doing a bit of reading up on the science behind making felt. What we usually do is add soap to water, in my own case, I use olive oil soap which has a pH of 8. The paper I read maintained that wool fibre would felt once the pH value was moved from neutral. This meant that I should be able to felt a sample by adding an acid solution to the fibre. I was keen to try it to see what would happen.

First of all, I rinsed off all my equipment, my water bowl, ball brause, bubble wrap and fulling cloth to make sure there was no soapy residue around. Then I laid out my sample (4 layers). I checked the pH of the water, which was neutral. I then added a quarter cup of vinegar to my water and checked the pH value which was now 4. The water was tepid. I wet out the sample. The first thing I noticed was that the water did not soak into the fibre as it usually does when soap is added and it took a lot more water and pushing on the fibres to encourage them to soak up the water. When I turned the sample over, there were still dry patches so even more water was needed! That (plus the smell) were the only differences I noticed. It felted easily and shrank down 47%. When it came to fulling the sample, I heated up the water/vinegar solution in the microwave. One advantage of using the acid solution is that the ‘water’ could be used for the next project. That said, I reckon it could be very hard on the hands if this was my main way of making felt. So I am going to decant it into a spray bottle and use it to clean windows, no waste!

We have a beautiful Norweigan Spruce tree growing in our front garden.  I like to refer to it as the gift that keeps on giving because it constantly suprises us.  For example, last year, while I was mindlessly staring into the garden, it launched a pollen bomb.  For those of us (this included myself up to this  point) unfamiliar with the term, the tree released it pollen all in one go.  So the whole tree was suddenly surrounded by a yellow haze.  In an instant, the haze lifted into the sky and was carried off in the wind.  It was truly spectacular.  I have lots of allergies and pollen would be one of my nemesis but I would put up with the discomfort to see this again.  Here’s a short Youtube video on the topic.  Our tree did it on its own while this one was shook but you will get the picture https://www.youtube.com/watch?v=rh2Da8Ms45M

Anyway, back to my story.  I found I had lots of fallen pine cones at the base of the tree so I gathered only some of them and put them on to boil in my dyepot.  The house was filled with a gorgeous pine scent during this process. Once I had extracted the dye from the cones, I filtered the mix through some muslin to remove the resin. The colour was absolutely stunning – a jewel red. I used it for four experiments; first of all, I extracted a litre of the liquid to make a pigment, then I used the remainder of the dyebath to dye some fibres (unfortunately I do not have a photo of the results and they are now added to my mountain of experiments (unlabelled – what was I thinking!). Experiment number three involved adding some of the leftover dye bath to citric acid to make a pigment. In the last experiment I left the liquid alone and just added the alum and soda crystals to separate the dye from the liquid base. Once separated, I filtered the liquid out of the pigment, then dried and ground all the results. So, I ended up with three different pigments and some dyed fibre experiments. I have inclluded a photo of the pigment made last summer and the result of the latest experiment in winter. There is quite a difference in the colour as you will see from the slide slow:

There’s a back story to the last project. We have a number of fruit trees in our garden. Unfortunately we lost one of our plum trees last year. This was despite our eldest son’s (naturally green fingered which he inherited from paternal grandmother having skipped a generation) efforts to save it. Finally, there was no other option but to fell it. He also decided to remove the roots which was a big job as the tree had been there a number of years. It became the focus for my last household and garden project. I wanted to find out if the dye from plum tree bark differs from the dye from plum tree root. To find out, I decided to peel some of the bark off one of the branches. I did the same with the outer cover of the root. I soaked these in different containers for up to a week. Now, here’s what I found interesting. Whereas I needed to heat the pine cone liquid to extract the dye in my previous project, this was not needed for the bark/root projects; the dye naturally extracted sitting in its vessel and the high tannin level meant that all I needed to do was soak my fibres and fabric. It was like magic! I wanted to use the dye in some small vessels I made for the 10g challenge I spoke about in my last post. Then, I took what remained in the dye pot and made pigment from it. I found it interesting that the result from the plum bark dye yielded a lighter colour dye but a richer pigment – the root was the opposite. The fabric/fibre experiment produced is a lovely rich golden hue on the different surfaces. Also, it turned out to be another gift that kept on giving as each time I used up all the dye, I added more water to the two mixes and it kept extracting dye – I could not even notice if the dye was weaker in the second round than it was in the first. In the end I composted the bark and roots as I needed to move on with life (I got busy again!)

Here’s a quick run through in photos:

Do you use household or garden items in your textile practice? Have they ever surprised you? I would love to hear about your experiences.

Helene x

Connections

Connections

I know that some of our readers are members of the International Feltmakers Association and therefore know all about our upcoming exhibition “Connections”. For those of you who don’t, the Feltmakers organisation uses their AGM at the end of March as the launch for a themed annual online exhibition to showcase our members work. The wonderful thing about these events is that they are not juried, there is no right or wrong so no one is judged, it’s open to any ability and how you interpret each theme is entirely up to you. All of the online exhibitions can be viewed by anyone, not just members, simply visit Feltmakers.com and click on Our Feltmakers from the menu and then choose Online Exhibitions. Last year’s theme was Hats Off! Hats and fascinators are simply sculptures for the head so we could let our imaginations run riot and you can see the wide variety of headwear created for that event here.

For me this year’s brief took more thought as there are so many different ways it could be approached…..”you can find connections in the way you interact with other feltmakers, in the way you are inspired by nature, other mediums or other artists. You can also explore the literal: how can I connect one part of the felt to another?”

I finally whittled my thoughts down to two ideas. The first would take the form of another head piece, because I’m developing a bit of a thing for fascinators, and the second would be a 3D vessel.

I am a huge fan of the Dutch Feltmaker and Milliner Saar Snoek. Saar has a different approach to many other feltmakers I know and her imagination and creativity when it comes to felted headwear is phenomenal!

How I approached my Fascinator might sound like a cop out to some of you but remember the theme of the exhibition is Connections🤩 So rather than start from scratch I decided to “connect” three existing pieces of my own to create a Fascinator, these are pieces that were never intended to be worn on the head. One of these was originally designed as necklace which I’ve worn on several occasions along with the second piece which was a matching bracelet. They were both Nuno felted, stitched, embellished with beads and backed with fabric.

Next I looked around for something suitable to top off my head piece. I’d been working with organza earlier that day so auditioned a piece of that but decided against it. It needed something with much more impact!

I’d previously made a blue version of the Splash, inspired by the wonderful Australian feltmaker Pam de Groot, and thought I’d try that out for size. Although it was far too floppy at this stage I could envisage it working as the third piece of the Fascinator. I used acrylic paint to colour it to complement the other two pieces and to give it enough rigidity to keep its shape.

Next I removed the necklace chain and invisibly stitched everything together.The final stage was to attach it to a gold metal headband repurposed from another project and then talk a friend into modelling it for me. Fortunately Maria was all for it and I think she really suits it too!

For my second piece I started by sketching a variety of shapes including cords, spikes and balls which could be used to join individual pieces of flat felt in a decorative way. While I was considering how this would look my design changed several times and ended up becoming a four sided hinged structure. At this point I realised it would be a good project for Waltham Windmills next challenge which is Structures. So having only made four connectors I decided to park that design for now and moved on to plan B.

The first four connectors are now being saved for another project

Plan B was based on a very rough sketch but became more of a “let’s make a start and see where it goes” sort of plan to avoid any more procrastination!!

I started with an egg shaped resist, covered it in green and grey Merino fibre and worked it to prefelt. Various thicknesses of hand made prefelt and fully felted offcuts were then arranged on one side and covered with a thin layer of white Corriedale fibre. At that point I decided to add the grey concertina protrusion before attaching the ropes, balls, cords and several other pieces of prefelt on the top side. In all I connected at least 60 separate pieces of felt as well as small pebbles, acrylic wallpaper and dried seaweed. It’s very tactile and I’ve left it hollow so it can be pushed and pulled and reshaped allowing the viewer to also connect with it.

I hope you’ll take the time to visit the Feltmakers website after the 29th March and see the exhibition for yourself.

Adventures in colour (Part 1).

Adventures in colour (Part 1).

Ions ago, I purchased all the bits and pieces that I needed for acid dyeing.  I never lost my enthusiasm for it (in principle!).  I listened to my textile friends waxing lyrical about dyeing. If I am to be perfectly honest here, I lacked both the knowledge and the confidence to try it.  So when I came across a dyeing course which was being run over the four Tuesdays in November, well, I didn’t have to think twice, I immediately booked it.  The workshops were run by an Irish Textile Artist and all round nice person, Sharon Wells (https://www.sharonwellsart.com/).  Sharon provided all the equipment and fibres but mentioned that we were free to bring along any fibres we wished to experiment with over the course of the workshop and of course our limitless curiosity!

Week 1:

During week 1 we worked with Jacquard Acid Dyes.  Once Sharon explained the basics of what would and would not work with these dyes, she set us to work, initially teaching us how to secure hanks for the dye pot.  We were each given our own pot to work with.  Then we got down to the fun work of choosing dyes, testing fibres and dyeing.

Our first experiment was with solid colour.  We each threw a variety of fibres into our respective pots and got to work.  It was great fun watching as the colours developed.  I had chosen orange for my first test and it was just so exciting watching the different hues develop.  I have prepared short slideshows of the results of each of the experiments over the four weeks.  Details of the fibres are included in the captions.

Next, to some of my fellow participants horror, we saw Sharon cut into an old shrunk felted jumper.  We were each given squares and shown how to randomly sprinkle the dye powder onto the surface.  This time we used a minimum of 3 colours on the sample.  Once prepared it was popped into the dye pot and other fibres were thrown in not to waste the dye that came off the sample.  Here are my results.

By this stage we were all getting really excited.  This was like alchemy or as one of us said, witchcraft (which is possibly a more accurate description as we all gathered round one of the cauldrons (yes there was one, the rest were pots))  and saw the reactions of the different coloured dyes we were adding to the pot full of fibres.  We were learning (among other things) how to control where the differed colour dye permeated the fibres and how the colours mixed throughout the process.  Here’s what I produced.

Week 2:


It is amazing how disciplines have their own languages. Mordants; fugitive colours; substantive dyes – Sharon quickly demystified all the terminology – a real confidence boost – then she produced a vat of fibres which she had been seeping in the mordant for some days.  She also gave us a variety of pots which we could work from.  Then came the fun ‘show and tell’.  Sharon had been growing and collecting various flowers and plants over the summer months.  She dried these especially for the session so we each got one to work with.  We had dried containers of marigolds, rose petals, sunflower petals, sunflower heads, and ground up nettle.  I got the nettle to try.  One of the participants opted for fresh eucalyptus.  We set pulling the dye out of the plants, straining it and then to dyeing our fibres.  Here’s our progress and the results:


  • nettle powder some of which has lost its colour from the sun, the remainder is a moss green
  • The beautiful and patient dog Loki with his ball
  • The marigold petals produced a delicate creamy result which differed in shade depending on the fibre used
  • The fresh eucalyptus produced a delicate green/yellow result which differed in shade depending on the fibre used


Then as a further experiment we took dye from a couple of the dye baths and added different components to see how the dye reacted.  We used tin, chrome copper and vinegar.  The results were surprising.

Top is the rose dye
middle L/R vinegar, tin, chrome, copper
Bottom is the Sunflower petals


I was disappointed with the colour of the nettles which were a murky colour.  Also the powder from the nettles made the fibre really grainy and unattractive.  I thought I would see if I could use fresh nettles from the garden.  Sharon had offered me some mordant to bring home for this experiment and like an idiot I forgot it.  So, based on an earlier comment she had made during the class I decided to try using aluminium foil as a mordant.  I steeped the fibre overnight and made up the dye which I strained.  Then I dyed the fibre.  The result is a beautiful soft green which I am very pleased with.  I am not sure that the mordant took as only time will tell if the fibre loses its colour but it did not happen when I rinsed it.  The grains from the original nettle powder were still scattered throughout the wool fibre so I took my carders to the Kerry sheep fibre.  Although I have yet to be convinced that natural dye is an avenue I want to pursue further I really enjoyed the day and the learning.

  • a sample of the fresh nettle dye looks green brown, like weak tea

I have so much to share from these four weeks that I will save weeks 3 and 4 for my next blog post. A million thanks to Sharon for facilitating such an interesting set of Tuesdays last November.

Bags of Inspiration

Bags of Inspiration

Having just read Kiki’s tutorial  https://feltingandfiberstudio.com/2023/11/19/left-overs-yessss/ on using up prefelt scraps, it occurs to me that I may not have mentioned something we used to do at our Guild (Dorset Guild of Weavers Spinners & Dyers) mainly to raise funds for the Guild but also for fun.

When I attended the Stitch and Creative Crafts Show at the Bath and West Showground in Shepton Mallet (Somerset, UK) back in 2010  – I saw a stand selling (for £8.00 each) bags containing 35gr of silk fibres, yarns, fabrics scraps, carrier rods and cocoons in various colours, left over from old projects which, when put together, made a fascinating collection for future projects.  So fascinating that I bought three of them.

They must have made quite a bit of profit on them because they appeared mainly to be the “waste” from artwork.

At that time (when I was part of the sub-committee organising the Guild’s Exhibition and Sale of Work) we were looking for a Guild Project which could be part of the exhibition or something hopefully to help raise some funds.  Well, I thought, our weavers must have lots of off-cuts of hand woven fabric, not to mention warp ends.  Then there were the spinners who would have odd bits of spun and unspun fibres of all types and colours.  We also had members who were dressmakers, beaders and embroiderers, and a soft furnisher, who were bound to have the odd bits and pieces that they didn’t really need.  So, with the blessing of the committee,  I put it to the members in the next newsletter that if they would donate to the Guild any odd bits of fibres, yarns, threads, warp ends, bits of fabric, beads, button, feathers, felt, cords, braids, tassels, sequins, sequin waste, ribbons, silk flowers and any other bits and pieces they could think of, we could make up some “Bags of Inspiration” and sell them to members of the public at our open days and outside demonstrations.  (I don’t know about in the rest of the world, but in the UK the word “bags” means “lots of” as well as “containers”, so the punning name “Bags of Inspiration” seemed apt.)

We used A4 sized polythene bags (which I was able to buy quite cheaply from our local green grocer) with an A4 sheet of card inside for stiffening, and I made up some stickers with the Guild’s logo on and a brief description of the contents, and posters also giving details of the contents.

Image of a poster detailing contents of a Bag of Inspiration
Bag of Inspiration Poster

We arranged a few bag making days at a pub in the village where our then President lived.  She had persuaded them to let us use their skittle alley at no charge, and we had a great deal of fun making up the bags and tucking in to “refreshments” from the bar and kitchen.

The members who came to these, brought with them all sorts of goodies which we spread out on tables, so that we could make collections of pieces which seemed to go with each other.  Those who didn’t think that their colour theory was good enough, could pick out a picture from a selection of magazines and have a go at matching colours from this  It was amazing how compulsive making the bags became.  You could pick up a piece of fabric that looked so dull and dreary and be amazed how it perked up and positively shone with life when paired with different fabrics, yarns, trimmings etc.  You just couldn’t stop picking up likely bits.  The difficulty was keeping the weight of each bag between 80gr and 100gr, so we quite often ended up making up at least 2 bags with similar contents.

image of tools and accessories for making up Bags
Equipment & Extra “Bits” for making up Bags

Prospective contents of a Bag of Inspiration - fabrics, yarns, fibres etc.
Prospective contents of at least one Bag of Inspiration

We put a price of £3.50 on each bag and they went like hot cakes – we sold out on their first appearance at our exhibition and sale of work.  Embroiderers and mixed media artists in particular liked them.

After a couple of years, we didn’t get so many volunteers to make up bags but we still had mountains of “stuff”.  So we added another string for our open days – Pick and Mix Your Own.  I had remembered that Woolworths (now there’s a blast from the past) used to have a counter full of different sweets and you could take a bowl and pick and mix what you wanted, and in the process buying a lot more than you would have if just buying a ready filled bag.

Boxes of different sweets to be picked and mixed
Pick and Mix Sweets.

It worked with our stuff too.  We gave the visitors the polythene bags and they could wade through all the bits and pieces picking what they needed, and we weighed them when they’d finished, charging £3.50 for 100gr.

We had had a lot of fibres donated so we started making up what are now called Art Batts and selling them as “Batts of Inspirations”, but because we were mainly selling these to Guild spinners and felt makers, they didn’t do quite so well as they were mainly able to make their own.

In all we made around £1000.00 for the Guild in the four years we were doing this.  Eventually though the members got fed up with spending time on making up the bags and the whole thing was shelved, as the Guild seemed to be relatively well off at the time.

Some time after that I took the idea back to myself and I was making up Batts to sell at Guild meetings, using luxury fibres as well as merino and synthetic fibres.  I made up some bands to fix around the Batts detailing the various fibres included in each.

This slideshow requires JavaScript.

I was also making up and selling Bags, mainly at a Needlework Festival in Dorset where most of the vendors were selling materials and equipment for crafters, as well as various craft fairs and so on.

This slideshow requires JavaScript.

I was getting the odd question like “they’re lovely but what do you do with them?” and  “can you make a bag out of what’s in here?”  So I made a sign from images of items that I’d made myself over the years and that helped.

Image of items made with contents of Bags of Inspiration
Some of the things I’ve made with the contents of BoI over the years

However, once Covid started causing problems, my selling opportunities dried up.  I had been intending to try selling Bags and Batts via my website, but it was very difficult and too time consuming to photograph the Bags so that the contents were visible, because of reflections on the polythene bags.  So that sort of died a death too and I’ve now shelved that project, and am using the bits and pieces I’ve collected over the years on theatrical costumes and props.

Perhaps some of our readers’ organisations, like Ann & Jan’s OVWSG, might use this idea to raise funds?

September Adventures

September Adventures

September has been a busy and exciting month in contemporary textile art (specifically felting art) in Ireland so I thought I would feature what I got up to, I will call it my September Adventures.

Weather wise, the month started as we hoped it would continue (it didn’t by the way) with a return to fine warm weather – something we had not seen since last June.  So I took the opportunity to visit our National Botanical Gardens (https://www.botanicgardens.ie/) which are situated on Dublin’s north side.  The gardens (there’s free entry, if you ever visit Dublin, Ireland) opened in 1800 and are an oasis of calm with restored glass houses, magnificent specimens, bee hives and, of course, a tea room.  There’s also a pedestrian access to the historical cemetery next door which I suspect is not seen too often.    Glasnevin Cemetery also houses a genealogical archive for anyone wishing to trace their Irish ancestors (https://www.dctrust.ie/genealogy/home.html).

But, I digress.  Let’s go back to the gardens.  My visit coincided with their annual exhibition ‘Sculpture in Context’.  The exhibits feature artworks in various media including ceramics, wood, metal.  I decided to focus purely on the textile element of the exhibition and to photograph any pieces I came across as I wandered around.  I was aware that some of the members of Feltmakers Ireland had pieces accepted for the exhibition; Clare Merry (http://www.merryland.ie/index.htm) an exceptional artist who quietly creates her pieces was featured.  If you would like to see some of Clare’s work please check out her website, which, she tells me, is not really up to date, or Google her and feast over the images; Fiona Leech (https://www.instagram.com/feltathome/?hl=en) had three beautiful pots which were originally housed in the cactus house.   Annoyingly two of the three pots were stolen within a matter of hours of their arrival and the remaining one was moved to a safer spot in the garden’s gallery.  I thought I would show you the three pots as they were originally grouped together.

Fiona Leech’s three pots (source: Fiona’s Instagram page)

I searched but could not find Leiko Uchiyama’s beautiful work but here is a link to her website if you would like to check her out: https://www.leikofelt.com/my-felt-work/  I found two other exhibits from members of the guild.  Their featured work while not through the medium of felt were equally stunning.  Congratulations Mel Bradley (https://melbradleysilks.ie/)  and Mette Sophie Roche (https://metteroche.com/)

I put together a slideshow of my textile finds in the gardens which I hope you enjoy.

We had our first meeting after summer in Feltmakers Ireland and as usual the committee put an incredible amount of preparatory work into making it successful.  It was a busy morning as everyone beavered away felting flowers to create a tapestry as part of the 20th anniversary celebration for the guild.  Much to everyone’s delight, the guild’s founder Elizabeth Bonnar joined us. I thought I would feature Elizabeth here as without her it is doubtful that there would be such a vibrant community of feltmakers today.   Here she is with her granddaughter and with the committee.

Feltmakers Ireland founder Elizabeth Bonnar and her granddaughter
Feltmakers Ireland committee with founder Elizabeth Bonnar (3rd from left)

Here are some photos taken on the day.

The finished tapestry was revealed at Feltmakers Ireland ‘Bountiful’ juried exhibition which opened on 30th September.

Feltmakers Ireland members: The Floral Tapestry to celebrate 20 years.

The exhibition also saw the launch of the new book “Exploring Irish Wool for Feltmaking”  The book is the product of a collaboration between many members of Feltmakers Ireland guild, sheep farmers, shepherds, shearers and suppliers and not forgetting the various washers and carders who took the raw fleeces, converting them into usable fibres for testing.  I think this approach was quite unique and it will certainly be a worthwhile and useable addition to any textile maker’s reference library.  Understandably it was a huge project so congratulations are due to all, especially Annika (Berglund), Breda (Fay) and Sinead (Doyle) who collated all of the findings into an invaluable resource on Irish wool.  It’s so full of well written practical advice and it was made extra special by the presence of one of our Government Ministers, Pippa Hackett an ardent supporter of the project, who officially launched the book and the exhibition . Here is a quick look at the contents page to give you an idea of the scope of the book:

Exploring Irish Wool Contents page

An added bonus is that feltmakers/wool artists can now make direct contact with numerous artisanal suppliers so there is no excuse for any of us not buying closer to source and of course for anyone overseas who wishes to use Irish wool fibre in their work purchasing from source.

It is available to purchase from the following link and I understand will also be available in eBook format shortly:  https://feltmakersireland.com/exploring-irish-wool-for-feltmaking/

I hope you have enjoyed my September adventures.   It has been an exciting month.  Once again I would like to thank Feltmakers Ireland and their hard working committee who work tirelessly to maintain this vibrant community – it makes such a difference that, as textile artists, we can gather together and create regularly. I take my hat off to Elizabeth Bonnar and her decision to found Feltmakers Ireland twenty years ago; the catalyst for lifelong friendships, masterclasses, collaborations, exhibitions, networks and travel.

To complete September’s birthday celebrations, I thought I would produce a slideshow of the Bountiful exhibition which is running for the month of October in Phoenix Park, Dublin Ireland.  I took photos on the day so I apologise where the light may be shining on the artwork.  There are over 30 pieces of art and it will give you an indication of where Ireland’s vibrant felting community is at in its journey.  I hope you enjoy it!

Making Waves Update

Making Waves Update

In my last post I mentioned a few of the projects I was working on with the “Making Waves” theme, along with other members of the Waltham Windmill Textile Group. I’d begun work on a 50cm x 90cm felted wallhanging inspired by the markings on large stone slabs on the beach at Seahouses in Northumberland.

Having recently bought myself a drum carder I carded a variety of left over bits of fibre, mainly blues, greens, yellows and neutrals, to make my background and laid them out with off cuts of hand dyed silk fabric, scrim and large nepps. On the left is how it looked after felting and on the right is where it’s at right now. I’ve added synthetic sheers, machine wrapped cords, hand and free motion stitch and in some areas I’ve heavily machine stitched to push them back and encourage the adjacent areas to stand out. The original bottom left section wasn’t working with those silk circles so they were pulled off and replaced with some stiffened, rust dyed fabric circles, recycled from another piece of work. I’m calling it Going With The Flow because a) it’s inspired by a trip to the beach b) it has flowing lines and c) like most of my work its design wasn’t preplanned. It’s evolving as I work on it, adding bits in and taking bits off until it feels right. It’s got a way to go yet before I can call it done.

One of the other challenges within the Making Waves theme is to make a 3D fish and my immediate thought was to create what many would regard as an ugly fish but which I prefer to think of as a fish with shedloads of character……..one that would get noticed amongst a group of pretty fish!

Having typed  “ugly fish” into Google I lost many hours over the next few weeks looking at images and some incredible videos of life deep in the depths of the oceans. Each new search revealed yet another fascinating species of fish, some quite honestly didn’t look real while some, like the Tasseled Scorpionfish were strangely beautiful. One of the weirdest I discovered has to be the Red Lipped Batfish. If ever there was proof we descended from the oceans this red lipped, whiskered fish that “walks” on its specially adapted fins has to be it! 

Last month the Waltham group had a day making felted fish, some are finished, others are still work in progress.

Lucy made a wonderful wet felted Puffer Fish adding recycled plastics, including pipette tips, wine bottle netting and glass beads with recycling symbols underneath, to highlight the plight of our oceans.

Sue is very new to wet felting but she’s taken to it like a fish to water (couldn’t resist!) and has made “Angry Fish”. I think he looks more sulky than angry but he’s terrific!

Barbara’s felted fish is still work in progress but looking great, as is her sketch book and fabric fish purse!

Originally I had intended to wet felt my ugly fish but, after all those hours of studying them and getting excited about what I was going to make, for some reason when I took out my carded Corriedale fibres I found myself felting a cartoon version of an Angelfish…….I didn’t see that coming! Her name is TroutPout and she’s approximately 33cm x 36cm excluding her fins.

I’ve been enjoying teaching 3D Seed Pod workshops recently using wire wrapped with Tyvek fabric so decided to make my Anglerfish from wire rather than fibre. It was only when I’d got the 60cm x 33cm framework made that I sat back and realised I’d gone past the stage where I had meant to start adding my fabric! Time for plan B…..maybe I could use wire mesh to give it “body”?

I looked for some online but hesitated as I wasn’t sure how flexible or suitable the mesh would be. Having put the fish to one side, a few days later I joined the Lincolnshire Textile group and at my first meeting I was offered a piece of silver coloured Sinamay. Sinamay is one of the most popular hat-making foundations. It’s woven from the processed stalks of the abaca tree, a type of banana native to the Philippines. I couldn’t believe my luck……..being silver coloured this off cut looked like wire mesh but wasn’t and if I sprayed it lightly with water I could easily shape it to fit and stitch it with aluminium wire to my framework. So this is how far I’ve got. I’m going to add a few more wire spirals and do something more interesting with the eyes. He should have menacing teeth but I might not go that far!

Another feature of next years Making Waves exhibition will be an Octopus’s Garden so once the fish are done it’s straight on to making lots of coral and a few Octopus. I’m loving this theme and could quite happily continue with it way beyond our event next year…….it has to be the most interesting and enjoyable we’ve had so far!

Making Waves

Making Waves

At the Waltham Textile group we have a biennial exhibition with a main theme, supported by any other smaller works we’ve produced during the two year lead up. Our current theme was launched in August and I was really happy to get a thumbs up when I suggested we have a nautical/coastal vibe…..if you know how much I love to create rockpool themed work you will know why I chose it! Within this theme we each get a metre width of wall space for a large hanging or several smaller ones and we’ve agreed a few specific group projects such as we all make a 3D fish, a 3D jelly fish, a decorated box and contribute to creating an Octopuses Garden.

Coming up with a title is always going to be tricky when it’s done by committee and, believe me, we debated many of them! Eventually we settled on “Making Waves” as its catchy, links to the ocean/shoreline but of course it can also be interpreted as rocking the boat or doing something subversive. Strange but no one in the group has mentioned this meaning so far, surely I can’t be the only one who’s planning on being subversive with (at least one of) the group challenges?

The general consensus is that the fish be attractive but my immediate thought was “angler fish“ due to its dramatic and sinister appearance. However a bit of Google research has opened up a whole new world of ugly fish, these are just a few that grabbed my interest. The red lipped batfish is probably the weirdest one of them all, I can’t help thinking it looks like someone’s added a face and four legs to a mushroom! That really is a face that only a mother could love! Collecting images of ugly fish is a whole new rabbit hole opening up so best to get back on track…..

It’s been a busy time recently with shows and workshops, plus playing catch up after being knocked off my feet for a couple of weeks with Covid. This has meant I haven’t made much progress but I have at least started one exhibition piece. If you visit the Felting and Fibre Community Photo page you may already have seen this as it’s made entirely from materials I had to hand and therefore fulfils the criteria set for the last challenge.

Making Waves vessel.

My aim was to create a wet felted vessel with a blue/green colour theme, an undulating surface and lots of texture. A student had recently commented on one of my necklaces saying it reminded her of rocks and coral and this passing remark inspired me to use the same technique and materials for my “Making Waves” vessel.

Detail of the felted necklace that inspired the vessel.

Using differential shrinkage is a great way to manipulate the surface of your felt. Thin areas have the potential to shrink much more than thick areas thereby creating hills and valleys in your work. These can be symmetrical, as in the yellow/grey bowl, or asymmetrical which was my aim for the necklace and this vessel.

The grey and mink fibre used is mostly World of Wool 23 micron Merino although, because I was using up left over short lengths from previous projects (remember the F&F challenge), I think there’s oddments of superfine in there too. The thicker areas are prefelt covered with hand dyed silk fabrics, printed viscose paper towels, sari yarn and wool yarns to create a variety of textures and after felting it measured 36cm x 17cm.

The eagle eyed might spot two pieces of lace which are on the layout but not the finished vessel, these didn’t look right so were pulled of. I’m now looking forward to some spare time next month to complete it with more hand embroidery, beading and shells.

Hair shopping at Twist Fiber festival with Mr. Mer

Hair shopping at Twist Fiber festival with Mr. Mer

Finally, the big day was here! It is time to take Mr. Mer shopping for Hair! I had persuaded him to wait to broaden his choices by looking at the Fiber Festival Twist in Saint-André-Avellin, Quebec. That would be a bit over an hour’s dive east of home. I had a few bags to put purchases in (optimism!), the camera, something to drink, Mr. Mer in his project bag and a good audiobook to start the trip off (today’s driving was accompanied by “A Lady’s Guide to Fortune hunting” by Sophie Irwin).

1) Mr. Mer is napping in his project bag before the big drive. I promise I will get him a bigger project bag!

Ah, summer, the other season of road maintenance in Canada. Oh well, at least the scenery is lovely, driving through the rock cuttings along highway 50. To see all the geology from the comfort of your car, (ok there were a few potholes and truck ruts to distract from the view). You get glimpses of the Ottawa River as it heads south then into the hills and more rock trees and farmland. Turn at the town that makes me think of pineapples (it’s a French word that has nothing to do with pineapples) and go north over a stream, past the cows and eventually into the town of Saint-André-Avellin. A couple more turns and you are at the arena complex wondering where they put the handicapped parking (no I do not actually have the special parking for my e-“specially” great spelling ability). I stopped to ask a man in a sheep hat with horns, I bet he will know! Oh, it’s right here? And don’t run over the line of people waiting to get in. What a close parking spot to the line, amazing! I got out, organized and was already in line, we were ready to go.

2) in line at Twist, handicapped parking is adjacent to the line, now that is close parking!

There are a few changes since the last Twist festival (2 years ago), there has been construction on the building and a covid clinic has taken over what used to be the classrooms. There were, as in previous years, tents outside for Emerging Artists and the Food court.

3) the first outside tent

Inside there are two halls, the arena and the gym and locker room spaces which they are using for classrooms this year. My plan of attack was to cruise through the larger hall first, looking for long locks (the Olive sparrow and a couple more booths might have some) but taking a quick photo of the Black Lamb’s mill ends on the way by. Continuing on to the small hall where the booth for Fibercraft might also have long locks. We were in agreement and had a plan of attack!!
With Mr. Mer leaning over the back support of my walker, the line started to move and we were off! We breezed through the emerging artist’s tent (I will look more carefully later) and took a fast sweep through the main hall looking for the elusive long fibre locks.

4) Inside the Arena (lots of knitting yarn but looking for those elusive locks)
5) Half of the Black Lamb’s booth. They have mill-end fibre.

Pausing briefly, I took a quick shot of the pile of mill ends at the black lamb’s booth. I am fascinated by the hugeness of the pile as the weekend starts and the speed it dwindles as the weekend progresses. I will be back shortly and do a bit of shopping there myself. I hope that some of the other guild members will post the after pictures from Sunday! Finding only a few booths with any fibre, none of it as long as I was hoping, we turned our vehicle to the small arena to do a quick fly-through there.

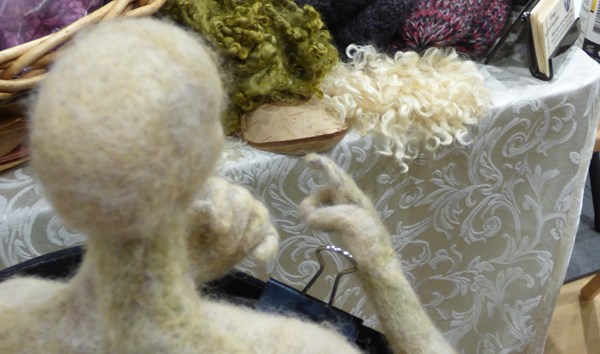
6) AH ha! We found some locks, not as long as he wanted but a good colour.

We headed past booths with knitting yarn towards the Fibercarft booth, which was looking like our last hope for anyone with long 12-inch or longer locks for Mr. Mer’s hair. I hope he will not be too unhappy if he winds up with a military haircut if long wavy locks are unattainable.

7) Success!! We bought a bundle of green and a bundle of orange-red for his daughter or wife’s hair.

These were the only extra-long locks we were able to find this year at Twist. There may have been some in the back of a booth I did not see, but we were pretty thorough in our such (Next year there will be lots I’m sure since a short bald Mer-fish was asking for them!). The green locks look a bit bright but there is the option to over-die or it may be ok as an accent with the locks from Bernadette. He will show you his loot in a bit.
We met a relative of his while we were in the Fibercraft booth. She was also inspired by Sara’s “Mermaid-felt-along” at the beginning of the pandemic. (https://www.youtube.com/watch?v=hljS4YRmz9w&t=1992s) this was a great way to keep us sane and busy during our time isolating. I am not sure if Sara realizes what she has inspired!

8) Mr. Mer met another Mer from a different branch of the family. (from the same Sara Felt along!)

We said goodbye to his cousin, I didn’t get her name so we referred to her as Ms. Coral Mer. With his shopping now done, we can relax and see what else is on offer.

Around the next corner, we spotted some familiar looking felt. This is Richard Hanna, he is an excellent sculptural felter and sometimes member of the local guild. It has been inspiring watching him work on some of his large pieces during meetings (the Narnian Lion head and Marilyn Monroe head were both very memorable). He has made some interesting green men and tree people more recently. He was quite busy so we didn’t have much time to chat. It was great to see him again, I hope he will have the time to come back to the guild and attend socials.

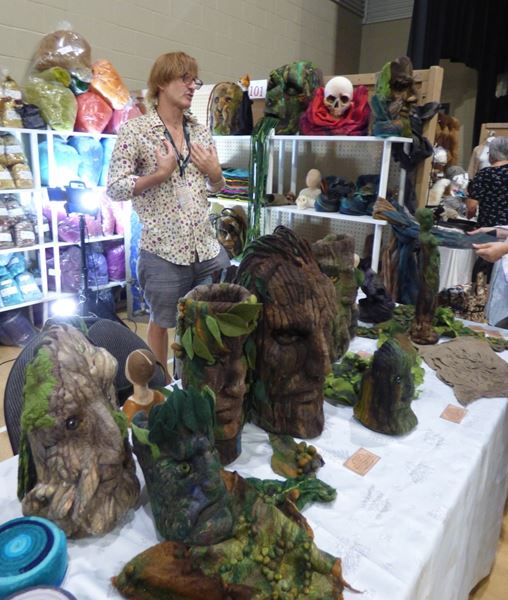
9) Richard Hanna’s booth at Twist

We stopped to have a quick chat with another guild member, weaver and basket maker Janet Whittam.

10) Janet Whittam’s booth

I took one of Janet’s basketry workshops years ago. To begin we went for a walk down country lanes near her home, collecting wild grapevines and other interesting vegetation. This salvaged material was used with various cane to make a basket. It was so much fun. Janet mentioned while we were chatting and I was admiring the new baskets, that working with the antler as she wove the basket was quite challenging. The final effect was definitely worth the extra work!

11) needle storage

In one booth I saw this lovely little pottery needle holder. What an elegant way to store needles!

12) These mice were so cute but I have no idea what they cost, I could not find a price and the vendor seemed very busy so I didn’t ask.

13) This is a prin to skene winder.

The Prin to Skene winder was incredibly cool and I would love to have bought it, I don’t know where I would put it but it turned easily and was just so cool! That is a giant bag of superwash merino mill ends, it’s sitting beside ($10.00 per LB). This means we’re back in the arena at the Black Lamb’s booth. Here are a few more shots to drool at. I got the last of the BFL (Blue Faced Lester)/silk which is fun to spin and it will also felt!

14) A few of the specialty blends at the Black Lamb booth

15) Mostly superwash merino but other blends of fibre too

16) a few of the Felting supply’s at the Olive Sparrow

We wandered back to the Olive Sparrow and perused silk in fish-appropriate colours then l checked out pieces of felt backing for pictures in so many colours. I spotted the painting in Wool book and one of the two recent Landscape paintings in wool books was also there. I found some extra-large leather finger cots by the cash so added that to my order too. (It’s hard to find thumbs that fit unless you sew your own.)

17) A Majacraft dealer booth

There was a booth selling Majacraft products, (they make spinning wheels that are very posh). I did not realize they also made fibre prep tools. I spotted blending Hackles, mini-combs, a tiny blending board and regular-sized drum carders.

18) A booth of mixed weaving equipment and weaving yarn

Mr. Mer was particularly excited about this Jane loom by Louet, I think the lack of treadles was appealing since Mer-persons would have a challenge to operate them with their tail fins. I did not point out that looms are usually made of wood so tend to float and would be hard to operate in an aquatic environment. In addition, getting wet would not be good for the loom.

19) This booth is Fibres of life

Fibres of life had cat caves, mice, balls in felt as well as felt backgrounds, really nice backpacks and bags as well as examples of the heavy commercial felt used in storage baskets (you can see them under the cat caves and holding the mice and balls). There were also mysterious giant balls of felted roving that looked like balls of snakes.

20) It was good to see such interest in spinning from a range of ages

21) this year the majority of the booths did seem to be more knitting oriented.

This slideshow requires JavaScript.

22-23) One of the outside tents was filled by the rare breeds conservancy group.

Rare Breeds Conservancy group brought four sheep, a mother and son and two twins, I think the twins were Shropshires. There was interest in the mom’s pretty fleece too!

24) Sheep dog demonstrations

We stopped to watch the sheepdog demo. One of the sheep had figured out it was bigger than the dog and was being stubborn.

With all the fibre I had purchased (as well as Mr. Mer’s shopping), it was time to drop things off in the car. We headed back through the food tent, I was very tempted by the “Hamburger de Bison 1/4lb”, available “avec Sanglier Effiloche” if you wanted for a bit more money. (I had it without the extras last time and it was delicious!)

25) Exotic lunch options

We stopped to have a chat with a lovely lady who had driven up from the states with some friends to attend. She had enjoyed the scenery of the drive from the 1000 island bridge through the southeast of Ontario and then into Quebec. She mentioned she enjoyed our weather (the heat wave the states and parts of Canada were having, had broken in eastern Ontario after a heavy rain storm last week. It was either that or the weather feels cooler when posted in Celsius?) She is presently a knitter but said she is a future felter who is just waiting until she retires to start felting. I hope she will be inspired to jump in and try both wet and dry felting sooner.

The ladies at the ticket table were very helpful in making sure I got safely back to the car (which was much appreciated). Mr. Mer and I must have been looking very tired and I was going quite a bit slower than when I arrived. We got the shopping in, but I said I just wanted to rest for a few minutes, in hopes that I was up to another trip around the venue and take a few more photos to let the guild know what was there. Mr. Mer seemed very pleased with his shopping so he got comfy in the passenger seat as I had a short rest. We had another Guild member stop by, say hi and linger for a chat. It was a very restful chat and I was ready to take one more round of the shopping options.

26) Having a chat with Mr. Mer, who has retired to the car to recover from his shopping trip.

27) He checked out Mr. Mer. (Safety first- always wear your seat belt), Fish fatigue from shopping!!

I left Mr. Mer to nap in the car with the shopping and headed back in for one last lap around the booths. The crowds had thinned and I was able to get into most of the booths with the walker. I found a bit of fibre but was wanting to save a bit of money for a treat after the shopping. There was a booth “the Campaign for Wool, Patron: HRH The Prince of Wales” which seemed to have literature but it was still too busy to ask questions.

28) I admired the Baskets from Big Blue Moma’s booth but didn’t get one.

The baskets were in the first booth just inside the first tent. It was a great strategy. You could buy your basket then fill it with purchases or after buying everything inside you were wanting, buy a big enough basket to hide it in for taking your new hoard into the house! Many would make excellent presents for a family cat but only if you didn’t fill it all the way up with fibre.

29) I stopped to admire the Kromski wheel

I did finally get into the booth with a Kromski spinning wheel, I cannot afford one of their ornate wheels but I now have a Kromski drop spindle! I took it for a spin when I got home with a bit of the BFL/Silk blend I had also purchased.

30) Kromski makes a drops spindle, which is more in my price range!

The tag says it’s an 85gr spindle, so reasonably heavy but It still spun quite fine yarn. At 32.00+ Tax, it was also the least expensive spindle I saw and now I can say I have a Kromski brand yarn maker! (Ok, technically it’s not a spinning wheel just a drop spindle but it is wheel-shaped and it does spin!)

Some of us have a post Twist tradition of heading to a small restaurant at the far end of town. We discovered it was there quite a few years ago. I had checked online, to make sure it was still there and that the comfy-duck-club-sandwich was still on the menu. (YES!) Therefore, I had carefully saved enough money to get 2 orders of the drool-worthy sandwich. Unfortunately, I arrived to an empty parking lot and new hours, I found out that the restaurant is having trouble getting servers for the evening. We will have to make another trip of just over an hour or wait until next year to get the comfy duck!!

31) La Toquade restaurant, with Club Sandwich au confit de canard (comfy duck served on apricot Raisin and sunflower bread, garnished with bacon, onions, green apples celery and mayonnaise, with a side of your choice of French fries or salad.)(this explains why the duck is so comfy)

I was too tired to go back to Twist and shop till my pockets were empty but my car was full. Instead, I put on my audiobook and headed home. It was a bit slower traffic due to the roadwork, but the book makes the time pass quickly. Now all that is left is to show you the results of our hunting expedition.

Mr. Mer seemed quite pleased with himself. He had a lovely time, enjoying women (and some men) admiring his 12-pack abs and his fine butt. He had acquired the only long locks we could find, for both himself and ether Mrs. Mer or Teen Mer, as well as picking up a little friend.

32) Mr. Mer shows off his shopping

33) My loot!

I was looking for felt bases for pictures but got distracted by the soft fluffy BFL/silk blend (the large bag of white) and the blue batt looked so oceanic (yet dry) I could not talk myself out of buying it too. I was pleased by the leather thumb covers (finger cots), they are good for protecting fingers if you get momentarily distracted while felting.

I hope you also have access to a local Fiberfest with shopping, workshops and fabulous food. It was a fun day and productive hunting. I hope all the attention Mr. Mer got doesn’t go to his head or I will have to find more hair!