Browsed by
Tag: eco printing

Botanical Printing Fun

Botanical Printing Fun

Autumn has definitely arrived in my little corner of the world, the trees are turning breath-taking shades of red, gold and orange and starting to fall to the ground.

This week I met with two friends who I normally meet every couple of months for a felting play-date but we couldn’t pass up the perfect opportunity to use the abundance of natural materials at our feet and have a go a botanical printing. Not something any of us are experts in but its always fun to try new things isn’t it?

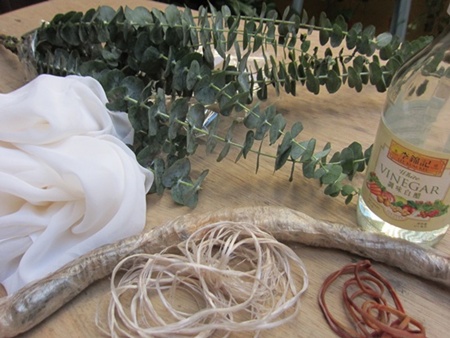
I have been playing with botanical printing for a couple of years now, so I already had a selection of materials to hand (rusty water, logwood extract, a tea urn and fish kettle for steaming etc) but Janine and Nancy also brought materials (red onion skins, another fish kettle, hot plate etc) with them, along with the all important vegetation and mordanted fabrics.

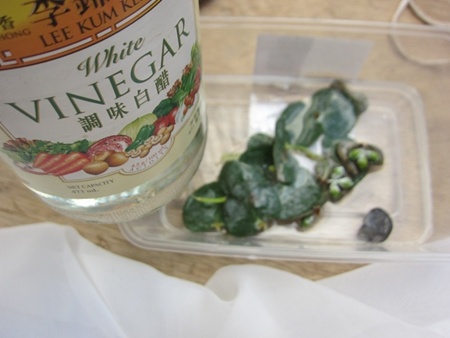
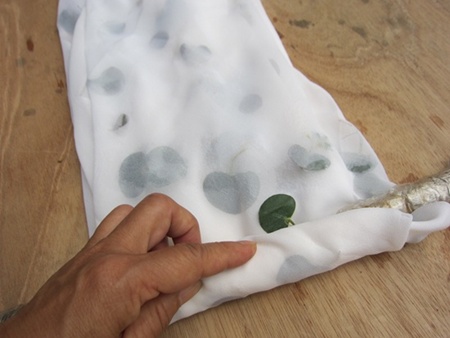
After looking through some of my previous attempts we settled on a logwood carrier blanket for the first attempt. The leaves were dipped in iron water before laying on our fabric, covering with the logwood-soaked carrier blanket and steaming. These were our results…

Janine’s dye blanket was smaller than the fabric she was printing, I love how her leaf prints appear to be breaking free from their logwood “frame”:

unmordanted habouti silk

I loved the greens Nancy achieved with jasmine and rose leaves:

Alum-mordanted cotton

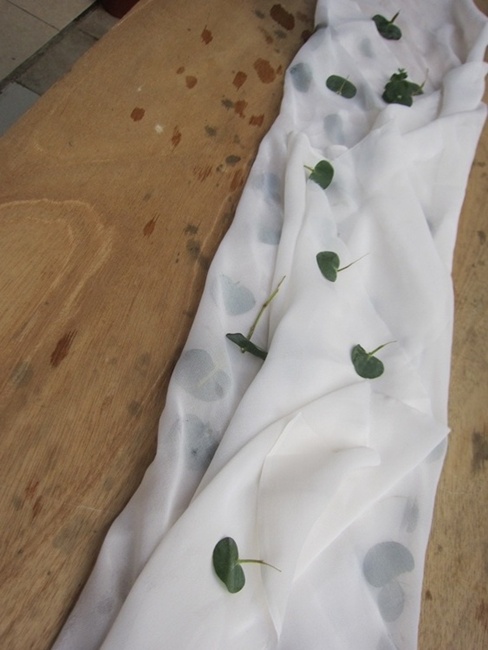
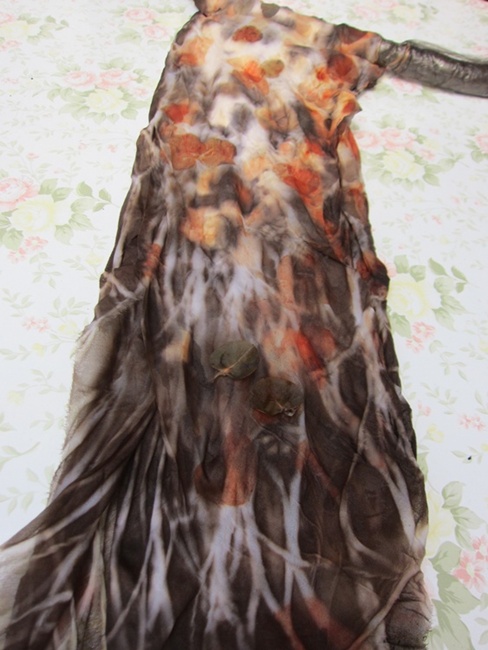
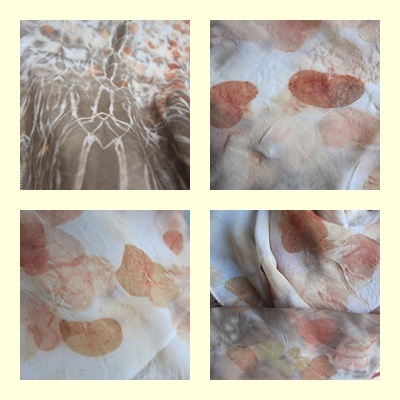
This was my silk scarf part way through the reveal…. logwood blanket with leaves still stuck to it on the left, printed scarf on the right. I was a little disappointed with the eucalyptus leaf in the top centre of the picture, I have previously achieved some lovely orange prints from this tree but not today.

Left: carrier blanket and leaves, right: alum-mordanted habouti silk

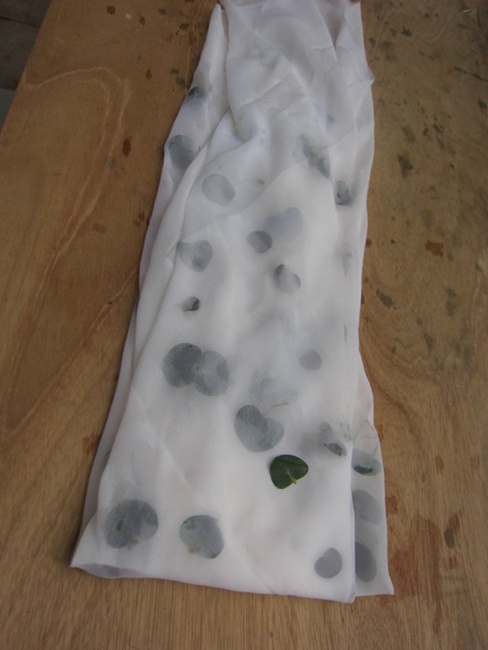
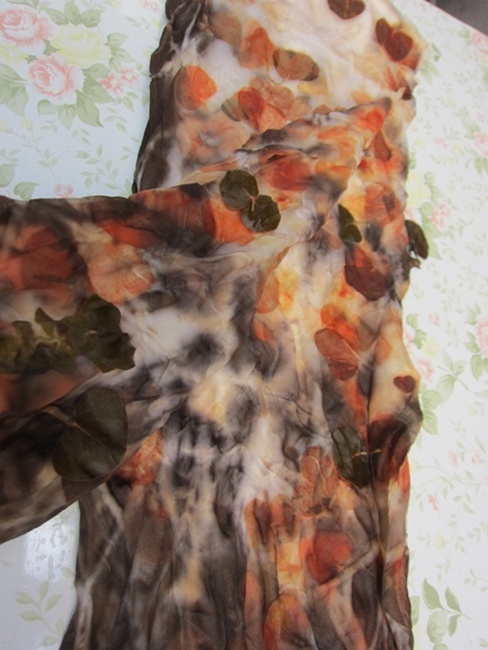
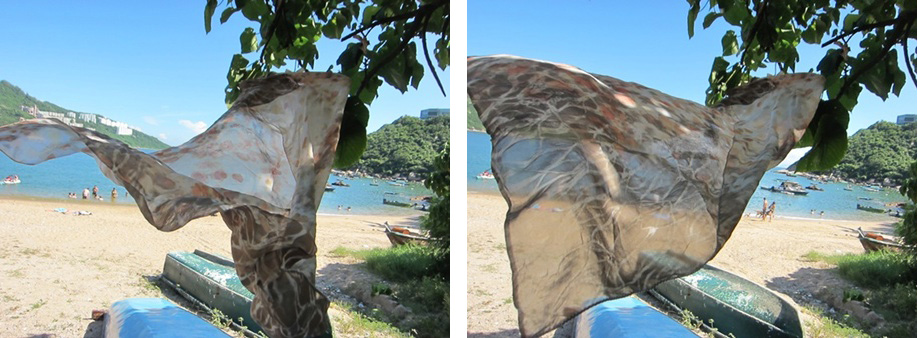
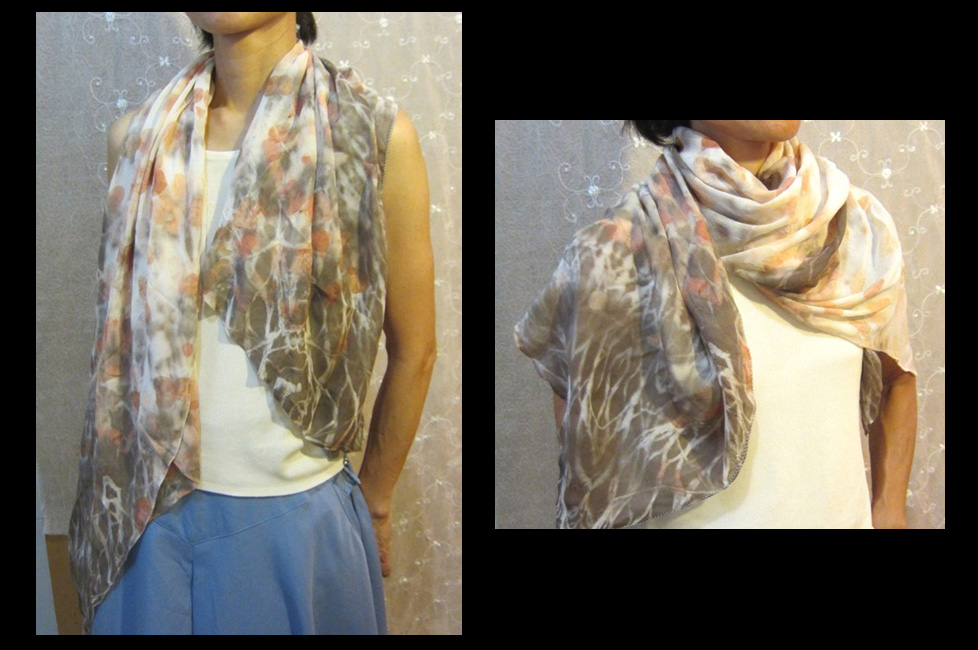
My silk scarf revealed….

Alum-mordanted habouti silk

Never one to make life simple, I added a previously printed nunofelt scarf to the other side of my logwood blanket. I was reprinting it because I did not like the original, insipid print, but I like the over-print even less! 🙁

unmordant nunofelt (chiffon and merino)

Now it is dry it arguably looks even worse! Not to my taste at all. Yuk!

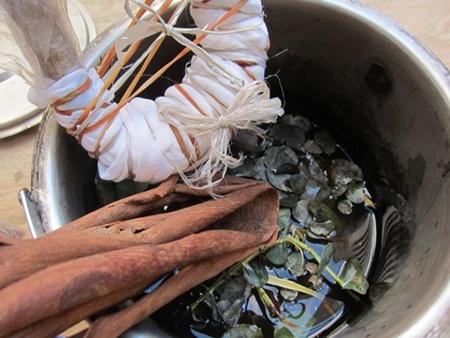
Next we tried a dye bath (as opposed to steaming our bundles), we mixed a sweet-smelling concoction of eucalyptus bark and red onion skins:

I thought most of the leaf print results from this batch were a little disappointing (only the cotinus appeared to work) although we did get some nice shibori style stripes. The colour difference between the alum-mordanted and unmordanted silk was striking, mordanting really does yield brighter colours.

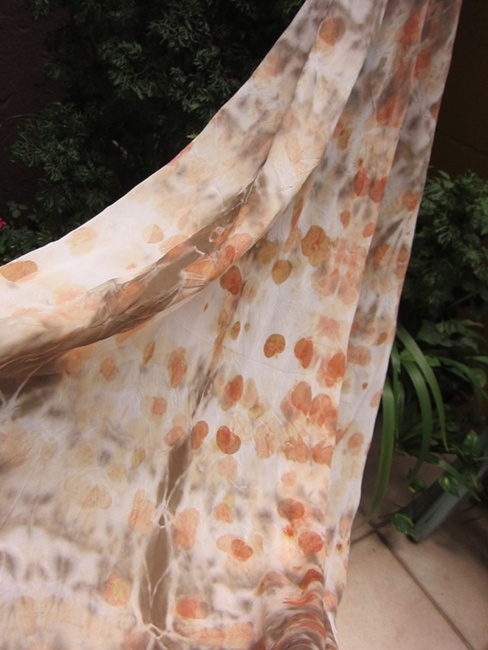
We sprinkled dried safflower petals among the iron-dipped leaves before bundling and simmering for 90 minutes.

Alum mordanted silk
Unmordanted silk
Alum mordanted cotton
Alum-mordanted cotton, washed and dried

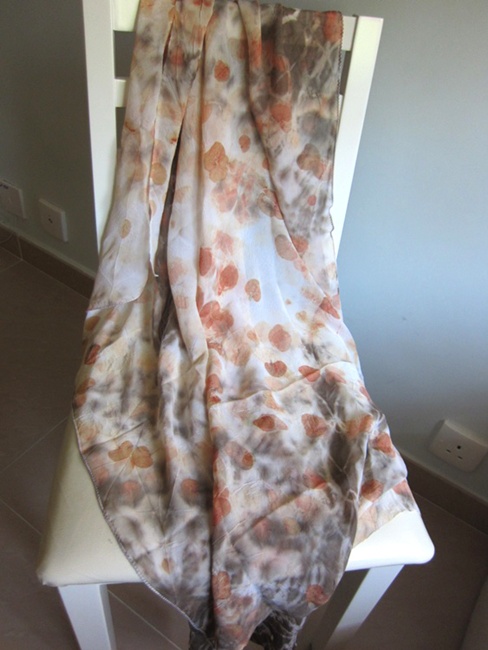
Nancy had better luck with a second piece of cotton in her bundle:

Alum mordanted cotton

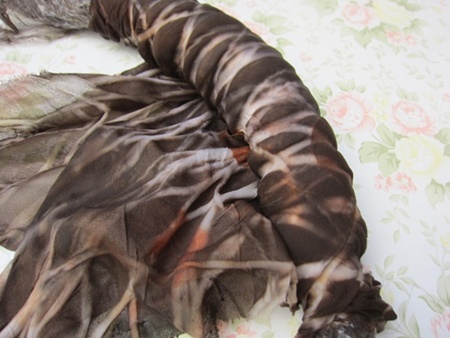
Finally we tried soaking our fabric in tea and using an iron-soaked carrier blanket, the tea gives a gentle yellow-brown colour but where the iron reaches the tea, it turns almost black:

I was quite surprised by how much the colour of the leaf contributed to the colour of the print, in previous tests I found the orange and red leaves gave yellow and brown prints, just like the yellow leaves…. this really is a craft that relies on serendipity! 

unmordanted chiffon/merino nunofelt

Another surprise was the beauty of the iron carrier blankets, they really stole the show!

top: nuno felt scarf with leaves, bottom: iron carrier blanket
Janine’s Acer on the iron blanket
Nancy’s Geranium leaf on iron blanket

Nancy also had a promising looking result from a heuchera leaf

But when the leaf was removed the print underneath was a little disappointing…

Our final bundles of the day were arguably the best. Janine and I used some large fatsia leaves and I included some wisteria that Janine had brought, this gave one of the most beautiful greens I have ever achieved from a botanical print. We dipped the leaves in iron water and used a logwood carrier blanket again.

My alum-mordanted habouti silk scarf

While I love the white silhouette effect of the large fatsia leaf on my scarf, I am in awe of the detailed print Janine achieved from hers…

Janine’s unmordanted habouti silk scarf
Nancy’s print on heavy slub silk

Feeling inspired by the wonderful greens Nancy’s jasmine had given, I carried on after they left, pruning my poor garden far more than it really needed 🙂 However, while the maple and liquid amber leaves printed beautifully, my jasmine wasn’t as pretty as Nancy’s:

Alum mordanted silk

I included a nunofelted scarf on the other side of this dye blanket too and was pleased with the colours from the sycamore and oak leaves, I think the yellows work beautifully next to the blue-grey background:

unmordanted nunofelt

I also put another bundle in the red onion and eucalyptus bark dye pot, but this time it was simmered for 2 hours, and I think the leaf prints were much improved from the extra 30 minutes of cooking:

Alum-mordanted habouti silk

Thinking of having a go yourself? You should, its a lot of fun if you like unwrapping presents! You can never really know what you will get 🙂

All but one of the scarves / fabrics in this post were steamed or simmered for 90 minutes, however, I found simmering in the dye bath yielded better results if they were left in for at least 2 hours. I know some botanical printers steam for a lot longer or leave their bundles to cool overnight before unwrapping, but I never have the patience to do that! 🙂

All the leaves were placed with the veins facing the fabric to be printed, in theory the stomata (the holes that the leaf “breathes” through) on the leaf underside should give a better print as there is more opportunity for the tannins to be released, but the prints on the iron blanket (they are printed from the top of the leaf) were equally stunning, I will leave it to you to experiment with that and see which works best.

In most cases (not when the iron blanket was used) we dipped the leaves in iron water before laying on the fabric.

All fabrics were gently washed after printing to remove the iron and organic material.

The Big Ski Chair Affair Completed

The Big Ski Chair Affair Completed

We did it! We finished our chair for the fundraiser that I told you about previously here and here. Dennis and I delivered four different chairs to their business sponsor locations. There are six more to move but thankfully, I have some help with four of those so I only have two more to move. Until the auction event that is. You can see some photos of the other chairs on the The Big Ski Chair Affair Facebook page.

The addition of the leaves took us quite a while to accomplish. We had to connect a lot of different wires and make sure all the leaves were secure.

You can see that there is an extra rock next to the main boulder that I felted. I already had this rock and thought I would add it to the chair. But I didn’t have a good way to connect them all together securely and so you couldn’t see the connection. So only the big rock was used in the end.

Here are a couple of close up photos of some of the leaves.

Here’s the back of the bench. We used a wooden rod through the two holes on the back of the chair and used that to hold up our back cushion with straps sewed into the cushion and velcro attachments.

Here’s a bit closer look at the rocks.

And a closer view of one end of the cushions. The cushions were eco printed on an old army blanket. We also have some throw pillows to go with the bench but we decided not to keep them with the bench until it is ready to be auctioned off. Since the bench will be sitting outside, we were afraid someone might walk off with the pillows.

And here I am with the chair after we moved it to the Firebrand Hotel who sponsored our chair.

And a slightly closer look of it against the rock wall. The colors are perfect against the rock and it looks like we meant it to go there! We didn’t know where the chair would be when we planned it so it’s amazing how well it fits in the space.

It was a big project and took a lot of time but we all really enjoyed the challenge. So if you ever are invited to try something big like this type of art project I would say, go for it!

Finishing an Eco Piece

Finishing an Eco Piece

Last year Cathy (Luvswool) and I did some eco dyeing.  https://feltingandfiberstudio.com/2016/11/03/eco-printing/

They pieces have been hanging around and I was going through them again and decided I liked the heavy cotton one in particular.  It was time to finish it.  Of course, it wasn’t that easy to decide what to do.  At first I thought I’d stitch the flowers and leaves, but I’m not that great at embroidery. So it sat for awhile again.

I really liked the straggly edges. Besides, if I turned the edges over I’d lose some of the nice design. Here is part of the design.  You can see at the top the ragged edge.  The two long sides were not that way, but I spent some time in front of the TV pulling out strands so they would all look the same.

I chose some embroidery threads that reflected the colors of the imprints, but subtle enough not to fight the design.

I did three rows of stitching around the whole piece.

I had decided it would be a wall hanging so I attached a small dowel with loops on the back.

The next question is where would I hang it so it would really look good.  I have a lot of dark walls and some light gold.  It’s hard to see the gold here, but there was some contrast.

My kitchen is teal and generally sunny.

The living room is a deep bronze color.

The family room is deep moss.

We’ve had a lot of dark days here, so I know the photos aren’t the best.

What do you think?


Just a quick addition.  This past weekend I met with my siblings in Madison, WI for lunch.  My sister Car brought me a fleece from one of the twin boys born last year – Little Will.  Here’s a quick peek at the open bag which was quite heavy.

While we were having lunch Car’s Granddaughter Madison received pics of two new twins that were just born.  A little boy at 8lbs 12 oz and a girl at 9lbs 6 oz born to ewe Mary.

What a great way to celebrate the get together!


A Peek at Terri Simon’s Eco Printing Class with Nicola Brown

A Peek at Terri Simon’s Eco Printing Class with Nicola Brown

Thanks to Terri Simon aka Meterrilee on the forum for sharing her eco printing experience today.

Today, I would like to share my experience with eco-dyeing. Most, if not all, of our blog hosts and many followers have experience with eco-dyeing, but it was a first for me and I loved it! I decided to take an online class with Nicola Brown from Ireland. She is a wonderful teacher—very thorough in describing the process in an online format, including several videos to illustrate further. She was available daily for six weeks to comment, problem solve, and encourage us as we journeyed through that week’s lesson. Like other online classes, there are “chatroom” areas to post pictures and ask questions, and to comment on one another’s creations. The online environment is available for six months and all of the lessons were downloadable in PDF format. Additionally, Nicola created a Facebook page for us to continue communication. Thanks, Nicola, for a great online experience!

As a dyeing newbie, I had to assemble equipment. At a nearby thrift store, I found an aluminum fish cooker with all kinds of inserts for steaming, an iron stake, and a length of copper pipe which I cut into pieces to fit into the fish cooker. We had an outdoor fire source…a propane tank and hook-up for deep frying a turkey. It worked perfectly on my covered back porch (this is Southern Oregon’s rainy season). Here’s my equipment:

terri-pans

All for $20. Not bad!

I ordered a bunch of silk, silk/wool blend, and 100% wool scarves from Dharma Trading, which had a good selection and reasonable prices. I also made pieces of felt to experiment with. For vegetation, I used rose leaves, loose tea, red and brown onion skins, strawberry and blackberry leaves, Japanese cut leaf maple and eucalyptus, donated to me by a friend who has several trees. The rest came from my garden (and kitchen.) There are lots of different “brews” for obtaining the prints. Some involve rust water, others vinegar water and other things thrown into the cooking pot (different metals, plants…). And of course, there are multiple ways to prepare the fabric for dyeing, none of which use harsh chemicals (the harshest chemical used is vinegar). I really like this aspect of eco dyeing…it’s all very natural. I am amazed that the beauty of a leaf can be imprinted substantively on fabric, right down to the intricate veining.


Here are some photos of my experiments.pic-2

This turned out sort of dark and muddy. These are Japanese maple leaves. The scarf actually looks good with the right outfit, but the prints are very subtle and not what you want when you are just starting out (at least not what I wanted!).

These are pieces of handmade felt, with eucalyptus (the skinny and bright orange leaves) and strawberry leaves. The purplish looking circles are cut from red onion skins.

pic-3

Next is a blend of wool and silk. You can really see the details of the onion skins on this fabric.

pic4

The scarf below is 100% silk. The print is much softer looking. I like the tie lines produced when wrapping the bundle.

pic5


Finally, I made some felt placemats and while they are interesting, I am not a fan of the muddy yellowish background. I found out it was operator error for not keeping the heat up high enough for a long enough time. I had to go out for a bit and turned off the flame under the pot, letting the placemats sit for about an hour until I got home to untie them. My mistake! Had I kept the heat up for the full five hours, I would have produced a much clearer print, such as the example pieces I have included in this picture. But, they are still pretty in a muted way.

pic-6

I highly recommend Nicola’s classes. She is an excellent teacher, very thorough and organized and she has a delightful wit as well.  You can find more information on Nicola and her classes here:   http://www.nicolabrown.ie/


Pandagirl’s Year in Review 2016

Pandagirl’s Year in Review 2016

I hope everyone had a nice holiday and are ready for the New Year.

It’s almost the end of 2016 and looking back on the things I’ve done, there seems to be a few themes.

I did a lot of natural dyeing.  Avocado skins, pits and the combo.

20160125_113312

Cochineal

20160701_155219

Alkanet/Logwood20160701_154915

logwood iron top wo bottom

Osagealkanet with iron

Madder

20160622_123212

Cutch, Rhubarb and Indigo

20160703_115005 20160701_155539 20160907_124311-1


Eco printing

img_7161

Resists

20150501_152541

20160301_164851

20160326_121301

20160322_113050

20160506_142241

Under the sea theme20160429_160634a_edited-1 20160526_155222

2nd Quarter challenge working with scraps – the former credit card case turned into an ear bud case.

20160506_122938

Then the cityscape with scraps.

20160523_142107

A scarflette with locks

20160125_111403

Ginkgo stitching

20160123_152812

Crochet piece felted and embellished with stitching

20160823_134235-1

Felting wit my grandsons

20160807_152216_001

Silk scraps into a free motion stitched vase

20160708_142758

3rd Quarter challenge adding dimension from Kristy Kun’s class

20160924_155325-1 20160924_155038-1

Ruth’s Paper Lamination class

20160614_153320 20160720_173749

20160609_122027

Teri’s hat class

20161012_152103 20161012_151800

Mini weaving wall hanging

20161113_151758

More work with scraps for a sewing machine case

20161204_142831

4th Quarter Challenge with embellishments for a coupon case.

20161107_164205

And blue booties for a shower

20161208_165948

Of course, there were also plenty of samples during the year including using the needle felting machine to felt some unfeltable fabrics.

A big thank you to Cathy Wycliff for her post on weaving and felting; my sister Carol Olson for sharing her new sheep with us;  Nada for sharing her workshop experience in Slovenia; Zara for her posts on Felting on a Trampoline and her Yak, Mongolian, Churro and Zwartables samples; Leonor for her soap tutorial and Terri Simon on sharing her projects from Kristy Kun’s class.

It was a great year for me in terms of learning new things and doing some recycling.  How was your 2016 year of fibers?

Happy New Year and Happy Felting in 2017!


Eco Printing

Eco Printing

Cathy  (Luvswool) and I had an Eco Printing day this summer.  I mordanted my fabrics before hand and picked some flowers and leaves from my garden and froze them to bring.

Elizabeth had kindly sent Cathy some Smokebush and Japanese Maple leaves.  Cathy generously shared some with me.  Thanks Elizabeth and Cathy!

I had brought some coreopsis, day lilies, lobelia, verbena, petunias and leaves from my neighbors tree.  I have no idea what kind, but they were red, not maple, and a little wavy.  Other than a few faint marks none of my stuff did much with the exception of the coreopsis.

Cathy also had some coreopsis, a little bigger in flower size, plum, geranium and rose leaves and pansy flowers.

Of course, time was at a premium and we were anxious to get started and forgot to take pics with the leaves and flowers before wrapping.  My bad.

My first experience with eco printing last year was a disaster.  So, I had a lot to learn and fortunately Cathy had everything ready when I got there.  So we got right to work laying out, dipping leaves in iron water and wrapping. We used copper pipes, bamboo mat and binders and clips.

20160719_125819

We had two pots going, one plain and one with  sweet gum seed water.  I had brought the seeds from California.

The light plum fabric below was Egyptian cotton from an old bed sheet. It’s too tightly woven to felt, but I wanted to try printing on it.  We also added a piece of handmade paper on the inside to print on both sides.20160719_130528

While still wet:

20160719_130657 20160719_130940

Now dry:

20161031_150831

Here are both sides of the paper:

20161031_172412 20161031_172420

I had brought a variety of fabrics — silk habotai, cotton broadcloth, cotton voile and cotton kona cloth.  This was the kona cloth while still wet.

20160720_160435

Here are both sides and a couple of closeups:

20161031_150330 20161031_150355

After drying you can clearly see the string marks and the bamboo mat marks.

20161031_150404

20161031_150421The silk piece came out nicely. Here it is wet:

img_7161

Then dry:

20161031_145914 20161031_145939 20161031_145950 20161031_150108I think the Japanese Maple, Smokebush, rose leaves, coreopsis flowers and leaves, plum leaves and geranium and pansies made the nicest prints.

The broadcloth didn’t fare as well except for the very ends.

20161031_150715 20161031_150724

The cotton voile:

20161031_150759 20161031_150808


Thanks Cathy for your guidance!  I’m pleased with the results.

Well, we’ve managed to hang on to summer for one more post.  Next time I hope to remember to take before pictures.  Now I have to figure out what to do with all this.  Any suggestions?


Art Retreat

Art Retreat

Last weekend my surface design group went on an art retreat. We stayed at the Kiwanis Lodge in Marion, Montana which is right on a lake. The weather had been rainy and cold and I thought it would continue into the weekend. But a small miracle occurred and we had beautiful weather all weekend. We did eco printing most of the weekend but a couple of us did some gelatin plate printing as well.

The Lodge

Here’s a few of us getting ready to start on Friday afternoon. We had all collected a lot of leaves so we had two full tables covered with leaves.

A Variety of LeavesHere’s just a small selection of what we used. Some worked great and others not as much. But almost everything we tried printed on paper.

Cards from the Florist

Louise got some leaves from a local florist and they gave us little cards with different sayings on them. This was mine.

We soaked our papers in alum water and then applied the leaves that had been dipped in iron water. Some of used plastic in between to resist the leaves printing where we didn’t want them. Then we put ceramic tiles on both sides of the paper leaf sandwiches and tied them up.

We had several steaming stations and pretty much kept them going all weekend. There was also an onion skin bath that some of the items were boiled in.

After steaming for an hour, the fun part of opening the packages began.

We got some beautiful results. The bright blue is from blue carrots.

Some of us also did eco printing on fabric and larger paper. I didn’t manage to get any photos of the fabric that was printed. But I will try to get some photos at our next meeting to show you.

We also played with gelatin plate printing again which was fun and colorful.

Sunset at Kiwanis Lodge

And I’ll leave you with this photo I took of the gorgeous sunset. It was a gorgeous weekend and we had a great time. It’s always so nice to allow yourself dedicated time to “play” with like-minded friends.

Fourth Quarter Studio Challenge – Autumn Scarf

Fourth Quarter Studio Challenge – Autumn Scarf

When Zed announced the 4th quarter challenge, I had already done some eco-printing on a couple of felt scarves. So I thought that this one would be the perfect project for the challenge. I wasn’t really happy with the results of the eco-printing and the scarf needed something more. So I took my mobius scarf which just happens to be a challenge piece from the “twisted” challenge and did some free motion machine stitching on it.

Natural Dyed, Free Motion Machine Stitched Felt ScarfI decided to use a variety of types of leaves and four different colored threads. Two of the threads were multi-colored threads and the others were red and orange to add a bit more color to the scarf.

Close Up - Free Motion StitchingI stitched aspen leaves, maple leaves and several other leaves that I had previously studied in my sketchbook.

Free Motion StitchingI always like to be able to refer to a photo or a sketch while I am free motion stitching.

More StitchingIt takes a bit of practice, but I love to stitch on felt.

Fall Leaves - Free Motion StitchingI’m not sure I “love” this scarf but I guess it looks better.

Free Motion Machine Stitched LeavesI think the orange and red thread is a bit bright. I might have liked it better if I just used the tan/brown thread. And then it would have been monochromatic too!

Free Motion Stitching on FeltBut it is finished and is my entry for Zed’s challenge.

Natural Dyed Felt Scarf with Free Motion Machine StitchingNow to see if I really wear it. I guess I’ll at least wear it for our cold autumn that we’re having here in Montana.

A Try at Eco Leaf Printing

A Try at Eco Leaf Printing

I have had one previous try at eco printing which didn’t turn out very well. But after Terriea’s recent post, I thought I would give it another go. You can see the process I followed on this post on my personal blog. I did some prints on paper as well, which you can see here. We used a variety of leaves. We did not have the correct kind of eucalyptus so the kind we used is the dried kind that must be artificially dyed. Where you see the bright blue green color on the fabric, it is from that kind of eucalyptus.

bundlesHere are the bundles that I rolled up with the leaves and cooked in the dye pot. I did one piece of silk, two felted scarves and one scarf that is a wool and silk blend. I also dyed several pieces of cotton too.

just opened fabricThese are the scarves after I opened them up and pulled off the leaves. So I did get some color but the leaf prints were still very vague. I was disappointed that you couldn’t see a leaf impression. The paper did much better than the fabric.

leaf impressionHere is a print that almost looks like a leaf. This is silk habotai.

The gallery above shows different portions of the silk. The silk seemed to work best with the leaf prints and took in the most color. I am planning on using this piece of silk for a nuno scarf.

These are photos of the cotton pieces. I didn’t do any leaf prints with these, just threw them into the different dye baths. I have to say that Zed made a comment a while back about some of the natural dye processes just leaving the fabric looking dirty and I agree that some of these fabrics look like dirty dish rags. But perhaps I will find that they will be the perfect background for a project.

And these last photos are of the wool items. The wool did get some color but again, I wasn’t really happy with the “prints”. My plan now is to add free motion machine stitching to the felted scarves in patterns of leaves with fall colored thread. Hopefully, that will make them a bit more attractive. 🙂

Eco Printing Onto a Silk Chiffon Scarf by Terriea Kwong

Eco Printing Onto a Silk Chiffon Scarf by Terriea Kwong

Our guest writer today is Terriea Kwong who has very kindly written a tutorial for us about eco printing onto silk.

********

This is the basic and simple way to do prints on silk chiffon.

a1. Materials used : eucalyptus cinerea leaves (silver dollar), 100% silk chiffon, vinegar, paper core roll, string and rubber bands. Well wash the fabric before use. Can be used when it’s wet or after it’s dried.

b2. Before putting leaves over the chiffon, dip in vinegar water.

cc3. Put the leaves over chiffon, 2-3 folds diagonally, put a little more leaves over it.

dd4. Then half fold it.

ee5. Roll up with the paper core roll tightly.

ff6. Bundle with rubber band, then tie with string.

gg7. Boil with some eucalyptus barks and the same sort of euc leaves (silver dollar) with 1/4 cup of vinegar.

hh8. After 1.5-2 hours boiling, unbundle it. The dye pot can be re-used.

ii9. Dark when it’s still wet.

jj10. Remove all leaves.

kk11. Dry in shade, then rinse and dry in air.

ll12. A scarf is made.

mm Tie lines and shades of eucalyptus leaves prints:

nn Soft and airy scarf:

oo This is silk chiffon, so color is a bit soft:

ppI’m pleased to share with like-minded and workshops can be arranged individually. Contacts via below:

My blog : http://terriekwong.blogspot.com

My email : terrieakwong@gmail.com

My page : www.facebook.com/TerLingCreation

******

Thanks a lot to Terriea for this excellent guide to eco-printing and dyeing 🙂 Terrie gets great results printing and dyeing, here is a gallery of some of her other work: