Browsed by
Tag: corriedale

A Summer Round Up

A Summer Round Up

As I sit down to begin this post the sky has darkened and the rain (fingers crossed) is about to fall, heaven knows we need it, but what a fabulous summer it’s been so far here in sunny Lincolnshire! I don’t know about you but I tend to not do too much in the way of creative stuff through July and August as there are too many distractions and this year the intense heat has made me feel very lazy so lots of time spent relaxing, reading and watching creative videos. Consequently I’ve now got a table of projects I want to finish and a head full of others I want to start!

A couple of projects I did do this summer are two wet felted vessels. The first one, inspired by a shrivelled seed pod, was made at the İFA Region 8’s Summer School in Arnesby near Leicester. Our region encompasses several counties and is so spread out we struggle to get our İFA members to attend. On the other hand we have a regular group of creative ‘non members’ in the locality who are more than welcome to come along to our events, and thankfully they do! It was a busy and fun two days…..

My seed pod began life as five leaf book resist measuring 27cm x 36cm and various colours of Merino and Corriedale fibres.

It’s final shape was formed after lots of pushing and pulling and using strong clips to get it to stay as I wanted it.I decided to keep the opening as tiny as possible and, as a consequence, the resist had to be ripped to shreds in order to remove it! I’m wondering about adding some hand embroidery here and there in the shape of circles using a dull gold thread, I think it’s lacking something but is that it?

Photo of a wet felted 3D multicoloured seed pod with a shrivelled appearance.

The second vessel was started last Friday when I was working at the Usher Gallery in Lincoln. I’d seen a post somewhere mentioning they were having their second Artist Studio Day and inviting local artists to apply. If successful it meant I would get the use of a table in their ground floor workspace and get to spend the day with four other artists. It sounded like a great opportunity and I’m so glad I applied! Only four artists turned up on the day and unfortunately one of those had to leave early. My other two companions were both painters and it was nice to get to know a bit about them and watch them work. We had a few members of the public come in to see what we were doing but for most of the time it was very quiet which allowed us to focus on what we were doing.

Knowing I wouldn’t get finished, but would need to get my vessel to a stable state before leaving the gallery, meant I needed to do a bit of prep the day before. So I decided on a size, cut my circular resist and made this piece of prefelt combining threads, fabrics and fibres to cut up and use as surface decoration.

Prefelt for surface decoration
By the time we had to leave I had a stable prefelt that looked like a pizza and could be folded into my bag….it was too large to carry it flat!
The finished rock inspired vessel

One of the Summer pieces I’ve yet to finish is an Iris which I started at the end of July. This is going to be for the Lincolnshire Textile Groups Bountiful Botanicals competition taking place in October. I’m creating it from hand painted Tyvek fabric and wire and the flower will be approximately 30cm dia by 115cm tall. I’ve just got the leaves to do now and then I’ve got the perfect spot for it in my lounge when it’s finished. I don’t want to reveal too much before the competition so this is a sneak preview for now…..

 Finally I’ll leave you with some images from this year’s fabulous Asylum Steampunk Festival. As ever there were some outstanding costumes, some very strange costumes and some that looked like they’d missed the theme altogether but it really didn’t matter! There were steampunk enthusiasts represented from all over the UK and from various European countries. One lady said she had come over from Hong Kong especially to join in the festival! The atmosphere is the friendliest you could imagine and the whole Cathedral Quarter was buzzing!

True to form I didn’t make time to create a costume but this year I did dig out a long skirt and a waistcoat as a (very) token gesture in order to wear my oversized steampunk dragonfly brooch.


Felted Shells and Fabric Insects

Felted Shells and Fabric Insects

In my last post I showed you my wet felted conch shell made from Merino and Corriedale fibres with ribs made from Sari silk yarn. I liked the shape of this and wanted to make another, this time in off white with pale coloured ribs. I found a site on Etsy selling a beautiful subtle coloured variegated sari yarn but unfortunately when it arrived it was so loosely spun I realised it wouldn’t be suitable for this particular project.

Pale neutral coloured Sari yarn layer out in rows


As I was in the mood for felting I didn’t want to have to reorder so decided to search for a pastel “slubby” knitting yarn which I knew was hidden somewhere in the depths of my yarn stash.

A ball of pale grey knitting yarn with slubs in shades of grey and peach.

It turned out to be far easier to work with than sari silk as it was less inclined to move while felting and it had just the right amount of colour and texture for the look I was after. I was intending to leave this shell plain white but now it’s made I think it will benefit from a bit of shading so that’ll get added at some point.

I increased the size of this one to approx 31cm long x 15cm wide x 6cm high. My spinning group has a coastal theme for our 2026 exhibition so there will be lots more shells being made in various fibres, fabrics, techniques, shapes and sizes.

Two wet felted conch shells. A small one in shades of red and blue. A larger one in white with pale grey and peach coloured ribs
A white wet felted conch shell with ribs in pale grey and peach.


Wet felted spiral shells crop up a lot online and I’d been wracking my brain for ages trying to work out how these are made. I had a light bulb moment back in December when I made this small spiral shell from 10gm of carded Corriedale. Since then I’ve worked out another way of achieving a similar shape and so made this larger version using 20gm of carded Corriedale fibre and measuring approx 13cm x 9cm.

Photo shows two wet felted spiral shells, the larger one is beige, the smaller one is grey.

At one point the shell was sitting next to this bowl and I wondered how the centre piece from the bowl would look inserted in the shell…..

Photo of a wet felted bowl made with blue and turquoise Bergschaf fibres. Felted cords radiate out from the centre of the bowl creating height and interest.

…..I quite liked it so I’m now wondering whether to leave it in there as an abstract hermit crab or make the effort to felt a more realistic looking crab, what do you think?

Beige coloured wet felted spiral shell. Lilac and pale green felt cords protrude from its opening suggesting an abstract life form.
Photo of a beige coloured Wet felted spiral shell with abstract hermit crab poking out of it.

Another theme I’m working on right now is insects, particularly dragonflies and butterflies. It all stemmed from a tutorial by textile artist Anastasiya Goleneva to make this beautiful dragonfly brooch. It’s made from hand and machine stitched and painted calico. At 16cm long x 21cm wide it worked out a bit too big for me to wear as a brooch so instead I’ve put a Command strip on the back and mounted it to the wall.

Having enjoyed making it I decided to do another but using interfacing and my own technique for the body and legs that would allow it to stand and give it a more delicate, longer, slimmer look. One thing I’m not happy with is the “flat” face which suited the brooch but doesn’t look right on the standing dragonfly so version three is underway!

Photo of a 3D dragonfly made from machine stitched fabric and hand painted. It’s standing on an outside table with greenery in the background.
Photo of a 3D dragonfly created from machine stitched fabric. It’s painted in metallic colours of mainly green, pink and blue.

The dragonflies led to my friend Diane asking me to show her how to make a simple butterfly brooch so I made a couple of samples with body and wings made from painted cotton velvet. This fabric takes on a beautiful leather like look and feel when painted with fabric paints or acrylics and remains very soft and flexible. I was thinking of hand embroidering the wings but decided to keep it basic as Diane could add more detail if she wanted to.

Read More Read More

Nothing Spooky Here

Nothing Spooky Here

Update on Maneki-Neko:

I took Lyn’s advice and made the whiskers from wire.  Here is the new look.  I also decided to put her on a pedestal to see out the window rather than sitting on the windowsill.  I found an old pot and turned it upside down, but I’m thinking gold may be better.  Although, when she’s in the window you can’t see the pot.


I recently realized I needed to carry on my tradition of giving each grandchild a pumpkin wall hanging.  I have a new grandson, Ken who arrived early in April.

But I didn’t really have a nice orange to make the pumpkin.  So, I made a batt using hand dyed Corriedale, a funky orange pink merino, bright orange coarse commercial fiber, gold merino, hand dyed Domestic 56s with Logwood from Cathy and a touch of white.  You can see the batt in the back.  I think the color turned out well.  I also used the merino/silk mix for the stem that I had used in the Edo challenge with the Sakura branches.

I had made a sketch of how I wanted the pumpkin to look.  A bit different than his sister Lisa’s girly pumpkin from last year.

Of course, I got into laying it out and cutting the prefelts and forgot to take pictures.  But here is Ken’s dried pumpkin.

Then after a little shave.

Now I guess I’d better start thinking about the upcoming holidays.  Did you do anything for Halloween?

Pandagirl’s 2017 3rd Quarter Challenge Part 1

Pandagirl’s 2017 3rd Quarter Challenge Part 1

It took me a while to decide what I wanted to do for the challenge of the Edo period in Japan.  I was drawn to the simple scrolls with flowers and branches.

https://feltingandfiberstudio.com/2017/07/07/3rd-quarter-challenge-2017/

I scoured the museum sites and Pinterest.  I’ve been to Japan during Sakura (Cherry Blossom) season and particularly love the trees and flowers so it wasn’t too hard to narrow it down.

Since the scrolls seemed to be pale yellow, I made a batt backing then made another light batt using the Osage hand dyed merino and corriedale as a background. I added some darker fibers randomly to give the effect of lines in a scroll.

I had some left over merino/silk scraps from a scarf I had made for my son years ago.  They were supposed to be tassels, but I didn’t like them and cut them off and saved them.  But they make perfect tree branches.  Here is my first layout.

But something was off.  It didn’t feel right to me.  So, I rearranged the branches.

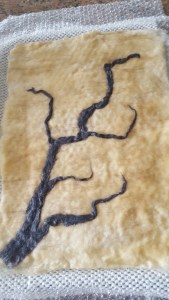
Next was to make white prefelt for the flowers (commercial wasn’t white enough) and cutting out the shapes in several sizes.  This was not an easy process. Here it is a wet look. The neat thing about the layout is that the branch can be down or up.

I didn’t want to felt it too hard.  But I may have to steam it before or after I add either hand or machine embroidery for details.

Actually the photo shows more texture than with the naked eye.

How do you like the branch, down or up?


2017 Second Quarter Challenge

2017 Second Quarter Challenge

At the beginning of this quarter, Ann had posted about this quarters challenge theme being early Celtic.

https://feltingandfiberstudio.com/2017/03/31/second-quarter-challenge-3/

I thought a lot about it and had several ideas, but wasn’t sure I could pull them off.  One of them was a pod with spirals.  Lyn got to it before me, but of course as she said, everyone does things differently.  So, I did.

I had some Llama yarn I hand dyed years ago in several colors.  I decided to use that for the spirals.  I made a little bit larger pod than usual in order to accommodate the design.  I laid one layer of Merino on each side, then two layers of Corriedale and a final layer of Merino.  I felt this would give the pod some substance.  Here is the start of the topside design.

Full design wetted down.

Bottom (I ran out of turquoise so I used yellow.)   I had actually had a yellow spiral on the bottom, but forgot to flip it over before starting the topside design so it ended up being cut out.

I did a lot of rubbing to get the design to stay, but the Llama was not cooperating.   It was felting to itself and not the Merino.  Frustrated, I let it dry out then needle felted the design in place.  That did the trick, but the Llama shed everywhere and blurred the design.

I tried shaving and shipping tape it but wasn’t helping.  So, I grabbed my tweezers and embroidery scissors and sat for an hour pulling long hairs out of the design.  There is still more I could have pulled out but goal was to get the black to look black and set off the design.

Much better.

I kept looking at the pod thinking it was out of shape, but it finally occurred to me it was an optical illusion because of the design.

As for the Llama, I thought I had used it before and if I did I didn’t remember it being problematic.  I don’t think I’ll be using it again.

Have you done the challenge yet?  You can post your work on the forum any time, but we’ll be announcing the next challenge soon.

It’s That Time of Year

It’s That Time of Year

Instead of doing another crochet post, I thought I’d share my sister Carol’s good news.

On March 19, I received an email with pics of the latest additions to her sheep family. Twin girls!  They were born at 5 a.m. to Secret Seven. One weighed 10 lbs 15 oz and the other weighed 11 lbs.

The Mom is Dorset & Corriedale.  She was  bred with an East Friesian & Lacaune dairy ram for these cute little lambs. Carol’s granddaughter, Madison, named them Joy and Snowflake, for now.

I had written about her new sheep acquisition last year here:

https://feltingandfiberstudio.com/2016/04/25/welcome-to-the-family/

Carol is expecting her East Friesan/Lacaune dairy ewe will deliver this week.  Her other two Corriedale & Dorest mix will deliver next month.  She has 9 older sheep and the two babies at the moment.  Three Corriedale & Dorset ewes, three Corriedale  & Dorset wethers and two East Friesian & Lucaune dairy ewes and a East Friesian & Lucaune dairy ram.  She’s hoping to get a Corriedale ram this year.

I hadn’t heard of the Friesian or Lacaune breeds. So, I looked them up.

https://en.wikipedia.org/wiki/East_Friesian_sheep

https://en.wikipedia.org/wiki/Lacaune_(sheep)

Evidently, they are both known for their milk being used for gourmet cheeses.  So, my sister plans to milk two of them to make cheese.

While they will be busy with babies, they will also be shearing the sheep soon. Yes, I will be getting fleeces to play with!


More Natural Dyeing with Cochineal

More Natural Dyeing with Cochineal

This is the last of my summer experiments with natural dyeing.  Cochineal are those little scale insects that are picked off of cacti.

cochineal

I’ve seen some really nice results using cochineal such as Nada’s experience she posted on the forum this summer.

As with my previous experiments, I used small amounts of silk habatoi, silk gauze, silk mulberry, wool yarn, and merino and corriedale rovings.  They were pre-mordanted.

The cochineal had to be ground.  I used a wooden mortar and pestle, then put them in a blender, then made it into a paste before adding boiling water.

The mixture was then left overnight before adding to the pot. (This was divided into three parts first to use with different modifiers.)

The first pot I used only cochineal.

20160625_155500The second I modified with cream of tartar.

20160626_153605

The last I added iron.

20160626_153855

After each batch was removed from the pot, I left it “cure” for two days.  Since I didn’t have both the a lot of room to spread them out I left them bunched up hence the lines. They also dried much lighter as you’ll see.

20160626_153611-1

This was cochineal with cream of tartar.  You can see the little bits of bugs on them.20160628_112634Once they were cured, I rinsed them out and hung them to dry.

20160628_112751

Cochineal only.

20160629_120347

With cream of tartar modifier. A nice bright pink.

20160701_155219

With the iron modifier.

20160701_154915

While the results were not exactly what I expected, I believe because the bugs weren’t finely ground I got lighter colors.  I may over dye the first batch when I find an electric grinder.  If I had to order cochineal again, I’d look for powder.

Have you done any natural dyeing lately?


Natural Dyeing with Cutch, Rhubarb and Indigo

Natural Dyeing with Cutch, Rhubarb and Indigo

This summer I’ve been playing with a lot of natural dyes with the help of Cathy (Luvswool).  This is the third in my series of natural dyeing experiments.

As with the other dyeing sessions all the silk and wool rovings were mordanted with alum potassium sulfate.  I used the same silk habotai, silk gauze, silk organza, merino and corriedale roving and wool yarn as I did in my previous experiments.

I started with cutch which was in powder form.

20160629_131153

The colors for silk and wool were pretty much the same gold peach except for the the organza which seemed to soak up all the color.

20160630_112547

20160701_155539

I decided that I wouldn’t use a modifier with the Cutch because I had enough browns and goldens.

So, I moved on to rhubarb liquid extract.

20160702_123135

The resulting colors were also in the peach/gold family.

20160702_142739 20160703_115005

A couple of years ago Cathy and I had an indigo dyeing day.  I had a piece of dark crimped silk left over and decided to use this as a modifier for the second rhubarb batch.

20160630_113531

I thought perhaps I’d get a muted green, but here’s what I did get:

20160703_115958 20160907_124311-1

There is a hint of green, but it’s not obvious in these pics. the silk gauze and habotai closest to a light turquoise.  The organza is dusky turquoise blue.  The wool is more of a baby blue.

Here is the indigo silk piece after being used as a modifier.  Still a nice indigo color.

20160907_124630-1

Have you done any natural dyeing this season?

Playing with Natural Dyes Part 2

Playing with Natural Dyes Part 2

I’ve been trying out different natural dyes using similar materials.  This time I tried alkanet roots and logwood with and without iron.

Here are the alkanet roots before preparation which took two days to get ready to use.

20160629_115247

The logwood also had to be prepared ahead of time.

20160629_115247_edited-1

Again, I used mordanted corriedale and merino roving, mulberry silk, wool yarn, silk habotai and silk gauze as I did in my previous post  https://feltingandfiberstudio.com/2016/06/28/playing-with-natural-dyes-part-1/

According to some of the charts I saw on the colors to expect from the alkanet roots, it could be anything from gray to deep purple.  I had also read it was possible for blues or even red.  As you can see from the pot, there was a light purple tinge to the water. The dye liquor was definitely dark purple but then it was diluted with the water.

aklanet only pot


The result was a silver gray.  For all the experiments I leave the pot to cool overnight to get the most color.  This was a lot less than i expected, but its a pretty color.

alkanet

The next step was to add iron to the pot with another set of materials.

alkanet with iron wet alkanet with iron

The top picture is wet, the bottom is dry.  So, I now have silver and gold colors.

Next was the logwood. From all the pictures I’d seen and roving Cathy had dyed in Arkansas I thought I would get some type of purple.  It looked pale in the pot.

logwood pot

So, I was surprised when it dried and it was more of a taupe color. But surprises are half the fun!  Then I added iron and did another batch.

logwood side by side logwood iron top wo bottom

The darker ones on the bottom are with the iron and its more of a charcoal color.

Again, these are all experiments and results can vary depending on water, temperature, etc.  While I had a little different expectations, I’m not unhappy with the results.  I can always overdye.

What have your experiences with natural dyeing been?


Welcome to the Family

Welcome to the Family

I had a big surprise last week when my youngest sister Carol sent me pictures of the newest members of her family — three ewes and four lambs!

It was an even bigger surprise to her that I use wool for felting.  In her defense, she lives in central Wisconsin and has a farm and she, her husband and son run a real estate business.  They are a little busy themselves.

It should have been no shock since she’s been an animal lover since she was a toddler.  She’s managed a dairy farm, a pig farm and has had horses and cows of her own. Carol also has five Border Collies and felt they needed more exercise.  Sheep would be great for them to herd. When she saw the sheep it was love at first site.

None of the sheep are purebreds. She thinks they are Corriedale/Dorset mixes. The ewes were pregnant when she brought them home.  Since then the oldest Mom, Secret 7,  had twin boys.  Carol’s granddaughter Madison named them Salt and Pepper.


Jpeg

Jpeg

The black Mom, Dusty, had a dark black boy named Little Will.

Jpeg

The youngest Mom, Amira,  had a teeny little brown lamb with tan on her face Madison named Rosie.  She was very weak and they had to milk Amira and bottle feed Rosie because she couldn’t get up and walk. But an hour later she was on her feet.  They will let Rosie and Amira out of the lambing pen as long as Rosie is doing well.  She is very tiny.

Rosie

The sheep have only been introduced to the two older Border Collies, Belle who is 2 and a half and Misty who is 1 and a half.  They just visit and fuss over the baby lambs.  Misty thinks all the babies belong to her.  She loves them.

The three pups are only 10 months old and will get introduced to the lambs when the lambs are at least half grown.  They want the sheep to feel safe and comfortable in their own space.  They  are going to build a special round pen for that so it will be easier to control both the dogs and sheep.

Carol is already planning on buying a Corriedale ram this fall. So, the excitement will continue.

I wish we weren’t so far apart, but I’ve been promised fleece next year. so, I’m sure a trip is in order.  Another new adventure!  In the mean time, I’m enjoying the pictures and updates.

Thanks to my nephew Bill and his daughter Madison for the pictures and to Carol for sharing this exciting experience with us.