The cowl is finished

The cowl is finished

I did finally get the cowl finished. It turned out just as I had hoped.  I took it up to a flax processing day to show everyone and Jan took some nice pictures of it for me I think they show it off very well.

If you remember this was the inspiration for this cowl. I liked the way the two points overlap.

This is the silk lap side out.

This is the filk fabric side out.

And finally, this is me wearing it. It’s not a great shot of me but it does show how the cowl fits. I plan to use it this winter. My neck is always cold but this will not be bulky under my coat.

I hope you like it and it was worth the wait to finaly see it done.

Holiday Decorations – Fourth Quarter Challenge

Holiday Decorations – Fourth Quarter Challenge

I have been thinking about what holiday decorations that I wanted to make for the Fourth Quarter Challenge. I wanted to do something simple and decided to try creating an ornament with prefelt. I don’t usually use prefelt in creating my designs so I thought I would give it a try. I decided on a snowman design.

I had commercial prefelt in white and black but none in red. So I created a piece of red prefelt as the first step from mixed 56’s hand dyed fiber.

Next I needed a circle of red prefelt from the background. I wanted my finished ornament to be around 5″ diameter so I used this approximately 7″ container to cut around. I used a craft blade and essentially just scored around the container and then finished cutting the circle out with scissors.

I had enough red prefelt for 7 circles. I hadn’t really planned on making multiples but what the heck, I might else well make more, right?

Next I cut out two circles in white prefelt, two black hat shapes and a black circle to go behind the red circle. I decided that my red prefelt wasn’t going to be heavy enough with just one layer. I used black instead of white because I like a deeper red better than I like a pink. I didn’t have enough red prefelt for two layers. Now on to felting.

I had hoped with two layers of white prefelt that I wouldn’t get a lot of fiber migration. No such luck. I did shave a bit off the surface of the white so it wouldn’t look so hairy and that helped. I only felted this one just to see how it would come out. Next time, I think I will cover with a light plastic to try and prevent any movement of red and black fibers into the white. This one was rubbed with my hand so I think that I got a bit of movement of fiber as well as migration through.

Now on to more decoration. I stitched a small piece of sari ribbon on to the hat for a band. The sari ribbon adds a bit of shine. Then I hand stitched the facial features. Now I have to decide if the ornament needs further backing, if it needs an edging treatment and how to hang it. What would you suggest?

More dyeing shenanigans (with a twist)

More dyeing shenanigans (with a twist)

The last time I wrote, I talked about dyeing yarn. As an indie dyer, my job is to create colourful yarn that someone else will turn into something beautiful. That’s pretty much the norm.

Now, what if I turned that regular idea around and dyed the finished item instead? What would happen? Let’s find out!

I had some very lovely 4-ply yarn at hand, plus some mohair lace that was just coarse enough to be uncomfortable if used alone. Paired together they would make the perfect DK weight yarn for a cardigan I wanted to knit.


Fast forward 2 or 3 days, and here’s the finished cardigan, minus the buttons.

Let the experiment begin! I wanted a red base. I had to add that to the dye bath first. It looks very much like a murder scene, so let me tone it down by inserting a cute photo of my cat Marshmallow next to it.


Since I wanted the red to be soaked up slowly and evenly, I started with cool water and no acid for binding. This will ensure the colour is seeped up gradually and has time to get to the whole garment. I then added the wet cardigan, turned on the heat to medium-low and kept an eye on it.

After 15 minutes, the water was warm and I could see that the red was all over the cardigan. Time to add citric acid gradually. Then turn up the heat, simmer for 10 more minutes, turn it off and wait for the water to clear up and cool completely.

A good sign that you’ve used the right amount of dye and acid is that the water clears up completely once cooled. This is also a great sign of minimal bleeding in future washes, the bane of any dyer.
(If your water isn’t clear, try adding more acid and simmering for another 15 minutes. Let the water cool completely and see if things aren’t better.)

I really liked this colour, but a rule of thumb is, if it looks perfect under water, it’s too light when dry. I also wanted a bit more dimension to the red, so some dark grey was needed.
I didn’t want this new colour to soak up evenly, so I didn’t remove the cardigan from the bath water as I added the new dye, and I kept the same acidic, fast-absorption water from before.

And here she is afterwards in all her glory!

I know the “scruffy look” might not be everyone’s cup of tea but I love it. It looks like a long-worn cardi, something my nan might have passed on to me. The vintage buttons complete the look.

Now, the important question: is the end result the same as dyeing the yarn in the skein? The answer is a resounding No. Depending on how tight you knit, you might end up with a lot of areas that the dye won’t get to because the stitches act as a resist. You can see lighter areas in the photo below, something I fully expected, even though I’m a fairly lose knitter. I actually like this feature because it’s very different from what you normally see.

I had never done anything like this before, and you might be horrified to know that after this, I’ve knit a shawl and now have a second cardigan on the needles, and both will receive the same after-completion dye treatment…

I wore it for the first time yesterday (at the time of writing) and it kept me warm all afternoon indoors.

I hope you enjoyed this experiment. Let me know if you’ve ever tried anything like this before, and what the outcome was! If not, what dyeing shenanigans have you been up to or would like to try?

Stay safe and enjoy the rest of your day.


A Long Wait for a Large Loom Part 3

A Long Wait for a Large Loom Part 3

In part 1 we saw the history of the guilds’ old 90 and 100 inch loom. In part 2 we chatted about the arrival and unpacking of the new 100 inch loom. Now lets take a peek at the reference binders related to the old looms and consider continuing that tradion.

My hope is that today’s guild members, as they chose a topic, whether it’s a coverlet or blanket or something else to try out the new loom, they look back to the weavers from earlier in the guild’s history. Like these earlier weavers they record their projects and designs, take photos of their weaving so we can get a glimpse of them as well as what they are creating.

In the past the guild weavers have sporadically documented their projects both with the 90 inch and 100-inch loom. I (in my capacity as one of the guild librarians) would like to see a new binder documenting the projects which our modern weaving teams will make with this new loom.

94  The 90” loom Samples 1 May 1973 to 1 May 1974

95 – 101 sample pages from the 90” loom sample binder

  102 OVWSG 100” Loom Samples Aug 1982 to Oct 1983

103- 110 sample pages from the 100” loom sample binder

111 OVWSG 100” loom Samples  1987 to 1992 (while the loom was in Donna G’s Basement. Donna also taught the beginner and intermediate weaving at that time with table looms)

112-121 sample pages from the 100” loom sample binder

We have some sample binders in the reference section of the library, including guild projects, workshops and individual members weaving careers.  It would be nice to have sample binders from Spinners, Basket makers, Dyers and Felters too. Keeping records in a sample binder is a way to keep track of your work and experimentation. Your collected projects will give inspiration to yourself or others.  Try to make your sample binder in a way that will keep your samples safe from damage. (Use acid-free materials if you can get your hands on them, sew in your samples if possible rather than tape or staples) and always take lots of photos as you work to include to show the process you went through to make it!

Weavers have the advantage of pre-made sheets (available from guilds or online) that save the draft or pattern of the weaving as well as noting yarns, yardage calculations and notes. i would like to see a similar collection of information for the other fiber arts. Spinners can keeps notes of what fibers were used, where they were obtained, what spinning techniques were used and what the end use for the yarn will be. For Felters, what fibers and their sources, weight of the fibers used,  techniques used, amount of shrinkage when fiber was sampled, note on how the project was made. Photos would be useful to document your project (felt sculptures don’t fit in binders).

Figure out the information that would be useful to have for each project you create. You may want to include not only the date started and finished, but keep track of the hours worked on each project. Or you may be more interested in what fibers are used or what mix of fibers were used and in what amounts. If you have demo-ed you may recall getting asked common questions, how long did that take, where did you get the idea, where did you get the fibers, how heavy is it, how did you make it do that? theses questions mite help direct you in what to include in your binder.

If you make a binder documenting your work it will both keep a record of your artistic career, showing your progress, and looking back through it may inspire new work.   I hope you will consider sharing it with other fiber artists too. If you show them yours, they may show you theirs!

122 Part of the Reference Section of the Guild Library

I hope the saga of the large loom has inspired you even if you do not go out and get one yourself!  If you are suddenly yearning to weave a coverlet or a lovely warm blanket check with your local guild and see if they have a 100” loom you could use.


Who could resist

Who could resist

My name is Janet Bayar, I’m 60 years young and live in the lake District Cumbria. 2018 January I attended a day felting course,a Christmas present from me to my daughter, with my daughter and now I am hooked. I have created art all my life but feel that now I have found “the one”. I am excited for the journey ahead. Apart from the day course I am self taught and live by the “what if” mantra.

When taking part in the beginner wet felting day like many I couldn’t get my head around how you could make this fibre and flat felt into a 3 d item. With patient guidance from my daughter , who has a degree in art , I mastered the craft of felt vessels. My mind then went to , well if you can have one resist why not more and thus the journey began.

I am often asked , what do I mean by a resist. A resist is something that stops wool fibres from felting together. In vessels it could be a simple piece of plastic sheet , in shobori it could be a button or marble. Something that stops the fibres of the wool knitting. Recently I began thinking about using the same techniques I have used in vessels but adapting them to 2 d pictures. I first laid down a base of Marino topps then used herdwick in various shades sandwiching between three different sizes of circular plastic. After wet rubbing until I knew the fibres were well felted I cut out the plastic

Shaping the piece was next. I have mainly used the ever forgiving Marino in the past and wasn’t ready for the harsh corse herdwick and must admit ended up skinning the side of my hand rubbing the fibres into shape. In the end I put on disposable gloves and used bubble wrap to creat the shape.

I loved the process so much I then went on to experiment more.

This shows the piece with only one resist cut out. You can see where the other resists are positioned.

I will now develop these. I always treat the felting pieces as the base of my canvas. Sometimes I go into a project with a concept of where I am going it sometimes the piece takes me by the hand and leads.

In this case my sample piece is developing. It’s early stages yet but I know where I am going but will post how it develops to the final outcome.

Slow Stitch Update

Slow Stitch Update

It’s been over a month since I last posted about my Autumn Nuno slow stitch piece. Here is where I was at the end of September.

I kept working on the negative space between the foreground trees. I was using a grey green thread and it definitely needs more darkness in between the tree trunks but I will have to add a darker thread for that. I am still mulling over what will be on the left hand side in the foreground. It’s kind of amorphous at the moment.

Once I finished the negative space between the trees, I decided that I needed to add some of the grey green into the mid ground/background area. It also helped to “cut” the overpowering sense of red and red orange there. Next up was to add “leaves” to the foreground trees. I decided to use a different stitch to highlight them a bit more. I will be adding a great many more of the leaves in a variety of yellows and yellow oranges.

The photo on the left shows where I am as of today. The photo on the right shows the beginning of the leaves being added with detached chain stitch. I still have a long way to go on completing this piece but I am happy with the progression.


Challenge – make an item for your home for the festive season

Challenge – make an item for your home for the festive season

This  is my version of a commonplace Christmas decoration – it’s not an original idea but it’s unique because I’ve made all the bits. I used fibre in the form of fabric, yarn and merino wool tops.

My colour palette was inspired by the winter sky – blue, white, yellow, pink and grey.

I cut a suitable branch from my garden then coloured it with dark blue acrylic paint (photo below shows the branch before painting)…

…then I rummaged around in the glass recycling bin for a suitable bottle to put it in.

To make the cracker, I used a piece of cardboard tube rolled up in fabric (you can see the white tube through the fabric in the middle) …

…then tied either side of the tube with sewing thread.  The ends were trimmed with pinking shears and the cracker was finished with some narrow organza ribbon.

I knitted a stocking using a  free pattern for mini knitted socks  then stuffed it with some merino wool fibres.  I like this pattern because it’s knitted on two needles, not the usual four, so it’s very easy.

The snowgirl was made from 3 large white felted beads and some floral wire (see how to make felt beads ) and how to make a felt bead snowman).

Her hat is made from a rectangle of knitting drawn up along one long side, seamed, then a small pompom added made from the same wool.


Her scarf is a simple knitted i-cord.  Here is a video – how to make an icord

The tree is a scrap of blue felt, cut to shape, then decorated with fancy yarn.

The star is cut from a scrap of thick felt – yellow on one side and pink on the other.  I applied PVA glue to the edges to stiffen it.


I made 5 snowflakes but each is unique – that’s another way of saying that I made several mistakes because I was watching a film whilst crocheting and not paying enough attention!

I made 15 large felt beads in winter sky colours – but I only used 12.  As I was hanging everything onto the branch I reached a point where I realised I had enough and I had to stop.  The photo below shows them drying on a rack.

Everything was hung onto the branch using thin, yellow coloured wire.

This was a really easy, fun Christmas decoration to make and the variations are countless.  I hope you enjoy making something for your own home, and if you want to share photos please post them here fourth quarter challenge 2020


A Long Wait for a Large Loom  Part 2

A Long Wait for a Large Loom  Part 2

(A long wait for a large loom  Part 1 https://feltingandfiberstudio.com/2020/10/25/a-long-wait-for-a-large-loom/)

The guild both Ann and I belong to had an old 100″  loom at the end of its life. With the greatly appreciated grant assist, we were able to order a new loom that will be much easier for our ageing membership to use. We had our grant request approved so put in our order with Leclerc Looms. We dispersed parts of the old loom, put in a new floor in the classroom and awaited the new looms arrival…..

Unbeknownst to us, other guilds seem to have had the same grant idea! So, the loom that should have been ready for us in a few months, was suddenly delayed, then delayed again. There was a backlog of orders at Leclerc looms for 100-inch looms!  Then Covid 19 hit and there seemed to also be a shortage of wood (looking at the packing crates I can believe that!) so 18 months since we placed our order and a couple of grant extensions, our new loom arrived.

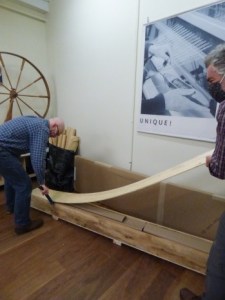
Long heavy wooden crates arrived and had to be carried up the stairs (there is a turn in the stairs too) since the 100” loom crates would not fit in the elevator.  All the crates and boxes were transported up to the classroom (which is down a long hall from the stairs with a couple more corners just to make it a bit more challenging). That was enough of an accomplishment for the day and a different unboxing date was decided on.

  41 – 42 A long way to carry all the heavy boxes up from downstairs

The evening they selected coincided with the day I would be doing the library book exchange, Oct 7th.  The guild library during covid has been doing book requests and drive by pick up /drop offs at the side door  for our members. It’s a bit more work for the librarians, but it is allowing the members to use the library again.  I was finishing with the library and started packing up, as the team of unboxers arrived.

43-45 yes there is candy involved in the library book exchanged!

   46- 47 I locked up the library, took the camera and headed for the classroom.

Upstairs in the Classroom, unboxing was already underway! Since we could not all be there to experience the extreme excitement of seeing the 100” loom unboxing I took photos and posted them on our guild face book group page.

48- 51  The Unboxing had begun!

I tried to capture some of the wonder of what is this? Where will this go? Is that a tensioning device for the bobbin rack? OOOH, a counter!!!! What are those extra beams for, are they just deflectors? OOOH, sectional bits and extenders!!!!

52-57 OOH!!

That is one big loom!!! In pieces it looks a lot bigger than 100 inches worth!!!

58 – 62 BIG!!!

63 There was ergonomic unboxing while sitting on a chair.

The last long wooden box was the one with the reeds, leash sticks and rods.

64-68 the last wooden crate

You can see the unboxing of the treadles and here is a close up of the treadles.

  69-73 that box was the treadles!

You can see the bobbin rack also still wrapped up. This will be a useful addition to the 100 inch since with a sectional beam you will not need as big a team to warp this large loom! I spotted the tension box, a counter and I think a tensioner for the bobbin rack too (COOL! My 60 inch sectional didn’t have one of those!).

74-75 Bobbin rack!!

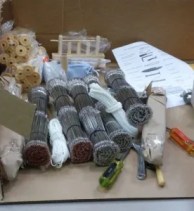
The loom parts were well packed! The packing crates look like long window boxes!

76-77 well packed

The assembly of this loom will be like a giant 3d jigsaw puzzle! I hope photos will be added as this part is started. This next step might take a number of sessions more to complete. I will check next time I’m in to work on the library to see the progress.

78

After seeing pictures of the 100-inch loom and the fun that the next assembly project will be, I bet you are glad that felting is just vast quantities of wool, soap, pool noodles, bubble wrap, needles, wire and odd bits of equipment that were not originally intended for felting. (ok, that can take up the same space as the big loom but the wool is lighter to move!!)


Next trip into the guild library to do a book check, pull a couple of magazines and get photos of a couple of reference books, I also went up to see if the 3d puzzle was underway. Yes! It was almost complete!

It looks so shiny and new with its bubble wrap still on the beams! (those extra pieces I wasn’t sure how they would fit turned out to be a rotating breast and cloth beams.) I look forward to seeing if the rotational aspect will improve take up of the cloth or warping the loom.


79-81 the 3D “Kebec II Loom Counter-balance with Pulleys”

The extenders and the sectional parts still need to be added to the back beam but that isn’t too big a job. The bobbin rack is still to be assembled too. But the new loom is almost ready for its first weavers!

82-84 Sectional pices yet to be attached.

85-91Loom close ups

92 – 93 the New loom even makes the Guild’s Grate Wheel look smaller!

Since the new loom is now here, it’s time to start thinking about what exciting things it will be making; Blankets, coverlets, catalogue, curtains, Icelandic blankets?

My hope is that today’s guild members, as they chose a topic, whether it’s a coverlet or blanket or something else to try out the new loom, they look back to the weavers from earlier in the guild’s history. Like these earlier weavers they record their projects and designs, take photos of their weaving so we can get a glimpse of them as well as what they are creating.

Weavers have kept samples binders of there projects with notes on drafts, samples of warp and weft yarn and a sample of the woven cloth. Sometimes there are notes about the designing the project or inspiration that they used. Some have photos of the weaving in progress, finishing, equipment and weavers involved in the project. Sample binders can be a history of a weavers life or inspire other weavers.

We have a few sample binders of previous 90 and 100 inch loom projects in the guild Library.  I will show you a few next week.  Since these binders are very helpful to weavers; the Spinners, Dyers, Basket makers and Felters may want to make there own versions of sample binders!  Have fun and keep felting!

94  The 90” loom Samples 1 May 1973 to 1 May 1974


Decorating the cowl

Decorating the cowl

As you recall I was dying some silk lap for my cowl. They turned out well. Silk always looks so raggy after dying. I think it’s the squeezing out of the excess water. They look a little better dry after a little shake and stretch.

With the cowl being different colours of purple I think either the gold/orange or gold/ orange/purple.


I decided on the gold/orange/purple. the gold/ orange was to close the leaf fabric. I cut a small amount from one side of the lap.


I stretched the silk over the back of the cowl leaving enough on each end to cover the front.

I flipped it over and then cut up the leaves to decorate the ends. I put some on the underside( the silk side) and some on the top.

Then the other end

You saw above I had about 10 grams of silk. After stretching it out to get the amount of silk lap I wanted, I ended up cutting about 1/4 of it off the 2 ends.

I covered it up and gave it a good rubbing on both sides and rolled it up. Next up, the rolling. I am starting to feel like this is the never-ending cowl but I hope to show you it all finished in the next post. Before I can do that, I have to make some more masks, my mom wants a couple and some more pie making. And of course, today is Halloween. No trick or treating for the kids but the grandkids are having a haunted walk in the field. The grownups have as much fun setting it up as the kids will have running around in it.


Mystery Fabric Nuno Scarf

Mystery Fabric Nuno Scarf

We were having a discussion on the forum about nuno felting and how to maintain the length of fabric without too much shrinkage in that direction last week. Then I happened to find a piece of mystery fabric cut in a scarf length in my studio. I can’t remember where I got it but I think one of my fiber friends must have given it to me. It has a loose weave and appears to be a man made fabric and feels fairly soft, kind of like jersey.

Here’s a photo of the scarf and a close up. If you look on the mid to lower right hand side of the right hand photo you can see the weave. (click on photos to enlarge)

The fabric has a fun pattern and I decided to use blue green for the wool color. I wanted to use a minimal amount of wool so the scarf stayed light weight and I wanted to avoid shrinkage of the length of the fabric as it was already fairly short.  I had some blue green short fiber merino in batt form that I decided to use.

I decided to use blue tape to outline the fabric so I would have a pattern for laying out the wool. I could have turned the fabric over and laid out the wool on to the fabric but didn’t feel like turning it over after layout. (Being lazy again)

So I laid out a very thin layer of wool laying the fibers at a right angle to the length of the scarf.  Then I put the fabric back on top of the fiber, wet it down and began rubbing on the fabric side. I usually always recommend doing a sample first to make sure the fiber will migrate through the fabric but since this was such an open weave, I didn’t think it would be an issue. And, luckily, I was correct in that assumption. The fiber migrated very quickly and I ended up just rubbing the scarf with soapy hands, rubbing the scarf with fabric side down on a rubber ridged surface and it held together very quickly. Then I did some fulling holding the scarf in my hands and accordion (sort of) style folding and stretching lengthwise to full.

Here’s the scarf after felting and fulling. As you can see, it shrank more than 50% of it’s width but minimally lengthwise. The scarf is very lightweight and still long enough to wear as a scarf instead of a cowl.

So now I have a new scarf just in time for 6 inches of snow and 1 degree F cold that dropped on us this past weekend.