A few of my collection of wheels (a wheel would be lonely if it were the only one!)

A few of my collection of wheels (a wheel would be lonely if it were the only one!)

January 2023 still is having its way with changing my plans so I will just have to acquiesce and make new plans more in line with the year’s decrees. I am still working on my vocabulary note, I can’t show you too much about my big Christmas present yet, since my desk is trashed as I try to move furniture and upgrade my office to better function. I am also debating which of my flock of wheels (is it a flock? or should it be a whirl or maybe a herd of spinning wheels? Maybe it’s a flurry, let me check with google, silly distractible brain!! Worse google doesn’t know!!! Let’s say it’s a whirl or a flurry, since when you get one, usually more follow.)

The plan, (barring more changes) for next Monday’s guild social, is a “meet the wheels” afternoon and early evening. We have a good number of new-ish spinners who began their journey just before or during the plague. Those of us with wheels who are willing to let others try them will bring one (or maybe two) to the social and introduce them to the curious spinners. I wish I could take all of mine outside and get a group photo, but it’s snowing and there are stairs to navigate. So that may be a photo shoot to do in the spring or summer possibly with a bit of carrying help.

My first wheel was found in an antique store on Bank Street. It was under $150.00 Ashford traditional wheel with 1 bobbin and a 1 or 2-speed flyer. I think I upgraded to the 2-speed. It was a bit overpriced, but it hooked me on spinning and started the collection. I have had a number of Traditionals over the years. The oddest was from the Stittsville flee market. I was cruising the outside parking lot stalls and spotted the wheel so stopped to check it out.  The wheel was very wobbly and may be warped, and the maidens (the part that holds up the flyer and bobbin at the front of the wheel) had been painted to the point they didn’t turn to get the bobbin out. Hummmm. The frame seemed loose too, that will just need an allen key to fix. Worse still someone had taken city of Ottawa fence paint, brown, to the whole wheel!! Poor thing.  (It looks like the brown colour that taking lots of leftover paint and mixing it together makes.)

The vendor rushed over excited by the prospect of a sale. “Oh do you like my antique wheel?”

Poor vendor, he really doesn’t know what is about to hit him. I replied going into educational demo mode, “Well, it’s an Ashford traditional wheel. It is sold out of New Zealand, as a kit spinning wheel. They were making them to help home production of yarn during world war II. I was on their website last night, you can still order one today and they make replacement parts!” I took a breath and his face looked a bit deflated. “The wheel may be warped,” I spun the wheel showing the large wobble, “the Maidens are stuck and won’t rotate to remove the single bobbin, it should have 3 bobbins and a lazy kate when it was shipped.” He looked a little more deflated when I looked up.

“So, you know what it is?” he said.

“Oh yes!” I stated with enthusiasm, “They still sell parts! If the wheel is warped I can order a new one, I may be able to get the maidens loose if not I can order a new mother of all,” pointing out the parts which would include the base where the maidens sit as well as the maidens. “So, how much are you asking for her?”

“Would $50.00 be too much?”

“No, that seems fair, I should be able to replace anything that isn’t working.” He looked relieved and took my money.  As I put the wheel on my shoulder and turned to go. There were two glaring women standing behind me…. I am not sure if they wanted a wheel to put as a decoration on their porch, or were actually spinners who just missed out on a good deal.

I wandered around the market with my wheel looking for an allen key. Then remembered I had one in my change pouch…. I found a quiet spot put the wheel down dug out the key and tightened all the frame joints, then gave the wheel a spin….. Oooh, it spins true!!! No more wobble! Now if only I can get the paint loose from the maidens and around the bobbin. I spent some time when I got her home working to loosen the maidens with success. She spun like a dream but was the ugliest wheel I have ever owned. I think I traded her to Elizabeth for the same make of wheel but one without paint (it looked better with the looms).

The guild has a couple of Ashford Traditional wheels. They have been good teaching wheels. I have found that mine always reminds me of a golden retriever of wheels. “Is that fibre? Can we spin it? Aww, Please?” They are fabulous sit-by-the-window-and-spin wheels, but with their Saxony-style shape (Flyer beside the drive wheel) they don’t fit quite as easily into and out of cars, so I probably will not bring mine next week.

1)  2003 one of my Ashford Traditional wheels (on loan to another guild member) and my Lendrum folding upright wheel (it has a broken peg  underneath that I cant fix so wobbles from side to side as she spins.  The wheel still spins well even with her drinking problem.) there are sample scaines hanging off the lendrum.1)  2003 one of my Ashford Traditional wheels (on loan to another guild member) and my Lendrum folding upright wheel (it has a broken peg  underneath that I can’t fix so wobbles from side to side as she spins.  The wheel still spins well even with her drinking problem.)

Wheels come in many shapes and sizes. You can divide them into spindle wheels (they have a spike to spin off like the sleeping beauty wheel) and flyer wheels (that’s the Rumpelstiltskin straw into gold wheel). We can then further divide the flyer wheels into the upright-shaped “Castle” wheels or the more horizontal-shaped “Saxony” wheels. There is a third group of flyer wheels called “Direct drive” wheels. They don’t have a drive band but they are usually small and portable.  I have a few wheels in each category.

Thinking upon my, flutter or flurry or whirl of wheels, I should select a couple that would be available but also they may not have seen. I think the ones that would be most beneficial for other spinners to try would be; the Louet S40 “Hatbox” (Louet made a commemorative edition a few years ago so you can again get parts for the old ones!). The Road Bug wheel by Murlen tree and probably my Alvin Ramer Kick spindle (it’s like a tiny grate wheel but a lot slower but also more portable).

The Louet S40 “Hatbox” arrived one day at the guild while we were still at the old location on Chapple Street in Ottawa. There were 3 of us drooling at the cute little wheel that fits in its own box. That is why it’s called the hat box and not by its actual name S40.  One could not get it to spin, (there is a trick to that) which left two of us in serious want of a hat box. The other contender was finding spinning more difficult from health problems so we decided that if she didn’t want it anymore she would sell it to me at the same price as was being asked. Which eventually happened and the wheel came home to meet its new wheel friends.

Being a direct drive wheel the flyer drive ring must sit against the drive wheel or the flyer doesn’t turn. If you spin and pull the yarn to the side away from the wheel, you also pull on the flyer and lift the drive ring off the drive wheel. Lifting the flyer Stops all rotation of the flyer and thus the spinning. So spin directly in front of the orifice or towards the side with the drive wheel.  It comes with three small bobbins. Along with the flyer, they are stored in the lid of the wooden top of the hat box. It is a single treadle with a nice heal-tow action.

2)  2010 Spencerville Demo Ann has an Ashford Traveler.  We are separated by one of my floor inkle looms.  I am spinning on my hatbox wheel. (We were in an unheated, dirt floored, arena. Not the heated building we were expecting.)2)  2010 Spencerville Demo Ann has an Ashford Traveler.  We are separated by one of my floor inkle looms.  I am spinning on my hatbox wheel. (We were in an unheated, dirt-floor, arena. Not the heated building we were expecting.)

This was one of my main demo wheels for years. Before the introduction of the commemorative reissue a few years ago, it was very hard to get replacement parts. The tensioner, to keep the flyer leaning into the drive wheel, had long ago been replaced by an old shoelace. It worked but, occasionally at a demo, she would randomly and holey unpredictably go from silently happily spinning and being ignored by passersby to suddenly screaming at the top of her lungs (yes I am sure this wheel at least has lungs). This tended to gather a large crowd to see what I was killing in the corner. She would again shift back to a mild happy spinning wheel persona and happily demonstrate spinning fine lovely yarn. (I think she just didn’t like being ignored by possible admirers.) I did eventually get a replacement for the old shoelace and she has not screamed at anyone in ages. (I rather miss her occasional screams).

The road bug wheel is made by Murlen Tree, in Vermont, USA. Mine arrived many X-mass mornings ago and was quickly put together. There was a bit of a wobble in the wheel but it spun beautifully. I borrowed my father-in-law’s computer and sent an email to the company asking how best to adjust it to reduce the wobble. (This was early X-mass morning so I did not anticipate a response until at least after Boxing Day.) The return email was back within about an hour with apologies and suggestions for fine-tuning. He suggested I get back to him if I had any further problems. WOW. What a company!  I sent back an apology for interrupting his X-mass morning and thanked him for his suggestions.  It has also been a fabulous demo wheel.

3)  Road bug at the Richmond Fair, wheel is sitting on a rubber-backed mat on top of a tarp on wet grass, covered by a tent. 3)  Road bug at the Richmond Fair, the wheel is sitting on a rubber-backed mat on top of a tarp on wet grass, covered by a tent.

4)  Road Bug spinning wheel in a under bed box at a rainy demo in Manotick.4)  Road Bug spinning wheel in an under bed box at a rainy demo in Manotick.

5)  Another rainy demo, this time at the Richmond Fair. Spinning with the road bug in an Ikea under bed storage box to keep it off the wet ground. (trundle box is visible behind the chair under the table.)5)  Another rainy demo, this time at the Richmond Fair. Spinning with the road bug in an Ikea under bed storage box to keep it off the wet ground. (trundle box is visible behind the chair under the table.)

I have trundle boxes for each of my travel wheels. It’s a folding plastic box with 2 wheels and an extendible handle. There is room to put the little wheel, hand cards, and fibre (or a bit more fibre if I’m spinning and shopping at a fibre festival!). If you are considering spinning in public or are demoing, a trundle box can make transporting your wheel and spinning equipment much easier. If you have a larger wheel, one of the folding camping wagons is a good acquisition to move your wheel, small loom or felting supplies.

6)  My spinning spot with the trundle box up on the window ledge, the Road Bug on a small rubber backed mat and a green uncomfortable hospital chair.6)  My spinning spot with the trundle box up on the window ledge, the Road Bug on a small rubber backed mat and a green uncomfortable hospital chair.

7)  Chesterville Spin in, 2013 Kick spindle in front of Road Bug7)  Chesterville Spin in, 2013 Kick spindle in front of Road Bug

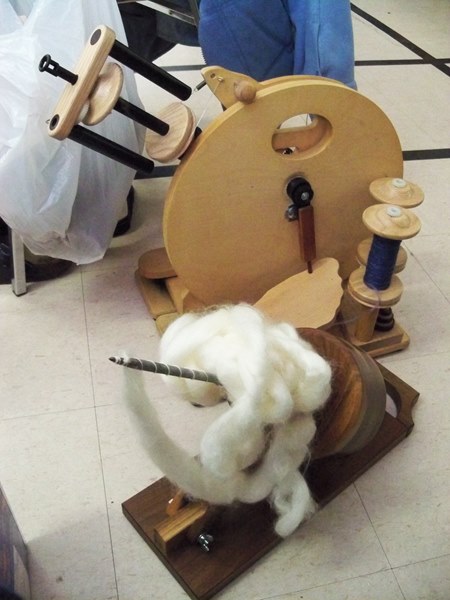
The last spindle wheel I was considering is called a kick spindle. Mechanically, it works like a Great wheel since it uses a spindle. Unlike my diminutive great wheel which has a ratio of 80 to 1 (that means one rotation of the big drive wheel turns the spindle 80 times) its ratio is much slower. There are quite a few makers of Kick spindles,  but they are not common. You can occasionally see them on Etsy or Kijiji. I found mine for sale on Kijiji and rushed out just at the end of a very large snow dump, before the roads were completely cleared. I only had to get to a town just south of Ottawa but saw many cars in odd parking spots off the sides of the highway as I slowly got there. The poor driving was worth it to bring home an Alvin Ramer made kick spindle.

8)  Farm show demo 2013m sitting with my Right foot turning the large drum, which runs the spindle. 8)  Farm show demo 2013m sitting with my Right foot turning the large drum, which runs the spindle.

 9)  Jan is sitting in the corner of the hospital room, listening to audio books, while spinning on the road bug wheel.9)  Jan is sitting in the corner of the hospital room, listening to audiobooks, while spinning on the road bug wheel.

10)  This is the Kick spindle I switched to part way through Glenn multiple times in hospital. 10)  This is the Kick spindle I switched to partway through Glenn multiple times in the hospital.

I had been taking in the Road bug and was sitting with him while he slept. He said he would start to wake up, hear the wheel making its whirring sound, know I was there and go back to sleep. One very early morning at shift change a new nurse rushed in to check the machines, muttering “it doesn’t usually make that sound!!” I stopped spinning and she seemed to notice the wheel and me, sitting in the corner of the room, she had run past me so I don’t know why she didn’t notice a spinning wheel. While Glenn found the quiet sound of the wheel soothing, it seemed to have distressed her. Therefore, I switched to my kick spindle, which is, basically, silent.

11)  Road bug in one of Glenn‘s hospital room, sitting on the window sill out of the way11)  Road bug in one of Glenn‘s hospital rooms, sitting on the window sill out of the way.

12)  A different hospital room, the same wheel and trundle box sitting on the window ledge.12)  A different hospital room, with the same wheel and trundle box sitting on the window ledge.

 13)  During the various hospital trips and stays I also found out you can spin fully gloved and gowned with a drop spindle.13)  During the various hospital trips and stays I also found out you can spin fully gloved and gowned with a drop spindle.

I spun in the coffee shop in the hospital while Glenn was in surgery and had patients, nurses and a couple of doctors come over while I was stress-spinning, and tell me how relaxing it was to watch me sitting by the window spinning.  This may be a good spot for spontaneous spinning, it helped me calm down while waiting and it also calmed those around me. It has been quite a few years since I have been spending time at the hospital but I still have my emergency spinning bag hanging on the back of the door.  It has a couple of spindles, in case anyone wants to join me spinning, and some good fibre. Glenn has not been hanging around at the hospital since these trips quite a few years ago, but it’s good to have a spindle ready just in case his body changes its mind.  (I have also taken felting for hospital appointments but I can’t find a photo of them.)

Looking through the photos I found another “meet the wheels” guild day in 2014 shortly after we moved to the new location. I seem to have brought the Road bug, Hatbox, Kick spindle and the Cowichan wheel (Indian head spinner) from B.C. I tried out a Majacraft Aura and enjoyed its smooth spinning. I hope to find an affordable, lonely, second-hand Majacraft Aura or Suzi at some point.

 14) My Cowichan and Road bug wheels with a spinner trying the latter.

15)  I am trying out a Majacraft wheel. the wheels moveing from left to the right is Majacraft Aura, Ashford Joy, Louet S40 Hatbox, Cowichan or Indian Head Spinner from B.C. and Merlin tree’s Roadbug.  Behind the wheels is the Alvin Ramer Kick spindle, sitting on the chair beside me.15)  I am trying out a Majacraft wheel. the wheels moving from left to right is Majacraft Aura, Ashford Joy, Louet S40 Hatbox, Cowichan or Indian Head Spinner from B.C. and Merlin tree’s Roadbug.  Behind the wheels is the Alvin Ramer Kick spindle, sitting on the chair beside me.

Learning to spin has taught me how to draft fibre, how to comb and card fibre into various fibre preparations and has given me the opportunity to spin different types of fibre and blends of those fibres. Coming from a spinning (and weaving) background I think this has helped me in my felting endeavours. Spinning also keeps your Fiber-hoard in check if you do a bit of Over-shopping. But I will warn you that the acquisition of “A” spinning wheel can lead to the acquisition of More spinning wheels!!

If you are curious you can find out more about two of the wheels that are still in production below, you will have to be lucky and catch a Hatbox or a Ramer Kick spindle secondhand. Both are fun and worth trying if you get the chance. Have fun and keep felting and maybe try spinning if you have not yet had the opportunity.

https://www.themerlintree.com/tmt_003.htm

https://www.ashford.co.nz/products/spinning/category/spinning-wheels

Doing Some Teaching

Doing Some Teaching

The last couple of weekends I have been teaching some workshops. Last Sunday was Nunofelt Scarves. This was originally scheduled for December. But I caught whatever nasty head cold was going around, it came with a very annoying cough. I did a test for Covid and it was negative.

Anyway, after a couple of years of no workshops and a delay, it was good to be able to teach people in person again. I am still rusty when it comes to taking pictures during class, so there are not very many of this one.

rubbing nuno felt scarves

students with finished nuno felt scarves


Yesterday I taught Wet Felt Birdfeeder/house.

This is the picture we use to advertise it.

Everyone in the class chose to do a feeder( larger opening) in a gourd shape.

I remembered to take a few more pictures but I still had a hard time remembering.

Laying out the base wool.

laying out wool for a felt birdhouse Two people laying out wool for a felt birdhouses two people laying out wool for a felt birdhouses


Decorating


The finished birdfeeders. I think some of the holes may need to be enlarged. They have balloons in them to hold the shape while they dry.


All in all, we had a great time on both days. It was so nice to teach again to interact and answer questions and see people be amazed when it really does work.


Handmade Mixed Media Tree ‘Specimen’ Book

Handmade Mixed Media Tree ‘Specimen’ Book

I have been continuing to slowly add bits and pieces to my tree ‘specimen’ book. You can see most of the ‘blank’ pages of the book in this post and some pages that have had ‘specimens’ added to them here.

This is definitely a ‘slow’ project that I am working on very intermittently. It’s been fun to pick it up again and just add a few things here and there without pressure to finish it or make it look perfect.

Mixed media book, front page painted watercolor background, machine stitched moss glued to background and definition of mossy torn paper glued down.

I added some more machine stitched moss to the first page and a definition of mossy.

Mixed media book open to left page painted cracked plaster on the left and torn sketchbook page with 'pine needles' on the right.

On this page spread on the left, I had one of my plaster coated pages but it had cracked significantly. I need to get some gesso to paint over these pages but since I haven’t ordered it yet, I decided to try something different. I layered different colors of paint on the cracked surface. You can click on the photo to enlarge it. The page on the right is a torn piece from one of my small sketchbooks. It kind of reminds me of pine needles. It was originally screen printed and I added colored pencil to enhance the look of the pine needles. Torn and messy is the point of this book so I ripped the sketchbook page and glued it down to a lightly painted background page. You can see the dark edges of the next page which is next up.

Mixed media book open to a page spread with an eco print of leaves and buds on the right hand side.

The page on the right is an eco print on paper that my friend Paula created. She has a big stash of these papers and kindly let me use a few.

Mixed media book open to page spread with blank plaster coated page on the right and back of eco print with cut out frame of painted paper and tea bag machine stitched skeleton leaf on the left.

This is the back side of the eco print above. I cut a window out of the painted background so you could see more of the backside of the eco print. I added a machine stitched tea bag leaf as well. The right side is another plaster coated canvas pages that needs to be gessoed and then drawn or painted on.

Mixed media book open to page spread with blank plaster coated page on the left and green painted paper background and stenciled/painted brown pine cone on the right.

This pine cone on the right was stenciled ages ago. I pushed some kind of thicker medium through the stencil to give a relief effect. It didn’t work all that well and got a bunch of bubbles in it. I painted it green at some point but didn’t like that either. I got it out of my paper stash and decided I needed to finish it. I added walnut ink, sepia marker and matte medium to get it to a point that I was satisfied with it looking like a pine cone. It also needed more strategic cutting out than I had done previously. I glued it down to the painted background letting a little bit of the pine cone stick out over the edge of the page. This is a testament to never giving up on a piece of artwork!

Mixed media book open to page spread with orange feathers woven into a gridded hand made paper on the left and an eco print glued to a dictionary page on the right.

Next to the feathers that I had shown you in my last post, I glued another one of Paula’s eco prints down on to the dictionary page. I can’t decide if this page needs something else but I will just leave it for now. I do want to leave more simplified areas where the eye can rest.

Mixed media book open to page spread, blank plaster coated page on the left and painted skeleton leaf on the right.

This one on the right is the last page that I worked on this time. It was originally a deconstructed screen print on paper all in the brighter green. When I was looking through the book, this page caught my eye as I saw a leaf in the middle of the page. I used Inktense pencils and then water on a brush to make the darker leaf appear more strongly on the page. I hope you can tell I am having fun with this. It is a very freeing process not worrying about the final outcome.


My story in 1000 stitches (or so)

My story in 1000 stitches (or so)

Hello, Felting and Fiber friends.

It’s me again, a beginner felter, a novice in knitting and crocheting

(have I told you the story of my then-boyfriend’s knitted scarf? the one that kept getting longer and longer the more he used it, and his mother, an accomplished knitter and crocheter who knits a new woolly jumper for my kids each Christmas, kept undoing the last bit of the scarf and fixing it? well, he is my husband now, it goes to show that even disastrous knitting is useful…)

no skills in weaving, BUT I used to do quite a bit of embroidery, and that’s how I began my adventure in textiles, so I better tell you a bit about it.

I started with cross-stitch as a little girl (maybe 10-11-years-old) at my local Parish: an ex-teacher of Feminine Skills at schools (yes, she was that old that the subject existed with that name when she used to teach) had accepted to run a class of basic embroidery stitches for little girls at the Parish, with the aim of having a few of them join the Parish group of embroiderers who would sell their works for charity once or twice per year at the Church. She was a spinster, with loads of nephews and nieces to dote on, and she was prim and welcoming: we addressed her as Miss, Signorina in Italian, ate the cookies that she brought as treat, and loved her. My mum accepted to send me only if I promised not to lose my time and sight on finicky embroidery, and at the beginning it seemed that we were making quite small designs, such as cross-stitch butterflies for cards, or a grass stitch embroidery on a cotton bag that was supposed to hold bread.

I have kind of disappointed my mum during the following years: the idea of painting with thread caught my fantasy, and I started spending more and more time (sometimes secretly) embroidering, especially cross-stitch. Miss and the group of local embroiderers were an oddity like myself, all guiltily enjoying together an outmoded craft while chatting away a few hours. My schoolmates were half in awe of my skill and half disbelieving that I could spend so much time on that.

In time I cross-stitched a lot of things, cushion covers, cards, bathroom towels, tablecloths of various sizes (never the big ones, though) and place mats and runners, babies’ bibs, alphabet samplers and Christmas decorations… I loved the fact that you could achieve marvelous paint effects just with thread and a wise design. I also liked the idea of following a pattern, and the repetitiveness of the cross-stitching itself, that helped me calm down in difficult times and made me happier.

I used to have a subscription to two main Italian magazines that were my inspiration:

  1. one is the monthly “Le idee di Susanna”, skewed towards cross-stitch, but with loads of practical crafting ideas around it, and also a bit of knitting, crochet and sewing thrown in to entice you to more. See it here if you are curious.
  2. the other was a magazine about any kind of embroidery, especially the free stitch types of hand embroidery, it makes you dream about the highest skills of the ancient embroiderers and the top modern ones, and had been published since 1929. its past issues of the Sixties and Seventies were more practical, with knitting and useful sewing, and are still traded online by crafters. Unfortunately, it has gone downhill very quickly around the 2010 after being sold to a new publisher, and I can’t seem to find any recent issue, so I guess it is not active anymore. Such a pity, but I guess I could sell my old issues for a good price in a few years! See some of its cover images here.

Most of what I embroidered and made in those years was sold for charity or gifted to friends and family, and there weren’t mobiles to take a quick photo, so I do not have much left of them. Not because I am particularly generous, you know, it was just safer not have all those proofs of my not-studying lying around the house… Anyway, I did not need twenty baby bibs, but they were all so cute that it was hard to resist when my nephews were arriving… Oh, well, some of the bibs actually came back to me when my kids were coming in turn, so.

Here are just a couple of bathroom towels that I cross-stitched for myself when I started getting serious with my then-boyfriend (way after the longest-scarf-of-all-times): I have the photos only because those were on linen, and thus light enough to come with me when we moved from Italy to England. I loved cross-stitching on linen or cotton-linen blends: slower, but the final effect is so neat and lovely!

(I apologise in advance for the fact that none of the things are properly ironed or pressed: those are all things that I fished out of drawers as they were, and I can not face the iron at the moment, please forgive me!)

A set of white towels embroidered with a blue cross stitch pattern of flowers
Cross-stitch embroidered towels with a blue pattern.
Detail of blue cross stitch flowers on a white linen towel
Detail of the blue cross-stitch pattern: it repeats itself three times to achieve the right length.
Back of a white towel showing a neat cross stitch blue floral pattern
I always like a neat cross-stitch back.
A set of white linen towels embroidered with a pink roses cross stitch pattern
Pink roses cross-stitch towels.
Detail of a pink roses cross stitch pattern on white linen towels
Detail of the pattern: you can see that the rose is the unit repeated to achieve the right length.
Pink rose cross stitch pattern towels on a heating rack in a bathroom
I noticed some humidity stains on the towels (that’s how much we use them!), so those are now getting their duty time in our bathroom!

We have some more cross-stitched towels in storage boxes in Italy, to gather dust there, along with a few other embroidered things. Here are cross-stitched place mats that I embroidered on an ecru linen-cotton blend fabric, that we use as breakfast place mats. I embroidered the edges with the simplest point-a-jour: I am not really a fan of making point-a-jour, but I like having my edges neat and hate hand-sewing even more!

A set of two ecru place mats with a floral cross stitch pattern and their matching napkins
Cross-stitch place mats and napkins for our breakfast.
Detail of cross stitch embroidered place mat and napkin with a floral pattern
Detail of the place mat and napkin
Detail of a jour bordering of embroidered place mat
A view of the a-jour that borders the whole mat and napkin
Back of cross stitched place mat with floral pattern
I always check my backs!

During my University years I started improving my free-stitch embroidery skills, and could not resist a forage into the variety of embroidery stitches that I was seeing on my magazines. Firstly, just learning about patterns and stitches, I soon started to use elements from books and magazines and adapting them to my needs and taste to create new things. Lately, I created a couple of things completely to my own designs. Here again I am afraid that I do not have much to show, because most of my creations were gifted to special persons or are in storage boxes in Italy at the moment. One day we will get all our stuff out of storage, who knows.

I only have three examples of my free hand-embroidery to show you: two of them, bathroom towels and a small tablecloth for teatime, I have brought with me to England, and the third is a small curtain that I have embroidered and hand-sewed for one of my best friends, and she graciously sent me the photos during the Christmas holidays.

So, here we go.

The bathroom towels are of the finest linen and I wanted a refined effect. It took me ages to complete the complex point-a-jour of the border, but it gave me plenty of food of thought for other embroidery projects (more on that later on). The embroidery itself is white on white: my initials framed by flowers and leaves for the main towel, and a smaller version of the initials for the small towel. I am afraid that I do not know the names for the stitches in English and I am kind of hazy about the Italian names as well right now: we are talking about nigh on twenty years ago, and even then I tended to focus on doing more than on names. The design of the embroidery was taken from a book or magazine that I had, and I modified it only a bit to simplify the framing elements, if I remember correctly.

Hand embroidered towels with my initials white on white
Towels embroidered with my initials, white on white.
Embroidery of initials C and P, white on white, with flowers embroidered left and right of the initials
Here is the embroidery: I hope you like it.
One bigger and three smaller embroidered flowers white on white on the left of the initials, with swirls and leaves and dots
The flowers on the left of the initials.
Three small embroidered daises with two bigger and several smaller leaves, and swirls, white on white
The flowers and leaves on the right of the initials.
Detail of a double a jour bordering on fine white linen,  a knot groups strands at regular intervals in the center of the drawn thread part of the hem.
This bordering took me ages: just tell me if it was worthwhile!
Neat back of embroidered initials towel white on white.
My fascination with neat backs goes on: I am quite happy with this one, what do you think?

As to the teatime tablecloth, we use it as breakfast table tablecloth: I like my breakfast as you may guess! and I really need something fresh and lovely for it to work, as I am not a morning person and waking up to ugliness would be too much. This is finest cotton, very lightweight and almost see-through. I designed it completely, and I wanted it quite simple and colourful. I started by edging the border: at the beginning, it was a lot of fun changing colours randomly every little while, but it was a long way to the end, I can assure you.

Embroidered teatime white fine cotton tablecloth with a hem embroidered in different violets and greens and small groups of embroidered flowers scattered on the tablecloth.
My favourite breakfast tablecloth: violets on a snowy white fabric.
Multicolured embroidered hem in different greens and violets and white.
I changed threads randomly to achieve a multicoloured look for the border.

The violets were quick to embroider, I remember, just a stem of grass-stitches and the violets themselves done with different violets or white (also mixed together) in lazy daisy stitches (is this the right name? I think so, I felt very lazy for sure, I wanted to finish it quickly). The leaves I outlined with grass-stitch and chose to cover only half with satin/full stitches in different greens. I like how it feels a very easygoing and modern type of tablecloth, in the end.

Embroidered violets 1 are white and pale violet, with pale green and medium green leaves
Which of the violets do you like most? Number 1
Embroidered violets 2 are medium and pale violet, with medium and pale green leaves
Number 2
Embroidered violets 3 are white and pale violet and a mix of the two, with dark and pale green leaves
Number 3
Embroidered violets 4 are dark and pale violet with pale and dark green leaves
or Number 4?
Neat back of embroidered violet on white fine cotton
I am satisfied with the backs as well.

And, lastly, the curtain that I made for my friend. Well, that was my first curtain, so I just could not reassure my friend of the final results: she was a bit doubtful, and also more than a bit afraid of my mum’s disapproval of me “wasting my time in useless old stuff”, I am guessing.

I presented her with my idea of design for it in a secret meeting at my place: she was going to live in a terraced house and I adapted her a terraced houses outline, taking inspiration from one of the magazines, that had a very intriguing design. In my mind the idea was already taking shape drawing from my experiences with variants of point-a-jour , openwork and different embroidery stitches, but she had to take a leap of faith and trust in my skills.

We went together to the market to buy the fabric, and she sensibly opted for a mixed synthetic and cotton: after all, she would have to wash it, not I! It took my around 2-3 months to finish it and present it to her: I remember that I was so excited when she lastly saw the finished curtain!

A white curtain with an embroidered outline of terraced houses, one different from the other, white on white
My terraced-houses curtain. Courtesy of Alessia Fabris: 18-years-old and still going strong!
Details of three of the terraced houses embroidered on my curtain with different embroidery stitches and thread work and openwork
All the houses are different! Courtesy of Alessia Fabris

I wanted all the houses to be very different one from the other: each of them has a different door and various windows made using different types of stitches. I made the windows all openwork, and used this as a way to practice different openwork effects. I hand sewed it completely, as I did not have a sewing machine.

I asked my friend to take photos of some details to her taste, and she sent me these:

Detail of an embroidered door on a terraced houses curtain, embroidered with a counted stitch pattern
Detail of one of the doors. Courtesy of Alessia Fabris
Details of embroidered and openwork front door on my terraced houses curtain
This door has a couple of windows on top. Courtesy of Alessia Fabris
Four openwork windows and an embroidered door on hand embroidered terraced houses curtain
I am amazed that those openwork windows are still looking fine after 18 years of washing cycles! Courtesy of Alessia Fabris
One of the embroidered houses on my embroidered terraced houses curtain
The same house seen a bit farther away. Courtesy of Alessia Fabris

My friend reported neighbours and passersby asking for information on her unique curtain that they could see from the outside, during the first years that she lived there. I want to think that it helped her make friends there faster.

I then went on to make two free hand embroidery curtains for myself before my daughter was born: both white on white, a small one designed by me, all butterflies of different sizes and was actually a sampler of stitches and openwork. The other one quite big, an adaptation of an idea and design from a magazine, was embroidered on all the borders (apart from the upper one) with a continuous repetitive swirling pattern, all in one single easy type of stitch, chain stitch. I finished it with my belly growing and going in the way of embroidering and sewing, but I got it done, and had the help of my first sewing machine to finish it faster. Still, it took me a couple of months to finish it (I was not working, and paused most of my attendance to my second degree at University due to not being able to move.), and none too soon: my daughter was born shortly after the last stitches.

As to point-a-jour, openwork and needle lace, they made me sweat swear and tense, but I love the look of them once it is finished, so my big unfinished project of embroidery is a linen towel set with a maybe 8-in-height border (20 cm) of openwork-needle lace. I got through maybe half of it on the first towel. I guess that it must be in one of the storage boxes in Italy, although I could swear that I brought it to England when we moved, still hoping that in time I would be able to go on..that was around nine years ago! Embroidering takes too much time for my current life style!

I hope that I gave you some ideas of embroideries to try!

See you next time for a bit of felting!


Playing With Fiber – A New Beginning

Playing With Fiber – A New Beginning

It’s 2023 and I am preparing for all sorts of fun this year! In June, I will turn 65, so I am busy learning about all my Medicare options. I guess, that will be a new beginning, but that’s not the one I am happiest about. What I am rejoicing in, the most, is my new business name and the dreams I have for the future.

Playing With Fiber Logo
Our logo

Playing With Fiber, is what I plan to do, for the rest of my days on the planet! Playing is the keyword, it gives me permission to try new things, and not place such restrictions on myself. Most of all, it will fit into the life Brian and I, are finally planning to live. It’s taken a lifetime to identify “what I really want,” and suddenly it is right in front of me. Brian and I were recently at a coffee shop, discussing upcoming travel plans, and he suggested we take photos during our quiet moments, and turn them into fiber memories. Like a bolt of lightning it hit me! This is our time, our plan, and our future…the business will work with us, wherever we are.

I’m excited to say, this blog post will be the very first post, on my new website. In our new business strategy, I will write about what I am doing, and offer specially curated custom kits. If a reader is interested in something special, they can reach out to me, and we will do our best to make a kit with supplies that work for them.

This blog post is about … blending yarns to make what you want to see. As my website implies, I am always fiddling with my fibers. I look at a single skein of dyed yarn as a flat canvas on which to build. Most of my favorite knitting projects are knit with a combination of yarns.

Playing With Fibers presents a seamless poncho knit top-down with leftover luxury and specialty yarns. Sections are approximately 1 inch in depth and color changes happen as yarn runs out.
Poncho style shawl, I knit for myself, using all sorts of leftover yarns and specialty fibers. Pattern: The Reunion Shawl by Jen Guintoli

In close ups you see the number of yarns I mixed together to get the blends I wanted to see. That sort of play, makes every project fun for me, and makes it uniquely satisfying. This project is from 2017.

Now, let’s fast forward, recent projects I have been playing around with. I made some educated discoveries along the way. Instead of throwing anything together, color wise, I have started to realize the transformative effects of additional yarns, colors, and fibers.

This hand dyed DK skein of 70% Baby Alpaca/20% Silk/10% Cashmere, is sitting on top of a cowl, knitted with another skein of the same batch.

This is a lovely DK weight yarn I dyed. I wish I dyed 2 skeins this way, but instead I dyed 5 of them. Now, that I have this cowl knitted, and no one seems to be interested in buying all it’s brightness, I have 2 entire skeins languishing. I saw a pattern for these quick slippers, and thought I could use some cozy slippers. I grabbed a small ball of leftover yarn and began pulling color options, to tone it down a bit. Nothing I had laying around seemed to work. In a moment of craziness, I threw some brighter colors at it, and surprisingly that was what it needed. I’m going to enjoy wearing these punches of color on my feet.

Playing With Fiber slipper made with 4 different hand dyed yarns
My very colorful Cloud Slippers. A free pattern by Adrienne Sullivan

My next example addresses working with beautiful hand dyed fingering weight yarn, when you no longer enjoy projects on small needles, that take forever. That’s where I find myself at this moment in life. I have a solution that works for me…knit luxurious fingerless mitts.

Playing With Fiber knitted these fingerless mitts. Shown with the two yarns combined together.
Maine Morning Mitts by Clara Parkes, is a free pattern available on Ravelry. My favorite, go-to pattern for fingerless mitts. Make a pair in 2 evenings.

http://www.mountaintopfarms.net is where I purchased this lovely angora blend yarn. You can see the yummy halo in the photos. This yarn gives all the warmth you can possibly want, and they knit up really quick on US-7 double points.

My last blended fiber project, is a sweet little shawl made with a special skein of silk and bamboo, I purchased at a destash sale. It was only $5. I thought about throwing it away a hundred times. But, every single time something stopped me. It was simply meant to be!

The shawl that almost wasn’t.
The perfect little skein, combined with a strand of KidSilk lace weight yarn, edged with a picot beaded bind-off. I am smitten and can’t wait to wear it.

I encourage you to play, with those favorite skeins, you have laying about. Dare to try something different! You may surprise yourself.

Capi Puszcz

Starting 2023 with books

Starting 2023 with books

2023 has already sent me a change of plans notice. My last goal for the end of 2022 had been to have the local guild library book check completed. Then I would spend hours grouping, sorting and formatting data into lists so the library would be more accessible for members to use. I was running a bit behind schedule and the new deadline was to have the circulating books counted by 4 pm on Jan. 9th.  If I cannot get all the circulating books checked between one meeting and the next it means I have a lot of extra checking to do once the books start moving in or out of the library. Ann had been extra busy this past year and was not as available as she had hoped. This meant that on the day of the meeting, there were four full cabinets of books checked, leaving one last cabinet full of books to check (780.’s Basketry to 900.’s Textiles – Finished cloth).

1) OVWSG Guild Library cabinet full of weaving books, on the door is a list of what is on the bottom shelf. In front of the cabinet is the old guild computer on the library rolling table.1) OVWSG Guild Library cabinet full of weaving books, on the door is a list of what is on the bottom shelf. In front of the cabinet is the old guild computer on the library rolling table.

I got into the studio extra early and It all was going quite well until I got to my nemesis, the bottom shelf. The “Problem” shelf.  The Shelf placement within the cabinets does not allow binder-height books to sit upright on the bottom shelf, so most books sit with their spine edge facing up. For easier use, I had created a photo and list of what should be on that shelf. Unfortunately, I had to check to make sure that all were present and accounted for. This involved a bend, twist and lean maneuver that I had to repeat as I found each miss placed book or worse lack of book. Missing books kept me searching longer before giving up, and marking them as not there. I finally got to the end of the shelf and thought I had gotten away with this particular acrobatic bending maneuver…. But my back was only considering how best to discuss this grievous insult to its dignity. (It also likely recalled the 4 previous circulating cabinet bottom shelves.) I knew well before the meeting had started I was not going to be able to stay. I had the library set up for the evening, labelled everything I could think of and waited for Ann to arrive after work so she could run the library. (Sorry Ann!!) I got help back to the car and headed home, hoping to watch the meeting on Zoom. (There is still the Reference section, Audio-Visual and Magazines left to check!)

It was a fabulous presentation on a reinterpretation of district checks by Carl Stuart. But by the end, it was a challenge to get from the computer down the short hall to the bedroom and into bed. It’s taken 4 full days to get the grumbles back to a manageable level so I can hope to think and type.

My original plan of having a chat about fibre prep vocabulary has been put on hold (it will let me find better photos for you too) and instead, I wanted to keep with the theme of this post so far and show you the books of X-mass 22.

Glenn has discovered buying Felting Books for me is as much of a challenge as buying Blacksmithing books for him. Even so, he did very well this year.

2)  Unwrapped Christmas presents, 3 felting books, candy and a plastic box sitting on a black duvet.2)  Unwrapped Christmas presents, 3 felting books, candy and a plastic box sitting on a black duvet.

(The Mysterious contents of the plastic box we will chat about in an upcoming post with Ann.)

He also found an IKEA Octopus and an Octopus winter hat!

3) Yellow IKEA Octopus wearing a Red, Black and Purple Octopus winter hat sitting at the pillow end of the bed.

4) Japanese book cover by Sachi with framed needle felted cat on the front

The first book is in Japanese, I think it may be “Portrait of Cat Made of Wool Felting”? It has a lot of detailed pictures about the needle felting of cat faces including how to make eyes, whiskers, patterns, and fur in detail. The text is completely in Japanese but the layout is correct for a European book (spine on the left-hand side) so I hope there will be an English edition soon. Ann said there should be an app on my phone to take a picture and translate it. I don’t think my phone is that smart but it would be helpful while waiting for an English version.

Let me show you a few interior shots so you can get an idea of the content, the pictures are extremely detailed and give lots of information even if you don’t read Japanese (Written English is still challenging enough for me, arigtozimasu).

4.1-4.4)  A couple of random pages showing photos and text from the book.4.1-4.4)  A couple of random pages showing photos and text from the book.

This would likely be a good book for those interested in extreme realism and fur applications. I suspect it will be even more enlightening if you have a friend who reads Japanese! I hope it will be printed in English, I would buy it.

The second book I had seen mixed reviews on.  I was hoping to find an inexpensive second-hand copy to check out. The rumours had been quite negative, that the book was basically a coffee table vanity project with lots of pictures of the artist’s work and almost no info about how to needle felt.

5) Cover of “Make Animals felt Arts from Japan” by YoshiNobu5) Cover of “Make Animals felt Arts from Japan” by YoshiNobu

While I would agree the first section (66 pages) of the book is inspirational images of the artist’s work, the second section, (page 67 to 118) are divided into information on tools, types of wool, ways of blending fibre, basic techniques, then on to small projects to teach the basic techniques and expand on them. The projects are finger puppets and broaches. The instructions start out with simple shapes and a bit of colour blending and get more complicated. There are occasional translational word choice problems but overall it has good information. (There is a drum carder labelled as a combing machine! I will return to address that in a later post).

This book may have received better reviews if the inspirational section was after the informational section. But the information included is good and the pictures though small are reasonably clear to follow.

5.1-5.4) A few interior pages from Make Animals felt arts5.1-5.4) A few interior pages from Make Animals felt arts

 6) Cover for “The Natural world of Needle Felting, learn how to make more than 20 adorable animals” by Fi Oberon showing needle felted pengquins.6) Cover for “The Natural World of Needle Felting, learn how to make more than 20 adorable animals” by Fi Oberon showing needle-felted penguins.

The last book he found for me was one I already had picked up in 2021. “The Natural World of Needle Felting, learn how to make more than 20 adorable animals” by Fi Oberon.

6.1-6.4) parts of interior pages of “The Natural world of Needle Felting, learn how to make more than 20 adorable animals” by Fi Oberon6.1-6.4) parts of interior pages of “The Natural World of Needle Felting, learn how to make more than 20 adorable animals” by Fi Oberon

This book has a different approach to sculpture than I usually take. There are a few projects where the wool is cut and the armature inserted when the sculpture is almost complete. There are a number of projects with partial armatures and some with no armatures. I purchased a copy while I was working on the armature wire project. There is the use of strips of felt to make the core of a sculpture as well as the suggestion of using a ball of wool yarn to start the center of a spherical shape.

There is an interesting suggestion for making felted mushrooms (a currently popular topic) by using cardboard yarn and then adding a cap and stem of needle-felted wool. Most of the projects are simplified shapes which are not too intimidating for a beginner or advanced beginner.

All 3 books are worth looking at and depending on the direction your style of needle felting is taking you may want to get a copy of some of these for your own library.

7-7.1) Ann looking at my Christmas felting books7-7.1) Ann looking at my Christmas felting books

Ann and I will show you a bit more of our Christmas acquisitions but that will be in a later post. In the meantime have fun and keep felting!!!

Stitching Some Trees

Stitching Some Trees

I am continuing with my slow(very slow) stitching. I have accidentally done part of the first-quarter challenge. Last time I showed you my tree trunk. Next, I got some of my handspun to make the evergreen part.

I pulled a lighter green first. it was much too light. I switched to t a much darker green that works much better. it is a thicker yarn too, which I think works better.

stitching an evergreen tree light green yarn test. stitching an evergreen, tree dark green yarn test


The practice one worked out well so onto the good ones.


stitched tree trunk stitched evergreen tree

The trunk on this one ended up a bit fat but I don’t mind

brown stitched tree trunk 2 stitched evergreen 2

2 stitched evergreen trees


And the third one

third stitched tree trunk  third stitched tevergreen tree

And this is how it looks now

3 stitched snow flakes and 3 stitched evergreen tree.


I like it so far but I am not sure what to put in the blank corner. I thought maybe a branch so I did a test one. I may try to add some cones or snow. I am not sure what kind of tree it looks like. What do you think? what would you put there?

stitched evergreen branch, half done evergreen branch finished


Adding Lichen to the Mossy Driftwood

Adding Lichen to the Mossy Driftwood

My next step in finishing the driftwood piece was to create lichen. I had made lichen before from Tyvek but alas, I had none in my stash. So I looked for other materials that could be shaped with a wood burning tool and that would shrink and make interesting shapes with a heat gun.

What I found was a fusible lightweight Pellon interfacing and nylon organza. The interfacing does not need to be fusible to work, it’s just what I had on hand. I can’t remember why I bought it but hopefully, it would work so I wouldn’t have to buy anything else.

Painted pastel blue green interfacing and nylon organza on white background

I painted the small pieces of interfacing and organza with a light layer of acrylic paint. As you can see here, the paint was not heavy and the shade of blue green was very light in value.

wood burning tool burning lichen shapes into painted interfacing

Next, I got out my wood burning tool and a piece of glass to burn on. I made random lichen shapes in the interfacing. I also did the same with the nylon organza. Once they were cut out, I held the small pieces with a pair of tweezers and used the heat gun to make them shrink up and get curly. I also added a bit of brown marker to the edges of the lichen as there are definitely brown bits on the real stuff.

Here’s the result. Yay, it looks like I wanted it to. Success. Now to add it and the dead teabag leaves to the mossy driftwood. I glued the lichen in place as it was mainly on the wood itself. I stitched the leaves down to the felt in a couple of places.

Textile Art Piece - driftwood covered with felt, stitched moss, stitched tea bag leaves and lichen from interfacing and organza

Here’s the result. You can click on the photo to enlarge it.

And the close up views. I’m happy with how it turned out and it was a really fun project.

Ideas for the F&FS Challenges

Ideas for the F&FS Challenges

A wonderful 4-week holiday in Australia, Christmas markets and hosting lots of family visitors mean I’ve done very little news-worthy felt-making since my last Felting & Fiber Studio blog.  ‘Production felting’ is my own term for making lots of similar things for shops and markets.  I did a fair bit of this in November and December: mostly printed tea light holders, printed wool ‘pebbles’ and Christmas cards. These were my 2022 cards: handmade felt with hand-printing. I extracted the tree from a larger, royalty-free, public-domain image and added the heart before printing onto fine flat felt.

Handmade Christmas card showing a black spruce tree outline with a red heart on the top by Lindsay Wilkinson Artwork
My 2022 handmade Christmas cards

I sold these through various outlets and sent a small number myself.

I’ve enjoyed making felt ‘pebbles’ for some years. Since learning to print on felt from Lindsey Tyson, I’ve been able to adapt photos of some of my Mum’s watercolour paintings to print onto the pebbles.

Here’s the link to a previous blog post, which shows the tea light holders and includes a link to Lindsey’s excellent course https://feltingandfiberstudio.com/2022/07/21/learning-to-print-on-wet-felt/

So, as I don’t have a lot of new stuff, I thought I’d contribute a few of my past makes and current thoughts as ideas for the first quarter and year-long challenges.

You can find the challenge details here

https://feltingandfiberstudio.com/2023/01/01/2023-first-quarter-challenges/

Thinking about the year-long tree challenge brought to mind a 3D tree stump I made 3 years ago.

The tree stump was part of a set of pieces I made to represent lifecycles.

More information here. https://feltingandfiberstudio.com/2020/03/01/3d-wet-felting-experiments-part-two/

Alas, I left the base alone for a long time during a pandemic lockdown and it was attacked by moths.  In a way, being eaten by moths was rather fitting: lifecycles in real life, but the moth holes meant I ended up cutting it up to make bookmarks (after some very hot washing). I did, however, recently sell the tree stump on its own and it now lives in Canada.

Pondering future projects for the tree challenge: I have a very tall, beautifully coloured ‘silver dollar’ eucalyptus tree in my garden.

eucalyptus tree top in a garden in Whitstable. Variety silver dollar
My eucalyptus ‘Silver Dollar’

I previously made a eucalyptus seed pod at a workshop with Gladys Paulus. Link here to find out more https://feltingandfiberstudio.com/2019/11/14/a-felting-adventure/

3D wet felted sculpture of a eucalyptus seed pod in grey and white wools with a surface of mohair locks

The eucalyptus tree has potential for lot of other projects, including maybe using the leaves for eco printing onto felt. Eco printing is something I’d like to try, though whether I will get round to it remains to be seen. I don’t recommend any breath-holding for this.

Contemplating Caterina’s quarter-one challenge of making something practical that you can’t buy: one of my favourites is this case I made for my iPad mini. Nuno-felted with sections of recycled sheer silk scarf.

I know you can buy iPad cases but I like that this one is unique and fits perfectly without any fasteners. Because it’s an exact fit, the iPad stays put until you need it, then slides out easily.  It’s getting rather battered now as I carry it around all the time so maybe it’s time to make a new one.

Felted vases and plant pots are also both unique and practical. Here are a few. I like that you can co-ordinate them to your décor, or to a specific plant or flower, or just go for colours and patterns you like.

https://feltingandfiberstudio.com/2022/03/15/9-vases-a-plant-pot/ for more information on how I made these.

And finally, here’s something that meets both last year’s challenge to complete some UFOs (un-finished objects) and this quarter’s challenge to make something that you can’t buy.  

Here’s a pair of earrings that I started making a while ago using hand-dyed 14.5 micron Merino wool. I incorporated the earring post into the felt and some black sequin fabric inside using resists. These were inspired by the work of Aniko Boros and Judit Pocs.

two tear drop shaped wet felted 3D earrings in marbled greys. One smaller with tear drop cut in front revealing black sequins inside. One larger with no cut
The sequin section is more sparkly than in the photo

As you can see, I got quite a long way along, but while I finished fulling the one on the left, I stopped with the right-hand one in the pre-felt stage. I’m not completely sure why: probably it wasn’t quite what I had in mind. But it surely can’t take more than about an hour to finish that one, so I’m promising myself here that I will complete that second earring. The world will be minus one small UFO.

I hope I’ve given you a few ideas about different ways of taking on the challenges.  How are people getting on with them? If you make something in response to these or any of our previous challenges, please do post your photos on the forum. We all love to see and be inspired by what other people are making.

In the meantime, wishing everyone a very ……

PEACEFUL

JOYFUL and

HEALTHY

A cute sleeping koala
koala
An emu with its mouth very wide which looks like it is laughing
emu
An echidna eating smooshed insect liquid with its very long tongue
echidna

…….. New Year

Twining with a little help from my friends

Twining with a little help from my friends

Happy New Year!!

November and December were incredibly busy but I am glad to say things have calmed down a lot in the last 3 weeks. The Christmas markets have closed and I have nearly finished writing the first draft of the much requested tutorial on how to make vessels with feet and lids. The lidded vessel pictured below is the main example I will demonstrate how to make in the new tutorial (with a few others for alternative methods to make lids etc):

A purple and orange felted vessel with a flared foot and a lid with a handle

I just need to write one more section, then edit and proof-read it. I hope to make it available in my Etsy shop in a couple of weeks.

Other than this purple vessel I have only managed to complete one piece of work between the markets, fairs and writing the new tutorial….

Back in September I was core spinning with the intention of using the yarn to experiment with adding twining to ceramic pots, you can read the post about that here.

This is the ceramic pot I made, after drilling out the holes I unintentionally filled with glaze. Drilling the holes has made the edges a little untidy but at least I can now get my yarn through them 🙂

blue and green ceramic bowl with holes around its top edge

I used paper yarn for the warp by threading equal sized lengths through each hole. I really like working with this material for the warp, it is stiffer than wool yarns and you can open it out to decorative effect.

Ceramic bowl with lengths of paper yarn threaded through the holes

Once all of the holes contained a strip of paper yarn, I cut 2 metres (6 feet) of a pretty boucle yarn to use as my weft. I folded it in half with one side longer than the other, this is so that when the yarn runs out while you are twining it only runs out on one side making it easier to add a new length of yarn.

Before looping the yarn over the first warp strip, I twisted the bottom of each pair of paper yarns to help hold them in position for the first few laps with the weft yarn. For the next pot I will try tying a knot in each pair of warp strips to secure them as the twist tended to come undone while I was twining, I really needed an extra pair of hands to hold everything in place while laying down the first layer of yarn.

Floki was only too happy to “assist”….

Ragdoll kitten looking at camera
“What do you mean, that’s not really helping?”
Ragdoll kitten rolling on his back while pulling and chewing on the yarn
“Your tension is way off, let me help…”

Even with Floki’s assistance the boucle yarn proved to be too fine for the space between the holes in the pot. I could have used 3 or 4 threads to bulk it up but it had proved so fiddly trying to hold the warp strips in place while twining the first layer I couldn’t face the prospect of trying to do that with 8 strands in the weft so I had a rummage in my stash and found some chunky grey yarn to use instead.

Same pot but with 5 layers of chunky grey yarn woven between the blue warp uprights

At this point I introduced some of my hand spun yarns, starting with the grey core-spun yarn from September (they are the grey bulges you can see at the top of the woven section) and then a yarn with colourful pink and blue beehives.

Woven part has doubled in size and now has bulges of yarn at the top in pink, blue and grey

Happy with the height and shape of the weaving, I tied each pair of warp strips to secure the top of the weaving and opened up the paper yarn before trimming the ends.

Ceramic vase base with grey weaving above and topped with strips of blue paper protruding from the top of the yarn

It reminds me of a blue cornflower.

Same vase as above but photographed from the other side

How has the start of 2023 been for you?