Preparing for Cangames (and felting) Convention, one more Mer?

Preparing for Cangames (and felting) Convention, one more Mer?

Today is Friday May 16th, and this year it is the long weekend in May. It’s time to start planting your gardens with the hope of no frost. here in Ottawa the Friday to Sunday is also CanGames (and felting) Convention I have shown you that before. Glenn will be playing board games, praubly those 18XX train games (older trains can rust, becoming useless and there is lots of math, how can that be fun?) there will be interesting games there such as the live action Kill Doctor Lucky or the chariot races! It also will be a good spot to work on felting or spinning. I may convert some gamers to fiber arts yet!! (i have tought a few to use a drop spindle in previous years.)  I am not sure I will be there the whole time, since I am still finding Mondays at the guild really tiring and am sore a few days afterwards. So now is the time I must decide on what I will work on this weekend.

You may have noticed last fall when the OVWSG had their 75th anniversary retrospective Exhibition at the Mississippi Valley textile museum that one of my Mer’s was missing!!!

from left to Right: Sharkett, Sharkboy, Mr. Mer, Mrs. Mer. from Left to Right: Mrs. Mer, Mr. Mer, Miss Manta, Sharkboy Miss Manta and Sharkette the Mer family pets1.1-1.3) the Mer Family and Pets having fun while out at the Museum, Mr. Mer trying to get someone to play Tennis with him, Mrs. Mer is admiring her new hair, Shark boy playing with the pets Miss Manta and Sharkette.

Yes the teen Miss Mer has wondered off! I was sure she was in the project bag just behind me but no! She had cleverly replaced her project bag with another when I was not paying attention! Teenagers!!! So she had wondered off and did not get herself finished to go out and have fun with the family and their pets. I think she may be wondering the house, looking for a boyfriend,…..she is a teenager.  Since I have looked in all the obvious places I think she might try hiding, without success,  I have decided to move to plan 2, Make her a boyfriend. That should tempt her back to the office! That could be a good project to start at the convention.

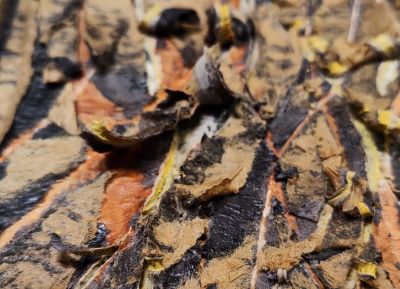
If I were an arctic char based teen Mer-person, what sort of boyfriend would I like? well, personally if I was a Mer, I think I would look for a very dry fish,  maybe one of the really early land walking varieties? Luckily, I am not making this fishy-boyfriend for me. I did see a cool looking fish as I was researching the other Mer’s fishy bits. it was very big, sort of an extra-large more feisty version of a pike. What were they called? Stergons? Oh its spelt Sturgeons? I was close. Hum that has potential. The transition would be fun to consider, but Lots of fiddly details on a sturgeon, so may not be the best option for a busy convention.

labled parts of a sturgeon2) Sturgeon, there are lots of types, and I would need to do more research to figure out which is which. The pattering is intriguing but very specific.

Since she is an arctic variety of fish-person, I should look at arctic options too. There are Inuit myths about sea people, there is the Qalupalik, who usually hunt children who stray too close to the water, catches and eat them. I am not sure that would work out well in the family dynamics of the Mers.

Inut sea person that steels children who play too close to the water.3.1) Qalupauk, who steel children who play too close to the water.

There is also Sedna the Sea Goddess, who has the head and torso of a woman and the tail of a fish. She created all the sea creatures the Inuit hunt.  I have only seen pictures of Qalupalik as women and a Goddess is also a woman so that would not be a boyfriend. Keep looking.

the Inuit Sea Goddess 3.2) Sedna the Sea Goddess

Let’s keep thinking, Narwhals are interesting but the fish parts would not have the fabulous horn. There are Orca (Killer whales), they have very interesting colour patterning, that might work. Why is my brain yelling at me to look at the walrus? That’s not a fish! But that would make an interesting Mer.

diagram of Narwal side and belly vew
File source: http://commons.wikimedia.org/wiki/File:Narwhalsk.jpg

4.1) Narwhal, it would be hard to tell from just the fishy parts that he is a narwhal without the horn.

diagram of Orca from the side.4.2) orca, strong graphic patterning and it would be fun to integrate fish and body parts together.

graphic image of walrus4.3) walrus, ooh this might be fun, integrating shapes, but I am pretty sure that this is not a fish.

I think my best options to consider are Sturgeon and Orca. Both will need ether 12 or 14 gauge wire for most of the armature with finer for the hands, maybe an 18 or 20 steel floral wire. I have a bag of “Carded Core Wool Sliver” from World of Wool, now where did I put it. I will also need photo diagrams to work from.  I hope the printer likes my computer today. (nope, i will see if Glenn’s computer is deemed worthy of printing)

For creating the armature I will have to pack pliers & wire cutter, wire, a ruler, a finger length guide or Sara’s Digitwidget, the proportions for the armature (I have that written out somewhere….)maybe I should go back and look at Sara’s Felt-along It starts here: https://www.youtube.com/live/hljS4YRmz9w

I will modify the original armature to suet whichever fish body I go with. Glenn likes the killer whale, since its simple, elegant, and very classy.

Ok I have a plan, consulted Sara’s mermaid armature and just need to collect the tools and supplies to be ready for CanGames!  Once I have the armature made I will need to bring; a work surface, the extra tacky fabric glue (the type that dry’s clear for fingers), a selection of needles and the fake clover tools(helpful to make fins), then top colours for whichever fish shape I go with.

I am looking forward to the long weekend, but may have to enjoy it in pieces.  i hope you will join me for the parts i get to attend, maybe you will find a sheep related board game we can play? Have fun and keep felting!

Lambs, Flowers, Some Finds and Taking Pictures.

Lambs, Flowers, Some Finds and Taking Pictures.

Hi all, have you been waiting, wondering where my post is? I wish I could say it was because I was felting or playing with lambs, but in truth, I thought today was tomorrow. I will make you wait until the end to see the lambs.

I will start with my new bits for taking pictures. What I was looking for was an arm to attach to my tripod that would hold my camera. I could find expensive things for proper cameras, but nothing similar for a phone. I did find 2 very similar phone holders that would fit right onto the tripod. They do point down, but they do not stick out very far from the tripod.

This is what I have at the moment. It’s a light ring with a camera holder. I use it for Zoom.  I don’t like the holder, it is hard to adjust it to level. The other thing is that it is too tall, two feet above where I am working.  Not a great shot, but it wouldn’t show up against all the wool on the shelves

My tripod will go much shorter than this. And these are the 2 attachments for the phone. I haven’t had a moment to try them out, but I will report on them when I get a little time.


The other thing I bought was a stand that sticks out. It came with a light ring like the one above. The two gadgets above will stick screw onto it.  This is the one I have the highest hope for. The angle is adjustable


Next are some things I picked up last weekend at a local village’s community garage sale. We only get to go to one garage sale a year. It’s the only one on before we start at the Farmers  Market this Saturday. https://barrhavenfarmersmarket.com/

I only got a few things. First, I got a small hair straightener. That might seem strange as I have long, very straight hair, but I got it for ironing inside a book resist vessel. More on that when I try it out.

Next are some mini hanging Shapes. I’m not sure what you call them. I thought they would look nice with little felt plants in them, or I could make tiny pods and place them over the candles that came with them. They are about 4 inches/10 cm tall

Lastly, I picked up the long roll of interesting fibre. It is probably nylon. I will have to see if it will dye.


Now onto flowers. My apple tree is starting to flower, and the lilacs will be along soon.

And here are all the kinds of violets I have


And finally, what you have been waiting for, more lambs


And proud popa, Storm. Really, what he is wondering is why I don’t have treats.

That’s all for now.

Paper Layering Experiment

Paper Layering Experiment

My local group had another “play” day and we created some layered paper experiments. We got the idea from this video.  I immediately thought it would give a good texture for representing bark and we decided to give it a try.

Layers of different colors of paper and string glued together with matte medium.

It’s a really easy process. Start with a background paper and then add layers of string and thin paper with matte medium glueing them together. By using different values and colors of paper, you can get an interesting look. We used painted tissue paper that we already had in our stash.

You can put as many layers as you would like but remember to leave the strings coming out the edges so that you can pull them once everything is dry. You also need to try and figure out what strings are the top layers and pull each layer of your strings as you work down. Use different thicknesses of string and thread and it gives different looks once the strings are pulled out.

Layers of different colors of paper and string glued together with matte medium.

Here’s one of mine when it was finished and drying.

Layers of different colors of paper and string glued together with matte medium.

And here are both of mine once dried completely. It took about 24 hours to dry completely.

Layers of different colors of paper and string glued together with matte medium.

Then you gently tear the strings out or rip them out. It helps to hold the paper around the string as you go so you don’t pull off too much paper. But you can’t really control what tears so it is very organic looking when you’re finished.

Layered torn paper complete

Here’s one of the results that Louise achieved.

Paula was very productive and took her photos with a matte around the pieces.

Here are my two pieces. I left the curly bits and they are quite textured.

Layered torn paper complete

You can see how textured with this close up angled photo. This was a fun process and gave interesting results. Now I have a few more pieces to add to my book.

Felt pods and flowers

Felt pods and flowers

Annie

Recently I decided to make a wet felted pod, I haven’t made a pod for quite some time so it was interesting to go through the process.  Then I made another one.  I didn’t really love the colours of the pinky yellow one, I’ve been more drawn to greens and blues for a while so I made a “woodland” inspired one that I like much more.  But I think I need 3, so am planning to make a purple one, with perhaps some yellowy orange accents.

Pods are a really nice thing to make, they don’t take long and people always seem to love them, they are very tactile. Also they look good with a plant in which always helps!handmade felt green pod with colourful curls

handmade felt pink and yellow pod with colourful curls


handmade felt green pod with colourful curls being used to hold a flower in a pot

I also have been making felt flowers, but the idea has been to make them as quickly as possible and with limited materials and as simple a technique as possible.  I was asked if I’d do a felt flowers workshop, but only a couple of hours long, and of course people who have never made felt before would love to go home with a finished item!

I’ve made several and I think they are pretty good, hopefully at a level that workshop beginners would enjoy making.

Trouble is that now I’m thinking oooooh I’d like to play with this more and make bigger and more flamboyant flowers and ooh praps I can add more fabric, and what about paint!? etc etc.

handmade felt flowers multi-coloured

I made one with a stem and I also found in my “UFO” box a bright 3 petal flower that I made probably years ago.  But it has interesting possibilities!

hand made orange and pink felt flower with stem

3 petal handmade felt flower pink, mauve, green

I’m halfway through spring beads but they aren’t as exciting as these flowers now, and I’ve got another trees picture on the go.

Lyn

Recently my ‘playing with textiles’ has mostly been unexciting (think curtains etc) so I have only managed to achieve a few greeting cards using scraps of felt.

If you are thinking of using your felt scraps to attach to cards, I’ve got a top tip because felt doesn’t adhere very well to other surfaces! Cut a piece of paper to the same shape, but 2mm (0.08″) smaller all around, as your scrap felt that you want to attach to card.  Hand stitch the paper shape to the reverse of the felt shape using stitches that don’t go all the way through the felt then cover the paper shape with double sided sticky tape. The felt will then attach to the card permanently.

Here are some felt stars cut from scrap felt and used to make a card – perhaps good for a male birthday.

handmade birthday card with felt stars


Edge Exhibition

Edge Exhibition

I live in a coastal town in SE England called Whitstable. As a member of a group called Made in Whitstable (a loose affiliation of local artists & makers) we had a group exhibition coming up with the title of “EDGE” at The Horsebridge – our wonderful local community arts centre. We needed to produce at least one item that fit the Edge brief, however we wanted to interpret it. The rest of our work was entirely up to us. 

I could have got away with explaining that practically everything in my wet-felted pictures happens at the water’s edge, and it therefore met the brief. But I was actually quite excited to think through some new and different work. I particularly like working 3D and it feels like a while since I’ve felt really energised by the creative process. So, I thought about what ‘edge’ might mean and I ended up making 3 different interpretations.

Edge 1

For my first piece I pondered the edge of the felt as a focus of a picture. 

I decided on a flat background with strips of felt jutting out to show their edges. I’ve made things like this using multiple resists to create flaps that then stand out. I wondered if I could pre-felt some strips before attaching, rather than creating flaps with resists in the lay-out stage. 

I selected some home-dyed Corriedale wool I had left over from an old project. Just as I’d decided to use this I noticed how well the colours went with a second-hand silk scarf I’d just bought so I decided to use some of that too. 

Home-dyed Corriedale wool and charity shop silk scarf

After I’d laid it out, leaving a fluffy edge to help attach it to the background, I realised I’d made it far too wide. “Oh well”, I thought, “I’ll cut it into strips once it’s prefelted”. I’d intended this to be a test for a more thought-through piece.

I decided to stick with what I’d done and move on to something else: I never made the more thought-through piece.

Edge 2

For my second piece I started to think about the outside edges of a shape. I decided I’d try using a book resist to make a vessel with a large surface area. 

I scanned the internet for book resist ideas that didn’t have too many ‘pages’. I alighted on an article Gladys Paulus (a felting hero of mine) had written for DHG comparing bergschaf and merino wools in which she included a 3 page book resist.

https://dhgshop.it/blog/article-compares-carded-wool-bergschaf-and-merino_88.php

I decided I’d use a similar shape using black and white wool but would cut and shape it differently from Gladys’s. 

I wanted to use carded batts as they’re much easier to lay out than tops / rovings when navigating complex shapes.  I had a good supply of white Norwegian wool batts but was struggling to lay my hands on anything appropriate in black.  I found a black merino batt and decided to go with that, though I wasn’t sure how the wools would interact, with the Norwegian being much more coarse than the merino.

Book resist
Starting to full the shape

The Norwegian wool was slow to felt and the black merino didn’t come through as much as I’d imagined. Interesting, if not surprising.  Eventually I ended up with something that looked decidedly anatomical: three lungs was the most polite thing I could think of.  I got a lot of comments about the anatomical possibilities of this one!

The vessel is an odd shape so I decided to embrace its oddness and bought some curved screw-in metal studs to add to the top of each segment. Given the brief was ‘edge’, I thought these would add a little extra edginess.

Edge 3

And, finally, I created a vessel using a circular resist that I would stand on its edge.  I’d recently bought a carded merino and silk (70% : 30%) batt from World of Wool that I was dying to use – it is deliciously soft and scrumptious to feel.

I laid out the first layer clockwise around the resist, and the second in circles radiating from the centre. 

Having wetted the fibre out, I turned it tightly over the resist then set about laying out another two fine layers in the same pattern.  Or at least, that’s what I intended. Looking back, I think I got distracted and may have only laid out two layers on one side, as the reverse side feels decidedly thin and soft, despite long and patient fulling.  Distracted? When I’m making something I’m finding fun, I tend to add lots of “what if”s and “how about”s instead of sticking to my original plan. See the ‘ooh, shall I add some silk’ for Edge 1.  On this occasion my “how about”s included a stripe of mohair tops, a dark circle cut from Edge 2’s offcuts (one on each side) and a strip of curly locks.  Fun, but not very scientific.

Adding ‘stuff’

Anyhoo, here’s Edge 3.  It does feel lovely and is very light but I wish I’d paid more attention to the layout.  I’m tempted to make something similar with a 6 layer layout.

In the meantime, here’s my exhibition space. I was pleased with the results and had very much enjoyed making three experimental pieces. 

Before I leave you, I thought I’d show you a natural phenomenon I saw while I was making my edge pieces. Being lucky enough to live by the coast, I often have a speed walk in the morning by way of exercise and enjoyment. It was a clear and sunny early morning when I noticed some mist rolling in. I saw a puzzling white arc in the sky – sort of like a rainbow except it wasn’t raining. I decided it might be a ‘mistbow’ and looked it up when I got home. Turns out it’s called a ‘fogbow’. It’s unusual as you have to have very specific conditions: enough mist or fog to reflect the sunlight but a low sun behind you which isn’t obscured by the mist / fog. The water droplets in mist are very small so don’t refract the light like raindrops do, they just reflect it. It’s also called a ghost rainbow. I saw this photo while I was uploading the images for this post and thought you might be interested. I’d never even heard of such a thing but I found it really lovely.

2025 Spencerville Fiber Festival

2025 Spencerville Fiber Festival

Yes, I think it’s spring, or at least a good attempt at spring.  We have had thunderstorms, loss of hydro overnight, more rain, the daffodils have joined the crocus, scilla and lungwort and now the trees are budding! Even the portable forest has started its spring migration! (it’s sneaking a pot or two across the driveway, finally arriving in its summer location.)

In the yearly calendar of fibre festivals near Ottawa, we have had in February, the Chesterville spin in, which is a fun, small event to help get us through the remains of winter and top up our fibre hoards, if they have started to dwindle. In April, the Peterborough Weavers Guild holds a large fibre festival that is about a 3-hour drive away from Ottawa, but is worth the trip. This year, I was out of commission for both of these and was very disappointed not seeing fibre friends or topping up the fibre hoard.

Poster for "the Forcast Calls for Yarn and Fiber" the Spencerville fiber fest 20251 poster for the Spencerville fibre festival 2025 (they have a Facebook page if you want to contact the organisers)

The third fibre festival this year was in Spencerville, a small town well south of Ottawa, almost to Highway 401. It’s in the Drummond building, so we will meet you there.

Glenn grabbed the book he was reading, and we headed off.  It usually feels like not that long a drive, but this year the seat belt and one of my incisions were arguing loudly by about 20 minutes out and just got more livid with each other the farther I drove. I also think they moved the town further down the highway, it seemed so much longer a drive than I remember. (Good thing I didn’t try to go to Peterborough)

front of the drummon building2 Front of the Drummond building in Spencerville, where the fibre festival takes place.

We arrived early and found that there were already a few cars with people waiting to go in. As Glenn pulled out my walker and camera, everyone else got out of their cars, and we all headed in to line up inside.  (I was more interested in the washroom.) This is not a big hall, but the sale had a good selection of finished goods, equipment, Yarn and fibre. There were also demo tables from the Kingston Weavers Guild and the Knitters Guild. Most of the aisles accommodated stopping and chatting with friends you haven’t seen in months, but still not blocking getting into the booths.

3 Let’s pay our $5.00 entrance fee and head in to see what the vendors have brought for us this year.

4.1- As we entered the hall

4.2 Luna Spinning has woodworking, spun yarn, fibre and crochet tools

4.3 Janet Whittam does weaving and basketry, you may remember her work from other shows too!

4.4 This was Krys Dallaire’s first time selling and had a very nice booth. She was selling Ile de France cross North Country Cheviot (close up showing crimp), Bluefaced Leicester cross North Country Cheviot (the bag being purchased), Fin (the dark fleece that came home with me) and North Country Cheviot (bags on the shelves). She was also selling maple syrup!!

4.5 Yvieknits Yarn had lots of yarn and a bit of fibre; she also had these lovely examples of knitting with her yarn.

4.6  You have seen Top of the Whorl spindle at a few past festivals too. They had some new spindles, spindle cases and lazy Kates for spindles. This is also where I found Naalbinding needles.

5 at the Top of the Whorl, a drop spindle lesson was happening.

There was a vendor selling punch tools,  including a couple of images set up as a “Try Me” sample. Ann, Carlene and I all tried it, I wonder if either will add a new fibre art to all they do?

6.1-6.3 Ann and Carlene try the sample. The loops are created on the back of the side you are working on. The different punch tools make different-sized loops. It was a bit like needle felting but with less need for band-aids.

7 Ann was interested in the rug hooking techniques, which gave a lot of textural elements depending on what was used with the rug hook.

Let’s keep looking around, ooh, do you see this hiding on the floor in the next booth?  It is mostly yarn but has some wool wash, wool pellets for the garden and plastic project bags, but hidden beside the table was a lovely fleece.

8 It’s labelled as a fleece of Gotland Finn Cross, it was so soft to touch, I was very tempted.

Let’s keep going (before I buy it without seeing all the show)

9.1- I missed the name of this booth, but it had a mix of tools and supplies for weaving, felting, and knitting. Ann seemed very interested in the knitting pattern cards. I wonder if we could do that for felting? Maybe shapes of resists or book resists for the wet felters?

9.2 Pretty String Yarn Co., lots of colours to entice you into knitting

9.3 Sheeps Ahoy. They have the most beautiful patterns that remind me of Philosophers wool who closed many years ago. I wish I could knit

9.4 Crazy about yarn, they use themes to create their Colour ways.  I think the purple was one of the galaxies, and the ones behind her are part of the planets series.

9.5 Studio De laine Cactus Yarn Studio, did you see the support chicken kits? She always has such interesting packaging.

10 We spotted Carlene and compared loot. We also saw a few others who showed off their finds.

There was a nice mix of things for sale, it was nice to see the new vendor with 3 different breeds of sheep. I had been hoping for the Lady who had the 3-D printed spindles at the Almonte fibre festival, but no luck on those. They’re not as pretty as the ones from the top of the whorl, but I would not want to leave one of their pretty ones in the back of the car for emergency spinning, but the 3-D printed one would work perfectly for that. Each spindle has its purpose, or just because it’s pretty and you really like it! That’s a good reason to get another spindle, too.

By early afternoon, I was wiped, and it was time to head home. Last year, we had seen the mill by the river, and I wanted to stop and take a few shots before the long drive home. I was captivated by the reflection in the river and the architecture when something large swooped past my camera.

11 Reflection of the barn in the river water

We drove around the mill building to see what it was.

12.1 Great Blue Heron waiting for lunch to come over the dam and be delivered to him or her.

12.2 Heron, waiting to select the entrée to dinner.

12.3 Spencerville Mill, the Heron is in front of the trees on the other side of the river, just left of the concrete at the far end of the dam.

We stopped in Kempville to have a very late lunch, and so I could take my meds. We finally got home and brought in my bags of loot! 5 paper bags and one big plastic bag. Yes, someone else bought the grey Gotland/fine,  but one of the black fin fleeces followed me home, it was just too nice and soft not to buy it! She said she will be shearing soon, in case you desperately need one too!

13.1 My purchases that followed me home.

13.2-13.3 It was definitely a fibre-focused shopping day, and there seems to be some similarities in colours too. I was trying to push out of my comfort blue, but seem to have only shifted over one to mainly green with a bit of red/orange and of course blue.

So what did or would you have gotten today? I probably overdid it, I am extra achy and about to face plant the keyboard, but it was so much fun to see everyone and add more fibre options to my hoard. But now it’s time to crawl back into bed in hopes I will be able to make it to the guild meeting on Monday. If you are in the area next year, you might want to add the Spencerville fibre festival (The Forecast Calls for Yarn and Fiber)  to your places to visit. I will hope to see you there!

PS Monday, I made it into the guild and opened the library, I even got some work done, but didn’t last all the way to the meeting. I am wiped and quite sore. I am heading to bed now. I hope you have enjoyed this shopping trip! If you saw anything that you really want to track down, check with the event organiser. I fear I may have missed a booth, but I really am too tired to figure that out, so before I do face plant the keyboard, it is off to bed. Have fun and keep felting… maybe a heron?

This Weeks Felting

This Weeks Felting


This week, I managed to make a few small felt pieces.  My husband has been asking me to make some more handle covers for his cast-iron pans.


Second. I have a wrap for my travel mug.  I don’t really like the feel of the metal of the mug, especially in the cold. I have several travel mugs, but only one cover.   I have been using the same one for about 10 years. It still looks good, but I thought I should have more than one. I wanted it to be a little longer and wider than the one I’m using at the moment. The one I have now is purple and blue. This one has a green background. The colour is shartruse, I think. The curls are Blue Faced Leicester.

Then I flipped it over and folded the edges in neatly.

This is the finished piece. It still needs a couple of buttons and some elastic to hold it on.

sheep curls felted int the green back ground A close-up of the curls.

close up of curls on green background

Lastly, I finished the strange-looking book resist. This was round one. At the time, I thought it was stiff enough, so I went ahead and rinsed it out and added lots of clothespins so it would dry correctly.

green 5 pointed 3d sat shape with clothespins outside of same piece with clothespins

After opening it up, I was not thrilled with it. It opened wide. I thought maybe ironing it would help. I was showing it in a Zoom chat, and Karen asked if it was completely fulled. My first thought was yes, it was stiff, but as I played with it, it got softer and softer. So I wet it down and kept working it while watching a cosy mystery.  It shrank more and is much sturdier. I needed a lot fewer clothespins. So I rounded the bottom of the arms.

same piece fulled again with clothespins . much stiffer

This is after it was dry. It doesn’t stand on its own. I will need to flatten the bottom or make a little holder, if I want it to stand like this.

same piece, dry without clothspins

Next, I thought I would try partially turning it inside out. I think I like it better this way.

same piece semi inverted, top shot same piece, semi inverted, bottom shot

One not felt thing. Spring is here, Lambing has started.

This little lamb was born on May 2. he will end up cream coloured. You can see the true colour past the dark tips.

wooly sheep and lamb


Learning and Experimentation with Online Classes

Learning and Experimentation with Online Classes

Have you wanted to be a little more experimental in your fiber art practice? Do you want to learn new techniques and add embellishments to felt or other fabric? Why not try an online class all about embellishing felt? Anyone from anywhere in the world can take these courses, no need to show up at a certain time (you can even wear your pajamas) and the classes are 6 weeks long so you have plenty of time to learn a new technique and try out an experimental approach. My online courses are 4 stand alone classes under the title Embellishing Felt with Surface Design Techniques – A Mixed Media Approach.  You can take just one or work through all of them. The classes are only $45 US for 4 weeks of video and written PDF’s plus 2 weeks extra time on the class website with full instructor support. Registration is now open and the class begins on May 16, 2025.

The first module is called Nuno Felting with Paper Fabric Lamination. The bark I created above used this technique.

You will learn the technique of Paper Fabric Lamination and then how to use these pieces in nuno felting. As you can see from the examples above, there are many possibilities with this technique. Click here for more information and to register for the class.

The second module is Experimental Screen Printing on Felt.

You will also be able to use these techniques to screen print fabric such as silk to use in nuno felting. These same techniques can also be used on cotton fabric to use in fabric collage or quilting.

You will learn how to create thickened dye, make your own screens and many ways to use these screens in an experimental approach. Click here for more information about Screen Printing and to register for this class. 

The third module in Embellishing Felt with Surface Design Techniques – A Mixed Media Approach is Printing, Stenciling, and Playing with Thickened Dye on Felt.

This one is really fun and experimental. Learn to make stamps, stencils and how to use a variety of objects from around the house to create your own unique surface design on felt. Develop your own style with designs you have created.

The techniques you learn in this class can be used for felt, other fabric types and even paper. The stamps and stencils can be re-used over and over and applied in different ways to create exciting patterns. Click here for more information about Print, Stencil, and Play with Thickened Dye on Felt and to register for the class.

The last module in the series is Free Motion Machine Stitching on Felt.

In this course, you will learn the basics of free motion machine stitching and how to use this specifically on felted projects. Does the thought of machine stitching seem a bit scary? If so, you should take this course to get a handle on how to use your sewing machine to create wonderful embellishments on felt paintings or other felted items.

We’ll start with how to set up the machine and some great practice techniques that will build your skill level until you feel comfortable with your machine. Then you’ll learn about machine lace, thread sketching and how to incorporate machine stitching into felt paintings. Click here for more about Free Motion Machine Stitching on Felt and to register for the class.

I hope you want to expand your fiber art skills. If so, click on any of the links above to read more about the classes, see the supply lists and to register. I look forward to “seeing” you in class!

And don’t forget, if you are a beginner, our online class Wet Felting for Beginners is always available.

This class teaches you all about wet felting. You’ll learn how to make a piece of felt, how shrinkage works and how to calculate it and the basics of felting, fulling and creating felt from wool fiber. Click here for more information and to sign up. 


MAD Museum & a Felted Shell

MAD Museum & a Felted Shell

Back in March Mark announced that he fancied taking up a new hobby and was thinking of having a go at making automata or possibly creating “gravity art”. He’d been looking at examples online of incredible, complex rolling ball creations by a guy who goes by the name of Copper Gravity. I love anything like this so did a bit of my own googling and discovered there’s a place in Stratford on Avon called The MAD (Mechanical Art & Design) Museum that showcases this type of art. If you look at their website you might get the impression that it’s geared for children, and maybe it is, but on the day I visited there wasn’t a kiddie in sight…..it was all adults having a great time marvelling at the exhibits!
Stratford isn’t exactly on the doorstep but I knew I would be down that way mid March to run a workshop so decided to plan my visit around that. On arriving in the town the first hurdle was to find the entrance which is very discreet. Even with Google maps telling me I was in the right place I walked past the museums narrow open door a couple of times before spotting it! On the positive side, having walked in the wrong direction to begin with, I did get to see Shakespeare’s birthplace.

The museum exhibits range from very simple to incredibly complex with everything in between and in front of each exhibit is a button which you wave your hand over to start the automata working. If I tell you the vibe is a mix of Wallis and Gromit, Heath Robinson and Scrapheap Challenge you’ll get the idea.
Some of the pieces are behind glass, which made it difficult to video them, but hopefully you can get the gist of this one. Keep your eyes on the tank and the rabbit!

There were several clocks on display but I thought this one, Gold Clock by Gordon Bradt, was particularly beautiful…..

The majority of pieces were displayed on open shelving. This submarine and its wonderfully weird operatives has to be my favourite! There is so much going on here and it’s quite hypnotic the way those little characters move. I would love Mark to make something like this, but I’m not holding my breath!

The “Platform Lift” by Keith Newstead was amusing and this was very “Wallace and Gromit”…..


Some of the exhibits are wall hanging and I loved this one by Chris & Angela Margett. It has three cheeky gremlins defacing a portrait of Shakespeare, Stratford on Avons most recognised figure!

Although the museum is small it’s jam packed with exhibits as well as having a small cinematic area playing a fascinating video and there’s a small shop selling automata kits and souvenirs. I must have spent over two hours in there and absolutely loved it!

The following day I was at Stitching Kitchen in Brackley to teach my Wet Felted Chickens. This was my second visit to this venue run by a lovely lady called Hannah Thompson. I had six students which meant plenty of one to one time and they all worked really hard to get their birds finished in the time allowed. What was all the more impressive was that two of the ladies had never wet felted before!

I’ve done very little felting since my last post but I have been collecting images of shells and thinking about how I can interpret those as “Structures” for Waltham Textile Groups next exhibition. This image inspired my first wet felted Conch shell.

The Conch is a medium to large sea snail which inhabits the Indo-West Pacific. This is my wet felted version of the Conch made from Corriedale, Merino, sari silk and paint. It’s approximately 25cm x 12cm. 


Hopefully I will have a few more shells to share next time…..or maybe I’ll have gone off at a tangent and be doing something completely different, who knows!

Decovil explorations – Part 2

Decovil explorations – Part 2

The next stage….following on from a workshop with Kay Leech (https://feltingandfiberstudio.com/2025/02/27/decovil-explorations-part-1/ ‎)

This is where I left you – at the end of the workshop and having started some hand stitching.

01 Hand stitching started with my favourite Colonial knots

I was pleased with what I had taken home although it was so very far from complete. Then I noticed that some of the applied elements were lifting off the glue. From workshop discussions with Kay in this regard, she had not had any problems over the years with her vases despite them being well and truly man-handled, but….she had fairly heavily machine stitched her work!

With this in mind, it was decision time – do I continue with the hand stitching or, almost start again by machine stitching it all. The latter demands time (a precious commodity at the moment!) at my machine, the former I can do whilst finally relaxing of an evening. Finally, I made the decision – I would not be happy if elements continued to lift, so….

Change the number of hours on the clock to 36!

Not totally happy, I removed some of my hand stitched elements, before then machine stitching the various ‘stone’ textures in different ways on the fabric, netting and tissue paper pieces.

02 The machine stitched Decovil


03 The stitching from the back


04 Details of the 'stone' texture
04 Details of the ‘stone’ texture

The final elements for machine stitching were the white mulberry paper pieces. I loved this ‘holey’ paper and thought that I should create circles to reflect the holes. But….I was not happy with my first attempt. The needle holes really punctured the white mulberry paper and somehow didn’t look right. We all learn from our mistakes….so out the stitching came!

05 The left over holes on the white mulberry paper

I don’t do FME every day and certainly don’t stitch small circles, so I practiced on a scrap patch and actually decided I liked the back ‘bobbin’ side better. Whereas the front just produced holes, the back with a seemingly tighter bobbin tension, created a more interesting texture with ‘lines’ which being more prominent, took the eye away from the holes.

06 My scrap piece with both front 'holes' in white and back 'lines' in beige.
06 My scrap piece with both front ‘holes’ in white and back ‘lines’ in beige.


07 An array of my typical machine stitch test pieces, which by adding a few elements, I can then use to make a card,
07 An array of my typical machine stitch test pieces, which by adding a few elements, I can then use to make a card


Mmmm….now I had a problem….The mulberry paper pieces were randomly placed and were not visible from the reverse side of the Decovil, but it was important to me that I got the circle stitching in the right place to echo the holey paper.

Woohoo….by sheer chance I discovered, thankfully, that the Decovil is surprisingly not totally opaque as it first appears. So, I traced the pattern on the reverse side with a heat sensitive pen (Frixion), by holding the work up to the window (the sun provides a great light box – I was lucky as the continuous morning rain and clouds had vanished about 30 mins before!).

08 Tracing the 'holes' on the reverse side using a heat sensitive pen
08 Tracing the ‘holes’ on the reverse side using a heat sensitive pen

09 On the left you can see the holes I marked up
09 On the left you can see the ‘holes’ I marked up

10 Both pieces marked up to echo the mulberry paper 'holes'
10 Both pieces marked up to echo the mulberry paper ‘holes’

To get a clear run with the circle stitching, I then decided to totally whip out all the remaining hand stitching….oh well – it should make for a better finish!

Before undertaking the circle stitching again, I decided to close the ugly, offending former stitch holes by carefully dampening the mulberry paper and ‘nail-wiggling’ (smoothing) the surface gently. It worked a treat. But when the paper was totally dry it had decided to remove itself from the Decovil glue – no problem – just iron it back in place!

At this point you might already be ahead of me!

I took the piece to the machine to ‘reverse’ stitch the same piece of mulberry paper (now on the underside) ….there was NO pattern marked on the back….REALLY?….I could have sworn I had done it!….

….I’d completely forgotten I had used the heat sensitive Frixion pen which, I’d inadvertently ironed off 😜 so it was back to the window!

Circle stitching was definitely a challenge as the Decovil was not in a hoop (I think it would mark and stretch the material) and is quite ‘slippy’. Another problem is that the needle picks up the glue after a while, so it is not as free-running as normal sewing. Kay recommends using a special needle and had given each of us one for our machines.

11 At last the circle stitching complete on both pieces

12 Detail of the circle stitching texture

12 Detail of the circle stitching texture

Now I’m happy that I have everything anchored – I can entertain, once again, hand stitching whilst relaxing.


The intention of the workshop had been to create a vase for which Kay had been saving (and cutting to size) empty plastic bottles. From the beginning I’d already cut my painted fabric to allow me to wrap both a narrow tall and wide short bottle to create a set of two coordinating vases.

13 My chosen plastic containers

Now, having solved the peeling-elements problem by machine stitching, I started to have further wonderings, better described as ‘construction’ thoughts….”If my calling was to loosely interpret stone, then I could veer away from the vase being a simple wrapping around a cylinder”….Mmmm!

More research was required. So back I went to various ceramicists’ creations….more pages were printed for inspiration….definitely food for thought! 🤔


As this post (written a while ago) goes live, I realise it will be 6 months since the workshop. Where has the time gone? It has simply evaporated! My Decovil creations are complete….sadly….only in my head!

In order that you are not all left hanging for another 6 months I’d best find some precious time (maybe by looking under my Decovil stones 🤣) and finish this WIP hoping you will tune in to Part 3.