Jan Scott documented the Sale and Exhibition put on by our Guild in early November, kudos Jan. It was a great success and inspired me to try to answer a recurring question asked by so many of my clients. I was embarrassed that I didn’t have the information for them. Will this skein make a hat, scarf, mittens, socks, etc? The response was always – ‘that depends’ and it does. It depends on technique, the width of the weaving, stitch size, needle size, size of hands for mittens, and all sorts of variables. It’s so frustrating to not have an empirical answer, so I decided to use my handspun and make a scarf, standard 14 inches wide by 40 inches long.
I calculated I had 234 yards/215m of brown and 495yds/457m of burgundy and silk. I would need 106yds/98m brown for the warp and 214yds/196m burgundy and silk for the other part of the warp. Based on that I had lots for the weft. We’ll see. Math and I are not on speaking terms.
Just to keep the learning curve vertical, I also decided to use a warping mill along with my sectional beam. If you have ever watched videos of industrial weaving facilities you will see huge walls of bobbins feeding into the back of looms. A sectional beam is one step down from that. All the threads you want are wound onto a single inch of the back beam of the loom. So if you want to weave something with 20 threads per inch you need 20 bobbins full of thread to wind onto that little 1 inch spot. You wind on for as many yards/meters as you want, then move to the next slot in the beam, wind on another twenty threads/inch and continue on.
The warping reel lets the weaver measure a single thread for the whole length of the project, change the colour as needed and then keep measuring for the whole length of the project. It’s perfect for smaller projects. The craftsperson will have to decide when it’s time to move onto a different warping technique to suit their purposes. This time I wanted to try a hybrid method of warping.
When using a warping reel you must keep the warp from tangling. It can become the weavers’ worst nightmare. I know in my early days I did lose the cross on one of my warps and nearly lost my mind. It did get untangled but I swore it was never going to happen again, so I do double crosses on all my reeled warps. Tie the cross at both ends of the warp. Better to be safe than very, very sorry.
I also didn’t want to waste any of the handspun if possible since it was in very, very short supply, so I used a salvage technique of tieing onto an old warp. This can save up to 24 inches or nearly 3/4 meter of handspun wool per thread. That’s a huge amount of handspun. It’s also a ridiculous amount of work, so I’ll have to rethink this, but once done I was pleased with the result.
I still had to check for threading errors and there were some. Don’t thread the loom late at night, don’t thread the loom late at night….and don’t thread the loom late and night.
The next morning, a quick check of the basic threading by lifting the threads at an angle shows that everything is in order, literally, and the threads are ready to be tied up and woven with a test thread.
And finally woven with the real stuff. I wish you could see this in real light, daylight, oh my goodness, it shimmers.
What a load of work, and what a great result!! I had no idea my hand spun could be so lovely, I’m so pleased, but there is the last bit of finishing that I need to do and hopefully that will be successful too. This will make a great display piece for the next Sale and Exhibition!
It’s been a bit of a sore week, I lifted things I should not have and then got a bit over enthusiastic with the fall gardening (Glenn was very helpful). My brain keeps telling me I am 25 and my body insists I am 90. I would like to find a compromise closer to the lower number but cannot seem to talk my body into that.
Each fall I wander into my backyard and discover the raspberries have made a break for it across the yard heading for the neighbour’s fence. The Grapes have anticipated their troop movements and are waiting for them. Grapevines were draping themselves over the fence, clematis and up into the back neighbour’s tall hedge. This year I found they were also working their way down the fence toward the patio and had stopped to attack my Japanese lilac tree.
Normally I trim and pull the grape vines out of the hedge. Usually, this extraction goes well, except for the one year they threw me on the cinderblock garden edging. I may have been lying partly in the garden bruised, but still won the war since their extracted vines were still clutched in my slightly numb hand.
1-2016, I am clutching the large branch of grapevine I had cut off and then pulled from the neighbour’s hedge, my arm is upraised so you can see part of the bruise on the triceps. The background shows the arbour over the compost bin the grape vines are supposed to be growing over. (just to remind you that the grapes fight back when extracted!)
2- 2016 War of the Grape vines, I had taken damage but won (this is a closeup shot of the bruise purple center with blue edges. impressive hematoma. )
Back to 2022
I do apologize I was not thinking as well as I usually do (I was still quite sore from the garage incident) and did not have my camera ready to document the coming battle and its aftermath.
I was not quite up to that level of physical conflict this year, being already quite sore from having attacked the moving of heavy stuff in the garage. Luckily, Glenn offered his help. With much tugging and a good pair of anvil pruners, the tree was freed from the assaulting grape vines. Glenn dragged the long pieces of grapevine to the sideyard to await my displeasure.
We (mostly Glenn) filled a yard waste bag of pulled weeds and errant raspberry plants. Then he retreated from the battlefield defiantly the victor of the first battle. (Glenn had a few scratches and I was still aching from previous endeavours)
Now on to the more fibre-oriented part of the day.
For the past few years, I have put my captured grape vines to use by trying to weave grape wreaths. The first few were ok but not substantial enough, not enough vine for the circumference it tried. The last few years have been much better. I hang the new ones on the gate and on the dog fence. This year the pieces of the vine were longer than usual and I had more of the old stalk as well as a lot of the new growth. I had a couple of pieces with old stalk last year and had tried soaking it to see if I could make it more pliable. It did not seem to make a difference, but I may not have been patent enough with the time I had left it soaking.
This year I started with the longest piece which had quite a bit of old stalk and slowly started the circumference (bent it to my will- maniacal laughter), weaving in the side and branching parts as I came to it. Sometimes I would have two side branches weaving as well as the main stalk. I would try to wrap them one from the inside and one from the outside as well as routing the main stalk around the growing wreath. I would add a new stalk as I go, to the tip of the old one.
3- close up of grape vines wound into a wreath with leaves left on. The house bricks may give a bit of scale. (big leaves this year)
I know I could get better compaction if I took off the grape leaves but I like the way they look as they dry and the chickadees seem to like the leaves on them through winter.
For this wreath I have only extracted and used about half the errant grape vines from the back yard. I still have to get the rest out of the hedge. So knowing I will have more I used all the extremely long stocks to make one very big wreath. I did get a picture of the finished project for you.
4 – Large wreath sitting on iron bench and leaning agenst the brick wall of my little house
As usual the grapes have disappeared (into the birds, raccoons and the rest of the local wild life), but we did grow very big leaves this year!
5- This is the side of the yard we cleared of the vines. Japaneses lilac beside wooden fence. A pot of Saskatoon berries with red/orange and gold leaves to the side of the picture.
6- hidden by grapevines, the fence, the arbor and one end of the nabours hedge.
This is part of what’s left to get under control! that hopefully will be next weekend’s work. There is not much left to do in the garden but harvest the extremely slow growing carrots, the last of the herbs and hope the last of the cherry tomatoes hurry up.
7- Possibly over optimistic tomatoes it is almost November! Close up of cherry tomatoes the closest to stem is just starting to change from green to orange but not yet red.
But for now its time to head back to bed. Other than ticking off my back last week, I also go my covid shot, was that yesterday or was it the day before? It’s a bit of a blur, which means it’s working. So I’m heading back to bed feeling like I have caught the flu, give me another day or two and I will be back on line. (Don’t worry, I always react badly to flu shots, covid shots just seems to hate me a bit more. Glenn got his and had no side effects at all!)
So please felt and have fun twice as much to make up for my lacking the last however many days this is/was.
8- Gratuitous marigold flower shot of to inspire you with their Red orange and yellow colours. Even the foliage is trying to inspire with its shades of green and touches of purple where the cold has hit them.
It’s summer time here in Ireland and the living is, well, slightly more laid back than the norm. Having decided to metaphorically kick off the shoes for the month of July, I thought it might be nice just to “see and share ” rather than “do” and this forms the basis of my post.
Before I start on the main focus of this post (my holiday in Italy), I just have to show you a beautiful piece that totally blew me away. Before heading off, I visited Dublin’s Botanical Gardens. Founded in 1795, it is an oasis of calm for any visitor and I would highly recommend a visit if you happen to be in the neighbourhood. While there, I noticed that there was a patchwork exhibition happening in one of their exhibition spaces. This piece just caught me, so I want to share it with you. The artist is Ethelda Ellis and the piece is called ‘Aoife’s View’. The curator told me that Ethelda is a medical doctor by profession. If you would like to see more of Ethelda’s beautiful creations check out her blog: http://ethelda.blogspot.com/
Now, to the Italian holiday. We headed to Como mid-July and, in spite of the heatwave, spent our time sightseeing and eating! Our base was Como which is to the north of Italy, right beside Switzerland. Lake Como is totally dwarfed by the Alps – a really beautiful place.
We called into the Cathedral, the Duomo which was magnificent internally and externally. I reckon that to appreciate all its beauty would take months observing 24/7! I want to share with you a small area of a tapestry which was made in 1610 and which underwent restoration in 1990. It was impossible to get a good photo of the entire masterpiece as so much detail would have been lost. So I settled for a little!
One of our tours took us to the tiny picturesque village of Orta which is situated on Lake Orta. It was recommended that we visit the interior of the local church which was situated at the top of a steep street.
My journey was interrupted by the sound of a piano recital and when I investigated I discovered a rather special textile exhibition happening in the same building. The works exhibited were by Sergio Cerini. The artist merges his early experiences in the Italian high fashion industry with his current artworks, producing beautiful pieces which are in essence a mix of paper mache and textiles. The description does not do justice to his widely exhibited pieces and he was reluctant to allow me to photograph his work. He did, however pose in front of one of the pieces and others can be viewed on his Instagram page @sergiocerini
Since the 1800s, the city of Como was historically the main producer of Italian silk. When ultimately production was outsourced to China, the area was in danger of losing connection with its cultural heritage. The large factory was bought by the Hilton hotel chain. These photos show early paintings of the factory, what it became at the height of the industry and where it is now (apologies for the reflection on the glass):
Rather than allow the old machinery to be lost to history, a wise decision was taken about 10 years ago to set up an Educational Silk Museum to preserve these beautiful machines. Along with displaying the machinery, some of which dates back to the nineteenth century, the museum offers interactive videos and exhibits of high fashion clothing. Unfortunately this section was not open during my visit but I thought it might be fun to show you some of the many machines featured. So please, grab a cuppa, sit back and I hope you enjoy the show. I have included captions for ease of reference.
As soon as I saw what Lyn was setting as our next Challenge I thought “but I can’t do that”. I have always stumbled when trying to understand Design because, although I can see pattern in a lot of things, I fail entirely in translating what I see into my work. I am very literal in my thinking, and when I see abstract pieces (usually “modern” embroidery pieces) based on images of say, a broken brick, or the reflection in a window, or a rusty piece of metal, or a “fractal”, I think to myself “yes, very clever, but why?” and “what would I do with it?” and “I can’t see that on my wall” (and just occasionally “I wouldn’t give that house room!”). This is why I tend to make my pictures or 3D sculptures as realistic as I can.
I was going to just not bother with this Challenge, and then I remembered that some years ago I had attended a course on Design – I had forgotten all about it and it is relevant to this Challenge.
In August 2015 the Association of Guilds of Weavers Spinners & Dyers included in it’s week long residential Summer School syllabus a course by Alison Daykin – “Design for the Terrified” and I was lucky enough to be allocated a place – most courses were usually over-subscribed. Here is the introductory list of available courses from the brochure for you to drool over!
The course was described as offering “help to ‘painting and drawing challenged’ weavers, spinners, dyers, or other textile practitioners, in understanding Design and using this in their chosen medium”. The brochure went on to say: “This course will provide simple, but effective guidelines in design, without the student feeling overwhelmed by theory. The tutor will also leave plenty of room for participants to express themselves in their chosen medium.
“By the course end students will have at least one sketchbook and understand the basics of: colour studies; textural studies; shape; line/stripes.
“Students are encouraged to make samples appropriate to their own textile skills. They may choose to bring their loom or wheel with them, or to develop further sketchbooks if they prefer.”
Frankly this description of the course frightened the life out of me and I nearly didn’t apply, not least because I would be foregoing the chance to take the offered very interesting felt making course. (It’s headline description was “… an ‘adventure with fibres and fabrics’, combining colour, texture and layering to produce felted fabrics for decorative purposes or garments” and that was what I was most interested in at the time.) However after exchanging a few emails with Alison, and reading the three blogs which she sent out about the course I decided to bite the bullet. The first blog post puts emphasis on your “Inspiration” and resulted in a further flurry of emails with Alison, since I had no idea what it meant or what my “Inspiration” should be in this context. She basically said that I should pick a subject which I found really interesting. I was undecided whether to plump for trees, which seemed a very big subject, or sea shells – almost as big but of which I had recently started a collection. In the end I went with sea shells.
Sea Shell collection with Sea Urchin “ skeletons”
The second and third blog posts and a “round robin” email from Alison encouraged us to bring along as many different types of art media as we might be able to lay our hands on, including different types and colours of paper and “mark making” equipment. In addition we were asked to only bring one image of our inspiration, but as many copies of it as possible. (As I hadn’t been able to choose just one shell my image consisted of most of my collection, which also included sea urchin “skeletons”.) We would also need to take a notice board (if we hadn’t already made a mood board – “Er …. what’s one of them?”) so that we could pin up various bits and pieces as we went through the course. We would also need the equipment and materials required to make samples in our chosen technique. As I didn’t know which shell would be my inspiration the “materials” consisted of most of my stashes of fibres, fabric & yarns! I’m sure you’ve all heard of the saying “everything but the kitchen sink” – very apt, my poor car was groaning when I set off with all this stuff plus clothes etc., and I had yet to fit in the friend I was giving a lift to, plus all her stuff and her walking aid. (She was still a bit frail after an illness.)
The Summer School was based at Moreton Morrell Agricultural College in Warwickshire, where (after we got lost twice on the way) I met Alison and the rest of the class members. There were weavers, spinners, an embroiderer and a felt maker – me. Alison showed us her own work, and took us through her process for designing woven fabrics for specific purposes, showing us her mood boards and pictures of finished fabrics “in situ”. Here is a much abbreviated view of how she followed one inspiration from an image of ancient ruins to cloth samples.
She then started us off on our own design journey. Alison suggested to me that I should pick my favourite shell from the picture of my collection and make an enlarged drawing of the shell, both in monochrome and in colour and using different media. I had a go at this, although my drawing skills are minimal. This was before she had found that we would be able to have access to the college’s print facilities, where we could get photographs printed, and colour and monochrome photocopies made on a copier, which was capable of enlarging. We all made great use of this facility – zeroing in on just part of our inspiration image and having multiple copies made on different colour papers as well as plain white – which enabled us to speed up our progress through the stages of the design processes that Alison had mapped out for us.
One of the “tricks” which Alison showed us was to take two images, cut (or tear) them into strips (leaving one side of the paper still intact, and then to weave the two images. This did produce some interesting results.
We also cut strips across an image and used this to reference yarn (in my case fibre) wraps. Using this method enabled us to achieve a colour swatch giving combinations, quantities and placement of harmonious colours.
Showing the progress from picture strip to felted swatch
Once we had all played around with these ideas for a day, we were encouraged to get on and start creating samples in our chosen techniques, keeping in mind how we might use the finished work. As I was interested in making felt for clothing and accessories, I had brought with me copies of designs from specific sewing patterns and tried to pick the patterns that would best suit. I had by this time branched out to using as inspiration two different Sea Urchin skeletons, one Cone shell (and when no-one was looking I did a bit of crochet based on the end of a Conch type shell).
Large Sea Urchin
Small Sea Urchin
Cone
As you can see, I’m still leaning towards the literal/representational side of designing.
Alison also encouraged us to take our cameras and go out around the college grounds and look for more inspirations for design. At this stage we had all got used to looking beyond the obvious and came up with some unusual images. This was the one I chose to do something with – don’t ask me why – it’s just a picture of the wood surround (and my toes) to a raised flower bed outside the portacabin which was our workshop, where we all congregated for coffee, snacks and chat.
Being full of enthusiasm for the project, I cut down the photograph to a corner and then cut out the image of part of the surround.
which I then had enlarged and with several copies started to develop the design
This is the design I finally ended up with.
There are five versions in this picture, the basic design on top with four colour changes of the small “pops” of colour. And here is the jacket pattern and a tracing of the design.
The last day of the course was mainly taken up with visiting the rooms where the other courses had been taking place for a grand Show & Tell. To this end, we had packed up all our equipment and materials and set up our notice boards and work tables as displays of what we had been doing. Here are mine
And here are some of the displays of other class members’ work. Not all of them I’m afraid, I had camera shake by then so I’ve only included the less blurred ones.
The whole Summer School experience was great, with evening entertainments, a fashion show, a display of entries for the Certificate of Achievement “exams”, a traders’ market (I spent too much money as usual) and a trip to Stratford Upon Avon for a tour of the Royal Shakespeare Company’s Theatre with a chance to see some of their costumes “up close and personal”.
We inhabited a bubble, with little contact with the outside world. (There wasn’t even a signal for our mobile phones, short of climbing a hill and standing in the middle of the road.) A wonderful experience and I’ve enjoyed revisiting it.
I am afraid that by the time I got home again I reverted to type and have not made any fabrics, felted or woven, from any of the designs. I just did what I usually end up doing after returning from a workshop – I put everything away and forgot about it! So I still don’t have a 2nd Quarter Challenge piece to show you; though as a result of writing this post and after seeing some of the pieces which FFS members have posted, I do feel better about the possibility of designing from random observations and images.
I am looking forward to seeing what the next quarter’s Challenge will be.
The silk recycling is woven, it’s all done, finished, tutto finito bandito! I actually ran out of the red and orange silk so for the last little bit I had to dig in the bag and retrieve some matching silk with blue, red and orange. It looks just fine. Once the weaving was done I hem stitched the edge, wove in any loose warp threads and washed the yardage.
The whole mass went into the washing machine on a regular cycle, in cool water with my usual detergent. This is the way I plan on washing the finished jacket. I also did this to release any dyes that are lurking in the silk. The jacket will probably bleed dye for the rest of its life because some dyers do not set the dye in silk. The cotton warp took on a slight pinkish tint, so that helped to level the overall look of the fabric.
I plan to hang dry the jacket, so the material was taken outside to hand dry and freshen in sunlight. This proved a tiny bit problematic. The fabric was really, really heavy when wet. This is also when the light began to dawn that this was not, I repeat not, just a four yard warp. I left the fabric to dry on the railing overnight, where it promptly froze into position. Freeze drying works too, so two days later, in it came.
I was able to measure and confirm that this was clearly a massive piece of fabric. Originally, the warp was estimated to be ‘maybe’ 4 yds or 3.5 meters. It was purchased at an estate sale from one of our guild’s best weavers, but the labels fell off and things got a bit muddled when best efforts were at hand. I knew I was taking a risk, even getting it on the loom was a challenge, but I have no regrets. The length proved a great surprise and reward at the same time. It also explains why I ran out of weaving material. There are 8 yards or 7.5 meters, plenty here to make two jackets if I’m careful!
The final product is gorgeous. It just shimmers in the right light and I really want to do it justice. Even though it is a recycled product, or maybe because it is recycled, it’s important that the final result show the very best characteristics of the fibres that have gone into making it.
Our guild has an amazing resource for researching just about anything fibre related. Jan is our librarian. She is the lead book slinger in our heavy rental group called Jan and the Librarians; they have sessions once a month at the guild. I joined in last weekend and Jan supplied me with my requests for information on Japanese clothes, braids and ‘Saori’ weaving.
Japanese clothes design save weavers from the angst of having to cut their beloved fabric. The patterns are usually straightforward, basic, and interesting. I qualified this statement with ‘usually straightforward’ because I had never seen Saori weaving before nor the clothes that have been designed to use the material woven on a Saori loom. the book is in Japanese, the patterns are like origami on crack and they fascinate me endlessly. Until I can figure out the patterns I opted for a very conservative jimbei pattern from the jacket my son lent me. There are examples of simple patterns in one of the books.
This jimbei is meant for hot summer days. The sides are not stitched close but fastened with a cable stitch or stitched close with a decorative embroidery stitch. The underarm is left open, again for summer comfort.
The front is loosely tied or left open as preferred. I was interested in the reinforcement used at the bottom of the sides. These were the same reinforcements I found on the kimonos, so they clearly work.
The female version of this simple jacket has a closed wrist. It’s called a hippari. I might do one of these for winter if I have enough material left. The photos of the jimbei and hippari are from “Make your own Japanese Clothes” by John Marshall ISBN 0-870110865-X, I really enjoyed reading this book, lots of ideas for ways to incorporate the Japanese style into my life.
There are so many new things I will need to explore once I decide to start sewing this jacket. I’m really looking forward to getting the sewing machine out again.
The loom has been sitting there needing attention for ages and I finally stopped procrastinating. Winter is a real challenge to get stuff done. I knew there would be threading errors; there are always threading errors when I do a loom. So I cracked out a good light and checked over the warp and found two. One required that I undo about four inches and re-thread everything, yuch. But the other was much easier. I just needed to move everything over by one thread in the reed. Very easy to fix.
All that needs to be done is wind 4.5 yards of warp yarn onto a bobbin, weight it, thread it through the empty space available in the reed and the harness, and let it hang out the back of the loom. The harness is the part of the loom that goes up and down and raises the threads and has wire “eyes” for each thread. I just use a very lightweight to keep the bobbin dragging a little. In this case, I used napkin rings.
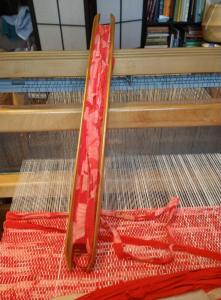
Next, I had to load up the really nice ski shuttle specifically designed for rag and rug weaving. The tools for weaving are sometimes the most beautiful things you can imagine, really beautifully made with an elegant design.
After a few passes, I noticed more threading errors. I fixed them and then noticed another. It became obvious the problem was the lovely ski shuttle was damaging the warp. I did a bit of research online and found out that the shuttles need to be maintained to a very high degree. The bottom of the shuttle needs to be polished and extremely smooth, none of my hand me downs were of that quality. I’ll fix them later, but for now, I needed an alternate solution. Back to fixing the warp.
I dug around in my baskets and found a different sort of rag shuttle along with several stick shuttles. The stick shuttle is a slower method of weaving, but it is all I had. I was really pleased with how well it worked.
The silk is weaving up softer and more flexible than I thought, the colours seem very compatible and I’m pleased with the results. The strips are attached with small knots and these are being used as design elements. I like the way they look when they pop up out of the warp. Because this is an experiment I will try to hold in my optimism for this to become the jacket I had hoped for; that might be too aspirational, but I am aiming in that direction if I can get enough yardage, but for now, I’m really pleased with how things are moving along.
As you may have noticed Ann, Bernadette and I, all belong to the same local guild. The guild has both a studio and a classroom located in Heartwood house, which is the umbrella organization that is Home to 22 Non-Profit & Charitable Organizations. The building we are now in was formally a Giant Tiger store with an attached strip mall and apartments above the mall. Heartwood house purchased the building in 2012 and renovated space for each of the various groups. We all moved in at the end of the summer of 2013. (It was a huge move for the library but that is another story.)
With covid, part of the time the building was closed and no groups could use their spaces. As lock-downs eased, a few people (masked) were allowed into the various spaces (the number depended on the size of the room). We are one of the groups that have been hit hard by the restrictions. Ann and I with help from other members have been keeping the library books circulating (knock on the window and pick up your books by the side door) each month but the weavers have only started to work on the studio looms in the last couple of weeks. We have moved our Monday night socials to Zoom which is fabulous for the easy Commute but not quite as much fun as chatting in person.
Heartwood House has noticed that, with fewer people in the building, the groups are not interacting with each other as much as they would normally. They came up with a plan for festive door decorating and asked the groups to participate. They would bring Coffee and muffins or pizza for lunch to those that did add festiveness to their door.
At our December meeting, the Heartwood house liaison asked if anyone would be willing to decorate our door. I was going to be going in to work on the library anyways so figured it would be reasonable if I volunteered so no one needed to make a special trip in.
The instructions were to decorate the door, something festive. I wanted to represent the main interests within the guild so Weavers, Spinners and Felters (we have basket makers too but I did not have anything in the way of basket-making supplies to represent them. Sorry!!!)
I have never worked in a regular office environment or lived in a cubical world for work so I have never tried to decorate a door before (or a cubical). I had seen two other doors under construction, one was a fireplace with a Santa the other was an upside-down reindeer. Both used construction paper, card stock, stickers, and there was even a garland. The office for Heartwood house had a couple stocking up and looked like something else would be added later.
Scoping out the Neighbours, their doors in progress;
This slideshow requires JavaScript.
I thought about it for a while and decided on sheep, with a star/comet. Maybe some snow? And some pine trees? As a composition, a door is a tall skinny vertical space. I like long horizontal compositions. Oh well, fewer trees and make it a taller tree. Let’s start on the star! Ann will recognize the cookie-cutter snowflake I used for the star shape.
a quick cookie-cutter shooting star!
This slideshow requires JavaScript.
(Oh no! The book I was listening to ended so on to the next audiobook)
I used some of the World of Wool, core wool that I had hand-carded and really cheap felt from the dollar store. (This is not the even cheaper felt that may be made of coloured dryer-lint held together with cheap glue.) Other than being extremely thin, it wasn’t too bad to work with. I embedded it into the wool I was adding into the cookie-cutter from one side then the other. I used both the single 36T as well as the 3-needle handle that seems to hold T40’s in it. I focused on trying to get the edges firm but should have spent more time establishing the crispness of the edge shape. My poor little star is looking more like a flower.
OK, now let’s look at the sheep. I kept to the same fibre, made a body, with handspun yarn legs, and felted feet. Hum….. needs a head. I sculpted a head with ears and felting from the back and sides of the neck attached it to the body. I like the head so much I made 2 more of them!
This slideshow requires JavaScript.
Ok, we have the Felters represented!
At this point the plot of my book got distracting and there may have been a break for YouTube, so I missed the photos of spinning woollen (I usually am a worsted or semi-worsted spinner) while hoping I could make Fluffy Yarn.
For the spinners, I made lengths of mostly lofty 2 ply which I sewed onto a cardboard shape for the sheep body. It was the inside of a Ritz cracker box and worked very well. Sewing the head on was a bit more challenging but I used a curved mattress needle into the center of the poor sheep’s neck and tied it on through the back of the cardboard. I think she turned out to be quite a nice sheep!
For the weavers, I considered a cast-off fragment of weaving I had salvaged from the studio fibre-garbage-bucket. However, it was blue linen and not white like the other sheep. I did not want the weaving sheep to feel ostracized from the flock. So back to the cardboard Ritz box and cut out another sheepish body shape. I had scored some loom waste (thrums) at some point over the last year or so. The warp is a similar colour to the wool I have been working with. I wrapped and taped down on the back yarn over the sheepie shape on the diagonal. If I had done a square or rectangular sheep body it would have been much easier! But it would not look very sheepish. I used a long blunt needle and wove through the warp I had just taped down. After the weaving was done I stabilized the edges and sewed on the head.
I used some of the 2 ply I had spun to make the legs and attached them at the back of each sheep. Now I was all set to head in and decorate the door, well except for a quick stop at Dollerama on the way in for a few more decorating options. (Please don’t be out of Cardstock!!)
This slideshow requires JavaScript.
Yeah!!! There was cardstock, wrapping paper, glue, foam double-sided tape, wooden snowflakes! I also brought more wool, a foam pad, yarn, as well as thread and needles in case I needed them.
Our door
Now the door. With the depression for the window, I wanted to have the cardstock as a base layer. I held up the first blue piece and liked the effect the edge of the door gave. It looked a bit like a matt.
This slideshow requires JavaScript.
I had to do a bit of trimming so the door handle would fit!
Lise, one of the guild weavers, was in weaving and held up one of the wrapping papers I had selected for the sky. We both liked the effect with the blue background.
14 transparent wrapping paper over cardstock
Ok, I know what we are doing for the sky, now let’s look at the snow for the bottom half of the door. This would have gone a bit more smoothly with just one more hand but Lise had already finished up her weaving by then and had headed out. Oh well, I managed to get 3 hills in my snow.
15 snowflakes in the sky and snow on the ground
I opened the solid green paper and found Christmas trees on the inside….. well I guess I could just use that side and make a forest but the trees are a bit small.
16 Surprise! it’s not solid green on both sides
You can imagine my surprise when not only did my solid green have trees but the solid brown has a grid on the inside!
17 Oh my the brown paper isn’t brown on both sides either!
My idea was to make a pine tree-ish shape on the side and have the sheep beneath that. The brown was to be the bark and trunk of the tree. So I squished and folded it length-wise to give it a bit of 3D.
18 a bit of 3D in the trunk
19 background and tree started
It’s still looking a bit pathetic, better add more green bits. I did debate with myself if I should put the trees on the outside rather than the solid green.
This slideshow requires JavaScript.
23 I need a few more embellishments!!! It must be more festive!!
Perfect!! Can you guess what I am making this time? I have the wooden snowflake, some fine wool yarn, a bit of wool and a T36 needle!
24 Ah! much more festive!!
Can you see where I put those festive items? No? Maybe a bit more close-up will help!
25 sheep in their festive attire!
Yes!! I made Festive sheep Bonnets or maybe they are hats? I will have to ask Ann what kind of festive sheep attire she has for her sheep. If she doesn’t have festive hats maybe we can start a new sheep fashion trend!!!
26 Festive Felt Sheep
27 Festive Spinning Sheep
28 Festive Weaving Sheep
Now I need a bit more bling, let’s add more of the wooden snowflakes
This slideshow requires JavaScript.
While I have been setting this up, one of the Guys that works in the Heartwood house Office stopped by to check out how it was coming. He really liked the sheep but said I should put pillows at the bottom of the door in case anyone fell asleep while they counted our sheep! (These must be super strong sheep if they can put you to sleep with only a count of 3!!)
32 all done ready for tomorrow!
All done now off to home and back tomorrow to work on the library.
When I got in the next morning the snow had melted!! The sheep were in a pile at the base of the door! Now I see why we needed a pillow!! (for the sheep!) It must be the unseasonably warm weather that has made the snow unstable and melt. Change of plan, fix the door then work on the library!
33 the snow melted and I had to put it back on!!!
I think I got the middle snow hill upside down but it still looks good (I was rushing!! )
Our Neighbour’s doors
Here are some of the other groups’ doors
This slideshow requires JavaScript.
I did get a small pizza for lunch (which was delicious) and got some work on the library done. There were a lot of people from the other groups throughout the day checking out each other’s doors. It was a fun event and I think they may do it again next year.
I still have more library work to do before the end of the month and hopefully some felting too! I hope all of you are having fun felting and are enjoying the festive season.
The idea of upcycling and recycling is enormously appealing given the situation we all face. But going back and undoing work from others’ hands is challenging. For those of you who have come late to my adventures in recycling, I am disassembling worn out silk kimono to weave into more modern type of jacket, still with an Asian look, but done in a rag weave. This is part of the Japanese tradition of using materials to their utmost, so I don’t feel too bad about taking these garments apart.
The process of tearing or cutting the fabric is boring, boring, boring and just for a change of emotion it’s frustrating too! I have dulled blades on fabric cutters, dulled scissors and now I’m trying a combination of rotary cutter and ripping, but still I’m not having great success.
Sometimes the silk tears perfectly and the strip can be used exactly as it comes off the fabric, then the next strip goes completely haywire for no discernible reason. These are really old kimono so my suspicion is that they have started to shatter, but that should be working in my favour when ripping, so I’m at a loss.
I have pressed and folded the silk and laid it out on the quarter inch. This is when the straight edge and rotary cutter come out. The silk used here is very fine, from the lining, so the width of the ribbon is a little more than the quarter inch. The poor rotary blade was starting to sound pretty grim after eight deep cuts. I’ll look for a small sharpener to try to extend the life of the blades.
The ribbons are joined into one long ‘thread’ using a split knot. A small cut is made in each end of the ribbon about a quarter inch from the ends.
The right hand ribbon is threaded through the slit in the left hand ribbon.
Then the very end of the left hand ribbon is threaded through slit in the right hand ribbon.
And finally, they are gently given a slow and gentle pull until they come together in a little butterfly knot that will be a design element of the weave. It will be random and just pop up here and there on the fabric.
I find doing this hour after hour nearly mind numbing, and can only do this for a few hours a day or two at a time. I really want to finish this kimono project but it’s getting to be a slog so I have to take breaks. I will finish it, but not in the original time line. What do the rest of you do when you have a project that starts to pale as time goes on?
This time boredom prompted me to crack out the dye pot and do something vivid and cheery for a November day.
A few weeks ago our guild was offered the estate of one of our more noteworthy weavers. She had stipulated that all her weaving supplies and equipment were to be sold and a scholarship be set up to help educate and promote weaving. We were deeply saddened by the loss of this talented woman, who was also a great resource for our guild. Her generosity set a high bar for all of us. I did participate in the fundraising efforts and purchased a cotton warp to encourage me to get back into weaving.
There was only a small problem with the warp; it no longer had a cross. The cross in a warp helps prevent the threads from tangling. This was going to be a huge challenge but one I wanted to tackle along with two other learning challenges.
Because I am self-taught there are huge gaps missing in my weaving knowledge. Some are very basic techniques. I desperately wanted to learn how to make a weavers knot. This is a knot that almost everyone involved in fibre seems to know how to make. Not me. I wanted it to become muscle memory, so I wanted to make lots and lots of knots. Then when the need arises it will be so easy for me to just – poof – make this non-slip permanent tiny little fastener.
Now comes part two of my learning challenge – reusing a threaded warp. If a weaver is careful and doesn’t remove the remnants of threads from the loom, and if they are long enough, they can be used as a labour-saving tool when threading through the heddles. The heddles are the little eyes on the loom. Threading heddles is a bit like threading very big needles and I really don’t like doing it.
I had preserved the previous warp. I knew it was narrower than the cotton warp I wanted to add, but I didn’t know how many threads were in the cotton warp. There is only one way to find out, count them. There are 225 threads by the way.
So I estimated I would need to add three inches of cotton on either side of the existing warp.
Then came the knots. First I just did overhand knots, but I really didn’t like them. They were thick and didn’t look like they would pass through the reed with ease. Then I started working on the weavers’ knots. Online demos are really interesting, but by the time I got back to the loom I’d forgotten how the loops worked and which way the thread wrapped around and it was all very frustrating. Finally, after a bit of digging, I found a printable diagram and that worked like a charm. My biggest concern is that I may not have a true weavers knot. This works, so maybe it doesn’t matter.
weaver’s knot
overhand knot
I had to thread the cotton through the heddles and Because the cotton along the sides was going to be a little shorter than the wool cotton combination in the middle I added a bit of an extender, sorry I didn’t get a picture of that.
And then it was time to start gently getting everything through the reed and the heddles. This was all done very slowly and carefully so that none of the threads would break. The weaver’s knot worked like a charm. The overhand knot was a bit thick and need some gentle nudging to make it through, but all in all, it worked.
Once the cotton was safely warped on the back beam it was a matter of untangling the threads and winding, untangling and winding. At some point, I was very tempted to just chop it all off the loom and throw it out. It was really getting to be a terrible mess, so discouraging. Then I would look at the back of the loom and see how ordered it was. Everything was coming together as it should, everything was aligned and going onto the beam the way it was supposed to, so I would take a break and come back to it a little later.
And then fairly quickly it was all done. I was a little surprised and definitely delighted.
All this time I had no idea what I was going to do on this warp, not a clue. Maybe make a table runner or some cushion covers. I have some really nice linen to use, some great thick and thin cotton or wool. Then last night it came to me. This lovely textured cotton warp with all its thick bits and thin threads, its ideal length of 4.5 yards (4 m) precise width of 18 in (45cm), it’s ability to take colour like a sponge will be perfect for the recycled kimono project!! Can hardly wait to get started.
I am lucky enough to live in Sturminster Newton, Dorset, England (known affectionately by locals as Stur). One of our Town’s claims to fame is our Watermill. There has been a Watermill on the river Stour here for at least 1000 years. The original mill was a Grist Mill – that is for grinding corn, but in the early 1600s a Fulling (or Tucking) Mill was built adjacent to the Grist Mill. This was largely to facilitate the greater production of a fabric which had been produced in and around Stur since the 1570s. This fabric was called Swanskin. It was a tough, course white woollen fabric, made from locally spun and woven wool, which was then scoured, fulled and the surface teazed and fulled again. Fishermen working out of Newfoundland, many of whom were recruited from Stur, greatly prized the Swanskin for its all-weather, waterproof qualities, as did the British Army and Navy. Originally the fulling would have been done by fullers treading the fabric in troughs filled with all sorts of nasty stuff, including urine. Once the fulling mill was built this hard work was done mechanically. The woven fabric, in its troughs of nastiness, was hammered by large wooden stocks which were driven by gears from the waterwheel. Eventually the fulled cloth was hung out to dry along the river bank, stretched out on tenter frames by tenterhooks. A report about Manufacturing in Dorset dated around 1812 reads:
“There is a manufactory in the neighbourhood of Shaftesbury of a kind of flannel called swanskin, which is a coarse white woollen cloth, used for soldiers’ clothing, and made from 18d. to 2s. a yard; but this is of little consequence to Shaftesbury, the chief trade in this article being carried on at Sturminster Newton, where about 1200 people are employed in it, and where between 4000 and 5000 pieces, containing 35 yards in length, in a piece, yard wide, are annually made.
At present the woollen manufactures are almost confined to Sturminster and Lyme Regis, at which latter place broad-cloth and flannels are made in considerable quantities.
At Sturminster there are four or five clothiers, and about 300 weavers; sometimes 700 or 800 people are employed in the manufactory of Swansdown, (sic.) but the trade is not so considerable as was formerly the case.”
In early 2016 I was asked by the curator of our town’s Museum and Mill Society (now known as the Sturminster Newton Heritage Trust) if I could produce a sample of Swanskin for the Museum since it appears that there is no example of actual swanskin now in existence. As Swanskin was such an important part of the town’s history, the Museum wanted to create an exhibit for future reference. This I did, so far as I could, and I also wrote them a report on the process, which I repeat here – it was of course written for the edification of members of the general public, most of whom would not be conversant with spinning and weaving terms, so please don’t think I’m trying to “teach granny to suck eggs”.
“Swanskin – Experimental Archaeology
“In order to try to recreate the processes in the manufacture of Swanskin some research was carried out by Kathleen Sanderson (a member of the Dorset Guild of Weavers Spinners and Dyers). It appeared that the likely breed of sheep from which the fleece was obtained was the Portland. This breed was found in fact over much of Dorset in the 17th Century. “Kathleen found however that the fleece from today’s much improved breed of Portland sheep was finer and more delicate than would have been the case in 1600. She therefore blended Exmoor fleece with the Portland to obtain as near as possible the coarser, more hardwearing fibres originally used. Originally the wool would have been spun “in the grease” – that is still containing (inter alia) the natural lanolin. The resultant yarn would have been woven in this state so that the resultant cloth would have had to be washed and treated with fuller’s earth (scoured) to remove the oils and other detritus like plant material and insect life.
Spun and Plied Yarn, with fibres
“The sample shown was spun after scouring because this had been necessary to facilitate the blending of the two fleeces. The yarn was plied and then twill woven – that is instead of the basic over one, under one, over one – of plain weave, the weft was taken over two and under two on the first pass then over one under two over two on the next. This results in characteristic diagonal lines in the weave. “When “fulled” twill woven fabric becomes denser than would a fabric with plain weave.
“I wove the sample in this fashion on a frame loom. After the weaving, the sample was wetted and fuller’s earth rubbed into it on both sides, just to make sure that all the grease and oils had been removed. This was rinsed out, the sample soaped and rubbed by hand to start the felting or fulling process. “This process would have been carried out by “Fullers” or “Walkers” in the 11th and 12th centuries. Though they would have done it by treading or walking on the fabric in wooden troughs rather than using their hands. At Sturminster Fulling Mill swanskin was fulled at the Mill using water power to move fulling stocks. These hammered the fabric until it was fulled or felted sufficiently to make it water repellent. “The sample was fulled in a washing machine, first at a temperature of 40° with a very hard rubber ball acting as a fulling stock. This was repeated once more and then at a temperature of 90° until the sample was fully felted. When the sample was almost dry it was ironed with a steam iron on both sides and then fully dried. The original swanskin cloth would of course have been dried on tentering frames in the open air.
“Once the Sample was dry it was brushed with a flick carder (the modern equivalent of using a frame covered in teasels) on one side only in order to raise a nap on the fabric.”
The mill was open to the public again this year, after having had to be closed during lockdowns. It is possible that, during the first lockdown, some of you may have seen reports about the fact that the mill reverted to milling flour which was provided to local bakers. Many people over here took to making their own bread so that there was a general shortage of bread flour, and, since approaches were received from people from all over the globe trying to buy bread flour from our miller, I assume that this was the same almost everywhere.
I have added below some internet links about the Mill and our Society (Sorry – Trust!), and some of the news stories from last year – Google has lots more.
Oh and a couple of my felt paintings of the mill – adding a bit of artist’s licence!


 1-2016, I am clutching the large branch of grapevine I had cut off and then pulled from the neighbour’s hedge, my arm is upraised so you can see part of the bruise on the triceps. The background shows the arbour over the compost bin the grape vines are supposed to be growing over. (just to remind you that the grapes fight back when extracted!)
 2- 2016 War of the Grape vines, I had taken damage but won (this is a closeup shot of the bruise purple center with blue edges. impressive hematoma. )
 3- close up of grape vines wound into a wreath with leaves left on. The house bricks may give a bit of scale. (big leaves this year)
 4 – Large wreath sitting on iron bench and leaning agenst the brick wall of my little house
 5- This is the side of the yard we cleared of the vines. Japaneses lilac beside wooden fence. A pot of Saskatoon berries with red/orange and gold leaves to the side of the picture.
 6- hidden by grapevines, the fence, the arbor and one end of the nabours hedge.
 7- Possibly over optimistic tomatoes it is almost November! Close up of cherry tomatoes the closest to stem is just starting to change from green to orange but not yet red.
 8- Gratuitous marigold flower shot of to inspire you with their Red orange and yellow colours. Even the foliage is trying to inspire with its shades of green and touches of purple where the cold has hit them.


 The right hand ribbon is threaded through the slit in the left hand ribbon.


