Browsed by
Category: Uncategorized

Flax Harvest 2020

Flax Harvest 2020

This summer, has been vary different from what I had expected at the beginning of 2020. With covid19’s arrival, we have not been out much, so even weeding the flax patches a month ago seemed wildly exciting, well more so than last year weeding seemed. we are even more excited about being part of the Flax study group for year 2, since we get a chance to see some of our guild friends even if we are a bit farther apart than we normally would be.

Last time i updated you on that fabulous fun of weeding the flax. We had intended to do a second weeding but our plans did not work out.  Instead we had a very Hot Dry spell. You may have noticed the temperature while i was felting outside (in the shade).

On July 12th, Cathy Louise let us know the flax was almost ready for harvest. The blast of heat pushed the seed ripening faster than we had expected.  The flax stalk are not as tall as we hoped but if the seed is ready it’s time to harvest!

1 1 the flax is waiting for us

So, we set a Saturday most of us could attend and  on July 25th we met to harvest this year’s 2 rows of flax.  We had a brief chat and inspection to check the ripeness of the seeds in both rows and realized that much of the flax had ripe seed, so we would harvest all of it now. Last year we did a large harvest and saved a small amount to see if the fully ripe seed would have better germination. (You can see the germination rate from both harvest times produced similar results.) From the pictures, you can see that both rows had very similar success.  We also found that a clump in the west row had been seeded more densely than the rest of the flax and it both helped support the naboughring stocks and had less weed intrusion. If we continue with year 3 we may try to increase from the recommended seed density.

  2-4 ripe and ready to harvest

We took out the support string that had been added to support the flax in case of heavy rain.

 5-6 removing the support strings

We then dispersed ourselves to start the picking on both rows, from both ends.

As we did last year when we harvested the flax, we selected a small amount of flax and pulled it up with the roots. The dirt knocked off and a stock or two is used to tie the bundle together.

 7-9 bundling flax

And repeat!!

This slideshow requires JavaScript.

10-26 Flax harvest in progress

As we gathered and tied the flax, we started to line the bundles up along the fence to dry. You can see the line of flax growing behind the flax pickers.

2927-30 drying bundle collect along the fence

  31-32 pile wating to go to the fence

We have about 1/3rd of the rows picked, you can see the weeds that that have been left after the flax is removed.

33-34 flax picked weeds remain

We kept going and soon were finding more weeds than flax were left.

35-40  starting to run out of flax

One of our team was collecting the weeds for his pigs and chickens to enjoy!

41-43 weeding

Can you see the flax bundles along the fence at the back of the patch and continuing to the left along the fence and into the market garden.

 44-46 the flax drying line grows

4748 47-48 the harvest drying

This is the after harvest shot and the weeds are being collected.

4950  49-50 Most of the flax harvesting team

Here is our harvest team at the end of this years harvest (Glenn myself and Cathy Louise are missing from the large group shot)

The flax sat drying along the fence, then it was turned and continued drying.

5451-54 Drying in the heat and sun

Once it was completely dry, (now we got the rain we needed earlier), it was collected and moved to the barn to await the next step. Separate the seed from the stock,  Decapitation, which will be violent and exciting!!!  But more on that next time!

5556

55-56 the unsuspecting dried flax awaiting us


An Interesting Cowl Experiment, Part One Design

An Interesting Cowl Experiment, Part One Design

Here is the link to the pattern I used for inspiration. https://catbordhi.com/wp-content/uploads/Rio-Calina-Cowl-1.3.pdf?fbclid=IwAR2sORW3PfXAJ3hP9Rcf_ZGYJM0rMsn5kdSnELmee1ca33VxeaoSSg2HLsw

When I saw it it had been shared form here.  It is a free pattern.   https://www.facebook.com/groups/knitscents/

When knitting this you do it flat and sew it together. I am not a great sewer and it would end up not looking very good. So I want to figure out how to do it over a resist.  It will also take up a lot less room when felting if it is around a resist.

I cut a piece of paper 36 inches by 9 inches.  The pattern is 34 inches long but it was easier for me to measure 3 feet. I have footmarks along the edge of my table. The 9 was a guess.

Next was figuring out the folding. the pattern has the cowl divided into 3 and you join it fold to fold. This is what happens when you try that with paper. You can’t align them properly because the bottom is bigger than the top.

I adjusted the folds until they aligned properly and taped it again. Then I folded it in half along the length.

This is going to be too small. It works with knitting because it has stretch, felt and paper do not. It makes an interesting hat.

I decided to slide it down to my neck. It was just manageable. I turned it over too.

So 3 feet isn’t the right length. I will try 4 feet.

This one worked well. it goes on fairly easy and it is not tight around my neck.  Of course, it won’t be as stiff as the paper.

It won’t be as bulky as the knit one but I think it will still be nice.  I may have it done in time to be another item for the 3rd quarter challenge. https://feltingandfiberstudio.com/2020/07/07/2020-third-quarter-challenge/  There is still time for you to join in too. You can share your items on the forum. https://feltandfiberstudio.proboards.com/thread/4185/2020-third-quarter-challenge


‘Seeing’ – Nature

‘Seeing’ – Nature

In a previous post (A yarn & preparation experiments https://wordpress.com/post/feltingandfiberstudio.com/34915) I told you of painstakingly unpicking 2 items of commercial knitwear in a bid to gain some interesting sequin yarn. Strangely I haven’t yet used that yarn but rather the waste!

Somehow, I couldn’t face throwing away the manmade yarn and, as shown in the previous post, I had crocheted some waste into large ‘mats’ (also, as yet unused), the remaining yarn languished in bags until I had a vague idea. I wound the various lengths 10 times around two fingers to make little 2-3cm bundles….hundreds of them, or so it seemed. I spent many, many, evenings making them.

Using two bundles together I crocheted through the middles to make 2 large mats (yes, more mats!) approx. 45 and 50 cm diameters.

02b

I’ve mentioned before that I have a Coloured Ryeland fleece, bought years ago in naivety, having been seduced by its colour. Not wanting to throw it out, I have found it is useful as a ‘stuffing’ wool. I have to say here that I’m not a needle felter, so I just use one type of basic needle to prod and poke the fibres as required.

For the 2nd quarter challenge I had thought to make a cushion (possibly, a purpose made cushion to fit my mother’s wheelchair to give her a soft seat?), so my vague idea was to use the waste yarn and Ryeland to create the internal pad – prod them together, throw into the washing machine and taadaa!

I hand carded batches of the fleece then set to needle felting these to the ‘mats’. The mats were then sandwiched together with 3 layers of wool between – laid concentric, radiating and concentric.

I laid radiating batches to the outside to which I’m now adding a concentric layer. You are up to date!

As I write this post it now has 6 ⅞ wool layers and is about 2cm squishy firm (if that is not an oxymoron). This is an evening activity which seems to take up an inordinate amount of space on my sofa, more so because surprisingly the ‘pad’ is increasing in size and is now 55cm (22 in) and firm right to the edge.

But now comes a dilemma….I actually like the pad and my thoughts are drifting….more later!

Over recent weeks I have been working, when time permits, on our textile group’s challenge for 2020 – to use a plain paper book to practice our drawing, sketching, creating etc to produce a journal. I’ve chosen to title mine ‘nature’ and have thus far been exploring flora which I love. Fortunately, parts of my garden (and my neighbour’s) offers some wonderful opportunities.

An update – I am gradually resurrecting my garden when time and weather permit.

Recently though, living in the countryside at harvest time, I have been plagued by the thrips (or thunder flies – 2mm long and about the thickness of a hair!). They tend to fly within 3m of the ground and 1m into an open doorway, particularly if it is sunny. They get everywhere – unscrew a container and they are actually in the thread and even into supposedly sealed boxes! Having very sensitive skin, I can feel each and every one and for a week/10 days end up running around the garden like a mad woman, as if my hair is on fire under my hat – they use my blond hair as a landing strip and keep taxi-ing!!!

But I digress….

Rather than concentrating on simply sketching I’ve been exploring patterns. I always doodled in school and can remember one time being asked an unexpected question from the teacher who had come up behind me – as I got the answer right I was never stopped from doodling again. Zentangling is however new to me (some ideas I have borrowed from the internet) so I’ve had a play.

All of this has led me to do more detailed studies, thus far on poppies and sunflowers (having enjoyed my vase of sunflowers, bought by my EPH, I couldn’t just throw the spent flowers away!) – so I’ve been pulling them apart, hammering them or slicing them up, recording my findings along the way.

33
One of our members has been doing basketry….so Kim, my discovery is for you – the stem, emerging after only a week in the vase, revealed very strong fibres!

The results have been very interesting, offering a wealth of pattern opportunities.

Back to my dilemma….

I’m now seeing an oversized sunflower to complement my oversized felted seeds that are all in shades of grey!    Mmmm!  🤔 Possibilities!   Sorry mum, you’ll have to continue with the other cushion!

2 New Ram Fleeces

2 New Ram Fleeces

While I have been working on the Mer-Project, I have been up to other things. To give you a bit of a break from “OH no another fish thing!!” (Sorry there is a bit more fishiness to come), but for now let’s have a peek at one of the other things that happens in the summer.

I spotted two ram fleeces for sale on the guild Facebook page from Shady Creek Lamb Co. I picked them up at the same farmers market Ann sells butter tarts.  They pasture the ewes under solar panels! Great self-mobile lawn mowers!!! Unfortunately, there are many burrs under there too. The Rams were kept elsewhere and claimed not to be as fond of burrs as their girlfriends.

1  1 Barrhaven farmers market at the log farm (they don’t farm logs.  It’s all very confusing)

You may have seen the short needle felting interruption where I picked them up and re-bagged them (they didn’t fit in the new bags well but they will not get wet if it rains! But this is August.  We don’t usually have much if any rain in August.

2 2 Miss Manta is blocking your view of the new fleeces

The one I was most interested in was the large grey fleece.  It may be hard to tell from this picture, but He is a BIG boy!

I need a sorting table!

3  3 the Ram in question (I think he is a Shropshire?)

Yes, I need a Big sorting table!

I don’t have a sorting table but I have a metal frame from my neighbour, Valerie, who moved a few years ago.  She left it for me, she used to grow cucumbers on it!  It has been sitting behind the metal bench in my side yard studio waiting to be useful. It will now have its chance!

44 Wire frame

I pulled out the metal frame and propped it up on the water barrels and a 2×4. I added extra support with a group of S-hooks.  It was a bit rusty and the spacing is a bit large so I used an old sheet that I use in the fall to cover the tomatoes saving them from a September frost.

5-6 the new sorting frame and quite dirty wool

As you can see I have thought ahead and had gloves ready, which you can see I will need. This fleece and his friend, have not been skirted! If you have not bought a raw fleece before they are usually pre-skirted. This means getting rid of the wool that is on the belly, lower legs, and especially the messy bit around the butt. This wool is worn, matted or particularly filthy.  (Sheep are not usually neat bathroom users. It may be due to their lack of toilet paper or just the lack of thumbs to operate toilet paper effectively.)

77 port-a-shade

It was again a lovely hot day so up went the umbrellas, Instant shade!! Oh that’s much better.

8910118 – 11 skirting and sorting into strainer bins

When I skirted the giant Shetland last fall, I sorted for colour. This time it seems mostly the same colour and from what I could feel similar fibre size. So, I divided more by cleanliness.  I kept skirting and sorting until I had mostly even buckets full of similar filthiness.

12-13 sorting done starting soaking

I pulled out the fleece washing buckets and moved the newly sorted wool to the table.  I also pulled out the remaining Shetland still to wash from last year.


Although I was dying of curiosity I started a batch of the Shetland as well as a bucket of the new ram

14-15 wool drained water filthy, on to next rinse

Hanging the strainer buckets up between rinses. The water is still filthy so I change it and soak them again.

I added another one of the giant soaking buckets and got a third strainer bucket going. This is going to take all summer at this rate!!

19-21 first batch out and second batch in

As the first batch was drying, I started the second batch.  Continuing the process of; soap soak, lift buckets gently and then replace a few times, drain and change to fresh water was going along wonderfully, ….. And then it Rained….

2222 UNFAIR!!!

Weather? Is this a snide comment that I am rushing and I should soak it longer? Or are you suggesting It needed another rinse?

and it stopped raining so it may dry, but no the sun didn’t last long and its back to raining, so let’s just consider this as well rinsed.

2323 soak

Showers intermittent continued and I decided it was a sign to work on something else. I am Back to felting inside.

It’s sunny this morning, well at least at the moment. I am getting suspicious the sun knows when I’m out here!  The wool is back out drying and I am working on another project in the outside studio. (I moved the wool buckets over so I could sit on the bench). The lighting was getting a bit darker and I was just about to go check the fleece when the sky opened up yet again! ok  let’s just consider this one more rinse….. positive thinking! positive thinking!

242524-25 Rain Again!!! (Is this some comment on the topic of my summer theme of Mer’s?)

Just to show you how much water we have been getting the farther 2 buckets are under on the umbrellas the nearer one is not and is now a lot deeper than I had filled it.

2626 the amount of rain we got covered the fleece strainer

The sun is just tempting me I know by this time but I will fall for his evil machinations again, by draining and putting out the fleece to dry.

2727 there is sun

Yes it was all a plot and Ann messaged me that we have a tornado warning happening, I took down the umbrellas, put the fleece away , it was getting So Much close to dry!!, back into bins and stuck them in zip lock bags away from  the  incoming storm. We had greenish tinted sky and cloud layers moving in different directions and speeds but luckily no tornado. On the western edge of Ottawa, One of our friends lost a Very big tree who’s aim was luckily poor and just missed their house. We were glad to hear she was safe.

Next morning Glenn picked up a couple knocked over pots and I put the fleece back out to dry… Someday dry fleece will come… maybe tomorrow?

28-29 OK trying again to dry wool

If anyone needs a bit of rain, you are welcome to have some of ours, the rain barrels are full and I don’t have to water the garden (which is actually helpful). That includes Ann who lives south of the city and has not had nearly as much rain as we have gotten!!! Why not rain on her sheep? Hers must be much cleaner sheep than my fleece is. Oh well it looks like it may be worth the work, if I can get it clean and dry. I am looking forward to seeing how it will felt and it should spin up some spectacular sock yarn, now I just need to figure out how to knit socks.


Burning the fuzz off a basket and then dying it.

Burning the fuzz off a basket and then dying it.

I thought I would try burning fuss of some felt, a bergschaf wool basket to be precise. My son gave me his cool little cigar lighter he picked up. It worked for about 5 seconds then was out of fuel. no problem we will just get some butane and fill it. Well, you would think that was easy but no.

So I will try a candle. We really only have beeswax candles so I got a tealight and tried it. It worked  (it looks more scorched than it is)  but I spilled wax on the basket and that’s not good. Good thing I decided to try the inside of the handle where it won’t show so I will not have to look up how to get beeswax out of wool. I seem to remember something about ironing with paper from my grade 7 batiking class. We will not mention just how long ago that class was.

Next was to see if Walmart has a little torch in the kitchen section for doing the tops of Creme Brulee. No, they do not. How about some butane? No, you have to order that on the online platform. No flammable gas in the store but they will ship you pressurized gas in the mail. No time for that, buy a BBQ lighter. They have that. I had to return that seems it won’t light. Next, let’s try Canadian Tire. Yes,  according to the website they have butane and even have a little torch on sale cheap ($9.99 marked down from $39.99). No, they are sold out even if the app says there are 2 left. And where is the butane? Nowhere to be found. Another fail. I am starting to think the universe is telling me not to do this. But there are BBQ lighters at the cashout. Let’s try again, I grabbed one and off I went.

This BBQ lighter works, now I can give this a try.

I worked well. A little hard to keep it lit because of all the safety features on lighters these days but I managed. I was wishing to the flamethrower lighters of my teen years. Just not the same waving a phone light. Not to mention you cant singe hairs of wool with them.

It wasn’t easy trying to get a picture of the singed hairs. If the pot had been white maybe it would have been easier but many tries later I got this good one. Keeping the torch moving is the key to not singing it. and the hairs shrivel quite fast.

The problem is it looks like it’s nice and hair free and then you brush off the burned bits and it just raised more hairs. I tried to be gentle but still. after a second pass, it was better but still, there were hairs. It’s too bad it didn’t work as I wanted because even though is it a bit stinky it was fun to do.

Oh well moving onto the next step, dying the basket. This time I picked magenta and purple.

First into the dye pot upside down to do the lighter colour on the top. it cooked loner than usual as when I went to take it out I realized I hadn’t added any vinegar. Oh well, no harm done.

Then the other way up to do the darker purple. You can see the wax I didn’t get off, on the top. A very effective resist.

I was very happy when I rinsed the basket, there was no bleeding at all.

I rolled up the handle to dry in the right shape this time. So there is a happy face instead of an alien this time.

This is a nice close up that shows the colour changes nicely. When it is dry I will shave it.


Here is t is off the ball. I will add some stitching but that’s a job for Sunday.


By now, with basket 3, I am sure you are sick of hearing about may baskets. I promise not to do another basket post next week when it is my turn to post again.


Brent goose: making a felt picture

Brent goose: making a felt picture

I love the sea and sea birds of the coast where I live and I often incorporate them into my felt pictures. 


A couple of years ago I was watching some dark-bellied Brent geese swimming in the sea and feeding along the shoreline a few miles east of my house. They’re smallish geese that breed in northern Russia and over-winter in the salt marshes, coast and estuaries of the South and East of England. They don’t populate large areas so are on the ‘amber’ UK conservation status list. I took some photos (one with a bonus curlew!) which I looked at again recently when I was thinking about creating a new felt picture. 


I decided to use as the background a piece I made a few months ago. I’m a little obsessed with trying to capture the many colours and patterns of the sea here. Sometimes they become stand-alone pictures, sometimes they are combined with a bird and other times they hang around waiting for me to decide what to do with them. 


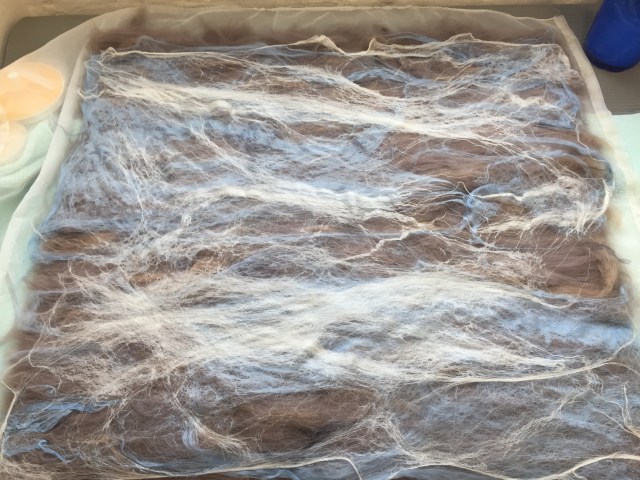
With this one, I made two pieces of cobweb prefelt (one white, one blue) which I laid on top of a pewter-colour (all merino wool) and wet felted them together. 


background layout
Background layout ready for felting


I thought it would serve well for this picture and was pleased to be using something I’d already made: saving time and freeing up storage space.


I did a quick sketch to help me decide on the size of the goose and cut it out to check the size and position and how it would sit in the frame. I realised its head was a bit small but this was only a guide and I’d sort that out later. 


first paper sketch 


I made some light prefelt for the goose’s wing and belly feathers using natural carded Norwegian batts as I wanted short fibres that would give me lots of colour mixing. 


One of the challenges was the potential wool migration between the black and white of the bird’s back half so I made a firmer white prefelt to lay as the top white layer which I hoped would minimise the bleed between black and white. 


Here is the rough layout for the bird (just before I added the white prefelt) and what it looks like after felting and fulling.  I made it bigger than I needed so I could trim it to the final goose shape. It’s easier to take away than to add and it needs to be a bit bigger than the final bird to allow for needling the edges into the background. 

I had a bit less definition in the grey/brown and white wing feathers than I’d hoped for. I should have made the prefelt a bit firmer (note to self). But I thought the white prefelt worked well. I kept checking the composition with the paper sketch, the background and the frame.  


Next I trimmed the goose nearer to size, using the paper template as a guide. 


Normally my felted birds sit on top of their backgrounds.  I needle felt them on which makes the picture more 3 dimensional. I hadn’t really thought through the fact that this one is in the water so some of the sea is in front of the goose. 


I pondered this for a bit. Maybe felt a wave to go across where the bird enters the water? How about cutting the background and slotting the bird into it? Not something I’ve done before and it felt like a rather brave irreversible step but I decided to go for it. 


Once the goose is slotted in, it’s time needle felt it into place and add some more detail. I faffed about with the shadow / reflection for a while, added more definition to the belly and wing feathers, added the white neck pattern then spent a while getting the eye and beak as I wanted them. 


final goose
Dark-bellied Brent Goose

Here’s the finished picture just before I framed it.  Framed it’s 64 x 64 cm (approximately 25.2 inches square).


Do you think cutting the background worked?  I wonder what other solutions I could have tried.  What ‘brave’ decisions do you make in your textile work?


A Felt Solution for a Small Problem

A Felt Solution for a Small Problem

Black thumb drive and black thumb drive and black thumb drive? Which Identical looking thumb drive has the file I am looking for? Silly me I saw them on sale and bought them! Now I again have a handful of thumb drives that I have to open each one to find out what it might have on them…. Well, that’s annoying.

thumb drives Yes, I have a lot of black thumb drives!

I had to pass some files over to Ann and need some way to make this little black drive look different from the rest of them and so it won’t get lost with any that she also has.

Sitting here in front of the computer, with a pile of fibre and lots of needles, I wonder…… can you needle felt directly to an attachment point on the drive? These have particularly small attachment spots for a toggle so a ribbon or leather strip won’t fit. But I think I can get a felting needle in there!

I had bought a pink rose and grey batt from Christine which just happens to be sitting here.  What shall I do? What shall I make? I have no clue… No, I don’t think I want a fish. So I grabbed a bit of fibre and started to poke at it, poke, poke, flip, poke, hmmm, no, not a fish. But it is starting to look like it wants to be a mitt. One of those really big winter mitts gripping the end of the thumb drive. Ha! My thumb drive has a thumb attached to it (with the rest of the mitt!)

OOPS, I gave it to Ann before getting a photo of it.

thumb and palmfingers

thanks, Ann!  the top is the thumb holding on to the hole in the drive and the purple is the back of the mitt. it has a big fluffy cuff. I will have to work more on the palm and wrist when I get it back.

Ah, another day of rain, I guess my fleece washing and drying is now getting an extra rinse again. it’s raining too much to even sit out and felt undercover today.

I grabbed some more of the same batt of pinks, rose and grey and started randomly poking at the wool. After a bit I started feeling like footwear, yes that is definitely a short felt boot. I added a bright pink bit of fibre as the sole and started pulling bits of curls and added them along the rim of the boot and extended the backup and attached it to the thumb drive.

1234567     1-7

I got distracted working on the computer and looked up to see MORE RAIN…. The fleece gets another rinse.

The weekend was busy with getting Mom groceries and birthday cupcake (chocolate on chocolate with chocolate!) She is 89 this year!  I had a wonderful visit with friends, with social distancing and then on to the birthday party and belated birthday presents for my Niece for her 16th birthday (we gave her a starter selection of fibre, needles and an instruction book. She had never felted before and made a very nice strawberry between getting the book, eating dinner and before dessert!

For the next thumb drive, I really wanted to make a wire sheep. I had some of the combed blue locks sitting close to hand so blue sheep it would be! I divided the single piece of floral wire into loops for legs, tail and left the rest for the head. My tiny scrolling plyers had disappeared gain so Glenn stopped into Dollerama to pick up more. I don’t know what I would do without that store, it has most of my not originally meant for felting supplies. I had to wait on the plyers until he got back from work so I hand twisted the legs and used the tail loop at the attachment to the thumb drive. I will tighten that up and make hoof loops later.  I decided to make a nice round little body but leave the legs and neck wire. The head I added ears and a couple of tight curls. I think she turned out quite well.

1089   8-10

The attachment is easier to see with the wire rather than with the boot or mitt felting.

111211-12

Since the labelling of the boot’s drive as a Boot drive gives it other meanings in computer vocabulary I will call this the pink slipper drive, and the other will be the blue sheep drive.

That was a fun little project and has successfully made the on sale black identical thumb drives now look different! Have fun and keep felting (but it may be best not to do wet felting with this one!)

13 13

Felt Basket #3

Felt Basket #3

Yes, I made another felt basket. this one is with some Bergschaf Tyrollean wool I got from Lituania when it was on sale and had free shipping to boot. I don’t know if its the same as the Bergschef that DHG sells.  https://www.etsy.com/ca/listing/532965567/one-of-the-best-wool-for-wet-felting?ref=shop_home_active_7&frs=1&crt=1

I used a little over 300 grams.

I repaired the resist from the last basket with some sheep duct tape.

The wool was in a bat as you can see. I  am not used to working with them. But even with splitting it and fiddling to make it all even, it was faster to lay out.


I rubbed a bit and then rolled it as usual until it was shrinking then cut it out and cut the handle. I didn’t realize how much it had shrunk until I pulled out the resist. this blue foam is much softer than the white I get and you don’t feel it bunching up the same way.

I have a washboard for rolling on but this was t wide for it. I have a great car floor mat that works great. it has a great texture. I wrap the piece in some plastic to protect the surface while I roll.

I also beat the basket into a nice round shape after blowing up a 24-inch beach ball inside it. Beating it with a pool noodle worked great.

I popped it outside to be another alien.

When it was dry I decided it had not been fulled enough. I wet it down and put it in the dryer with some bumpy balls. It shrank some more.

I dried it on a 20-inch beach ball this time. It is nice and sturdy now.

Not great pictures but it is thundering and we are about to get a downpour so I had to be quick about snapping a couple of pictures.

the handle is quite straight across when I roll it up. I think I may have to steam it and let it cool in a rounder shape.  Also, it is quite hairy. part of that may be the fulling with the bumpy balls. Tennis balls would have been a better choice, I think.

Anyway, I like it but the next step will be to try doing what they do for felt carpets in the middle east. use a blow torch to burn off the fuzziness. I was hoping to have pictures of that for you today but I have run out of time. so hopefully next week you will have some pictures of me trying that.  Anyone else ever tried to burn off the fuzzies?

Cuffs and Stuff

Cuffs and Stuff

A couple of years ago a friend alerted me to the wonderful Australian magazine simply called “Felt”. It’s only published twice a year but I look forward to it eagerly as it’s always crammed with interesting photographs and articles including artist profiles and project tutorials.

One of the artists featured in the latest edition is the Canadian born feltmaker Christianna Ferguson. Christianna’s work is very colourful and textural and, as well as teaching and exhibiting, she also creates what she calls “more functional art: scarves, purses, cuffs, tea-cosies and wearables.”

Examples of the colourful and textural work of Christianna Ferguson

So, having read about her work, when I turned the page and saw the tutorial for making her fabulous little Nuno felted and hand embroidered cuffs I had to have a go!

The fasteners are particularly cute and make an interesting feature but I struggled to get them as firm as I would have liked. For an added twist I’ve included some hand stitching and a bead to my fasteners. I added some hand embroidery to my green cuff but wasn’t happy with it…..looking back at Christianna’s examples I can see that my stitching wasn’t subtle enough! I much prefer the grey one which I left plain.

The good thing to come out of this exercise, having made two in this style, is that I’ve been reminded how much fun cuffs are to make. I designed several Nuno felted & free motion stitched cuffs for my sales tables last year and this has encouraged me to get on and make more.

Some of my earlier cuffs – can’t help but think of bacon rashers when I look at this photo!
Nuno felted and free motion stitched cuffs

I also got thinking about other possibilities and how much more sculptural I could make my cuffs. The next set are based on the design of one of my bangles, using a felt ball as the fastener and keeping the little beaded element.

The bangle that inspired the cuffs
The slits have been filled with half balls and metal buttons

They were all fun to make but I’ve come to the conclusion that I prefer the irregular shaped, Nuno style with the stitched edging (from last year) so I’ve come full circle! These are two I started this morning…..

Pre-felts laid out and wetted prior to felting
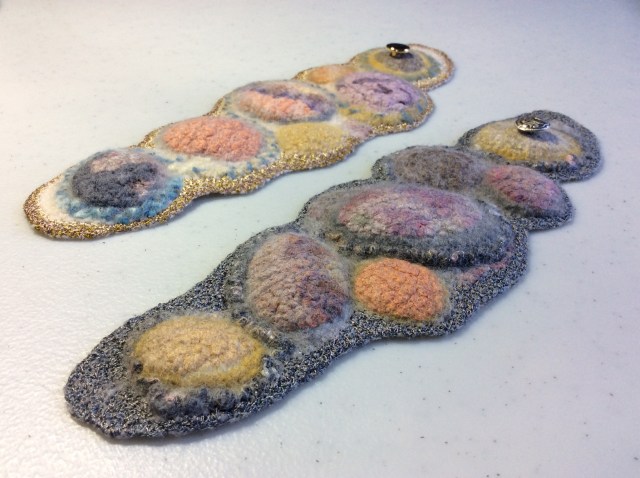
Using differential shrinkage creates an undulating surface

And this is them finished. Christianna said that when she makes hers “each cuff feels like a little piece of abstract art” and I couldn’t agree more. Although I love creating larger pieces of work there is something very satisfying about making these little cuffs and ending up with a totally unique, wearable item.

Felting Alfresco (outside! Its Summer!) Pet Two Part 3 She is Naked! We must fix that!!!

Felting Alfresco (outside! Its Summer!) Pet Two Part 3 She is Naked! We must fix that!!!

Felting Alfresco (outside! Its Summer!)

Pet Two Part 3 She is Naked! We must fix that!!!


Now it’s time for me to start adding a bit of colour! this is where we left off last time.

1928

this is the understructure of the manta ray next will be laying colour on top of the structure, like a gresi painting.

12 1-2 laying in the T line so she is an oceanic manta

If you have taken art classes, either commercial or fine art, you may have had a teacher that reminded you that paintings with large black spaces are not as effective as deep shadows with suggestions of something within the shadows. So not a solid black but layers of dark blue, green, charcoals and browns with maybe a bit of pure black. I mixed the darkest charcoal with a very dark green and blue. I also started to add some of the lighter greys in thin wisps over top to give that dappled light effect.

 3-5 base layer of simplified pattern and fibres I was working from

 I kept a zip-lock sandwich bag of mixed greys which I could then make lighter or darker as I needed.

676-7 Zip-lock of greys, a bit of mixed colour sitting on her shoulder about to be added in a thin layer over the dark sections.

Distracted by Princess Auto flyer, the snap ring plyers I have and use to bend the ends of the wire are very tiny and not as smooth as I would like. So I will be off to check these out at next weeks’ sale. I will likely also replace my old wooden bench (the one I was stuffing unskirted raw wool into bags on) while I’m there.

 8-9  This is Next week’s Princess Auto flyer! Another great place for fibre related tools, really! It is where I found the Bee combs! (Yes!! We got the Bench!! However, they were out of the cool plyers)

I added the Dorsal fin, I made the basic shape and added it just above the base of the tail. I then build up the sides of the fin to give it more of the correct shape.

1011 10-11 added the Dorsal fin then built up the sides

After checking with the photo reference I brought the darkness around the edge of parts of the wings

1213

12-13 Bringing the colour to the edge and just around.

Next adjusting the angle on the lower part of the white shoulder markings and adding white to cover thin areas where the understructure was showing through. So far she does not have any under spotting but I may revisit before the end of the entire project.

1415 14-15 Final touch-ups on the back of the mantel.

16-19 looking good, but she will need eyes so she can judge that for herself

Time to add eyes!  Hmm, I think we need a bit more extension on the eye orbs or she will not be able to see around her Cephalic fins. I surrounded the pupil then used the super sharp scissors to cut off the excess. (I found these again at Dollarama, for 4.00 Canadian, they have worked very well so I bought a couple more pairs).  I may leave her for a couple of days then re-evaluate the eyes, they are not quite right yet but close!

  20-24 Adding eyes and the nice scissors from Dollerama

I think the heat was getting to her since she started her photoshoot by stealing my glasses and mask!

  25-27 Mantas seem to be curious and playful and maybe a short-sighted

Oddly, the glasses seem to fit her.  Unfortunately, the mask does not quite cover both her mouth and gills.

So on to the photoshoot!!!

2829

28-29 She seemed a little static in her poses, so l let her loose in the garden to have some fun.

     303132       3335343736  30- 37 A quick swim through the front garden (wait till she finds out there is a back garden!)

I took her out to buy butter tarts and to show Ann. It’s good to get out and meet new people but she forgot to wear her mask!! I think she will need to quarantine before she can play with her Mer-People!!!

38-40 Felting is better with Butter tarts

I hope you have enjoyed the creation of my adolescent female Manta Ray. I still have more to do with this set of sculptures so please keep checking in on how it is going. Have fun and Keep felting!!