So what have I been up to lately? Well this and that! I finally joined facebook a year ago to promote my work and workshops. I also opened up my Etsy store, so I have been a bit busy.
I have been lucky to also receive a few commissions. A lady asked me to make her favourite, a dragonfly! Well it’s good to step out of your comfort zone and try new things isn’t it. Luckily it was well received and here it is finished and then a picture when Gloria framed it.
I have a few fairs coming up including a two day fair, so I need to up my stock. I really love making a wet felted picture and free motion sewing it. I didn’t have any sheepy ones so here is one in its fluffy stage and then onto the sewn version.
Because of the upcoming shows and dare I mention the C word – Christmas. I thought I would make a few similar snowy cottage cards, with the view to getting them printed onto cards as I have done in the past. I put them on my facebook page and asked people which one they thought I should use as the card. Votes where across the board, but I have chosen one. I won’t say which I prefer, but which one do you like?
Finally I have a little prize giveaway going on on my fb page. I want to get the following picture printed onto cards also, but I need a title! If you would like to contribute a title that would be wonderful. The persons who’s title I choose I will send a card to them, a small prize maybe, but it was made with love!
A couple of weeks ago I went on a sublimation printing workshop with Dawn Dupree, a well-established textile printer based in south London near me. She specialises in multilayered collage, often made using sublimation printing techniques, like those below.
Sublimation printing uses a heat press and solid ink, usually painted on paper, and only works on synthetic fabric. You put the inked paper face down on top of the fabric, sandwich it between newsprint to prevent the ink from getting on the heat press, then press it in a heat press for around 30 seconds.
The heat causes the ink to sublimate to a gas and also opens the “pores” of the fabric, allowing the gas to penetrate. As the fabric cools down, the ink returns to a solid state and becomes part of the fabric. Unlike with heat transfer printing, the colour does not sit on top of the fabric so doesn’t crack or peel off.
You can buy ready made dye papers in different colours, and you can also make your own papers by painting them with dye and leaving them to dry. The colour of the paper is usually very different to the final colour on the fabric – the fabric is much brighter! So it’s better to do some sample testing if you are after a particular colour.
You can create collages in several ways. The simplest way is to cut the dye paper into different shapes, or use stencils to create a negative outline. You can also use transfer the dye to a photocopy in the heatpress and then use the photocopy to create an image on fabric. Carol’s pieces below, based on the beautiful work by her daughter Alex, used these techniques.
You can also transfer the dye to other items, such as lace, doilies, or yarn, like Gabriela and Maritza did below.
With the heat press you can also add foil to highlight various parts. Catherine’s multilayered piece below included foiling.
I wanted to see how shibori techniques worked in the heat press. So I took a piece of Vilene and folded it in a series of knife pleats in one direction and then the other. I printed this folded piece in one colour, and then unfolded it, repleated it along different folds, and printed with another colour.
Below you can see the folded Vilene on the right after printing with two colours. The purple dye paper is on the left.
Below is after printing withe four colours:
And this if the final piece after printing with five colours:
I also tried stitching. I stitched a piece of white polyester with five rows of running stitch, pulled up the stitches into pleats and then printed it with pink dye paper.
This is what it looked like when opened up.
I removed the stitches, pressed it and restitched in different places, and printed with a second colour.
I repeated this twice more. Then I tore the piece in half and foiled one half (the piece at the bottom).
I noticed that the papers I used for printing retained a very clear image of the stitched fabric. So I used them to print on other pieces of fabric, which looked amazingly 3D.
I hope you enjoyed this post, even though it doesn’t include any felt! Please note that the post is being scheduled to publish while I am on holiday, so I may not be able to respond to comments immediately.
Hi, my name is Deb Stika and I’m a member of Ruth Lane’s art group. Our group meets monthly and once annually for a 2 day retreat on Bitteroot Lake in Montana. In preparation for doing deconstructed silk screening at the retreat, Ruth asked me to describe the process. We took a few photos to help you visualize what we are doing.
We set our stuff up on Ruth’s back deck so we would have plenty of room to spread out. We mixed the print paste in Ruth’s old blender.
Here’s Ruth mixing dye powder into the print paste, making sure there are no lumps! Since we have a bunch of screens, we mixed a variety of colors.
I’ve decided to use this Styrofoam packing material for my first patterned screen. (Ignore the purple color, that’s leftover paint from Ruth using it for printing on another project.) Our first deconstructed screen is orange. And a second bigger screen is created using the same packing material. We simply used the leftover print paste on the packing material and pressed it against’ the screen.
Here I am contemplating using misc. stencils on this bigger screen.
Other good textures: rubber bands, toothpicks, string, etc.
Drying screens.
Here are some of our dried screens ready for deconstructed silk
screening.
Our first pull using the string screen. And the reveal!
Another pull using the rubber band screen. And the reveal!
More reveals!
Thanks Deb for showing everyone the deconstructed screen printing process. We use these printed fabrics for backgrounds in our various fiber art. Screen printing is a fun process, give it a try.
And to announce the winner of the drawing for First Time Felting, drum roll please…
The winner is Anna Ashton! Congratulations Anna, I will contact you to get your address so the publisher can send you your free copy of the book.
Some of you may know that as well as being a felter I have recently developed an interest in basketry. Given that I love making 3D vessels and sculptural felt, this is probably no great surprise!
My preferred method at the moment is random weaving, as I love the organic, freeform texture of this technique. After starting with cane, I moved on to work with paper yarn, which I like much better. I think my textile background has instilled a preference for softer materials! 😉
I can also dye the paper with indigo or other natural dyes, like this piece dyed with eucalyptus. And untwisting the ends of the paper produces some delicate feathery effects.
I had the idea of combining felting with random weaving after seeing a photo of a cape gooseberry.
I thought that if the orange fruit in the centre was made from felt, it would make an interesting contrast with the paper carapace. So I wove the paper case, leaving a hole at the top, and then inserted a small orange felt sphere and stitched the two together with very fine fishing line. I then finished the top with some twining and a little tassel.
Photo: Owen Llewellyn
I decided to develop this further into a submission for an exhibition with the theme of “fragility”. With widespread concern about the human effects on our fragile environment, I read that scientists at Kew Gardens estimate that one in five plant species are in danger of extinction due to activities such as intensive farming, deforestation and construction.
So the idea for my piece, called “One in Five”, was to make five stylised seeds combining felt and paper yarn, to represent the fragility of the environment in general as well as their own precarious existence.
The second pod I made was based on a sycamore seed. I needlefelted the two seeds first before wet felting them, and then wove the paper wings around them.
Photo: Owen Llewellyn
I used a similar technique for the third seed, which was based on a bean pod.
Photo: Owen Llewellyn
The fourth seed was slightly different – no random weaving was involved. Instead, I wrapped several strands of paper yarn together, feathered the separate ends, and covered the wrapped ends with felt to resemble a dandelion seed.
It was a bit tricky to felt around the paper without making it soggy and droopy. So I ended up applying some matt varnish to the paper to protect it before felting, which worked a treat.
Photo: Owen Llewellyn
The fifth and last seed was the most difficult. I wanted to make a spiky seed case, a bit like a chestnut, but it was tricky to work out how. I eventually made a random weave sphere and then looped short lengths of paper yarn all over it. I started feathering all the ends, but then decided that the overall effect was too much and that I should just feather a few randomly. So I had to reloop quite a few bits of yarn!
Photo: Owen Llewellyn
Having finished making the seeds, I had to decide on the best way to display them. They would obviously look better suspended rather than lying on a flat surface, but in one of the galleries where this exhibition will be displayed we cannot hang things from the ceiling.
One of the other advantages of felt and paper is that they are both very light materials – each of the seeds weighs only a few grams. So I thought I could somehow mount a branch on a wall and hang them from that.
I spent days looking for the perfect branch. Luckily, we’ve had a few blustery days recently, so there has been no shortage of branches, even on London pavements! I finally found one that’s not too heavy, is an interesting shape and has some lovely lichen.
So then it was off to a photographer friend, Owen Llewellyn, to take some pictures that would hopefully wow the selectors and persuade them to accept my submission. After experimenting with three different backdrops we finally went for a plain grey background, though there also some interesting experimental shadow pics!
Anyway, it clearly worked, as I have just heard that my submission has been accepted for the exhibition, which will be on display in London at the end of May and Birmingham in October. Phew!
The last time I wrote I shared some of the artwork I loved at the Knitting & Stitching Show. This time I’m sharing a bit more, with a special focus on my favourite artist this year.
*** Please note: this post will have verbal references to eating disorders in the context of an art exhibit, which some might find triggering; none of the artwork has any explicit imagery related to this mental health issue. ***
Remember Libby Vale, the artist with the “Ironing Bored” in my last post? She also created a doll that reflected our modern human self-absorption. Note the bag full of Stuff You Don’t Really Need in the her hand. This doll was posable and each day would look different.
I love seeing textile art in 3D so these textures drew me in. I forgot to record who made them.
The next artwork reminds me of Zed’s creations. Do you agree?
More 3D art. I’m always drawn to wire creations, they look so ethereal.
Now comes the exhibit that touched me the most. As someone who has struggled with an eating disorder in her teens, this was very powerful to me. The work of Caren Garfen gives voice to her former self and to those who can see themselves reflected in her words and creation.
This size 0 dress tells the story of Anna. It was painstakingly stitched with human hair.
A reflection of mood.
The angry voices of the loved ones who don’t know how to deal with an invisible illness
Caren created a dollhouse reflecting the mood of an anorexic. Everything inside it has a relation to eating. In the middle sits the artist, underweight, with a food-related unfinished artwork, looking lost.
Finally, a piece of her handmade patchwork blanket. Knowing when to ask for help is what people with a mental illness struggle the most.
I hope you enjoyed this post, even if the last theme was a little heavy. Art isn’t just about the positive side of life, and its role needs to also be one of awareness about what surrounds us. If sometimes you feel you’re struggling – you’re not alone.
This weekend the biggest fibre and fabric-related event in Europe happened right here in London. Every year I volunteer for my spinning guild and, in return, I get a free pass for all days.
Although the Knitting & Stitching Show is mostly about the sales, there’s always a section dedicated to textile arts. Established artists as well as art school finalists exhibit their work every year, so that’s what I’m sharing with you today.
Let’s admire this larger-than-life crocheted cow by TOFT. They also had a giant lobster and other animals. How many hours went into each?
The artist Jenni Dutton had an exhibit about her Mother, called Dementia Darnings. You can imagine by the title how poignant each portrait was – we see this woman depicted from a young age to her final, frail days. I was very moved by it.
Look closely – can you tell how each work was created?
It’s yarn. You can see it hanging down on the portrait above. Isn’t it wonderful? All this hard work, you can tell the artist loved her mother very much. I felt like hugging her for this dedication.
Next, quilts. I’m not a particular fan of the “traditional” ones but when this technique is applied to create something unusual, you have my full attention.
I’m afraid the pictures don’t do these works justice. Both artists are American I think you can feel a lovely sort of vintage US vibe to these images.
Finally, something that made me smile, by Libby Vale.
Ironing is definitely not on my list of priorities, so I connected perfectly with the sentiments depicted in this board!
There was a lot more to show, but I’ll leave that to my next blog post. I hope you enjoyed my choice of art. Have you ever been to the Knitting & Stitching Show, or a similar event where textile art is shown? Let me know all about it in the comments section.
Although the Ottawa Valley weavers and spinners guild is the largest guild in eastern Ontario, we also have many smaller neighbour guilds. One of the closest neighbours is the West Carleton Fibre Guild who hold their meetings on a Tuesday afternoon in Dunrobin, Ontario (just a bit past the west end of Kanata). But the September’s meeting was special.
Back door of the Almonte Textile Museum
They had a field trip to the Mississippi Valley Textile Museum in Almonte. The trip was planned so they could have a special tour of the Puppet exhibit by Noreen Young. At present there are 3 exhibits at the museum. There permanent display of Mill equipment and modern weaving looms, a spectacular quilt exhibit and Noreen Young: a Puppet Retrospective. With 150 examples of some of her life’s work in puppetry. She is internationally known and has received the order of Canada for work with producing, writing and puppeteering in many children’s and educational programs.
Poster for the exhibit. First puppet in the exhibition (a rod puppet with detachable legs
Noreen with her first puppet
She gave us a tour through the exhibit explaining different puppets and giving anecdotes of her work with them. She was asked if she had a favorite and told us her Granny character, Mrs. Gertrude Diddle and Gloria Gopher she was particularly fond of. She took some down from the display and showed us how they moved and what they voice sounded like. She did the voices for most of her puppets but occasional had to lip sink to a voice actor which was harder.
Almost all her puppets were to be worked with the puppeteer below holding one arm up to operate the mouth and the other hand controls the rods to move the hands. She showed us how it was important to make the puppets bob as they moved or it looked like they were skating along or floating in the air witch just wasn’t right.
Her earliest work was in the 60’s “Hi Diddle Day” 1967 to 1976. These puppets are in a glass display case with a couple more the puppet cast. Not all the puppets are in display cases though.
Displayed on shelves with monitors showing bits of the program they were used for beneath them were the Puppets for “under the Umbrella tree” which ran on CBC, Disney and Canal Famille from 1987-1997.
She explained about the studio being an old garage and having a lower ceiling than studios usually had. So the puppeteers had to sit on rolling boxes since they could only raise the live actor up a certain height before the ceiling was a problem. For most shows she said the puppeteers stood on the floor with the live actors raised on platforms so they could interact with the puppets. The head bands the puppeteers are wearing holds their mikes. This insures the mike is always the same distance from their mouth as they switch between looking up at the puppet and down at their scripts.
There were puppets from series I didn’t remember but am now sorry I missed. “Bats” from a 1987 Pilot.
Also “Wacky Palms” from 1994 about a small boutique resort in the Bermuda triangle. Run by a cow with a theatrical past and with an eclectic staff. Strange things happen when a time portal opens and havoc is unleashed upon the hotel.
She said that some of her most effective puppets had elements of movement such as the feathers for hair, parts that dangled or the way the fabric moved with the puppet.
Noreen was also known for her Caricatures of real peoples. Her Prince Charles from 1975, created for “What’s new” a kids news show for CBC, is very recognizable. She also made a copy of the mayor of Ottawa.
She has made caricatures of may Almonte area people (about 50 on display) who have been used in various puppet shows in the area. She was the artistic Director for “Puppets up!”; an annual international puppet show from 2005 to 2016. International puppet shows from across the planet performed in the tiny town of Almonte.
There are some puppets that can be interacted with. It will take 2 people to run them one is the head and hands and a second person runs the feet.
She did puppets for and educational spot about food nutrition.
This is the Granny Bride puppet she made for a friend in 2000.
I didn’t recognize this group of puppets but it looks like an interesting cast.
Most of Her puppets are made by sculptor the head in plasticine then casting it. She uses the cast to create the flexible, expressive rubber faces she uses in her puppets.
She has given 3 workshops on making puppets during the run of the exhibit and has another lecture to do before the exhibit closes. My husband was lucky enough to get a spot in one of her workshops. She said he was very well prepared and had amazing focus making his puppet Blacksmith. He said he had a blast and was very glad he had gone.
Glenn Martin Blacksmith puppet
This exhibit made me smile! I couldn’t help but feel happy looking at all the puppets many I recognized. I am sure you would enjoy seeing them too. Keep an eye out for Noreen she says she drops by regularly to the exhibit.
For today’s blog post, I am sharing with you a workshop I went to, where Dani Ives was teaching how to paint with wool. If you haven’t heard of Dani’s work, I highly recommend you check out her website.
Portrait of Luna, copyright Dani Ives (taken with permission from the author)
Before we get started, what exactly is “painting with wool?” It is a 2D needle felting process whereby you pick a theme, copy the design onto flat wool sheets or another type of fabric, and then proceed to “paint” it with different colour wools using felting needles.
This term was coined by Dani Ives when she realised she was essentially using wool the same way painters use paint to represent an object.
My “classmates” before we started
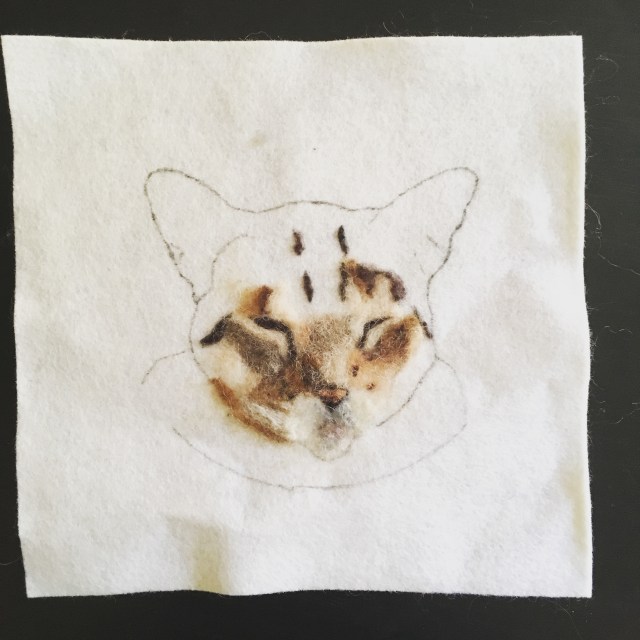
I was asked to bring an image to reproduce. My main goal with this workshop was to learn how to do 2D pet portraits, so I decided to be ambitious and chose a photo of my cat Marshmallow.
I’m being ambitious but not overly so – her eyes are closed
After transferring the image onto the felt fabric with an ordinary pen, it was time to pick the appropriate colours to use. I confess this is the part I have the most trouble with, because you have to think of the colour not only “as is” but also have a little sense of how it will look after it’s been blended with the others around it.
We then proceeded to apply the wool onto the surface and needle felting it in place. You need to keep the reference photo at hand and look at it often, as it’s very easy to get carried away and start using artistic licence – you don’t want to do that when you’re going for a faithful reproduction!
There’s more hours put into this than I want to admit
This is a slow, laborious process. Obviously you will get quicker as you become better but I sure took long to reach the above phase.
This is my current progress. It’s slowly coming together. I can’t wait to see this finished.
Finally, I had to share my fangirl moment, a picture of me with Dani Ives herself!
Have you ever done any 2D needle felting? Let me know how it went for you in the comments section. Thanks for reading!
Hello, Leonor here. My guest post for today is going to be a simple “show and tell” as the weather here in London is too warm for complicated thoughts!
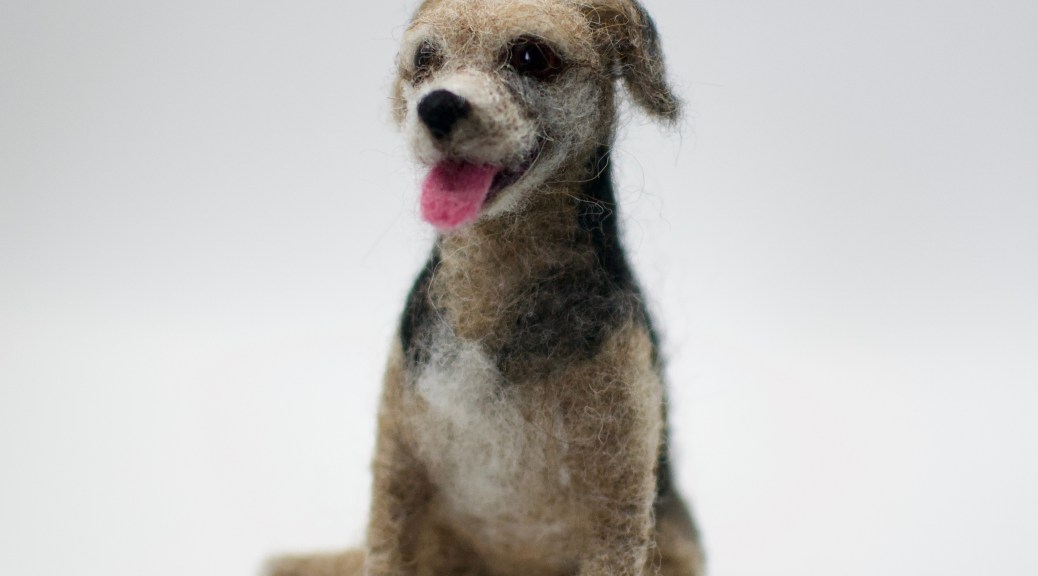
Some of you might be aware that I am a fibre artist by trade. Anything wool and I love it. I got into this business a little by accident, and making custom needle felted dogs was even more unexpected – basically, a friend asked me for a mini of his whippet, I took the challenge, and the rest is history!
I’ve now been playing with wool professionally for around 5 years, and I must confess there was one hurdle I was yet to conquer in my work – creating an open mouth. I’d tried once and it didn’t come out right, so I more or less gave up on it. That is, until I made Chico!
At first I was going to make his tongue out of polymer clay (the idea of finishing it off with a nice layer of glossy varnish to mimic moisture was very attractive to me) but then I decided not to. I liked the idea of a 100% fibre sculpture better.
I made the lower jaw separately, making sure the upper section was thin enough to accommodate both parts without looking weird. I added a layer of black around the edge to make it more realistic, and then a little white on the back for teeth. The tongue was made using two shades of purplish pink blended together. I made two mini tongues and chose the one that fit best.
I received a few reference photos to make this little guy, my favourite was one where he was sitting with his leg to the side and smiling. I just had to make him this way.
I love the detail of paw pads, the feet immediately look real. You can’t really tell from this picture, but Chico is er… anatomically correct. I like a realistic sculpture!
Below is a picture of the original Chico. The mini version is off to a Spanish island as a surprise for the whole human family. I hope they like it!
Have you ever created a needle felted animal? What wool did you use and how did you like your experience? Let me know in the comments section.
Questions? Happy to help, just leave a comment!
Here is part 2 of Jan Scott’s felting tool post. It was much prettier in the word doc format but I don’t seem to be able to transfer that to the blog.
I have a large selection (24 years of collecting) of Massage related implements that may have potential for Felting. One of which are the I.T. Band rollers. They were once veryexpensive and rather limited to acquire. A few weeks ago I found a number of variations of surfaces on rollers at Dollerama for 4.00 each.
So I got a few and gave one to Ann. She tried it out at the Felt in using a pool noodle to mimic a rolling pin (a really big Rolling pin!)
Another massage tool you might like to consider would be the Bar, it is used on large muscles to work out knots.
It is similar to a rolling pin but has groves.
There are also foot rollers and trigger point balls. Not only are they excellent for getting tension out of Levator scapula or the plantar arch, they also work quite nicely to felt with. They come in various stiffness’s for the knobby bits. There are similar balls with knobby bits at the dollerama for much less money. Check the pet toys and the kid’s toys. The tall purple cylindrical roller was from Walmart in the exercise section and was still cheaper than the massage supply stores.
If you find a theraband roller in a second hand store you might want to grab it. Not only is it wonderful for treating both Golfers and tennis elbow (a common felter’s complaint) it also is a cylinder with grooves so again good for felting. They come in different firmness in case you were wanting to use it to stretch your medial or lateral Epicondilitis.
I have been keeping an eye out for Fondant rollers with groves and patterns, they are a Kitchen implement which may also be useful in felting. I have also seen pictures of a regular wooden rolling pin with a bamboo place mat elasticed to it. It looks like it would work too.
Ann has been tracking down wooden facial massagers and foot rollers from Ali express out of china. It’s a very interesting site but be very attentive to the size of items some look much bigger in the picture than what they are when they arrive. They are good for getting into small corners but some of them have a bit of a squeak when rolling.
For needle felting too there are tools not originally designed for felting. I only started to try Cookie cutters for needle felting templates recently. I am not sure if I will investigate further since I really have enjoyed the sculptural aspect of felting but for a production felter it may be helpful to start with a standardized base shape.
I have a number of different sizes of dowels, Meet skewers and wooden scraper for rapping wool around. Most were acquired at the Dollar store in the art or cooking sections.
I have been wanting to try wax on felt to crate claw tips, beaks and noses. I have a suspicion that melted crayons may work. If I need more stiffness I can add paraffin wax. If I need more flexibility I can add more Bees wax. To melt the crayons, I have been cruising the second hand stores looking for a melting device. This is what I have found and am looking forward to trying it out. I will let you know how it goes!
I have found the Extra-large Zipper Bags at Dollerama to be extremely helpful. The Foam pad I used for making the 3D pictures fits in it perfectly. The Foam is a chair pad I bot at Walmart. The 3” thickness I found to be safer than the smaller 12×12 by 2” deep pad I have also been using. I have been leaving the thin plastic over the foam, finding it gave me good separation from the wool and the foam. As I continue to work in one aria the plastic eventually will deteriorate. I have just kept moving to a new section but eventually will add another layer of plastic over the foam. The Foam I chose has no memory foam content. (I have heard rumors of needle felting and memory foam are not compatible.)
Have you noticed at Dollerama, the test tubes with screw tops? They have decretive erasers in them, but you can empty them out, add a bit of wool at the bottom and then they hold felting needles very nicely. I have been keeping the needles I’m working with stuck in the side of my foam but the test tubes are grate to store extra needles. I have labeled each tube with the needle type size and source. I will add a label to the lid once I find a good storage box for all 16 reasonably available needle types. I am still tracking down spirals in a coarser size.
Now that I have most of the needles that are available it will be easier to determine what the Chinese supplier are labeling as small medium and large, or fine medium and coarse.
There is one last thing I think would be important to any art and craft person which is a comfortable table height. I was lucky to find a small adjustable table at Walmart. The top is 30”x19” so hold a table loom or all my needle felting stuff. It adjusts from 21 to 28 inches so has worked well for seated work.
I also have a printer table that was not the height I had hoped for. So added leg extensions of PVC piping to raze it up. I think Ann is using the same technique on her table to make it a good height to stand and work at. With a bit of height adjustment, you can have the table slope just enough to drip water off one corner and into a bucket or drain.
Ergonomics, in body position, comfort of tools and working height is important if you want to keep doing what you are enjoy for your entire lifetime.
I hope that I found something that was new to you and that you will share some of your best finds with me!




 Noreen with her first puppet