Browsed by
Category: Guest Artists

It’s beginning to look a lot like Christmas

It’s beginning to look a lot like Christmas

Annie (rosiepink)

For the 4th quarter challenge I made a few different things because once I started thinking about it I came up with lots of ideas and I couldn’t decide which to make!  I ended up making:

a stars themed table mat

a Christmas pudding decoration

some stars on sticks to poke into my houseplant pots

and a wreath of holly & stars

I needed a mat for the side table in my hallway because people always put keys etc on there and it gets scratched.  I was going to make one in the summer but didn’t get round to it and now that it’s winter I went for a theme of dark inky blue sky with white stars for a festive feel. I had a disaster with it when it wouldn’t felt, but that turned into a triumph when I rescued it with the embellisher because the mat not only felted but also became reversible where the pattern migrated through to the back 🙂

There is more detail about it over on our blog if you are interested: https://rosiepink.typepad.co.uk/rosiepink/2020/12/starry-night-hand-felted-table-runner.html

When trying the mat on the table I saw my simple felt “flower” on a stick that is poked into one of my flower pots, and it gave me another idea.  I thought some stars on sticks would look nice and festive scattered in my plant pots. The flower is just a circle sample of felt from the odds box that I stuck on a wire one day and pushed into the soil.  A friend commented that she really liked it so I left it there.  Also, I had promised my plants I would make them some name tags this year and I didn’t, so they can have a star each instead 🙂

Since making the Christmas Podding a few years back …

https://rosiepink.typepad.co.uk/rosiepink/2014/12/christmas-podding-and-the-chocolate-thief.html

… I kept thinking I’d like to make some more wired twisty holly leaves, possibly made into a wreath.  After some experimentation I made 3 sheets of colourful felt to cut the leaves from…

…but then decided it would take too much time to make all the leaves, so I decided to make a flat Christmas Pudding instead that could stand as a decoration and then I’d only need to make a few leaves!  The pudding is stood on a plate but leaning against a hidden glass jar.

To make the holly leaves I pinned some fabric to the back of the felt for stiffness then free motion stitched a few holly leaf shapes round 3 times in black thread and twice with white.  I also used some old felt to make some other leaves to mix up the colours.

To make the pudding I raided the scraps box. From scrap felt I cut out two main shapes – a 20cm diameter circle for the pudding and a wavy “topping” for the custard. I backed both pieces with fabric then stitched them together.

I cut some little “raisins” from orange felt and stitched them on then free motion stitched a pattern around them on the main pudding.

I attached the holly leaves and added some felt balls for berries. I had already made these a long time ago but they were perfect for this project.  Lastly I added a few little yellow stars for extra sparkle.

I had originally planned on making holly leaves using a base of green fibres plus a lot of other unusual colours to make it a bit quirky. I made a big sheet of felt to cut them from, but found I had used too many dark greens and not enough of the other colours so it wasn’t quite right. I decided I wanted to go more colourful, resulting in the felt I made above.  However, it is a lovely piece of felt and has some interesting passages in it.  For example, I can see lots of little landscapes in it and I will revisit it at some point because I think it has potential.  For now it’s one for my pile of “Ideas & Projects in Progress”.   Again, there is more detail on our blog about this if you are interested because this post is way too long as it is!

https://rosiepink.typepad.co.uk/rosiepink/2020/12/from-felted-holly-leaves-to-landscapes.html

Then in a sudden swirl of enthusiasm I decided to make a big bunch of holly leaves after all to see if I could cobble together a wreath of sorts.  Here are some in progress photos:

After making lots of holly leaves (but sadly no wire, no time!) I hit a problem in that I couldn’t get the leaves to attach nicely to the metal wreath ring I had. I didn’t want to glue gun it in case I want to take it apart and repurpose the bits at some point.  What to do? I had a look around and rediscovered a narrow felted “scarf” that I had made in the summer.  I had been far to impatient when making the scarf and it turned out nothing like I had hoped (basically lovely colours but a complete disaster!). I kept it in the hope that it would come in handy one day, and it did.  I wrapped the ring in the scarf which gave me something to stitch the leaves to:

I mixed in some felted stars and some yellow glass beads as berries (yellow, red, who cares?!)  The stitching is appalling as it was done in record time, but it’s on the back so it won’t be seen.  My patience has limits especially on something fiddly like this when I’m running out of time!  But I think the overall appearance is fun and a bit different and if I ever make another wreath I have learnt a lot along the way for next time!

Here is everything together on the table in the hallway:


I Got My Hat Started.

I Got My Hat Started.

I finally started my new hat.  first I had to make the template. I started with one I had then changed one side.

I was down to the last of my purple so I decided to use black for the middle layer. the purple is so dark black seemed the best choice. Now I will have enough of the purple to make some mitts after the hats done.

For some reason, I decided to fiddle with the silk for the inside next. It would have made more sense to do it after laying out the wool. the silk sticks out past the bottom. this is sow I can fold it back over the edge of the wool along the bottom. so the bottom will remain open.

Having done this first I had to leave it on because it wouldn’t go back on properly If I took it off. If I had wet it, it would stay without the clothes pins but I don’t like layout out on top of wet stuff.

So onto the laying out of the wool.

All done and ready to assemble.

After wetting it down and wrapping the sides around I added the silk lap.

That’s it for now. I am hoping the open bottom works. I haven’t made a hat that way in years. I should be able to tell you next week in my next post.


Challenge, Corona & Christmas 2

Challenge, Corona & Christmas 2

I’ve just re-read my post and suddenly 2 photos are missing so….here they are. Which might also explain some stand-alone text not having its accompanying images.

And no I wasn’t testing the gluhwein!!!!!

Challenge, Corona, and Christmas

Challenge, Corona, and Christmas

All the ‘Cs’….

Challenge and Corona have been best bed buddies since the end of February, but I will ignore that pairing and concentrate on Challenge and Christmas.

Christmas has always been my best time of year. As a child I was surrounded by the twinkle of white lights, the smell of pine trees everywhere, the wondrous spectacle of the original Christmas markets and the delicious variety of Christmas baking, particularly my favourites – Stollen and Lebkuchen (gingerbread), ohh and not to forget – Printen. I’m so pleased Albert married Victoria and brought many of the traditions with him.

Over the years I too have continued the traditions….Christmas lights must be warm white, presents are kept secret until Christmas eve and then opened in sparkling candlelight, with each person having a special Weihnacht’s teller – a ‘Christmas plate’ filled with nuts, fruit, special biscuits and fine/fun chocolates.  So you see the Christmas magic has never left me….although some might say that now has something to do with the glühwein! 😇 😊

It used to be when the children were younger and at home that every November, we created cards, ornaments, and goodies such as sweets, biscuits, jam or chutney, as giveaways to our friends and neighbours. I miss those special hours and look forward to a time when the world shrinks a little more so that I’m close enough to my grandchildren to repeat similar fun creative activities.

Made by my daughter 20 years ago, aged 12, and still a treasured ornament.

Left to my own devices over recent years, each November I set to ‘making’, being creative in a variety of mediums and I present a few of them below. Although this Christmas has been more difficult I have managed to meet two set challenges….our village Advent calendar window and the Fourth Quarter challenge which you will have read about already. Getting this post written has been another – albeit skidding in at the last moment!

Currently awaiting the opening.

The Frӧbel stars (left) are made with 45cm long paper ribbons and I used these as my theme for one November village craft group meeting. Fingers and thumbs somehow didn’t co-ordinate with the brain for some of our group – resulting in so much hilarity we had to contend with a pile of wet tissues too. Too be fair they are fiddly!

Wire beaded snowflakes and angels. The skirt of the angels is created using quilting pins and are great fun to make.

Fabric fir cones – another craft group activity and one which I’ve also taught at a conference workshop – uses pieces of fabric, or lengths of ribbon, folded and pinned (using short 12mm pins) to polystyrene eggs. They don’t have to be seasonal and can be made with fun colourful, or muted sophisticated, fabrics/ribbons on other polystyrene shapes such as balls.

The 3 tiny ones (finished 2.5 x 1.5cm) were extremely fiddly!

Each point of the paper stars was made using a sheet of square tracing paper and then interlocked into the next point – the translucence of the paper is very effective hung in a window.

Just simple folding of square paper and a few cuts are needed to make these trees. A few years ago I made a forest of different sizes which combined with lights made a lovely table decoration. I love the design looking down onto them.

Yesterday evening I actually managed to run a workshop on these trees as part of a Zoom meeting with a non-craft group….heads were bowed, comments were continuously made (some = ***!!!***), laughter was shared, all I could do was listen and repeat my stage demos. I couldn’t see what anyone’s fingers were doing to help, although I did see some wine glasses being raised! Taadaa, despite several misplaced misgivings everyone produced a duplicate of the original.

(An aside….I still prefer in-person workshops both for learning and teaching.)

Last year I was super productive making many sock snowmen, gnomes and Ferrero Rocher ‘hats’. I only have 2 figures remaining in my possession (the 3rd is borrowed from my mum), the others I managed to sell at a craft fair.

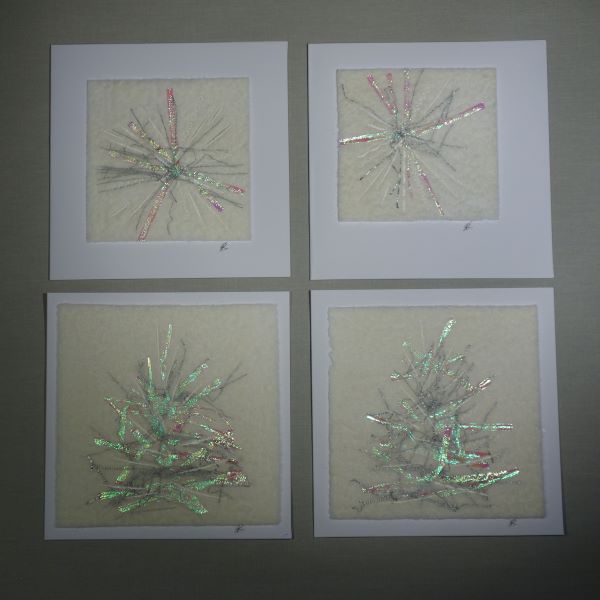
In addition to these I also experimented with tinsel and felt.

Tinsel was de-constructed and ironed before being incorporated into coloured or white felt.

Once dry, I used a variety of decorative machine stitches to finish the felt. I enjoyed creating these cards and at some point hope to make more.

As I sent one of these for the Holiday card exchange this year, I’m feeling extremely guilty – I have forgotten to let my exchange partner know that I received her beautiful card with her warm greeting inside….so Ann in Canada here it is, for all to see! Thank you.

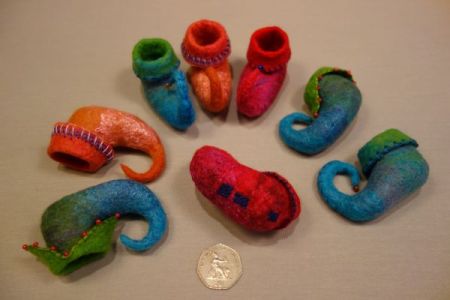
This November I decided to make tiny elf boot ornaments, with my grandchildren in mind, to meet the Fourth Quarter challenge….a challenge it certainly was!

They are tiny (as you can see against the coin) so getting my fingers in and around the point was oh so very fiddly! (Karen – now you know why I made my comment and have sympathy!). Each pair took quite a while to make including the embroidery. One poor elf was in need of a new pair of boots, but I did darn the holes in his old pair (centre) 😂

Over the decades there have been many cards made in our family, and this post has given me the opportunity to dig out a few and reminisce.

They have become more sophisticated over time and no longer use the red corrugated paper that wrapped around biscuits, complete with lick and stick stars – ooh so many memories. For close family and friends, EPH too continues his cartoon renditions of our 4 year old Raffles.

As I write this post the 13th has not yet arrived, but here is a sneak peek of the window display (complete with a ‘spot the difference puzzle for you!’). It will look more distinctive as day turns to night.

As this year comes to a close, I wish everyone – a creative, adventurous, and importantly, a healthy 2021 to come.


4th Quarter Challenge: the Making of Elf Boots.

4th Quarter Challenge: the Making of Elf Boots.

Recently Karen Lane did a post on Christmas ornaments.  fourth-quarter-challenge

I thought the elf boots she made were so cute I would have a go at making some for our tree too.

I drew one out the size I wanted then scaled it up.

I traced it. I like this underlay. You can see through it to trace things out. I have some blue stuff that’s opake and I have to cut things out to trace around or work it out, right on the underlay with a marker.

Then I have some “sheep” wool in a batt that was a nice gree so I laid it out wet it and started the rubbing.

I did some rolling with a mini pool noodle and some shelf liner. when it was ready I cut them apart.

I worked them one at a time. you can see the difference between the start and finished.

I have some gold Beada tinsel, non-tarnishing that was probably bought in 1960. It is a thin cord. I used it to make the laces.

having success I decided to make some more. Now, you would think after all this time and the fact that I warn my students about directional shrinkage, I would have known better than to lay the wool (merino top) across the boots because it would be easier to wrap it around. Needless to say, the foot part is much thinner. So perhaps they belong to some clown elves.

This slideshow requires JavaScript.

I think I will try it again. They are fiddly to finish but I enjoy having something to do with my hands watching BritBox shows in the evening.

Have you done anything for the 4th quarter challenge? We would love to see them. You can post them over on the forum. https://feltandfiberstudio.proboards.com/thread/4214/2020-fourth-quarter-challenge

Time for a new hobby

Time for a new hobby

For many of us going into lockdown meant we suddenly found ourselves with lots of free time. For the first month I carried on felting and stitching, working on a few projects I had planned for Summer exhibitions. By the time we got to the end of April reality had hit home and it was looking less and less likely that those exhibitions would be happening before the Autumn, if at all this year! For ages I’ve been wanting to take up dressmaking and it suddenly dawned on me that I’d now got the time for a new hobby.

I’d only tried this once before when I made my “duvet dress”, a tunic made from an old Ikea duvet cover. It was a very simple pattern, bought because I liked the style but also because it said “Yes, It’s easy” on the front of the packet! I was pleased with the result but never got around to doing any more.

img_2746

What I really wanted to do this time around was to make a pattern taking inspiration  from a Masai dress I particularly liked that was well worn, and accidentally splashed with bleach. I took it apart, laid each section onto lining paper and traced around, adding half an inch all round for seams. I found some 3/4″ elastic for the sides of the hem but didn’t know how to create the elasticated band across the back of the dress. In the end I figured, as it was such a loose fit, an elasticated back wasn’t really necessary. Instead I cut a pattern for a plain band, the same width and depth as the elastic panel, and gathered the excess fabric onto it. I didn’t have any dress fabric, and besides I wasn’t sure if the pattern would work, so used the old left over Ikea duvet cover to make a toile, or muslin.  

This was quickly followed by a couple of camisoles. The pattern was created by tracing over the top section of the See & Sew tunic pattern.  I took the bottom of the armhole and the centre fold as my base.  It didn’t want to be as loose as the tunic so the side seam was narrowed, the neckline lowered and the shoulders were shortened and narrowed. A quick search on YouTube provided techniques for adding facings and for making and inserting thin straps. Once I knew the pattern worked a Principles skirt was cut up and used for the second cami…..nothing will be safe in my wardrobe any more!

The next item was based on a favourite jacket. It’s had a lot of wear and become very pilled and bobbly but I was determined not to throw it out until I’d found a replacement. This was a bit trickier to trace around as it’s stretchy and I couldn’t bring myself to take it apart! There are lots of Youtube videos showing how to fold items to trace around them…..it’s easy enough as long as there are no darts involved…..nothing I’ve traced so far has had darts! One thing I learnt from drawing around the jacket sleeves though is that it isn’t enough to simply mark the fold line…..you need to allow a little more width when dealing with thicker, folded fabric. My first attempt resulted in the sleeve being a little too narrow. The other thing to bear in mind is your choice of fabric. It was quite a challenge searching the house for a fabric with similar properties to the original to make the toile. It needed to be thickish, stretchy and ideally something that wouldn’t need hemming. The nearest match I could find was an old fleece blanket with a pattern of enormous spots! I’d no intention of this being a finished item, it was just meant as a trial, but since the weathers cooled off I’ve worn it twice already!!

Another project has been this midi length dress, recycled from a charity shop buy. It was four sizes too large for me but I loved the fabric and knew it would come in useful sometime! After taking it apart the sleeves were used to made saddle bag pockets, the side seams were taken in and the hemline scalloped. I’m not normally a flowery type but it’s worn with a pair of wide leg linen trousers and I absolutely love it! 

img_2721-1

I’m loving my new hobby and getting a bit obsessive with it….these items are just a few of what’s been made so far from recycled fabrics.  Although our shops are not fully open yet, last weekend I did manage to pick up a couple of new dress fabrics, neither are quite right for the Masai dress but it will be fun making something from them! 

BC4B4D7D-685E-4EF4-B551-8F721B81F60D

Cabin fever and mock-ups

Cabin fever and mock-ups

Hello. Let me start by hoping you and your loved ones are all of sound health.

In light of recent events, last week my husband and I decided to self-isolate. Not too hard a task for two humans whose favourite activity is staying in their respective studios and create, but once it became a Rule I Must Follow in my brain, I knew I needed a project to stay busy and not rebel.

Before I tell you what that project is, allow me to share a new acquisition – I got a serger!

Brother

Meet Bert. Bert came to me pre-loved on eBay, from a lady that didn’t have much time to craft anymore. Judging by the state of his insides (lint everywhere!), you could tell he was indeed much loved.
I haven’t played around with Bert yet but I’m sure he’ll make a great companion to Marge, my sewing machine.

Now, to the project.
I’ve been down a historical costuming rabbit hole for the past few weeks (because, reasons) and decided to make myself a late Victorian waistcoat. This all may have gotten worse after I bought a magnificent pair of trousers with a very 1910s style, and felt my ensemble wouldn’t be complete without a vest, and later a jacket.

Who knew the internet had sewing websites just for this type of historical thing?

pattern

You’ll see on top right corner that the pattern I bought allows me to choose from 4 different styles. I went for the one shown in yellow. Don’t make me confess how many tailoring videos I’ve since watched on YouTube to learn how to create a proper lapel…

Fearing things might start going slightly dystopian, before I self-isolated I managed to run to one of my local fabric shops and buy the appropriate materials for this.

fabric

I got this beautiful 100% wool tweed for the exterior and a beautiful silky paisley for the lining. The latter is polyester, something I’m not very keen on, so I vowed to find something made of natural fabric for next time.
Both materials have been pre-washed but not yet pressed.

Now, before I get to play with the pretty stuff, I need a mock-up. If you’re unfamiliar with the concept, this is when you test the shape and size of your pattern by first sewing with inexpensive fabric – this is often called a muslin.

Mock-ups save you the heartbreak of finding out the pattern doesn’t fit you somewhere after you’ve cut into the expensive fabric. They are also a great opportunity for you to get to know the construction steps of your project, and train the techniques first. My waistcoat pattern reportedly comes from an original 1890s pattern so you can be sure I’m testing it first!

Good thing I did, too…

mockup

My mannequin isn’t completely true to my size but I can already tell there are some adjustments I’ll need to make to the bust line, plus there are a couple of instructions I’m not sure I’ll be following to a T (I am a rebel, after all).
I also managed to find out the pattern has some mistakes, such as telling me to use 4 pieces of something they only tell me to cut 2 of.

The keen-eyed among you might notice I’ve pinned the pieces together on the outside. This is so I can make easy adjustments and transfer them to my final pattern once sewn.

Unfortunately this is where my experiment is at the moment, so I don’t have any more to share with you. However, if you’re intrigued by this piece of clothing – have I mentioned this will have some real historic-style boning for structure? – I’ll happily share my progress in my next post.

Until then, stay safe and I hope you have plenty to keep you pleasantly occupied.

Studio Space -“Final” Layout

Studio Space -“Final” Layout

On my last post, I showed you my new studio space. I had just moved in and my beloved fibre was still very much scattered around, and I felt a little at a loss as to where I should place my furniture.

It’s been 3 months, so how have things progressed?

IMG_5106

The quick answer is, very much as I’d expect – there’s still work to be done! For good reason, however: I’ve been busy working on a new collection and have been concentrating my energy on that instead of changing things around.

IMG_5107

I did manage to add a little touch of whimsy to this corner. A few of my for-dyeing fibres are tucked in those cubicles, and I managed a way to show off a few o my hand spun art yarns, as well as some commercial ones I have plans for very soon.

Holes in the walls are a no-no, so I’m buying some MDF, placing it behind the shelves and  drilling that instead to keep my vertical storage organised. Having it propped against the walls as is isn’t agreeing with me.

IMG_5108

My little reading corner, currently filled with work stuff. When I’m sewing I feel I never have enough space to place my finished items.
I managed to add a little artwork to the walls, to liven the place up. My ceiling is very high and the bare walls looked a little sad. Wish me luck when it’s time to remove them…

IMG_5109

Placing the sewing table in front of my window was both smart and silly. I get plenty of light (my initial reasoning) but when it’s windy I can feel the draft from the window ventilation slots. For now, it stays where it is, but I might change it later.

Have I told you I named the sewing machine Marge?

IMG_5110

My former dining table can be completely stretched now, which is lovely. It might look chaotic but every item is in use for my current project! Ok, most items are.
Spot the Christmas wreath in the background… it’s needle felted.

IMG_5111

I made this wreath for my husband, who had to spend the holidays by himself in Scotland. I wanted him to enjoy a little seasonal joy and made this in a couple of hours. What do you think?

That’s my tour of the studio space. I’m still going to add more artwork to the walls, and might change the big table’s orientation. Other than that, I’m very happy with my work area and have found my energy is higher here, especially now that the days are growing longer. I’m looking forward to working in my corner during Summer.

Plaited felt vessel

Plaited felt vessel

This is a guest post by Kim Winter of Flextiles.

In September I started a two-year part -time basketry course at City Lit, which is an adult education institute in London. Although it’s only one day a week in college, there’s at least another day’s worth of homework, so it’s quite intense. But I am enjoying it immensely.

Plaited paper vessel

In the first half of the term we focused on plaiting, mainly with strips of watercolour paper. In the second half of the term we moved on to willow, which was much harder on the hands! You can read more about either of these subjects on my blog if you’re interested.

Stiff paper or card is ideal for plaiting, as you can get nice sharp edges and the structure retains its shape. But I like messing about with different materials, so I wondered what would happen if I plaited strips of prefelt and then felted them afterwards. How would shrinkage affect the overall shape and pattern?

If you don’t know how to make a bias weave plaited basket, there are some good instructions here. I don’t usually twine around the base as shown here – I just use pegs! – but otherwise the method is the same.

I used commercial prefelt for this experiment, in two colours. The white prefelt was merino wool, while the grey prefelt was Gotland. Gotland has a sturdier finish than the merino, but in my experience they have slightly different shrinkage rates, so that was another thing to throw into the mix! 🙂

I cut six strips of each colour and then wove them together to make a squarish 6 x 6 base. I pinned them together as I went along, and when all 12 strips were in place I then stitched horizontally and vertically. I did a couple of back stitches at the beginning and end to secure the threads but left the ends long so I could use them to continue stitching up the sides.

Prefelt strips woven and pinned together

Prefelt strips stitched together

(Apologies for the quality of some of these photos, but they were taken in artificial light, as the days are so short at this time of year!)

Once the base was stitched, I started weaving the sides by overlapping the central two strips on each side and then continuing to weave under and over the adjacent strips. I pinned and stitched as I went along.

Weaving and stitching the sides

This is what the piece looked like after I had woven the sides and cut off the excess felt.

Normally with plaited baskets you have to make a border by tucking the ends in or stitching a band around the edge. The advantage of felt, of course, is that it is self-sealing as the fibres mesh together, so I planned to finish just by trimming the edge after felting.

Once the weaving was complete, the felting could begin. I wetted the piece down, rubbed with soap, and started gently rubbing it all over, turning it inside out to make sure that both sides were felted.

I had to keep opening it up and turning it around during the rubbing phase to make sure the sides didn’t stick together (I could have used a plastic resist but didn’t bother, as I never rubbed for too long in one position).

The prefelt strips felted together fairly quickly, but despite the care I took when rubbing, holes started to appear at some of the intersections. So when the piece was partially felted I did some more stitching to ensure that there were no holes. I’m afraid I didn’t take any photos of this as it was quite dark by this stage!

This is what the piece looked like after felting and fulling.

I was tempted to leave the felted ends on, as they gave quite an organic feel, but in the end I trimmed them off, and rolled the piece some more to seal the cuts.

I also initially thought I might leave the stitching in, as I liked the marks and texture it added. But when I took out the stitching on one side for comparison, I felt that it distracted from the subtlety of the pattern, so I ended up taking it all out!

The inside and the outside have different patterns due to the weaving, but during felting some of the fibres have migrated through, so you can get an idea of what colour is on the other side.

Scaled up and turned upside down, I also thought this could make a good flowerpot hat – I can see Audrey Hepburn wearing something like this, can’t you? 🙂

So it is possible to plait with felt, though it is rather fiddly and time consuming. The forms are softer and more rounded, and you get a subtle idea of the pattern on the other side.

Thank you for reading, and I wish you all a very happy and creative 2020!