Browsed by
Category: Guest Artists

A new picture: A lighthouse

A new picture: A lighthouse

I seem to be in picture mode. I wanted to do something with water but not necessarily as the main feature. I thought about a beach and that was my intention as I started but as was looking for pictures and some of the cliff-top pictures really took my eye.

I used a nice thick piece of wool prefelt that I bought at the Almont Fiberfest a few years ago. It is 4inches by 6 inches, 10cm by15cm  I think it is wet felted on a flatbed machine. It is course wool and more solid (felted) than the thin needle felted prefelt we usually get. It is much closer to being felt.  I would love to get some more but don’t know where to find it.  If you know let me know.

I start with what is farthest away, sky and water. When I do sky, it’s always cloudy and I have to do a google search to remember if the sky is darker or lighter near the horizon. The wool I used for the water has a few bits of sparkle in it. I think that’s what is making the white dots in the picture.


Then some land and the rocks. I used a mix of 3 grays so the rock wouldn’t be flat.

Added the lighthouse and the path


Then I used throwers waist to make the white water around the rocks and some whitecaps. At this point I gave it a light felting mostly to sink the silk into the felt so it didn’t look so much on the surface. . There was still more needling to do though. I added the top of the lighthouse and started the stitching.


And as usual when you start stitching you start unstitching. The grass stitches here were much too small. The path needed changing as well as being far too straight it was much too wide.  you can see how all the extra stabbing pulled the piece in even though I was poking up and down and not sidewise.  I stretched it out.

Back to stitching. I am using 4 colours for the grass, 2 shades of gold and 2 of green.
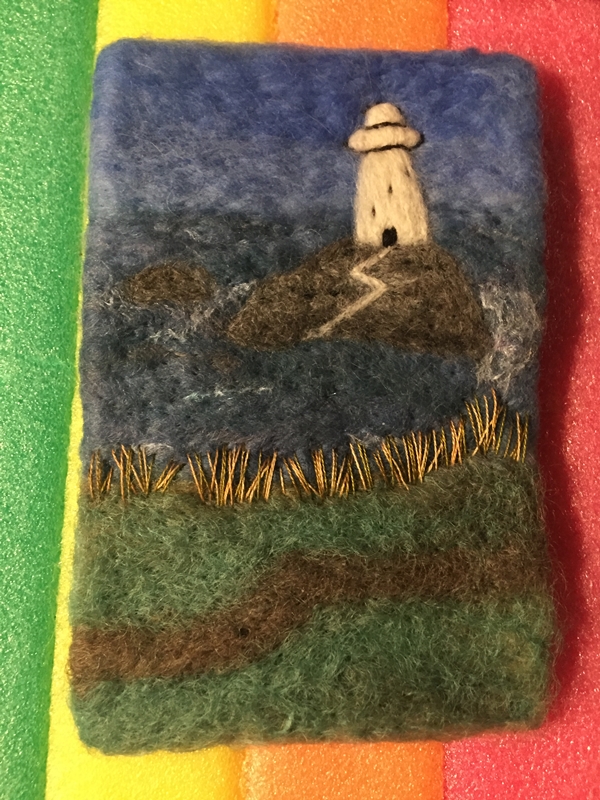
 

I added some small blue dots for flowers.


Then the foreground grass


Then some french knots for more flowers. I used a couple of shades darker blue for the foreground.


This is a close up of the stitching.


That’s a lot of pictures but I hope you enjoyed seeing the progression.  Stitching really helps a picture pop. And as I promised picture without Sheep. I can do it. LOL

So a week has gone by since I wrote up this post ready for the 4th of February. After a comment from a friend, and looking at it after a break from working on it,  I decided to fiddle with it more.  First I ripped off the path it was far too white, I remade it with some light gray. I did want it to be distinct but not a lightning bolt from Zeus. I added a tiny little dock, not easy but that’s what I get for working small.  And the sky was too much open space so I added some birds, again very fiddley. I did add some slight shading to the lighthouse but it doesn’t really show in the picture the wight really reflects.

so here it finished again. I hope you like it.


Who could resist , the sequel.

Who could resist , the sequel.

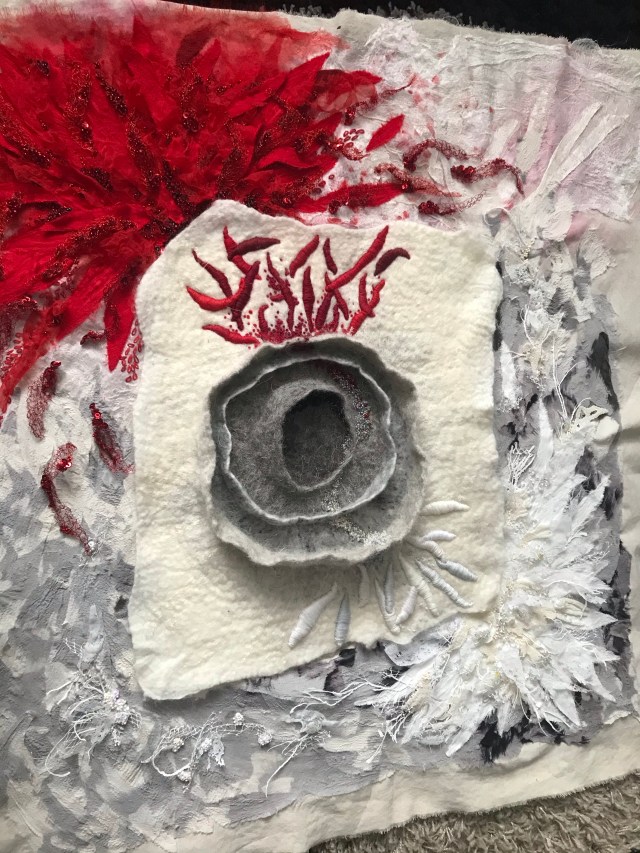
I simply had to develop one of the pieces from my play with multiple resist further. This particular piece intrigued me, and after we spent time together ie me staring at it for a considerable time, I knew where we were going. The centre felt like something had fractured, a cell broken apart. Having recently lost both my parents it felt like a metaphor for my grief and the feeling I was going through, emotions of pain and detachment. These became the red, pain, anger, hurt. The white, detachment, cold, an emptiness. And do our journey began.

To the original felted piece, I added some shaped prefelt which I added with a couching stitch. This gave me the raised effect. I then added beading from the centre of the “cell” out to either side. Throughout the whole piece, I chose a palette of white red black and grey ( there is a little exception to that but I will go further later ).

I wanted to use a material other than felt for the background of the piece and decided on mixed media. As a base, I used calico which I coloured with acrylic paint. As I turned out I needn’t of done this as I covered the whole piece in materials. I knew from the very beginning how the piece was going to turn out but wasn’t sure of the materials I was going to use to achieve the textures I wanted. So I had a play. I got several different materials and heat treated and used my embellishing machine to see the effects I could achieve.

For the red area, I decided upon prefelt with red satin added with the embellisher, heat treated tulle, crocheted wire and beads.

Arranging composition

In the white area, I decided upon prefelt embellished with satin I also heat treated a mixture of materials lutrador, plaid plastic bags and plastic netting (from a cheese sac) doing this gave the texture of ice which is what I wanted to achieve.

Developing the white area

For the other surrounding area, I cut up an old silk dress that had wonderful shades of grey. These were added with the embellisher around the edges. It had many shades of grey going to black so I could shade the composition. It did take the whole dress to complete it.

The base layer was now laid down so next I added the beading As part of the white area I wanted some raised beading so I beaded small clusters of beading on the net and glued the back. When dry I cut them out and arranged them on the piece.

In these little parts, I added only a couple of golden seed beads. My little sign of hope I suppose.

In the red area, I added beading in shades of deep red and dark green also many sequins which reflect light wonderfully. wire crocheted flame-shaped pieces were added radiating out into the grey area. I also embroidered with daisy chain stitch.

And so our journey ended. I have never worked on a piece that felt like a part of me more than this. Because of the lockdown here I am unable to get it framed but it will be. Then it will go on my wall

Needle felting a toadstool

Needle felting a toadstool

Is it too late to wish you all a Happy New Year?

I haven’t properly picked up my felting needles in quite some time. I can’t tell you why, but my mind just hasn’t been “in the right place” to make anything particularly unique.

Things changed when I got commissioned to make a mushroom sculpture. It was just simple yet challenging enough for me to see if this would finally open those creative doors. The client wanted something similar to what I’d made before, so all I had to do was look at an old photo and start felting. I’m not copying something that needs to look exactly like something else, but it’s also not mindless felting. Perfect.

This is the old mushroom she saw in my online shop and wanted another of (sorry the resolution isn’t the best):

I really enjoy looking at past work because I’m often surprised at the fact this is mine. Do you get that feeling with things you created a long time ago? I am particularly chuffed when I get that “oh, that’s pretty” feeling before it registers it came from my brain.

Now, for the new sculpture. I gave my client a few fabrics to choose from, but she went for the same as the first one. Not surprising, as she really liked the original item and was very motivated to have a mushroom like it.

I started with wire wrapped in wool to make the stem. The top was created with leftover wool felted into shape, then I sewed the fabric to the top and some tea-stained gauze to the bottom.

The base looks very messy, so I’ll be adding some wool to cover it.

Then comes the fun part: assembly!

I chose some hand dyed mohair locks, plus some natural Wensleydale ones and put it all together. After that, I sewed the beads and stones here and there. Here’s the finished item:

The finished object is just different enough for me not to feel I made a complete copy, and the familiarity helped make the felting process easy enough for my Lockdown Brain to not feel too flustered.

Finally, not related at all, but here’s a photo of a lovely Edinburgh sunset for your enjoyment.

Have a lovely weekend and thanks for reading!

First Quarter Challenge

First Quarter Challenge

Lyn and Annie have set us a challenge for this quarter to make something inspired by the decade 1900 – 1909. The challenge is here If you would like to see it and maybe you could join in. first-quarter-challenge

They gave us examples of what was going on and what caught my eye was the aerial photography.  It made me think of some wonderful works by the fibre artist Chris Cullen of As theCrow Flies. https://www.facebook.com/cbdasthecrowflies/.  She uses mostly recycled knits and yarn in her amazing pieces. she sells mostly through galleries but does commissions through her Facebook page. for sale at https://www.facebook.com/Blue-Bramble-Gallery- in St Ives, and https://www.facebook.com/a2gallery.wells Also from Spring, Baxters Gallery in Dartmouth.

These are 2 of Chris’s recent pieces


I have in the past thought about doing a piece inspired by her amazing work. Lyn and Annie have given me the push I need. I thought I could do something similar in felt for my own farm. First a prototype. This is a flat piece and not of my farm but just a farm. I used an old sweater that I ran through the washer then dismantled and ran through a couple more times. I wanted a nice sturdy base.

I did this picture by needle felting into a square cut out of the sweater.  I have one of the little 6 needle holders that I used for most of it. Then switched to a single needle to put in the details. It is done in a very minimalist way with

The sweater piece.

The background and the road and the start of a field.

Added the fields and the house and barn.

Then some sheep of course.

I folded all the wool

Lastly used some green curls to make the trees.

It was a lot of stabbing, too much stabbing.  I think I will try to do all the main features like roads and the fields by lightly needling them into place and then wet felting them. Just adding the detail and features with needle felting. The next one will be more 3D. I have some ideas for the house and barns. Have you started thinking about his challenge? We would love to hear about it on the felting and Fiber studio Forum. Here’s the link to the place to post pictures. https://feltandfiberstudio.proboards.com/thread/4247/2021-first-quarter-challenge. or use the Forum button on the left to get there.

Pleased to meet you, I love fibre

Pleased to meet you, I love fibre

Thank you Ruth and Ann for the invitation to the group. My name is Bernadette and fibre has been part of my life for a very long time. I started spinning and weaving in my late teens at the University of Regina. Since the pandemic there has been a lot of time available to really enjoy more indepth experiments with fiber.

There must always be purple! It’s my favourite colour and how I start every dye session.


I searched my stash and found loads of unwashed fleeces from so many different vendors and shepherds. There was mohair and silk, cotton, alpaca, linen, the list is pretty complete. Wool alone has so many breeds. They fascinate me with the variability of colour, texture, and spin characteristics within a breed and even within a single fleece. These past months allowed me or rather forced me to wash, sort, and dye several fleece from my stash. So with hand on heart I made the solemn promise that “I will not buy another fleece until these are all done”. I lied.

This rambouillett comes from Hutterite colonies in Alberta. These are extremely good farmers and the fleece shows it.

So I washed, dried, and dyed as many fleece as possible over the summer, Then as the weather cooled down, the wool has been either left in locks or hand processed into roving from wool combs, hand carders or from the drum carder. I’m starting to experiment with blending wool and other fibre. Over the summer I joined Jan and several other guild members in the Flax Project. Friends and family were worried there would not be enough raw material available for me and gave me fleeces, or sent me information on great resources for interesting materials. It was a gong show to say the least. I will be sharing the final results of the pandemic experience as the year progresses.

Writing and sharing my experiences is very new for me, so I hope over the next eleven months I can show you what my near geekery looks like. Being called a fiber geek no longer bothers me, its who I am. If there is any one thing that specifically interests you please let me know and I’ll do my best to help you.


Interesting New to Me Scarf Type

Interesting New to Me Scarf Type

These last couple of weeks in the Wet Felt Makers group on Facebook people have been making in interesting and new to me type of scarf. It’s called a french scarf.

Arlene Toth shared it with the group and shared the youtube video.  It is part of a video from a fibre festival a year ago. The teacher is Elena Nayemova. https://www.youtube.com/watch?v=Ho5B-bOHKwE The instructions start at 28:58 in the video. It is in Rusian. You can probably figure it out by just watching her make it but If you want to and you are on a computer not using the Youtube app you can use a translation future on Youtube. It’s nowhere near perfect but it helps. I will explain that at the bottom.

The scarf in the video is very lacy and mostly yarn, very decorative. I wanted something warmer so used much more wool. After seeing how small the ones using the dimensions from the video were turning out  I sorted out my own sizing that I thought would work and had a go. If you are petite then the smaller dimensions would probably work for you but I am Rubenesque so that isn’t going to work for me. I picked purple and orange, my go-to colours. I used orange and gold silk lap bits on one side and some yarns for decoration on the other.

You can wear it in different ways.


The part that goes behind the neck is a bit short I think and maybe the rectangular part too. I added some to both parts and had another go in red this time, using silk hankies and silk top


For this one, I used silk hankies on one side and silk top on the other. I like this one better. I pulled the piece through farther so it hangs down to wear it out. I am not much for big bows. If you want to fold it into a triangle and poke the corner though I wouldn’t add the extra length to the rectangle part. Here are different ways to wear it

This slideshow requires JavaScript.

The other thing I realized while taking pictures is that you can give the large piece a twist in the loop so you have both sides showing

 I wanted a winter scarf inside my coat. It worked wonderfully even though it’s not really cold here yet. I hope you give it a try.

Translation on Youtube.  You have to be watching Youtube in a browser and not on the app for this to work. Rather than write it all out, I will give you the link to Pat Spark’s blog post about it, as she explained it very well. https://sparkfiberarts.blogspot.com/2020/05/blog-post.html

ReConnect

ReConnect

Happy New Year!

I have my fingers, legs and toes crossed that, at some point later this year, we might actually be in the position of being able to safely congregate once more in large groups. Zoom has been, and continues to be, a great way of keeping in touch with family and friends but it’s also proving invaluable for many creative groups allowing us to carry on meeting, have our regular show and tell, exchange ideas and generally stay together.

Another creative positive from last year was online shows and exhibitions. Ok it’s certainly not the same as actually being there but it has allowed artists an outlet for their creativity and, in turn, provided inspiration for those of us who have visited, albeit virtually. In some cases it may be that, having seen a body of work online, we might be all the more likely to make the effort to travel to see it in the flesh once things return to normal. For me, the most inspiring work I saw online last year was the Hinterland collection created in 2017 by Gladys Paulus and featured in the 2020 video Hinterland by Gladys Paulus – a film by Chris Chapman. Gladys’s work is incredibly skilful in its design and execution and I’ve been in awe of this body of work since it was first made public but not had the chance to see it on display. With this film we are privileged to not only see but also hear the story behind this collection, as narrated by the artist. This takes the viewers experience to another level. Its a very personal and very moving story, if you haven’t already seen this film please take a look.

Another “positive” that some of us were able to take from last year was a “reconnect” with nature. Prior to lockdown my morning routine with Maddie was a short walk to the local park where I would throw her ball for half an hour while chatting to other dog walkers. On days when I was working this would sometimes feel rushed and I would be constantly clock watching to ensure I wasn’t making myself late.

Lockdown meant my days had no time constraints, it was also no longer socially acceptable to stand around in groups in the park chatting, and the government were encouraging us all to get fit……Maddie was about to discover doggy heaven! The lengthy weekend walks, anything from one to two hours across the fields and through the woods, now became our daily routine. When we return to work I’m going to have to set my alarm a lot earlier as this is one routine I’m not prepared to give up!

Country walks are always a great source of creative inspiration and, if you’re like me, you’ve got hundreds of photos saved “just incase”! Someday you might get around to starting that felted/textile project on weeds, lichen, frozen puddles, frozen leaves, dried leaves, tree bark, tree skeletons, fungi, seaweed, stones, bracken, insects……..the list goes on!

One thing I hadn’t particularly noticed, and hadn’t deliberately photographed, prior to last April was shadows. I’d not given them a thought in the past but with time on my hands, and what seemed like never ending sunshine, I found myself noticing them. The most interesting were on a tree lined stretch of the Viking Way. I’d walked this path hundreds of times before but only now was I seeing these wonderful lacy patterns and thinking they could be the starting point for an abstract wet felted Wallhanging.

I didn’t sketch or design my layout or colour scheme, it simply started out as a white Merino background with clouds of pale Viscose. Several layers of “shadows” were built up randomly on top, the first was green Viscose, the others Merino. After felting I added detail with free motion stitch and lots of Colonial Knots – my favourite hand stitch! The addition of texture started to move the piece away from “shadows” more towards bark/fungi but I was happy with that as it was keeping the tree connection. The finished piece is approx 42cm x 58cm.

Due to ongoing restrictions the International Feltmakers are holding a virtual AGM on 27th March and to coincide with that they will be launching their second online exhibition of members work. This years exhibition title is ReConnect and any work submitted has to be less than a year old. I’ve chosen this piece as my submission as its creation back in June was sparked at a time when a lot of us were reconnecting with the natural world, taking the time to notice things that have always been there but which we may have previously overlooked. It’s world’s away from the imagination and expertise of Gladys but we all need someone or something to aspire to…..fingers crossed it gets selected!

I wonder which feltmaker/textile artist you find particularly inspiring?

A picture with some metal in it.

A picture with some metal in it.

It’s after the Christmas crazy and I feel all out of sorts. There is nothing I need to be doing.  Nothing to shop for, nothing to bake for. I do have some nice new teas to try but although they are delicious, that is not really doing anything. I want to yell I’m bored, but my mom wouldn’t hear me at her house and what’s the point of that. So, like many of you, I must kick my own butt and just get on with something. Start with housework, if that doesn’t start you thinking of things to do in the studio, nothing will. After several loads of laundry and digging out the corner of the bedroom where we toss things to deal with later, I had had enough and I grabbed a tea and my sketchbook and headed for the studio.

I know you are thinking but what about your hat aren’t you supposed to be sewing the flower into place and making leaves. Yes, I am but I don’t feel like it. I had a poke through some recent sketches I did. I can’t really draw but I can get the idea down and use it to work from.


I dug out some felt pieces I did as starter pieces. Picked one and started.

First I defined the house. It was just a roof and walls when I picked it. I forgot to take a picture, sorry. I added some windows and the roofline and the corner of the house.  Then, strangely I started at the front of the picture with some fence posts. Usually, you start in the back and layer to the front.


With the magic of felt, I just took a picture and then pulled them off and put them aside.


I added some sheep, I bet you didn’t see that coming…..LOL. You can see I decided the house looked more like a barn and changed the windows into a large door. I also by this time decided the blue was water and added a path along the cliff edge.

I defined the sticky out piece of coastline to help with the water effect and check the placement of the fence posts. I decided to keep them straight because the right-hand one is going to be short anyway. I added some different blue to define the sky and some white with a bit of sparkle for waves. There was lots of wool sticking out past the picture edge so I just folded it around the back.

Then it was what to do to finish the fence. This is where the metal comes in.  Originally I was going to use thread to be the wire but then I was chatting with Jan about wire and remembered I had this spool of wire.  It is a very old spool and I don’t know what kind of wire it is or what it was meant for. It is thin but strong and flexible. It is old, as you can see from the wooden spool but there is no rust. It has a 58 stamped into the top but it’s not the gauge.


I decided to make a real wire fence. I twisted two lengths together and cut 4 of them to stick out past the ends of the picture.  I folded them around the edges to hold them in place. I then couched them down with 6 strands of grey embroidery floss to be the fence staples.  I think it really works. The whole picture is only 5.5inches (14cm)by 4 inches(10cm).


I did think about making at least one strand of my fence barbed wire. I made one barb, to try it but you couldn’t really see it against the wool so wasn’t worth the fiddling.

My New Years’ Resolution is to do more felt pictures and to try to do them a little bigger. Do you have a Fibery New Years’ Resolution?

Ending this weird year with some dyeing

Ending this weird year with some dyeing

So, who’s ready for 2020 to go away? I sure am (although I’m not expecting things to be much different in the first half of 2021… thank goodness for crafting!)

On my last post, I wrote about dyeing a cardigan after knitting it. This time I decided to do the same with a triangular shawl.
It’s a simple pattern, one I use mostly when I feel like doing some very mindless knitting and still end up with something useful to wear.

For the past few months, I’ve been craving the colour green. For those who know me and my 95% black-and-gray wardrobe, this is definitely a weird and unusual occurrence, which I’m blaming on Pandemic Brain. I don’t own a single piece of green clothing, so this shawl seemed like a good way to remedy that.

The wool I had bought for this a project so many months (years?) ago was, no surprise there, gray. The lighter areas are almost white and I felt this would make the colour absorption more interesting.

I chose a mixture of two dyes, one green and the other one more teal blue. I find the two colours together gave me the right amount of hue depth.
Pro tip: sometimes dyes look “flat” on the fibre if used alone; for added depth, add around 25% of a lighter hue (so your dye stock is 75/25) and you should see it “pop” a bit more.

I know the photo shows it as more blue than green, but that’s just my camera.

This dye bath wasn’t very acidic, to allow the fibre more time to absorb the pigment. I also added the dye to the pan before the shawl, and made sure to start with cool water that I then heated slowly (this wool wasn’t superwash treated, so I had to be extra careful).

Once the water was warm enough and the dye had enough time to penetrate the fibre, I added more citric acid and let the whole thing simmer for 15 more minutes, until the water was clear.

As usual, I let the water cool down completely before removing the shawl. Can you see how the darker base colour of the fibre allowed for variegation of the project? I really like that.

And here is the somewhat finished shawl (I haven’t woven in the ends yet). Do we like?

Allow me to finish this year’s last blog post with a little furry homage. Here is Squish, my first ever pet, who lived to be 19. He passed away this March after leading a very full and spoiled life, and I’m very happy I had him in my life! Wasn’t he the most handsome boy?

Happy holidays, whatever/if you celebrate, and let’s all hope 2021 is less weird! Wishing you all creativity, love, and joy. See you next year 🙂

Alex’s Christmas Stocking

Alex’s Christmas Stocking

About welshfelters

Hello, my name is Lisa, and this is my son Alex, who has Down’s Syndrome. We live in Swansea, South Wales in the UK. We started learning to Wet Felt when Alex moved back home during the Covid 19 pandemic.

We were thinking about what to make for our first post, and decided (as it’s Christmas) we would have a go at making a Christmas stocking. Alex and I are really new to felting. We got into our new hobby quite literally because of the Covid 19 lockdown! Alex usually lives with a group of other young people, who have additional learning needs like himself, but because he has a lot of complex health issues, everyone decided it would be safer for him if he moved back home to live with his Mum. Since March 2020 when he returned home to live, we have tried lots of new activities, including gardening, art and felting! Alex really enjoys his new felting hobby, as it is something he can do on an equal footing to everyone else. It is giving him such a lot of pleasure, because he gains such a sense of achievement, and we have discovered that felting is something that is fun and it’s also something we can do together! The first thing we made was a sample! Not quite knowing how it would turn out, we decided just to play and have fun. That 12″ square of felt turned out pretty well and we were eager to try making something we could use. Alex loves colouring, and has amassed huge quantities of felt pens and other ‘tools’, so our next project was a pencil case. That turned out really well but it was large…larger than we planned! So it is now being used to hold his many small tubs of modelling dough instead! Having tried a few more projects, we have reached Christmas time! So, here is our latest project – Alex’s Christmas Stocking!

The resist…

First, we drew a template of a Christmas Stocking, which we then cut out to form the resist. I have drawn the dimensions of the template on the resist for you to see both in inches and cm.

The resist was quite large! I think Alex is very hopeful that Santa will fill it to the brim!!

The next stage was to start laying down some wool batt. We chose red and white wool for our project, as red is one of Alex’s favourite colours! I can’t tell you how much wool we used, because Alex likes to do things his own way! So we just went with the flow!!

Laying the first layer of wool!

We started to apply our wool, firstly around the edges and then filling in the middle…

That’s one side laid out!

We layered the wool vertically on the first layer and horizontally on the second layer. As you can see, we made a novice’s error here. We took the wool right up to the top of the resist!! We found that we had to insert another piece of resist in the top once we started felting, to make it longer and to ensure we didn’t end up felting the back of the stocking to the front! But Ho! Ho!; we’re only learning!!!

After we had finished layering our wool, we placed netting on top and applied our soapy water using a sponge. Then we gently rubbed the wool with our hands for while, gently agitating the fibres until they had started to felt together. Alex loves this part and gets really enthusiastic! Then, we turned the boot over to start the other side…

Time to start laying the wool on side 2

We repeated the layering, and after applying some net, we got started on the felting of side two.

Now we’re starting to get somewhere!

Alex can’t wait to start working with his palm sander, which was a beautiful gift to him from Robbin Firth at Heartfelt Silks https://heartfeltsilks.com/shop/
Alex loves to get stuck in!

Alex really enjoys this part of the activity because he can see things are starting to take shape!

Now the workout gets going!

I have to say, this is truly Alex’s favourite part of wet felting. He gets really stuck in with the rolling, and smiles like a Cheshire cat as he’s counting the number of rolls he does! He also knows we are nearly at the end, and he gets quite excited to see the finished project!

And after rolling, then fulling, this is how we ended up! We decided to decorate the stocking with a needle felted Snowman. Alex had his first go at needle felting, and he made the snowman and I did the fiddly bits!

Alex’s first attempt at needle felting!

And now, to see the final project! Alex is really pleased with his ‘oversized’ Christmas Stocking!!  I think there’s a definite bonus to the large Christmas stocking – it holds so much more!!!!!  We hope you like it as much as he does! And here it is on the fireplace, all ready for Santa to arrive!!!!! ‘Nadolig Llawen bawb’, Merry Christmas everyone, love from Alex and Lisa