Browsed by
Author: zedster66

Felted Wool Kebabs

Felted Wool Kebabs

There weren’t very many of us at the Well Being centre last week, but the idea of ‘wool kebabs’ went down so well, I think it could become an art form in itself! We’re carrying on this week, so I took the opportunity to make a few wool kebabs and a few felted examples to take in. I mostly made lots of black/white/grey combinations for the kebabs. For the first sample I used black Merino and blend I got from a Botany Lap waste bag. The shiny fibre looks like bamboo or viscose. I just used 5 pieces on this:

From this angle you can just about tell, that they aren’t exactly flush with the surface:

For this sample, I covered the whole pices with wool kebabs, these were mostly quite ‘hairy’ rather than smooth because I used some coraser blends. The neat rectangle really changed shape with the areas of different shrinkage according to how thick/thin it was in places:

I thought I’d used all the ‘same’ type of kebabs, but I think I picked up a couple of different ones next to each other, which made a nice patch of dark/shine contrast:

I think the blend I used for these had a few brownish shades of wool in. These were quite texturey too. I don’t know which wool I used for a base. I think that was from a Botany Lap bag too. I think this is my favourite:

I think another ‘rogue’ kebab got in with these too, one of them has a bit more grey and a definite sheen:

I bought some stripey wool from wollknoll a couple of years ago, and thought this would make some nice wool kebabs. I used them on Black Merino, and they turned out really nice too:

You can see more texture on these, I think:

Even closer:


I got quite addicted to making the wool kebabs, something very soothing about the process: blending, laying out the wisps, rolling, sliding the tube off, repeating, and watching the little pile of similar tubes grow 🙂

Bits and Bobs

Bits and Bobs

I made a couple of felt pieces to use as lampshade covers not so long ago, one of them wasn’t nice at all, it looked okay, but it was made with Shetland, and what I think is Corriedale (from a bag of Botany Lap Waste) and now I understand why people shiver at wool! I used that one for the shade, but couldn’t get a decent photo. The other piece I made is going to be a removable ‘skirt’ when I think of how to attach it. It’s a bit crinkled because it ended up under a pile of things!

A while ago we made pouches using resists at the well being centre. I think I might rewet this and reshape it as a bottle cover:

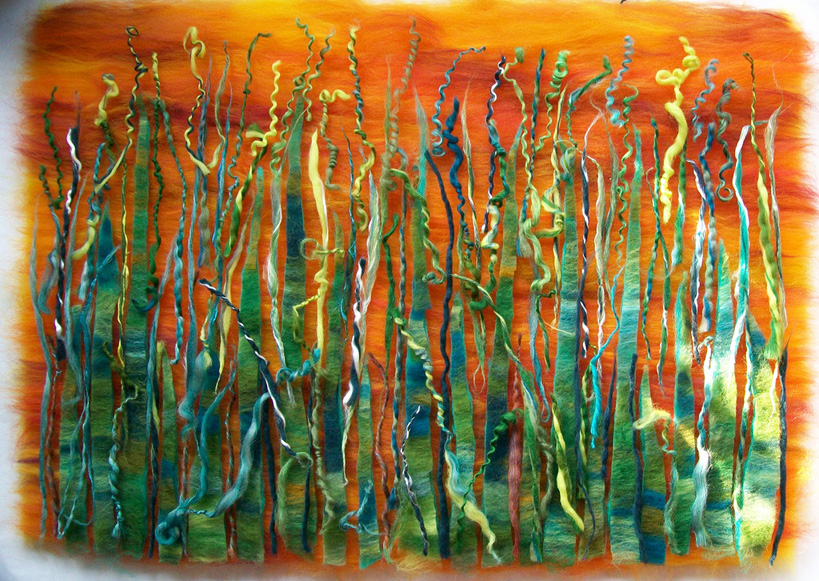
We’re going to start learning some techniques for making felt landscape pictures at the Well Being Centre. After we were talking about it I showed the group the picture Tracey blogged about not so long ago:

I also showed some of Marion/Blyth Whimsies gorgeous floral pieces: https://www.flickr.com/photos/24232165@N03/albums/72157681820827174 I don’t think we’ll be making anything on that scale though! To get started we made some really simple landscapes, I like doing these, they’re usually around postcard size:

I made it clear that landscapes aren’t something I’m particularly good at or experienced with, Mine are usually simple like that above or very abstract like this:

But, I know fibres and effects and techniques, so we’re going to start with those and build up the skills to make more adventurous pieces. We’re going to start with making simple things like wool strands and twists:

Wool kebabs … I recently read something that when small rolags (usually of cotton) are made, they’re called ‘punis’. But I think these are even smaller, and I’ve been calling them ‘kebabs’ – because they’re rolled around a kebab stick-for so long it’s just stuck now!

Handspun yarn, singles, plied, mixed with fibres or commercial yarns etc:

Coils and Spirals:

We’re probably going to buy some prefelt, but we’ll make our own too:

And combine all the things:

And add things like leaves and flowers, nepps, fibres etc. And hopefully, we’ll all be landscape experts before long! Luckily, we have a group member who is amazing at hand-stitching and embroidery and our very own Free Motion Embroidery expert so we can embellish on the sewing machines too 🙂

Small Nuno Pieces

Small Nuno Pieces

I thought some of the recent scarves I’ve bought might make nice panels for the front of bags. I usually do a few samples when I get new fabrics, see how they felt at various sizes with different thicknesses of wool. This first piece attached ‘better’ at this size than it had when I tried a narrower strip. I think it’s viscose:

It has a nice texture:

These next 4 pieces are all silk. I wasn’t sure which colour of Merino to use with this, it was a toss up between ‘Mink’ and ‘Catkin’–a pale yellow. On its own it looks beige, so I chose ‘Mink’ , but now it looks more cream in colour so I might try a sample with the pale yellow 🙂

This was a difficult one to colour match too. I wasn’t sure whether to go for green or pinky purple. I decided on green, I didn’t have quite the right shade, but got as close as possible:

I used another piece from the same scarf, it might have been a panel from the bottom of the previous sample, this part definitely seemed like it’d be better with a pinky/purple shade. I chose the closest light purple I had, ‘Orchid’ I think, and used a bright pink underneath:

It’s funny how something looks a certain colour until you match it with something, then you see different colours more. This looked very pink, so I used a Salmon base, after felting, the beige seems very similar to the first piece and the lilac/pink/purples look similar to the previous piece. Maybe they’d work together in strips?

This is one of my favourite pieces. I think the scarf I tore it from is Polyester. This attached better than a narrower sample I tried too, it turned out much better than I thought. I tried to match the colours of Merino to the colours of the stripes on the scarf so they werent dulled by migration:

It has a really nice texture too:

Have you bought or tried out any new fabrics lately?

Project Updates

Project Updates

I showed a piece of green plaid-inspired felt a few weeks ago. I made it to use for a notebook cover with front flap and incorporated cord/tie. I finished that a couple of days ago. This is how it looks on the book with the cord wrapped around:

This is what it looks like on the inside without the book in:

I promised photos of the finished purses, and surprisingly, I have them! This is the bluey/purpley ones, and I also made a small simple case with a green plaid offcut:

And here are the finished pink purses:

I liked the green felt with Bluefaced Leicester locks so much I made a blue one:

I used more embelleishments on this one though: silk carrier rods, silk paper, viscose paper, cotton gauze, unravelled novelty yarns.

The shiny white patch at the top is viscose paper, the blue rectangle in the bottom right is silk paper:

A BFL lock:

I feel like I could sleep for a month now, and if I never have to do blanket stitch again this year, I won’t mind!

Latest Nuno and Bookcover

Latest Nuno and Bookcover

I made the last of my nuno strip pieces into panels for a bag. It was this yellow piece:

I used various types of fabric–cotton, viscose, silk, suspected silk, so got various textures:

I liked these two strips next to each other, they showed the very different way felting/shrinkage affected them:

I used some of the spare offcuts from the orange piece to make up the panels:

I made the Green felt which I piled with BFL locks into a notebook/diary cover. The pictures look a bit weird because I had a small patch of desk out of the sunlight when I was taking photos, but it must have been shadier at one end so, to me, they look upside down!

Here’s the other side:

This is the inside without the book:

And this is the outside without the book:

I’ve finally got the buttons and buttonholes on nearly all the purses from a few weeks ago, so hopefully, I’ll have those to show next time 🙂

New Bags, New Felt, New Braiding

New Bags, New Felt, New Braiding

I remembered to take photos of the blue/green bag I was in the process of making, though it really doesn’t look too much different to the separate panels 🙂 This is the front, or more blue side:

And this is the back/more green side:

I also made a smaller bag with some of the green pieces. Side 1:

Side 2:

I felt the urge to make something multi coloured after all the matching colour themes. I bought some of World of Wool’s dyed scoured BFL ages ago and had never used it, so I thought I’d add a few colourful bits to the top of a piece I’d laid out with various green shads of Merino. I might have got a bit carried away with the locks, and dyed viscose, oh, and dyed silk throwster’s:

I like colourful and shiny, so can never resist braiding when I see it! I bought these last week:

You can see the shine on an angle:

Blues and Greens

Blues and Greens

These are the blue and green nuno pieces I made using fabric strips a few weeks ago. I tried to include a wide range of colours as well as various fabrics.
This one was a mix of blue, purple, green and turquoise:

The two viscose pieces either side of this silk chiffon have great ripples, the chiffon just sunk in. It’s one of my favourite fabrics, from a dress I got at a charity shop and didn’t realise was silk until I used it and saw how it sunk in, and went back to search for the label.

I’ve noticed that some fabrics attach better if they are in the middle or aren’t too close to the edge. I’ll try a sample with just this thick blue scarf piece at the end, and see if it attaches better not so close to the edge.

All the fabrics I used on this piece were silk or strongly suspected of being silk:

It looks much better close up, and on an angle – the lighter pieces seem to reflect light a lot:

You can see the textures better too:

I think I made the strips a bit too long on the green piece, a few of these didn’t attach well along the edge, even though the rest of the pieces did. I usually try to make sure I work on edges, so I don’t know why it happens sometimes:

Slightly closer:

I did think I’d probably make one mostly blue bag and one mostly green, but once the strips were cut up and moved around to see which others they looked best with, it didn’t work out like that! Also, being conscious of how bags wear more on the back, picking pieces to work best there also influenced the final outcome. These are the two panels I made for my next bag:

I have to remember to take photos of it sewn up for next time!

Project Updates

Project Updates

I remembered today that I haven’t shown the rest of the money purses or the notebook cover I was working on a few weeks ago. These are the purses opened up:

And this is what they look like closed:

I’ve added blanket stitch around all the purses now, but they still need buttons and button-holes. This is how the book cover looks from the front, with a notebook inside:

This is how it looks from the back:

I took a couple of photos without the notebook in, this is what the inside looks like:

And this is the front and back together:

And while I was looking for those photos, I came across some felt I made for another book cover. I wanted a cover with the tie incorporated in the design.

Once I tried the felt on a notebook, I realised it wasn’t quite wide enough, so I made another piece to cut the back cover panel out of:

I’ve only got as far as cutting the felt to size so far.

Still Sewing

Still Sewing

Well, my sewing stuff – and the mess – is still out! I realised I was running out of offcuts, so decided to make some more. I suppose technically they’re not offcuts if I make them with the intention of cutting into strips, but you know what I mean 🙂 I made a few different coloured nuno felt pieces:

I loved the variety of textures I got from using different fabrics on the orange piece:

The red piece was made with all silk pieces:

This is a corner of the red piece with sunlight on it:

I think this is my favourite close up, from the yellow piece I made, and a strip from a viscose scarf:

Before I got too attached to the pieces, I cut them all up into strips:

I made a mistake with some of them, because some pieces weren’t very wide. I should have left them ‘whole’ instead of cutting the strip in half like I did the others. I started with the red and orange strips, and matched up some pieces, it turned out some of the purple strips worked well too so I used some of them. I made them into a passport style shoulder bag. I made this side as the front:

I made the back to match, but different enough that it can be reversed for a different look:

It’s not very easy to see, but I finished the bottom of the strap off with some wooden beads.

Exploring Different Pod Shapes

Exploring Different Pod Shapes

We have another Guest Post by Tracey from the Forum today.

I wanted to carry on exploring how to make different shaped pods by altering the shape of the resists. I thought a stone shape may open up new possibilities regarding the surface design. I have always used pond liner for my resists, I think it is perfect for the job, especially as we had a lot left over from pond construction! Here is the resist, it roughly measures 15.5” x 10.5”.

As before I placed six layers of Merino wool either side of the resist and here it is wetted down with yellow and orange silk hankies as decoration, the colour of the wool is a lovely rust so I thought how this would compliment it.

After lots of hard work felting, I cut a cross to take the resist out, it is a small hole, luckily I have small hands to get inside to start the fulling!

Once it was fulled, I packed it with fabric to help it dry out, by doing this it creates ‘memory’ and hopefully retains the shape you want it to be. When it was dry I had plans to decorate it slightly with some Mother of Pearl nugget shell beads that needed a home, the colour matched perfectly. Here is the finished pod.

Because by then, I definitely had the bug, I made more.

When I am layering the wool, I try to lay it neither too thinly or too thickly, but evenly of course. I was putting down six layers of wool each side of the resist as I have mentioned before. However, when I have held my pods I feel that the very bottom ‘gives’ a little, even though I work them until my shoulders and arms ache!, so I was not very happy with this. I decided to go to seven layers, a lot of wool!, but I am far happier with the outcome, much sturdier and thicker of course!

I then decided to change the shape of the resist once again and cut an oval shape, this one measures 16.5” x 13.5”.

For this design I put down four layers of Merino each side, wetting down each time. I then added two small circles of resist to reveal craters in the end design, with a different colour underneath. Here is the picture, I didn’t realise at the time but it looks like a happy grinning martian! I then continued with the remaining three layers each side.

I then decorated it with lots of lovely Blue Faced Leicester locks and wool nepps.

Lots of hard felting and fulling later, here it is, with a little bead detail.