Browsed by
Author: ruthlane

When I discovered felting in 2007, I finally found the creative outlet for which I had been searching. I love that the versatility of fiber allows me to “play” with a wide variety of materials including wool, silk, fabrics, yarns and threads. Creating one of a kind fiber art pieces to share with the world fulfills my creative passion.
Felting Around the Web

Felting Around the Web

Diane Christian’s Felting in the New Year (fabulous Greenman mask)

Jana’s Felted Calendar Cover

Red 2 White’s Felted Throws

http://www.gillianchapmanfelts.info/

Crochet 101

Bumble Bee Pot Holder free pattern

Guzzie Sue’s Fly Stitch for TAST with handspun thread

Beautiful bead mandala using Fly Stitch for TAST

Choosing the right size needle and thread for your project

Peacock using Fly Stitch for TAST

Felt Stitched Tiny Toadstool Beret

How to Make Skeleton Leaves

Dragon made completely out of plastic kitchen utensils

Helen’s Natural Dyed Fiber from her Winter Garden

http://dipandstain.blogspot.com/

Surface Texture Challenge – From Studio Journal to Finished Piece

Surface Texture Challenge – From Studio Journal to Finished Piece

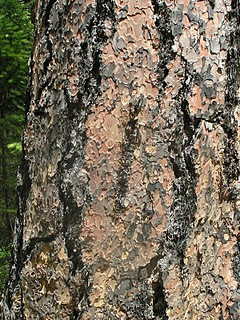
Here is one of my many photos of bark. This type of bark has flat looking pieces that resemble puzzle pieces. The pieces gradually flake off and I collected a bunch of these off the ground. I love the different layers and colors that result. Many times, I work in a studio  journal when I find an inspirational source. Over the last several years, I have played around with these bark pieces.

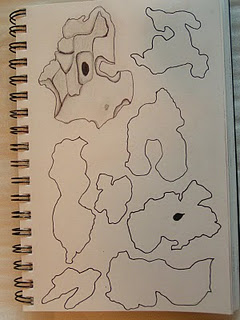
Here I have sketched the various shapes of the bark. Most are multi layered like the sketch in the top left hand corner. I just shaped the overall shape of most of the pieces. I made several different stamps and a few stencils of these shapes.

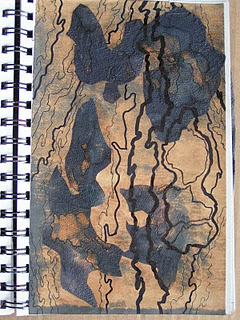
This is a collage that I did in my studio journal with pieces of discharged paper and stamps. I also added the linear components to give it the feel of bark on a tree. This has been in my studio journal for two years and I really haven’t done anything else with it. This past weekend, I decided I was going to try a technique that I have been thinking about for a long time. Because I had this challenge to work on, I finally got this idea in motion.

I took two pieces of water-soluble fabric and sandwiched some wool and viscose fiber between them. On the top piece of water-soluble fabric, I had traced some of the imagery from my paper collage. I then free motion stitched with zigzag stitch over the lines and shapes. I ended up not putting in as much detail because it shrunk so much with the stitching. And it would shrink more with the next step.

I then took the free motion design and added it into a felted cover I was making for my new Kindle. Since the fabric is water-soluble, it would wash away during the felting process and just leave the stitching. When you stitch directly on felt with the machine, it gives a quilted effect. I was trying to add machine stitching without getting that quilted look. I also want to be able to add machine stitching easily to 3D felt objects. It is hard to get a three-dimensional felt to fit under the sewing machine.

Here is the result. It was a bit dark when I was taking the photos so sorry for the quality. (Click on the photo so you can see the details better.) I loved the result! The stitching is completely attached as the fibers it was sewn to, felted right in with the rest of the fibers. And the stitching is right on the surface, it worked perfectly. The darker lines in the middle were yarn that was couched down by machine stitching. The machine threads are shiny in comparison with the felt and add a very interesting texture as the thread didn’t shrink but the wool did. I will definitely be trying more of this technique.

Here’s the Kindle sliding into the top of the cover. I made the cover fairly thick so that when I put this in my bag, it won’t get banged around so much. That shows a little bit of the way I tend to work. Have you tried anything yet for the surface texture challenge? Do leave a comment and let us know.

Resist Shapes

Resist Shapes

Several people have asked me about what shape resists I use when making hats or vessels.  A resist is used in felting to make three dimensional objects from a flat pattern. The resist can be anything flat that will keep the two sides of felt from felting together, i.e. it “resists” the felting process. I usually use a thin foam as it is waterproof, inexpensive and can be used over and over again. The resist shown above is from floor underlayment. That is the stuff that is used under laminate flooring. It comes in huge rolls so unless you’re making large patterns for things such as clothing, you might want to use a craft foam or recycled packing materials. You can also use bubble wrap, plastic, cardboard or anything that will hold up to the felting process. The resist above made the orange hat in the next photo. The hat block shown in the middle gives you the idea of how much shrinkage occurred. I used merino with a shrinkage of about 30%. But if you’re going to be adding lots of folds in the felt, that takes lots of extra room in your original pattern.

For this hat, I wanted to have random folds but it could have been finished different ways. That is the fun thing about using a resist with lots of extra room in it. You can make small, subtle changes in the shaping of the hat and you’ll get a completely different look. This hat could have had uniform folds done concentrically and it would look like a completely different hat.

This is the resist shape that was used for the hat shown below.  All of the space at the top is used for the concentric folds that make the top of the hat.

This hat is made from a Stratta batt from New England Felting Supply. It felts very easily and is a quick and easy lay out as you don’t have to pull the wool all apart, just tear it to shape and you’re ready to go.

Here is the resist used for the Iris flower vessel shown below. I leave the top open so the edge is uneven, given it a more organic look. You could cover the entire resist with wool, cut it open and then have a straighter edge on the top of the vessel if that was the look that you wanted.

I made this vase for my sister as she loves iris. It is made with a variety of wool and silk.

This is the basic shape I use for making slippers. The resist shown here was for my husband’s slippers and I didn’t make as a big a cuff for him. The cuff is the connecting part between the two slippers. The more space in between the two foot shapes, the longer the cuff is. Or you could make it really long and make boots. Just remember to make them wide enough to get your feet in and out. You can see I’ve taped this resist back together again with duct tape. You cut the two slippers apart after you’ve gotten to the soft felt stage to remove the resist. But you can use the resist again, you just have to retape it each time.

Here are slippers made on a similar shape resist. I don’t wear these because they ended up just slightly too small. I’m going to need to make a new pair soon!

This is an experimental resist shape. If I was going to make this again, I would not leave the edges so pointy. Any pointy edge or really sharp angle is hard to cover in wool. I have found that the best resist is the most simple one. Just make the resist bigger for extra room if you want folds.

Here is the resultant felt vessel from the resist shape above. It’s kind of odd, isn’t it?

This is a vessel resist covered with wool and wet down. I used this same shape resist to make both of the vessels below. This shows that you can use the same shape resist but come up with a very different end product.

This taller vessel was made by stitching ridges lengthwise and then felting them together. You can see the thread at the top before it was removed. This formed a tall and slender vessel.

This vessel was made from the same resist as the tall vessel. However, I made concentric folds around the shape to make a short and squatty vessel.

As you can see, almost any shape can be used to make felt. The fun thing is that even if the same shape resist is used, the final shaping of the felt can change the end result. What shape resists do you use when felting? Or perhaps you haven’t tried felting with a resist? Give it a try and let us know how it worked out for you!

Diversifying Your Product Line

Diversifying Your Product Line

If you’ve been selling your work for a year or more, consider reviewing your line to decide if you need to diversify. The buying public notoriously changes tastes and styles. You should prepare yourself to expect changes in the marketplace. You can prepare for these changes by keeping an eye on fashion trends, home decor styles and color forecasts. Most of this information can be found very easily online. You can also do research in craft trade journals or join an industry specific organization such as a felting guild or a surface design group to gather more ideas.

Use the information that you find by thinking of how it applies to your product line. Maybe you need to add a new color to a product that sells well but is looking a little stale with the same old color themes. Perhaps there is a new electronic “gadget” that needs a felt cover that could be added to your already existing products.

Some of the reasons that will determine that you need to diversify are:

  • a particular style has been exhausted, for example, the lodge look (everywhere but NW Montana)
  • consumer demand slows for a particular item
  • you find a new and unexpected niche
  • customer’s continually ask for this type of product
  • a competitor adds a new product
  • you need more income
  • a new trend or style excites you
  • you examine your side lines and see that they could offer more profitability with more effort or changes
  • you have many repeat customers, they will need to see something new to continue to buy your products

Expecting change and diversifying your product line periodically will keep your work fresh and appealing. If you find that your market is becoming too crowded with people making the same sort of items, look for intersections with other markets. Look around for other types of customers who might benefit in an unexpected way from your products. Perhaps you could sell to a certain type of collector if you made a product geared specifically focused towards that theme.

As a buyer for my store, I always look for “new” products and something different from what I’ve seen over the years. The artists who continually work to upgrade and diversify will get my attention much more readily than someone who “has the same old stuff”. I’d love to hear about how you’ve dealt with a changing market and the “fickle” buying public.

2012 First Quarter Studio Challenge

2012 First Quarter Studio Challenge

I love texture, especially natural textures such as lichen, bark, fungus, moss… I could go on and on. I have tons of photographs of these types of surfaces and I’m always inspired by looking closely at them. So my challenge for the first quarter is related to surface texture. I want you to go exploring and find an interesting texture that inspires you. You don’t have to limit yourself to the natural world. Perhaps you are inspired by a rusting piece of old machinery, multiple layers of posters stuck to a wall, peeling paint on the side of a boat or whatever captures your fancy.

Once you’ve found the texture you’d like to develop into a work of fiber art, take photos. I’d love to see your working process with this challenge. Since you have three months, take your time and see where the original inspiration takes you. Perhaps you just jump right in and just start laying out fibers to felt or whatever it is you do. Or maybe you draw some sketches and paint some pages in your journal, make some samples and then begin your final challenge piece. Show me your working process and how you got from the photo to your finished piece.

All four of us here will be posting periodically through the next three months for the challenge. If you’d like to join in, please join our Flickr group and post your photos there with a tag of surface texture challenge. Or if you have your own blog, post about the challenge and then come back here and leave us a comment with a link so we can go check out your surface texture piece or process. We’ll put all the links into one of our Felting Around the Web posts so that everyone can see.

What surface texture inspires you? Please do tell! I know I’m not the only one who is taking photos of odd things while everyone else is taking photos of the scenery. 🙂

Focus in 2012

Focus in 2012

Last year, instead of making goals, I chose a word for the year. I saw this first on Christine Kane’s blog and she explains about choosing a word in her post Resolution Revolution.  I like that the word you choose is related to everything in your life as it is about “being” instead of “doing”. Keeping one word in the forefront of your thoughts is much easier than trying to remember a list of resolutions. Last year, my word was “choose”. I did get a lot done last year in relation to my fiber arts, I was happy with the choices I made and I want to keep moving forward in that same vein. While I was looking at the list of possible words that I might choose for 2012 on Christine’s blog, I came across several that spoke to me. I wrote those words down and my list included clarity, focus, mastery and discipline.  After I looked at these words for a few minutes, it seemed to me that all four of the words fit under the word focus. Focus has several meanings including the center of interest, to adapt to the prevailing light and become able to see clearly, to concentrate or to think about closely. So for the coming year, I will be thinking about focus and how that relates to fiber art.

Vision Quest

I also have a list of intentions that I want to accomplish during the year. I’m not sure how I’ll get them all done but I’m sure if I focus…

  • Continue the Level II Hand and Machine Stitch course
  • Promote my book when it comes out in August
  • Begin teaching felting classes at a local yarn store
  • Investigate future teaching possibilities (felting/fiber art) at the local community college
  • Mentor artists through the Montana Arts Council program at the store about the business of art
  • Participate fully in our new virtual studio The Felting and Fiber Studio
  • Continue exploring the combination of hand and machine stitching with felting
  • Begin making video fiber art tutorials (which I’m sure will involve more than I think it will)
  • Learn more about Photoshop and use it more frequently
  • Continue to explore surface design including more eco-printing with leaves with my local group
  • Begin researching and planning for The Yurt Project

Now if you were paying attention, you might be saying “What yurt project?” I have really wanted to make a yurt  in the traditional way with a felt covering for a long time. It will be a ton of work and I’m sure I won’t get it all done this year. But I’m going to start working on it this year. I have already gotten some books from the library and my hubby is going to help with the frame construction. I may see if I can involve some school groups or civic organizations and teach more people about felting. The idea is still brewing but I’m excited about moving forward.

What are your plans for 2012? I’d love to hear about them.


Is Your Product Line Cohesive?

Is Your Product Line Cohesive?

Once you’ve developed some amazing items that you want to sell, step back and take a look at what you’ve created. Do you have a line of products that are interrelated and form a unified look? I don’t mean that everything has to be the same color or look alike, just that the products should seem related in some fashion. The easiest way to do that is to concentrate on using a consistent material or technique. You could also combine various methods in to one type of “mixed media” but you don’t want to present disjointed products that have little in common. It should be easy for the customer to take a look at your items and understand what it is you’re selling. Don’t be the hobbyist who can’t decide what to sell.

If you are like me, you have lots of interests in arts and crafts and it is very easy to start branching out in all directions and trying new products or new techniques. To form a cohesive product line, you will need to concentrate on one ‘craft’ and improve your skills in that area. Look at old ideas and create new lines from those ideas. Try to produce items that can be made more easily in larger volumes with a streamlined process.

Your product line should include a variety of price points from something under $20 retail to higher end, one of a kind items. Concentrate on the mid range price points and have more of these types of items available for sale than the lower or higher price points. Do offer one or two products that are a premium version of your mid price product line for that segment of customers who want to buy the ‘platinum’ variety item. Don’t try to control costs with this product, add real value such as using more valuable materials and create an incredible result.

Once you’ve got a line of products that are cohesive and include a range of price points, think about how to make your products easier to buy. One way to enhance the value is to name your product lines. Perhaps your lines are coordinated by color; consider using the color names to develop a memorable name for the line. Look for ways to include the benefits or functionality of the product into the name. Emphasize how the product will make the customer feel and add a story to your product. Telling a story about you or about how the product was made will add value and enhance the ability to sell the item.

Next time, I’ll talk about diversifying your product line (if you’ve already been selling your work for a while) and how to deal with change.

Felting Around the Web

Felting Around the Web

Felt Along’s Wool Furry Vessel

VunoRad’s New Blog with Wool Paintings (see galleries)

Felted drawstring skirt

Barbara Trafficonte’s Needle Felted Santas

Jagusia’s Felted Tree Ornaments

Christy’s Needlefelted Embellishments on Knit/Fulled Bags, Mittens and Hats

Free Vintage Knitting patterns

Feather and Fan Comfort Shawl

Knitted Pinwheel purse

Crocheted animal sculptures

Crocheted Rope Basket

Chad Alice Hagen’s Stitched Felt Pieces

Annie and Lyn’s Stitched Felt

Interactive Jellyfish Swarm – Origami

Year End Reflections

Year End Reflections

We thought it would be fun to look back on the past year and see what all we have each accomplished in terms of our fiber art. Many times, everyone has a big long list of what they want to felt or make. The list tends to get longer and longer and not everything gets completed. I personally have found if I write out what I’ve done in the past year and what I want to accomplish in the following year, I tend to get more checked off my list. So I’m starting out with what I have done in 2011. Then in January, we’ll write about our plans for 2012. We’d love to hear about your plans too. So leave us a comment or come over to the forum and let us know.

As the year winds down, I have been reflecting on what I have accomplished in the last year. At the first of the year I had decided my word for the year was “choose” and that I wanted to make decisions with intention. I actually did most of the things that I had planned on doing and then did several more “big” things that I had no idea I would choose to do. It was a pretty exciting year. Here’s my round-up of the fiber art related things that I completed in 2011.

  • The Design Focus Friday series of blog posts was completed. I really think that writing about design has helped me think about how to design a piece with a better focus on the principles and elements.
  • Continued exploration into surface design including making my own silk screens, screen printing with oatmeal, torn paper and water-soluble glue, gelatin printing, Eco printing with leaves and fabric painting.
  • I played with encaustic and even though I probably won’t do any more, it was fun.
  • The fabric book page swap came to an end and I fabricated my “tree” book.
  • I did attempt to get my work into another gallery in Missoula and sent entries to two fiber art competitions. None of my work was accepted but that’s OK, at least I tried.
  • Completed two rice paper and watercolor collages in my studio journal.
  • Dyed a variety of scarves and made tons of cat toys to sell in the store.
  • Completed Level I Hand Stitch at the Gail Harker Creative Studies Center.
  • Began Level II Hand and Machine Stitch with Gail which will continue until February 2013.
  • Carded half of a fleece of merino wool (still have the other half to finish).
  • Felted three bird houses for Felt United Day.
  • Felted a Möbius scarf for the “twisted” challenge.
  • Felted and direct dyed a bag for my husband’s new tablet.
  • Made a felt scrap bowl and Christmas tree ornaments with a step by step photo tutorial.
  • Mentored another artist in nuno felting.
  • Wrote the book ‘The Complete Photo Guide to Felting‘ which is being published by Creative Publishing International. This was 6 months out of the year of very hard work. I felted tons of samples and projects for the book but wasn’t able to show anyone any of it. The book is still in the editing process and I still have to work with the editor on making sure everything is in the right place and it says what I meant it to say. The publish date will be August 1, 2012. It will be so exciting to see it completed.
  • One of the most fun things I did this year was to get together with a group of three other felters from all over the world and develop our own virtual studio and forum. I have so enjoyed interacting with my felting friends in creating the website and I look forward to our work together over the coming year.

So, for me working a full-time job, that’s a pretty impressive list. The next time I ‘choose’ to write a book, I think I will have to quit my other job. Writing a book is a full-time job in itself. But there are no plans for another book at this point and the next year and a half, I will be concentrating on my Level II stitch class. I am going to be considering what my word for next year will be and what my other plans will be. Once I’ve decided, I’ll write another post to let you know. What are your plans for the coming year? I’d love to hear what you want to accomplish in the coming year.