Just looking around my crafting space, I realize how many things I’ve started and completed, in these past 6 months. I think it’s a byproduct, of becoming comfortable with my neurodivergence; working with it, rather than fighting it all the time. As I sit here, looking around the room, I’m feeling quite proud! I’ve completed a couple quilt tops that are ready to travel off to be long-arm quilted. I’ve finally found a pattern for knitted socks, that fit my wide feet and ankles, and made 2 pair in record time. For this article, I plan to follow up on the progression of my spinning, and new acquisitions.
I included the link to my last article above, so I can refresh you on where I was. To recap, I was having issues with twist holding my spin together. I mentioned signing up for a Long Thread Media annual subscription, and how the included access to online spinning courses helped me greatly, and saved me money in the long run. I have learned so much, right from the big screen TV, in my home crafting space. This saved workshop/retreat fees, and the travel expenses that accompany such trips. I am posting a link here for this resource: http://spinoffmagazine.com/subscription
These yarns were spun between November and end of December 2024. Photos shown in date order left to right. The video courses made a difference and gave me confidence to try different things.
Fiber spun from a art batt.
Batt blended on drum carder, and how it spins up.
A batt I blended to sell in my Etsy shop. I thought seeing it spun up would improve chances of selling.
Here I found myself out of empty bobbins. So I started spinning over the previous test.
I tried to blend an art batt. Not bad for first try: good thick thin texture
Christmas Gift – Merino, Sari Silk and Flax.
My Christmas gift from Brian was all fiber dyed by the incredibly talented nuns at Inglenook Fibers. If you’ve not heard of them, look them up. Their regular work consists of painting frescoes on the walls of Greek Orthodox churches. But, they use their talents of mixing paint colors to create colors in the dye pans. I still feel a little green, to spin their works of fiber art, but I have plunged my hands into a few of those batts. We took my spinning wheel and fiber on vacation with us, and I spent a few days spinning on the balcony overlooking the water. Next year, I will bring double the amount of fiber, and plan fibers that can be plied together. I was enjoying my spinning so much, the fiber was gone in no time. Unfortunately, the bobbins were full of fibers that were never intended to twist together. This encourages the next lessons in spinning: forward thinking = planning ahead.
Part of this fiber was spun on vacation, and the rest when we returned home. I decided to try a bobble plying method I saw on a YouTube video.
This is the first plying of the Inglenook Fibers.
I was noticing that my spinning was becoming thinner and thinner, which is what happens when your spinning improves. But, I don’t enjoy knitting with thin weights of yarn. What am I supposed to do with all the thin yarns I am spinning? So I began studying YouTube videos, of those spinning thicker Art Yarns. I found, as with most fiber pursuits, it’s related to your tools and preparation of fibers. I started with the easiest one I could fix right away. Rolaggs are the way you can blend fibers, colors, and make texture. I found that if you want to spin thicker yarns, you need to begin with larger diameter rollags. Instead of wrapping rollags around 2 quarter inch (6.3mm) dowels, I started using US-19 (15mm) knitting needles.
My first rollags – look like crumbly cookies – fall apart easily.
Getting better at removing them from the blending board. They are still a small diameter.
I haven’t used these yet, but these are about 2 inches across.
I pretty much knew, after watching all the YouTube videos, I wanted an Ashford Super Jumbo e-Spinner. I began checking Facebook Marketplace several times a day. Surely, someone had to have one they didn’t care for, and wanted to get rid of it? Nope: not one available. The US tariffs were looming, and I knew I would kick myself if I didn’t get one now. So, I used Etsy shop funds, to purchase this beautiful giant sized e_Spinner. It’s a lot bigger than I expected. The bobbin holds a kilo (2.5lbs) of spinning! I am not a bit sorry! It’s whisper quiet, and there is a toggle switch to choose S or Z twist. It has a huge 1 inch orifice to accommodate Art Yarn. However, it comes with 2 smaller, nesting orifices’, that make it capable of spinning any weight. The best feature for an Art Yarn spinner, is the ability to start and stop spinning immediately with the included foot pedal. That allows a spinner to stop, adjust fibers, and such: start right back up where you left off. No delay getting back up to speed. You can’t do that using a wheel you treddle! Brian insisted that I get a couple extra bobbins, as I am always running out of them. Honestly, I don’t feel like I needed them or the extra expense. But I love that toggle switch feature to change spinning direction. Before I used the e-Spinner to spin anything…I used it to ply off 2 of my bobbins from my regular wheel. Gotta love a machine that helps you in ways you never imagined!
Large oversized orifice.
Side view of the e-Spinner: measures 9” wide x 18” length x 12” high.
I have been shopping with abandon in the past month or so. This is funded by a bonus at work and birthday cash. And so I have added some new equipment, yarn and fibre to my stash.
First off, I adopted a new eSpinner. I purchased an Ashford Super Jumbo from Susan Allen in the Ottawa Valley Weavers and Spinners Guild. Susan is an Ashford dealer and made the transaction really easy for me. I got the espinner in early April and I’m still getting to know her. I also ordered a 3D printed bobbin from MJFYIndiraDesign. The bobbin arrived really quickly and was really well made. I’m very happy with it.
Ashford Super Jumbo espinner
First singles on the new espinner
Thread plying
Finished yarn
On the same day I picked up the espinner I visited a number of stops on the Maple Run Tour. I had a fun time visiting the various stops and at one of them I stumbled across Stitch Noir‘s booth and adopted this awesome yarn.
Dyed sock yarn and gradient set
Another tool that I have been considering investing in is a Rail Reed. The Rail Reed is a reed for a loom that lets you adjust your warp density on the fly as you are weaving. They are manufactured in Estonia and I have been thinking of getting one for months. Just after I decided to invest my money in the espinner instead of the reed, a used reed popped up on Ravelry and I was able to adopt it. I have not tried it yet but am looking forward to doing so after my current project is completed.
Rail Reed for weaving
I also decided to invest some of my bonus from work on a bulk yarn order from Evergreen Export (aka S Silk on Facebook). I have to say that doing an international money transfer was a bit of a stressful adventure for me. But it was worth the
Yarn order from Evergreen Export (India)
Next up came an email from Les Belles Bouclettes, a local Mohair farmer offering me a discount coupon for my birthday. I had purchased some washed mohair from this farm last fall and spun it up with some Gotland roving to make a delicious yarn. So I was happy to get some more fibre to play with (though I haven’t had time to wash it yet).
Gotland roving and mohair locks
Gotland mohair singles
Plying the Gotland mohair yarn
Gotland Mohair yarn
Les Belles Bouclettes
1 pound of unwashed fleece from Marley (J192)
Marley (J192) fleece
1 pound of unwashed fleece from Lexie (J179)
Lexie (J179) fleece
I received some birthday money and invested some of it in yet more fiber, this time from Adele’s Locks of Love (aka Adele Forward). There is 1 pound of Superwash Merino tencel, 1 pound of Superwash Merino and 3 pounds of Superwash Merino Nylon blend roving. (Each bag is 1 pound of dyed fiber. ) And I purchased some yarn from another Indie Dyer Fiber Pusher Fairy.
Dyed fiber from Adele Forward
Dyed yarn from Fiber Pusher Fairy.
Then in early May it was time for the first fiber festival of the season The Forecast Calls for Yarn and Fiber. Early entrants to the show received a gift bag with some freebies. I saw Jan and Ann at the show and Ann was nice enough to gift me the knitting needles she received in her gift bag since she does not knit.
Gift bag items include knitting needles, stickers, wool wash, needle stoppers and a stitch holder cord.
Superwash Merino, wool yarn (on sale) and a tin for notions purchased from Karberry Farm.
Rovings from Sassy Yarns dyed by Kiss My Knits. The blends include BFL, Superwash BFL, and Merino Cashmere Silk.
Silk hankies, dyed locks and roving from Mapi Creations
I got some awesome fibres. It was fun to shop from some favourite vendors including Karberry Farm, Mapi Creations and Sassy Yarns. I was especially taken with the Merino Cashmere Silk roving from Sassy Yarns. Once I felt it with my hand I could not resist it as it was amazingly soft. The rich colours are wonderful as well.
So… as you can see my stash is bulging and my wallet is empty. I am content and looking forward to using my new tools and transforming these delicious yarns and fibres into projects. Thanks for reading this long post about my various shopping exploits.
I had a plan, and my reference photos. I packed a cool commercial felt box from Dallerama with a bag of tools and extra needles, a wire armature, one (about 1kg) of the 2 bags of core wool from the last World of Wool order and a couple drop spindles. Glenn loaded the felt box, a few bottles of pop, my meds and my audio books and all the board games he would be selling into the back of my car.
Off we went to the Rideau Curling Club. We got there in time to get one of the last three parking spots on site! There was more parking arranged for down the street but carrying boxes of games and a box of felting supplies was much easier close to the building.
You may remember from previous photos that the curling club is an old building, long before accessibility was a thing architects worried about. So, it’s not the most accessible building. They have tried to retrofit as best they can. There is a removable ramp to get up to the main area, which overlooks the curling hall. There is another ramp that allows access to the curling hall floor, but the door dose not open wide enough to get my walker through (it is one of the bigger walkers available). There is now a handicapped washroom added to the main level, which is grate since the others are upstairs! (I miss upstairs). All the extra effort to get into the curling hall is worth it, so let’s go have a look.
1.1) CanGames (and Felting) Convention at the Ridea Curling club, CanGames info booklet, strangely the felting component was not mention again this year.
1.2) overlooking 4 boxes of games for the second hand game sale and looking into the curling rink full of tables ready for gaming.
We were early so Glenn filled out the list of games he was putting into the sale, I pulled out my reference photos and started wrapping the human parts of my next mer-person, The “Boyfriend”. I had one of the volunteers and another attendee wonder over and check out what I was doing. They were both felters! I later met a weaver who was learning to spin, she would drop by and see what I was doing tomorrow after her shopping trip to Wabi Sabi. As gamers dropped by to see what I was doing, I asked if they thought an orca or a sturgeon would be a better boyfriend? There were slightly more Orca suggestions but the sturgeon votes were very persuasive, that it would not be good to have a boyfriend that is likely to eat Miss Mer’s family! i will keep asking anyone who expresses interest.
2.1) The armature and core wool from world of wool and Adding the under layer to the armature. Used Tacky fabric glue for tips of fingers
By the time we could enter the floor of the curling rink, I had the Right hand well in hand, but the arm still looks way to skinny. We got my little table set up and I decided to start the left hand.
2.2) I am happy how the right hand is coming along.
2.3) this is not the usual anatomically expected number of fingers!!
2.4) Ok I think I need to recount those fingers.
I seem to still be having a tiny problem with post anesthetic brain….it seems I can’t count yet. It usually takes a while for my brain to clear, but i guess not yet. Oh well I can fix that.
2.5) all better now! 2 hands, the same number of fingers. I think he is checking I got it right this time.
2.6) Ok now I have that fixed let’s take a quick look around. I am in the back corner between the open gaming tables and one of the venders.
3.1) the booth behind where I was working “3dbatch”, had 3-D printed items.
I thought Leonor may enjoy the raven dice tower with skull. There were two little dragons I had been admiring, in this booth as well as little articulated drawing figures. There were also dioramas for gaming that were quite impressive, well if you are a gamer. Actually, even if you are not it’s still pretty cool.
3.2) the 2 little blue dragons cot my eye. Someone was looking at one when I left for a moment but both were gone when I came back. Glenn was there and I told him of my disappointment, luckily they seem to have found a new home in my bag of maple candies and one seems to like the taste of hand spun yarn. There were bigger ones on display at the booth too. (They might have wanted to eat the whole wheel!)
3.3) The detail in these dungeon areas fascinated me.
The detail was amazing, one had a chapel building that lifted off and revealed a crypt, if you lift the lid there is a stairway to a lower floor. The floor tiles lift away so you can play in the lower area too. I remember little mettle figures and graph paper was what we played with in late 1970/80’s.
Now that you have seen what is behind me, let’s take a quick peek at the other part of this felting …er gaming convention.
4.1) Lets take a quick look around the curling rink, there is more gaming happening in the basement, the loby and upstairs. (I did not make it upstairs or to the basement)
Do you remember watching the Chariot Race last year? I wasn’t feeling up to playing this year but did enjoy wandering over to check out the fun and carnage.
4.1) And they are off!! Look out for the first corner!!!!
The chariots are racing on a track that starts out wide12 squares and shrinks to much narrower4 squares. Each chariot has a number and that is dawn randomly to get the order of movement. The charioteers have to write down what speed they are going to go then roll a dice to see how far they are traveling. If you pass another chariot you can try to whip them or they can try to whip you. If two wind up in the same square, well, you can see what happens!
Back to work for a bit, I will go back to check on the chariots a bit later. I suspect there may be a bit of carnage, its is usually a very fun game.
4.3) there were still tables open but there had been a few cancellations of games and it was early on Friday night (the convention had started at 2pm). Saturday will be the busiest day.
If you were curious, Here is my work set up. we brought the folding table the box of fiber and tools, a bag of drinks and munches and I have way more core fiber than I will need. I kept working on firming and building up the human body, until my curiosity at how the race was progressing overcame me.
Lets check in with the Chariots. The carnage at the first corner was the worst I have yet seen! Never gallop your horses in the corners! If you were betting on the youngest charioteer to win you were right!
4.4) the Chariot races
Now back to work!
5.) at the end of Friday I had had the beginning of an under-structure but lots more to do. (his head is too thin, have to add more biceps…..)
Its time to go home get some sleep and get back in the morning. I am sure you are as tiered as I was so lets have a little nap before heading back for Saturday. It will be a busy day with the second hand game sale, possibly some spinning and of course more felting! But for now its time for a nap. Thanks for coming with me so far and i hope to see you there when i go back next post! Maybe we can find a sheep game to play?
I taught a lovely and fun group of ladies how to make a vesel. One of the ladies made a really nice Instagram reel. I am going to try embedding it here. Fingers crossed. It was hosted here https://hookingoutsidethelines.com/ I will share stills of the finished vessels below it. If it doesn’t work, then try this link:
This one was cut across the circle about 1/8 of the way down to get the resist out, so she has a flat coaster, too
This one was also cut about 1/8 of the way down, but she opted for a shallow dish.
This one was cut just about halfway. She has two similar-sized bowls. Here, I was showing her how she could reverse them to have the pattern on the inside.
A nice round green one with lots of sari silk waste
Pretty pink with silk hearts on it
Jan told you about the sale we went to a little while ago. I was much better behaved and only bought a few things. Two small sample rolags and 3 bags of slubs. I have been wanting to try slubs. I know the neps are very hard to keep in the yarn when spinning, and do not like to stick to a felting project. I am hoping slubbs will stick better in both. If they do, then I may have to order some and dye them myself. One more thing on the to-do list.
I am running late with my post today. We have been traveling and then got busy right away with class homework when I got home. I forgot my post! I hope you don’t mind but I will show you a few photos of our recent trip to Boise, Idaho to visit friends. Hopefully, you will be inspired by some of the landscapes and bird photos.
We took a hike on the road up to Bogus Basin (we were going to view the ski hill but the road was closed) and you can see that the area is high desert. Very different than the landscape I am used to in northwest Montana.
These rock formations were interesting. You can almost see a sleeping beast if you look closely.
The close up textures were fun too.
Even some lupine blooming which is ahead of the blooms at home. “My” lupine aren’t blooming yet.
We also walked along the Green Belt in Boise. It’s a wonderful path along the Boise River that was much greener than our previous walk. Plus there are various places to stop and have a drink or some food.
The center makes homes for birds that are injured and can’t return to the wild. I hope I get the right names for the right birds, please excuse me if I make any errors. This is a Harpy Eagle. He looks like a Dr. Seuss character to me.
The center has a great educational program to teach you about the habits of different birds of prey. They also have a program to breed condors which are endangered. They have so far brought the population in the wild of the California condor from 22 to more than 3,000. You couldn’t see the condors up close as they don’t want the birds to be habituated to humans. This red tailed hawk is Phoenix. The person holding him is a volunteer. This seems like a great volunteer job!
This is a Lanner falcon.
This was my favorite. A barn owl whose name I have forgotten. The program was great because the owl flew over your head in a closed room from perch to perch.
We had a great visit to Boise, Idaho (thanks Howie and Janine) and I hope you enjoyed a few of my photos.
I would like to talk to you about an exhibition I have been to recently: another one, I hear you say, this girl is always going around!
I wish it were even more so, but yes, I am quite glad to have had the chance to go to a few exhibitions in the past months, as I am a strong believer of being inspired by other artists’ works and I am living in a city that has quite a lot to offer in terms of the arts scene, so why not offering a taste of this experience to you!
This exhibition was ‘Flowers’ at the Saatchi Gallery in London, United Kingdom, and it was about, what else, flowers in Contemporary art (also art inspired by flowers in ancient and past artists’ works!) and who does not love a bit of flowers in their art? I liked this one very much, as I love flowers and there was a bit more attention to textiles than in other exhibitions, though the very bulk of artworks were either oils or photos. Actually, it was fairly big and there was really plenty to see, so I am not complaining.
Here we are, ready to go into the Saatchi GalleryThe writing on the wall.
The works were split up into sections around common themes related to flowers, for instance still-life of flowers or flowers in connection to Medicine or flowers in connection to Science (Maths linked to flowers/plants, Technology inspired by flowers..) or Fashion inspired by flowers or Film posters with a flower theme, and so on.
Sophie Mess’s mural and canvas greeted us as the first paintings in the exhibition: hypertrophic overexpressive and non-apologetic blooms in spray paint that set a general mood of riotous flowery abundance.
Sophie Mess’s canvas took one wall, whereas her mural run along the first staircase to access the exhibition.
One of the first sections in the exhibition was about still life takes on the flower theme, as a Roots topic for the whole theme…see what they have done here, oh oh, root-plant. Obviously with a twist: here we have Amy Sheldon’s work with pressed flowers arranged in a pattern by the artist on led lighted board. It is a still life, in a sense, but exploding the concept with the arrangement. and the use of real flowers.
Amy Sheldon had a couple of works in this exhibition, made with seasonal pressed flowers for a better connection with nature.A detail of the pressed flowers in Amy Sheldon’s work: it has been very hard to choose which one to photograph and show you, as they were all different and individually beautiful. They were all wild flowers picked in early Spring time and remaking a Springtime wild meadow in a way.
A few paintings by old Masters were present in this room:
An old master take on the Flower theme: a still life by Jean Baptiste Bosschaert (1667-1746)Another old master’s still life oil painting? Nope, this is a still from a 70-minutes loop film! By rob and Nick Carter
This is a typical Art Nouveau panel where the woman is almost like a flower herself, a decoration, a pretty thing among pretty things, or you can read it as a flower/Spring goddess, celebration of feminine power and beauty: up to you. By Alphonse Mucha, ink on silk, it was firstly painted as watercolor on paper.
Among other serious paintings, I loved the quirkiest ones, such as this, showing that you can make art with anything at hand:
Margaret Mellis, crayon on envelope: I can imagine the situation where you will have crayons and a scrap of paper and just start doodling an idea, then getting quite taken by it and ending up with a full blown artwork..oh, pity for the media, how am I going to present it to my agent, oh, well, it was fun. As you can maybe see, the glass was a reflective one: almost none of the works exhibited with a glass in the frame had non-reflective glasses and the glare was awful. It was very hard to get nice photos with limited glare.
Actually, that is not a one-off artwork on the back of an envelope: Margaret Mellis was an English artist who explored mixed media and collage quite extensively in her long life (died aged 95), and she produced many more artworks on the back of envelopes! Well, why not, waste not want not, as they say. (She apparently loved beach combing to pick materials for sculptures as well.)
This modified photo by Mari Mahr is just one of the many that were on display: I would say photography lovers would have find this exhibition quite satisfying. I picked it because it was modified in a way that reminded me of some embroidered photos that I have seen recently, where the artist would use an old portrait photo and especially embroider on the face of the subject.
Mari Mahr wanted to talk about a sense of loss and longing modifying photos of her friend’s daughter, after she had moved far away.
There was a part about Sanderson floral fabrics: I think most of you have seen some of those floral patterned fabrics and never given it a thought, as I had done before this exhibition. They seem something that has always been there, a popular cultural given, fabric with one of those patterns will surely lurk in thousands of lofts, leftover from Auntie, or Granny’s favourite that she left me and I could not bear to throw, or you maybe have a quilt done with scraps of that..do not even try to deny it (“oh, no, not at all, it’s too chintzy for me, too much English rose for my Aunt, you’ve never known her, a tough modern lady my Granny!), I will not ask for confessions, it will remain our cosy secret, let’s just say that as soon as you will see the patterns in my photo and you will recognise it as an old (if a bit worn out) friend. And you can say it aloud, old, because those designs have been created about 160 years ago, firstly for wallpaper and then in time also for textiles by the Sanderson factory: talk about flowers that have become classics.
Do you recognise them? When I was a child and teen my bed cover was cotton fabric in one of those designs. Actually, one thing that I did not know and that I find amazing is that I live in an area of Greater London that is very close to the first Sanderson factories that produced those designs: life is weird that way.A long tradition of Sanderson products.
There were also other pieces linked to flowers in the house, included a lovely small handpainted side table.
A small handpainted beauty by two of the group following William Morris’ s ideas, George and Annie Jack. This was used as embroidery table: please, excuse my drooling on the laptop.
And of course some pieces by William Morris:
No fabric section with a floral theme could be complete without William Morris. Block print on cotton.The original drawing by William Morris for the tulip fabric above.Some other pieces by the Morris movement.The printing block for the tulip fabric, and a few tiles that look very modern.
Quite interesting to have a look at all those printing blocks and drawings and pieces with abstracted flowers: it just makes me itch for a go at thinking other printing blocks or stamps to use for surface design, with streamlined abstract flowers. I just have a passion for abstract floral designs and feel you can never go wrong with one and will surely find the right time to use them! Actually, very recently I used the floral design stamp and stencil made when I took Ruth’s brilliant class on surface design to make hand painted wrapping paper to sell at a small market: so, it is all true, surface design is not just for embellishing your textiles, surface design is for life!
And, since I am keen on abstract art, I really enjoyed pieces like these of Gillian Ayers’ that made me wonder how one can make something similar in felt (it must be a lot of fun with those colours):
Very colourful oil paintings, clearly a strong influence of American Abstract Expressionism and Colour Field painting, according to the label
Or other abstract ones like this very interesting one with its definite choice of colours:
A bit of an unusual use of the space, with that third lower part almost blocking the sight of the huge flowers, and the oversized flowers all in the upper part of the painting. Gloss paint on aluminium. By Gary HumeOil on linen for this abstract painting by Alex Katz that feels somehow very classic. And with such simple lines and blocks of colours it would work well as a felt piece with minimal embroidery, would it not?
But I have also a find for the charity shop hoarders: a cornucopia style sculpture by Ann Carrington, entirely made using kitchen implements and cutlery. I checked, it is.
Made entirely in spoons, forks, butter knives and whisks, sculpture for the charity shop lovers “I am not hoarding, I am collecting for my art project, honest”.These oversized abstract flowers by Michael Craig-Martin seem also very enticing to me as inspiration for felt pieces. Screenprint on paper. Sorry for the very bad glare on the upper ones.This one is to show that flowers can be dark on dark and still impressive! Have you ever thought about this combination of colours for flowers? Oil paint and oil stick on linen, metal substrate, exposed linen on the side. By Michelle Jung.
Another screenprint that I found very interesting as inspiration for other medias or functions (wearables or objects or..) is this one by Yayoi Kusama:
I could see a handbag with this design, or a fabric for a dress, or maybe a scarf or a brooch. An artwork in felt would be quite nice too! How would one make the polka dot patterns in felt, though, or the tiny cracked effect in the background?
And here we finally come to some textile pieces, with these embroidered flowers:
Embroidery silks on cotton calico by Martin Maloney.Sorry for the weird angles of the photos: I was really having to take them so quickly, as the exhibition was packed. This is ‘Pink Cloth’, 2024. I really like how the embroidery is totally non-realistic while using stitches that have traditionally been used for very realistic rendition of flowers!‘Yellow Vase’, 2024 by Martin Maloney.
A textile piece with a wow effect, this one was all made of individual elements in different sizes all connected by streaming yarn dangling from the various bits:
This textile piece by Anne von Freyburg has been inspired by an 18th century still life, so we go full circle back to the beginning of the exhibition! Acrylic ink, synthetic fabric and PVC fabric for the textile painting; fabrics, sequin fabric, hand-embroidery, polyester wadding and hand-dyed tassel fringes on canvas for the tapestry.
I managed to take photos of a couple of the elements in the big cloud of colours:
More attention to textiles in other artworks before going to the section dedicated to flowers in fashion:
I found this oil portrait interesting for the attention to textile details, a modern response to the old Master’s portraits of brocaded ladies colliding with a Judith iconography that feels a bit unsettling. By Wole Lagunju.
And here we are at the fashion show:
An example of hand-embroidery changing face to a casual pair of Converse trainers. By Cristina Alcantara of Camomille Creations
There was an area with a big turnable display on creations by the famous Finnish company Marimekko, very popular since the Fifties:
Marimekko style is hardly difficult to spot, with typical bright bold colours and big abstract shapes.The display for Marimekko designs held different garments in different patterns and colours.
And here we come to British fashion icons Mary Quant and Vivienne Westwood: one with a very abstract idea of flowers, the other with an exuberant use of flowers for contrast. Two very different periods in London, two different ideas of fashion.
Mary Quant’s miniskirts in the Fifties, and a long hooded Kaftan in the Seventies, but the abstract flowers remained a motif in her collections throughout her career.Another of Mary Quant’s garments, along with original posters advertising Mary Quant’s fashion.I doubt there is someone out there who has not seen at least once in life the iconic Mary Quant’s flower shape or some item reusing that shape in some way, as it is so effective.I bet you can find similar jewelry today, that flower shape is simply inescapable.
Vivienne Westwood is a different proposition:
Crochet is really good for flower effects on wedding dresses.I am not exactly sure when one is supposed to wear the first one (with platform sandals), but I really loved the pure Vivienne Westwood look of the second one with the ballgown size of the skirt and the deadly cute kitten on the t-shirt.This one and the next are not actually her creations, but made for her collection quite recently by Andreas Kronthaler. This one is a bit like how I would think a costume for Flora (goddess of Spring) may look like if you’d need one for a party. (I guess that you can take off the flower crown/headband/whatever while on public transport to get to the party, and then put it back on)This is also pretty recent, and I would have thought not: does it not feel very 80-90s to you?
I have many more things to show you about this section and the rest of the exhibition, and I feel that this post is already a bit packed with images: I will stop here for now and get back to you with the second part of the exhibition in my next post.
(Plus, it is too late in the night to go on writing, the foxes are screaming outside, and it just feels time to go to bed!)
If you are a felt-maker in New Zealand, you probably recognise Sarah’s name and her distinctive style from Creative Fibre circles. Her jaw-droppingly beautiful, cubist-style, needle-felted artworks have appeared on the front cover of magazines and in many exhibitions. We have felt (excuse the pun 😉 ) very fortunate to learn from Sarah and watch her work, and now you can too… Sarah is about to publish her first needle-felting book! It is packed full of tips, lots of “how to” information as well as 10 patterns and designs for you to follow and adapt to your own personal style and colour palette.
There is something for everyone, from curious beginners to experienced felters looking for a fresh creative direction.
This book is the result of Sarah’s own journey as a self-taught artist. After years of experimenting with wool, colour and composition, she developed a painterly style and soon discovered how eager others were to learn her techniques. Writing this book was a natural progression from offering kits and teaching in person, providing a way to share what she’s learned in a practical and approachable format.
Where can I buy a copy?
If you are coming to Woolfest in Auckland on 24th May 2025, you can pick up your hard copy and chat with Sarah in person. Alternatively, if Auckland is just a little too far to travel, you can download the e-book from Sarah’s website (www.sarah-ritchie.com) or purchase a hard copy from Amazon.
What makes ‘Needle-felting with Sarah Ritchie’ stand out is the combination of technical guidance and artistic encouragement. Rather than simply replicating each piece, readers are invited to adapt, explore, and make each artwork their own. It’s a book that doesn’t just teach a craft — it nurtures creative confidence.
Today is Friday May 16th, and this year it is the long weekend in May. It’s time to start planting your gardens with the hope of no frost. here in Ottawa the Friday to Sunday is also CanGames (and felting) Convention I have shown you that before. Glenn will be playing board games, praubly those 18XX train games (older trains can rust, becoming useless and there is lots of math, how can that be fun?) there will be interesting games there such as the live action Kill Doctor Lucky or the chariot races! It also will be a good spot to work on felting or spinning. I may convert some gamers to fiber arts yet!! (i have tought a few to use a drop spindle in previous years.) I am not sure I will be there the whole time, since I am still finding Mondays at the guild really tiring and am sore a few days afterwards. So now is the time I must decide on what I will work on this weekend.
You may have noticed last fall when the OVWSG had their 75th anniversary retrospective Exhibition at the Mississippi Valley textile museum that one of my Mer’s was missing!!!
1.1-1.3) the Mer Family and Pets having fun while out at the Museum, Mr. Mer trying to get someone to play Tennis with him, Mrs. Mer is admiring her new hair, Shark boy playing with the pets Miss Manta and Sharkette.
Yes the teen Miss Mer has wondered off! I was sure she was in the project bag just behind me but no! She had cleverly replaced her project bag with another when I was not paying attention! Teenagers!!! So she had wondered off and did not get herself finished to go out and have fun with the family and their pets. I think she may be wondering the house, looking for a boyfriend,…..she is a teenager. Since I have looked in all the obvious places I think she might try hiding, without success, I have decided to move to plan 2, Make her a boyfriend. That should tempt her back to the office! That could be a good project to start at the convention.
If I were an arctic char based teen Mer-person, what sort of boyfriend would I like? well, personally if I was a Mer, I think I would look for a very dry fish, maybe one of the really early land walking varieties? Luckily, I am not making this fishy-boyfriend for me. I did see a cool looking fish as I was researching the other Mer’s fishy bits. it was very big, sort of an extra-large more feisty version of a pike. What were they called? Stergons? Oh its spelt Sturgeons? I was close. Hum that has potential. The transition would be fun to consider, but Lots of fiddly details on a sturgeon, so may not be the best option for a busy convention.
2) Sturgeon, there are lots of types, and I would need to do more research to figure out which is which. The pattering is intriguing but very specific.
Since she is an arctic variety of fish-person, I should look at arctic options too. There are Inuit myths about sea people, there is the Qalupalik, who usually hunt children who stray too close to the water, catches and eat them. I am not sure that would work out well in the family dynamics of the Mers.
3.1) Qalupauk, who steel children who play too close to the water.
There is also Sedna the Sea Goddess, who has the head and torso of a woman and the tail of a fish. She created all the sea creatures the Inuit hunt. I have only seen pictures of Qalupalik as women and a Goddess is also a woman so that would not be a boyfriend. Keep looking.
3.2) Sedna the Sea Goddess
Let’s keep thinking, Narwhals are interesting but the fish parts would not have the fabulous horn. There are Orca (Killer whales), they have very interesting colour patterning, that might work. Why is my brain yelling at me to look at the walrus? That’s not a fish! But that would make an interesting Mer.
4.1) Narwhal, it would be hard to tell from just the fishy parts that he is a narwhal without the horn.
4.2) orca, strong graphic patterning and it would be fun to integrate fish and body parts together.
4.3) walrus, ooh this might be fun, integrating shapes, but I am pretty sure that this is not a fish.
I think my best options to consider are Sturgeon and Orca. Both will need ether 12 or 14 gauge wire for most of the armature with finer for the hands, maybe an 18 or 20 steel floral wire. I have a bag of “Carded Core Wool Sliver” from World of Wool, now where did I put it. I will also need photo diagrams to work from. I hope the printer likes my computer today. (nope, i will see if Glenn’s computer is deemed worthy of printing)
For creating the armature I will have to pack pliers & wire cutter, wire, a ruler, a finger length guide or Sara’s Digitwidget, the proportions for the armature (I have that written out somewhere….)maybe I should go back and look at Sara’s Felt-along It starts here: https://www.youtube.com/live/hljS4YRmz9w
I will modify the original armature to suet whichever fish body I go with. Glenn likes the killer whale, since its simple, elegant, and very classy.
Ok I have a plan, consulted Sara’s mermaid armature and just need to collect the tools and supplies to be ready for CanGames! Once I have the armature made I will need to bring; a work surface, the extra tacky fabric glue (the type that dry’s clear for fingers), a selection of needles and the fake clover tools(helpful to make fins), then top colours for whichever fish shape I go with.
I am looking forward to the long weekend, but may have to enjoy it in pieces. i hope you will join me for the parts i get to attend, maybe you will find a sheep related board game we can play? Have fun and keep felting!
Hi all, have you been waiting, wondering where my post is? I wish I could say it was because I was felting or playing with lambs, but in truth, I thought today was tomorrow. I will make you wait until the end to see the lambs.
I will start with my new bits for taking pictures. What I was looking for was an arm to attach to my tripod that would hold my camera. I could find expensive things for proper cameras, but nothing similar for a phone. I did find 2 very similar phone holders that would fit right onto the tripod. They do point down, but they do not stick out very far from the tripod.
This is what I have at the moment. It’s a light ring with a camera holder. I use it for Zoom. I don’t like the holder, it is hard to adjust it to level. The other thing is that it is too tall, two feet above where I am working. Not a great shot, but it wouldn’t show up against all the wool on the shelves
My tripod will go much shorter than this. And these are the 2 attachments for the phone. I haven’t had a moment to try them out, but I will report on them when I get a little time.
The other thing I bought was a stand that sticks out. It came with a light ring like the one above. The two gadgets above will stick screw onto it. This is the one I have the highest hope for. The angle is adjustable
Next are some things I picked up last weekend at a local village’s community garage sale. We only get to go to one garage sale a year. It’s the only one on before we start at the Farmers Market this Saturday. https://barrhavenfarmersmarket.com/
I only got a few things. First, I got a small hair straightener. That might seem strange as I have long, very straight hair, but I got it for ironing inside a book resist vessel. More on that when I try it out.
Next are some mini hanging Shapes. I’m not sure what you call them. I thought they would look nice with little felt plants in them, or I could make tiny pods and place them over the candles that came with them. They are about 4 inches/10 cm tall
Lastly, I picked up the long roll of interesting fibre. It is probably nylon. I will have to see if it will dye.
Now onto flowers. My apple tree is starting to flower, and the lilacs will be along soon.
And here are all the kinds of violets I have
white
speckled
purple middle
1/2 and 1/2
purple
And finally, what you have been waiting for, more lambs
And proud popa, Storm. Really, what he is wondering is why I don’t have treats.
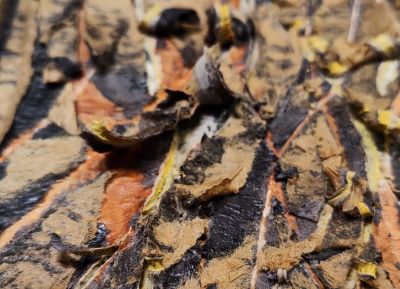
My local group had another “play” day and we created some layered paper experiments. We got the idea from this video. I immediately thought it would give a good texture for representing bark and we decided to give it a try.
It’s a really easy process. Start with a background paper and then add layers of string and thin paper with matte medium glueing them together. By using different values and colors of paper, you can get an interesting look. We used painted tissue paper that we already had in our stash.
You can put as many layers as you would like but remember to leave the strings coming out the edges so that you can pull them once everything is dry. You also need to try and figure out what strings are the top layers and pull each layer of your strings as you work down. Use different thicknesses of string and thread and it gives different looks once the strings are pulled out.
Here’s one of mine when it was finished and drying.
And here are both of mine once dried completely. It took about 24 hours to dry completely.
Then you gently tear the strings out or rip them out. It helps to hold the paper around the string as you go so you don’t pull off too much paper. But you can’t really control what tears so it is very organic looking when you’re finished.
Here’s one of the results that Louise achieved.
Paula was very productive and took her photos with a matte around the pieces.
Here are my two pieces. I left the curly bits and they are quite textured.
You can see how textured with this close up angled photo. This was a fun process and gave interesting results. Now I have a few more pieces to add to my book.


 1.1) CanGames (and Felting) Convention at the Ridea Curling club, CanGames info booklet, strangely the felting component was not mention again this year.
 1.2) overlooking 4 boxes of games for the second hand game sale and looking into the curling rink full of tables ready for gaming.
 2.1) The armature and core wool from world of wool and Adding the under layer to the armature. Used Tacky fabric glue for tips of fingers
 2.2) I am happy how the right hand is coming along.
 2.3) this is not the usual anatomically expected number of fingers!!
 2.4) Ok I think I need to recount those fingers.
 2.5) all better now! 2 hands, the same number of fingers. I think he is checking I got it right this time.
 2.6) Ok now I have that fixed let’s take a quick look around. I am in the back corner between the open gaming tables and one of the venders.
 3.1) the booth behind where I was working “3dbatch”, had 3-D printed items.
 3.2) the 2 little blue dragons cot my eye. Someone was looking at one when I left for a moment but both were gone when I came back. Glenn was there and I told him of my disappointment, luckily they seem to have found a new home in my bag of maple candies and one seems to like the taste of hand spun yarn. There were bigger ones on display at the booth too. (They might have wanted to eat the whole wheel!)
 3.3) The detail in these dungeon areas fascinated me.
 4.1) Lets take a quick look around the curling rink, there is more gaming happening in the basement, the loby and upstairs. (I did not make it upstairs or to the basement)
 4.1) And they are off!! Look out for the first corner!!!!
 4.3) there were still tables open but there had been a few cancellations of games and it was early on Friday night (the convention had started at 2pm). Saturday will be the busiest day.
 4.4) the Chariot races
 5.) at the end of Friday I had had the beginning of an under-structure but lots more to do. (his head is too thin, have to add more biceps…..)


 1.1-1.3) the Mer Family and Pets having fun while out at the Museum, Mr. Mer trying to get someone to play Tennis with him, Mrs. Mer is admiring her new hair, Shark boy playing with the pets Miss Manta and Sharkette.
 2) Sturgeon, there are lots of types, and I would need to do more research to figure out which is which. The pattering is intriguing but very specific.
 3.1) Qalupauk, who steel children who play too close to the water.
 3.2) Sedna the Sea Goddess
 4.2) orca, strong graphic patterning and it would be fun to integrate fish and body parts together.
 4.3) walrus, ooh this might be fun, integrating shapes, but I am pretty sure that this is not a fish.


