Browsed by
Month: May 2014

A Sneak Peak at Surface Design Class Samples

A Sneak Peak at Surface Design Class Samples

I’ve been talking about Fiona Duthie’s Surface Design Online Class for months.  Ruth Lane first announced a class giveaway on February 19 on the Felt and Fiber Studio Forum.  I entered, but didn’t win.  However, I signed up immediately after learning I didn’t win because I was intrigued by what the class had to offer.  The class was a big commitment for me — six weeks long and more than 21 different techniques to learn plus a final project.

Over the following few weeks, I found I wasn’t the only one from the Forum to sign up. Cathy (Luvswool) and a few other members also registered.  Since Cathy and I live in the Chicago area, we started excitedly messaging about our preparations, supplies, resources and after the class started our plans and progress.

Part of the class agreement was not to share Fiona’s techniques because this is how she makes her living, but we are free to share our class work.  So, today Cathy and I are sharing several of our favorite samples.

I had never taken an online course so this was a totally new experience for me.  However, Cathy has taught online, but I think we both agree this was a unique experience.

Here are Cathy’s favorites:

Cathy’s Wool Breed Inclusions


Cathy's Pockets and Loops
Cathy’s Pockets and Loops
Cathy's Spikes
Cathy’s Spikes


Cathy's Nui Shibori
Cathy’s Nui Shibori

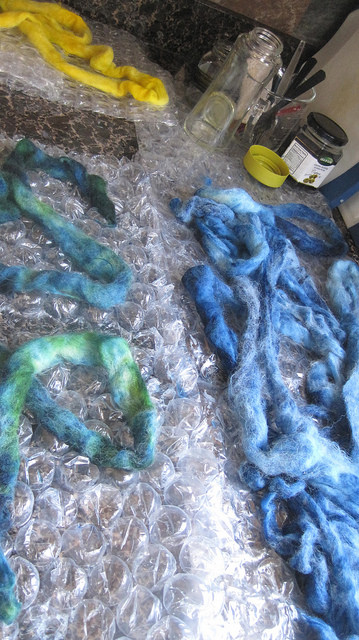
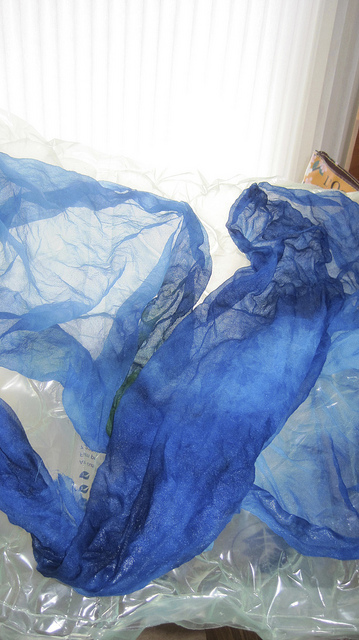
Now a few of my favorite samples:

Marilyn's Carvings
Marilyn’s Carvings
sdo 5 anemones
Marilyn’s Anemones
Marilyn's Tiles
Marilyn’s Tiles
SDO 4 spikes flower
Marilyn’s Spikes and Iris

Since I’m always looking for functionality, I chose to use the spikes above as ring holders in case you’re wondering why there is jewelry hanging around.

These are just some of the wonderful techniques we learned during the class.  It was a great experience doing the assignments then seeing the different interpretations of the techniques by other students on our weekly discussion site.

For more information on Fiona’s workshops check out her website http://www.fionaduthie.com/

Of course, I couldn’t complete the course without including a panda and bamboo in a sample (which are not felted, just the background.)

Marilyn aka Pandagirl's Loops and Pockets
Marilyn aka Pandagirl’s Loops and Pockets

Thanks to Cathy for sharing her work today. Anyone else who is taking the class, please contact me if you’d like to share your samples or post them on the Felt and Fiber Studio Forum.

What new techniques have you learned lately?


Meet The Supplier and a Giveaway

Meet The Supplier and a Giveaway

Meet the Supplier

Banner
Fibre 3, 2, 1

Q-3 Three types of fibre you can’t live without?
Angelina fibres, I did not think I would like this fibre until I started using it and now love the bit of sparkle it adds. Also merino pre felt, and wool tops, especially dyed merino.

Q-2 Two tools you use all the time?
Twisted felting needles because they felt evenly throughout your piece and leave a smoother finished surface. The other tool has to be my Janome sewing machine, I love to be able to make practical but beautiful things like blinds and bags with cotton and linen fabrics.

Q-1 One fibre art technique you love the most?
Wet felting, both pictures and 3D forms. I enjoy the creating, and rinsing off the soap to see the final piece is great. Even if it’s not quite how you expected there is always something a little bit lovely about what has been made.

PrefeltB
General Questions

What is your business?
heidifeathers is an online felting supplies business

What kind of items do you sell?
We sell wool bundle mixes, needle felting kits, wet felting kits and drop spinning kits, pre felt bundles, nepps, glass eyes, felting needles, dyes, dyed tussah and mulberry silk fibres, scarves, angelina fibres and other felting tools, basically we are a one stop shop for felting.

mulberry tops 3What do you think makes your business different from similar ones?
We offer lots of colour! Lots of mixed items such as wool bundles, silk bundles, and pre felt bundles, giving you variety so you don’t have to choose. We stock a lot of felting related fibres, tools (including an extensive range of felting needles). We offer all the supplies you need so you can experiment with felting. We care about the customer and are always willing to offer help and also care about stocking good quality items.

merino playful2What can you make with your kits?
Our kits all come with instruction. The needle felting kits come with a 24 page booklet with 6 projects and wool for plenty more. The wet felting kit has 3 projects and some other basic information about wet felting, again there is wool for lots of other ideas and we include a template and instruction for making a purse. The spinning kits explain how to spin wool tops in to two ply yarn using a drop spindle.

kit2Where are you located?
We are an online business based in the Cotswolds

Where can we find you on the internet?
www.heidifeathers.com, also on etsy at www.etsy.com/uk/shop/sweetgorgeousthings  and ebay http://stores.ebay.co.uk/heidifeathers

GIVEAWAY:
Heidi Feathers is offering a very generous prize for a giveaway. Because of the size and subsequent postage costs, this giveaway is only available for postage within the UK. That doesn’t mean you have to live in the UK to enter though, feel free to enter as long as the recipient is in the UK 🙂

giveaway Kit2 The prize is a complete Wet Felting Kit. Zoe from Heidi Feathers says “The kit is a high quality wet felting kit which is fun and easy to use for any age, with everything you need to start wet felting (besides warm water)” The kit contains: 200g of the finest soft merino tops (21 Micron) in 20 beautiful colours including pinks, blues, greens, orange, yellow, greys, browns, purples, reds, black and white; one large piece of bubble wrap; one large piece of voile; one light weight rolling pin; one small cloth; one block of pure olive oil soap, and one bamboo rolling mat 45cm x 30. It also includes a 3D re-useable template for making a purse and instructions for three felting projects to make:  A bead, a picture and a purse.

All you have to do to enter, is leave a comment to this post. Check back on Thursday 5th June for the winner to be announced, and please leave a comment on the announcement post so your details can be passed on to Zoe.

Thanks a lot to Heidi Feathers for answering our questions and for the very generous giveaway 🙂 Please have a look at the sites and the great variety of products.

Trying Commercial Prefelt

Trying Commercial Prefelt

A couple of weeks ago, Zoe from Heidi Feathers kindly sent me some prefelt samples to try out. I don’t have a massive amount of experience with prefelt, I’ve made my own a few times for specific projects, and have tried a couple of thicknesses of plain white Merino prefelt as a base for a few things. We’ve talked about commercial prefelt on the forum a few times, wondering things like whether it keeps its shape well, is it thick enough to use for surface design, etc. I had no idea so I was looking forward to trying it out.
For the first piece I made, I used a couple of layers of Merino tops, then did a very basic ‘weave’ using strips of prefelt, silk  and cotton gauze:

OLYMPUS DIGITAL CAMERAI didn’t do anything to the prefelt pieces, just laid them out. As you can see, the silk didn’t attach to the prefelt in a couple of places because it is quite firm and there aren’t any visible loose fibres.

OLYMPUS DIGITAL CAMERAIn my opinion this is definitely a good thing, I’d much prefer a prefelt to be firm with definition, and when using with fabrics which might not attach easily, you can rough up the prefelt where you need it, using an old toothbrush or wire dog brush. For the next piece I tried out, I used the same ‘mirror’ idea from the Studio Challenge and repeated patterns either side of an imaginary line across the centre of the piece. I started with two layers of Merino for this too, then just cut a variety of oblongs, triangles and squares in matching pairs and added them to the top in a random reflective design.

OLYMPUS DIGITAL CAMERAI really liked the way this turned out. It gave me confidence that a more complicated pattern would work well, keep the defined edges and shapes without distorting.

OLYMPUS DIGITAL CAMERAThe last piece I tried was just a little test using some scrap pieces. Left to right: Some geometric shapes; a piece that I rolled between wet hands; a piece I dampened slightly and coiled; a piece I twisted with some Merino top; a piece I twisted on its own; some very thin off cuts I laid out or twisted and another prefelt/Merino top twist.

OLYMPUS DIGITAL CAMERAI took this on an angle so you can see  there is some thickness to the shapes while still firmly attached.

OLYMPUS DIGITAL CAMERAThanks a lot to Heidi Feathers for the prefelt, who are also doing a generous giveaway and a Meet The Supplier in a couple of days, so please check back on the 28th for that 🙂

Around the Felting Studio and Farm this Week

Around the Felting Studio and Farm this Week

Not a lot of felting itself going on this week but I have been busy. Like everyone else I never have enough storage space in my studio so I painted up all the peices and hubby and son put a new shelving unit together for me. I started to put sort and put things on it already but more needs to be done.

shelf

I am teaching at a multi guild gathering today. We call it Distaff day and for a small fee you get two 2 hour classes, lunch, vendors and lots of chatting with like minded people. I am teaching nuno felt bracelets and taking hookers necklace. I will have pictures of the day in a later post.

stuff for class

I washed some old fleeces I found stashed away and salvaged a small amount of curls I will cut from the  matted back. I don’t know where I got these but they would have been free. They don’t look bad in the pictures but they were in rough shape.

washed wool

I received a raw flees I ordered for a hat project that you will get to see when it’s done.  I was down to picking between 2 fleeces and in the end picked this one because I liked the sheep’s name. The fleece is very curly. I love the smell of raw wool.

wiki fleece

Lastly around the farm: the chickens and turkeys arrived. The Black chickens are egg layers and the yellows are meat birds.

chickens 2 chickens 1

The turkeys are at the ugly stage

turkeys 2

Second Quarter Challenge – Barbarous Elly

Second Quarter Challenge – Barbarous Elly

The artist chosen by Ann for the 2nd Quarter Challenge as you all know by now is Stewart Stephenson. I had not discovered this artist before and he certainly has a wide array of styles although most are pretty abstract. It took me a while to find a piece that inspired me as I wanted to try some different screen printing techniques on felt in creating my challenge piece. Then “Barbarous Elly” caught my eye. I’m not sure about the name but I immediately thought of a way to recreate this piece with screen printing. Plus it had circles in it and since I just finished up a lot of circles work with my recent online class, it was appealing.

Barbarous Elly by Stewart Stephenson

My original thought was to make a couple of book covers from the finished piece of felt. I’m not sure about that at this point though.

MINOLTA DIGITAL CAMERA

I laid out red-orange wool in a subtle gradation. I added blue silk noil to the surface.

MINOLTA DIGITAL CAMERA

This is the piece after felting. Can you see the gradation of color from left to right? Lighter orange to darker red-orange. I didn’t want a big change, just a slight one.

MINOLTA DIGITAL CAMERA

This is a little better color representation of the silk. It’s blue tending toward purple.

MINOLTA DIGITAL CAMERA

Then I silk screened a very dark blue-green dye on to the felt.

MINOLTA DIGITAL CAMERA

And here’s the finished piece. The dye changed the color of the silk noil so it stands out very nicely adding the blue-green color I wanted.

MINOLTA DIGITAL CAMERA

Here’s a closer view. I really like the result and like Zed and her challenge piece, I’m not sure I can cut it up. It may have to be a wall hanging. I have considered if I should add more to this piece, like stitching or even beading, but for now, I’m leaving it as is. It’s not quite as dramatic as the original painting but it will do. So now to come up with a name, what do you think?

Evaluate Your Marketing Plan

Evaluate Your Marketing Plan

In our last marketing blog, I used the Felt and Fiber Studio Forum as an example for determining marketing goals towards developing a marketing plan.  We discovered the who, what, why, where, how, and when for the plan creating a road map for our plan.

photo 3Now it is time to evaluate our plan and see if it meets our needs in terms of our goals. However, before we do that we need to take a look at what is working and what is not.

If your business is humming along just fine, you may wonder if this is really necessary.  There is no one right answer.  If you are satisfied with how much you’re selling and the way you are marketing and selling, it’s probably not necessary.  But what if you want to expand your market?  Make more money?  Diversify your offerings?

woman shopping

If you were running a restaurant and sales were down, customer complaints up, low tips for staff and few return customers, you’d have a good idea something wasn’t working.

However, in the internet world of marketing for arts and crafts, you don’t have the luxury of easy or obvious measurements of what is working.  At a craft or art fair, you can see your competition, compare pricing and quality first hand.  It’s easier to see how your products differ on the spot and ask customers what they think.

survey_clipartIn our Marketing Strategy for the Felt and Fiber Studio Forum the Driving Action for the goals of the Forum is participation.  So, in order to determine how we are doing since we can’t meet face to face, we are asking our members (and blog subscribers) to take a simple ten question Membership Survey so we can evaluate our plan.

What do we want to know?  We want to make sure we are serving the needs of our online community in a friendly, giving and nonjudgmental way.

Please use this link:

https://www.surveymonkey.com/s/RX2XM9W

There will also be a link on the Forum under the Business section.  Please only fill out one survey.  We will not collect any personal information.

keyboard

I realize some of the people that read the blog, may not be Forum members.  So, if you would like to take the survey, please answer the questions applicable and put in the comment section of question number 8 that you are are a blog subscriber.  If you read the blog on a reader, please mention that in the same section.

dog and computerThe survey will be available for a week.  I will publish the results after I have collected and analyzed the data.

Please feel free to leave any comments here or on the forum.  We’re always interested to know how we are doing and what more we can do to help you.

Thank you for taking a few minutes of your time to participate!


2014 2nd Quarter Challenge

2014 2nd Quarter Challenge

At the beginning of last month, Ann posted her 2nd Quarter Studio Challenge, the work of artist Stewart Stephenson. His work is very diverse, and I must admit I prefer his more abstract works, maybe because they are similar in style to my own oils and acrylics. I played it ‘safe’ with the first piece I made for this challenge, using one of his ‘sass’ flower paintings: Sassy Wildflowers:

sassy wildflowersI drew myself a little sketch, marked down which colours to use where, then laid out the wool. I did a similar thing for both pieces and the colours were quite a bit off! This is before felting:

OLYMPUS DIGITAL CAMERAAnd this is what it looked like after felting:

OLYMPUS DIGITAL CAMERAThe other Stewart Stephenson pieces I quite like are his mixed media ‘line’ pieces. I’m not sure which mediums are used, some look to be just paint, some seem to be digital images or at least digitally altered. They all seem to be based on the idea of having a centre and working out from there. The one I mostly used for reference was ‘Line Up Now’.

lineup nowAgain, my colours were a bit off, and also his works don’t appear to be mirror images, but I liked the idea of that, so that’s how I did mine. This is a close up of one part before felting:

OLYMPUS DIGITAL CAMERAMy girlfriend suggested I use some very dark blues and black on it, to give it more depth, so just before felting, I added those colours. This is what it looked like after felting.

OLYMPUS DIGITAL CAMERAI really like the way both pieces came out. I made them of a size big enough to make notebook covers, but I think they’ll stay as they are 🙂 We’ll be adding the entries to the Challenge Galleries, so if you’d like to be included just let us know. We also have a post on the forum where you can see other entries too.

A Felt Beret

A Felt Beret

The other week I decided to make a beret to see if I remembered how as I haven’t made one in years.  They seem to be making a bit of a comeback where I live.

I decided on a nice bright red

side one first side wet

I added some white throwsters waste for some interest

silk on beret silk on beret close up

After some rubbing and rolling I cut a small hole to get the resist out and to make a hole for my head.

cut out for head

The whole stretches easily to the correct size

fulling and stretching the head hole beret finnished

As it turns out a little bigger ( not much) would have been better it is a size small so tight on my head.  I stretched it as much as I could.   Just as well as I do not look good in a beret. I could make it bigger by cutting and adding sewn on brim but I am lazy.

finished beret 1 finished beret 2

I really like how the silk worked. It is quite big but I was thinking the you could put your hair inside it.


Dyeing Fabric and Fibres – Guest Post

Dyeing Fabric and Fibres – Guest Post

Today we have another guest post from Cathy Wycliff (luvswool) who has recently been experimenting with different dyes.

***

Dyeing is one of the popular topics on the Felt & Fiber Forum, but I admit I was very reluctant to give it a try.  I read about the chemicals involved, the need for rubber gloves and a face mask, and I admit that scared me away.  But after I ordered 10 pounds of white wool (Domestic 56s), I realized I needed to do something, so–being the chicken that I am when it concerns “dangerous chemicals,” I opted for food colors, which are non-toxic and “easy to use.”  The Wilson icing gels I used met both of those criteria, so I happily dyed my wool in the microwave.  However, once I started wet-felting with the wool, I realized the colors bleed, even though I had followed the instructions (vinegar rinse).
That’s what led me to acid dyes, as I witnessed the beautiful results Forum members achieved through their use of acid dyes.  I went ahead and ordered Dharma yellow and blue (figuring I could make my own green), and began my dyeing journey.  I gathered my materials using Ruth Lane’s book “Complete Photo Guide to Felting,” even though Dharma offers instructions on their website.  I just do better with photos. Not pictured are the rubber gloves and mask I wore throughout the process.

5549Preparing to dye, I soaked the wool and silk according to the instructions.

5550While the wool was soaking I laid out the plastic as protection for my kitchen countertops.

5551I mixed the acid dyes according to Dharma instructions on the labels, double-checking with Ruth’s instructions.  I used glass jars, which are fine, but I have since ordered those squirt bottles for easier and more direct application of the liquid dyes.

5554 Here you see the wet wool and silk, ready to be dyed and steamed.

5555I poured the dyes on the wool and silk, first batch, and then repeated for two other colors, mixing the blue and yellow to make green).

5556Each different color of wool was wrapped separately in plastic wrap and stacked in a stainless steel vegetable steamer. Here you see my designated stainless steel large pot, never to be used again for pasta!  I put in an inch of water in the pot and covered.

5557I steamed according to instructions, used a soaking solution again …

5559… and rinsed well — and there you see my first packet of wool (green) laid out on plastic to cool.

5561bI continued the process with the blue and yellow packets of wool.

5563bHere you see all of the dyed, wet wool laid out to dry.

5564Here you see the beautiful blue habotai silk scarf stretched to dry…

5569… and the larger green silk habotai shawl as well.

5570bI now have a good supply of green, blue and yellow standard wool roving and pencil roving, along with a couple of silk pieces ready to be nuno-felted.  Would I do this again?  Absolutely!
Just received my new colors of Dharma dyes, ready to go again!

Visit to Waldron Grove Alpaca Farm

Visit to Waldron Grove Alpaca Farm

Last weekend, I took a little ride to the Waldron Grove Alpaca Farm in Campton Hills, Illinois for their annual Open House and Art Sale. The two day event featured their 30 Suri alpacas and an array of handmade items for sale and demonstrations by five featured artists.

alpaca farm

The farm is owned by Susan and Ron Waldron since 2003.  Susan is an oil painter and felter.  She combines needle and wet felting using her Suri Alpaca fleece exclusively for her designs.  She and Ron also specialize in alpaca farm start ups.

The alpacas are a little shy so they kept to themselves, but it was fun watching them in the field.  Susan had two wonderful weather days for the event.  (Lately, our weather has been very iffy.) A little windy but sunny and warm.

The garage was filled with wonderful art pieces for sale.  While I was there I was able to watch a spinning and drop spindle demonstration by Laurie McGee who is a dyer, spinner, weaver and knitter.  She also makes custom yarn, hand combed tops and gives spinning lessons.

Laurie spinningLaurie w


Laurie 1

There were many of Susan’s oil paintings, tapestries, silk scarves, shawls, silk coverups and clothing beautifully displayed around the area.  She also sells alpaca needle felting kits featuring alpacas, irises, and other flowers. You can learn more about Waldron Grove at www.susanwaldronart.com

                            more scarves shawl on rack scarves


felt kits          clothes rack

LuAnn Toborg and Anita Riemer were manning the cash register while I was there and I had an opportunity to talk to both of them.

LuAnn specializes in hand dyeing yarn with natural plants, berries and flowers.

Lu AnnLaurie

Anita creates dyed yarn with acid dyes and makes cowls, scarves, hats, felted wallets, jewelry and baby blankets.

Anita

While I was there, Susan demonstrated needle felting and hand carding for her guests. She’s modeling a wool jacket she embellished with alpaca.

susan demo

Of course, I bought some alpaca to play with.  I also arranged to come back to take a lesson on using the needle felting machine.

It was a fun afternoon talking with fellow felters and artists and perusing all the wonderful works of art available for sale.

What special events have you attended recently?  Remember, if you have a project or event you’d like to blog about, please contact one of the moderators and let us know.