Browsed by
Tag: needle felting machine

First Quarter Tree Finished and I Got Mail.

First Quarter Tree Finished and I Got Mail.

After some final fiddling with the width of the trunk and shadow and adding a little red bird for interest, I decided I am done with the winter tree.

Next is spring so I have to figure out what kind of tree I made. I wasn’t thinking of a particular tree when I started the experiment in making a tree. Here is the original tree experiment post. https://feltingandfiberstudio.com/2023/02/22/an-experiment-thinking-about-the-year-long-challenge/  After doing some picture searches I think it is most like an Oak tree. The other option was a Maple but the bark on a Maple is quite grey and Oaks have much more brown and textured bark. Naturally, neither of these makes the kind of flowers that pop into your head when you say tree in bloom. They make droopy green (sometimes red) tassels. Maples make maple keys and Oaks make acorns.  What kind of tree do you think it is?  I may decide it is a fantasy tree so I can make blossoms anyway. What do you think?


The other exciting thing Jan told you about too. I got my Package from Georgia (Russian Federation whether they like it or not).

Here are some unboxing pictures.


I was surprised it was all assembled. Jan had some assembly required with hers. The other fun thing is it is purple and has a cute little bee. It has 4 what look to be size 36 felting needles in it. It holds 4 of them.

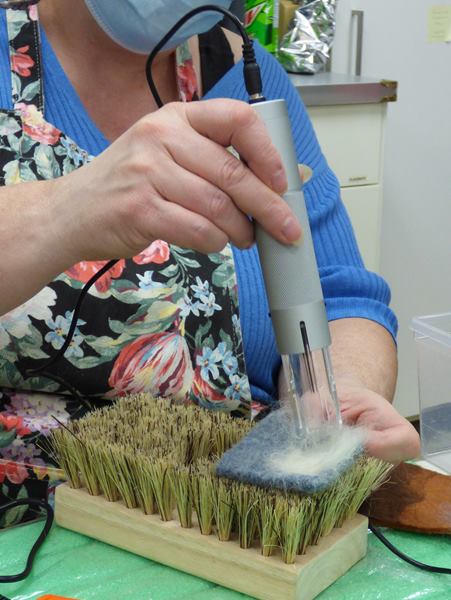
Purple and a bee are all very well but how does it work? It took a little experimenting on how where to hold the machine in relation to the felt surface to get the best felting. It worked well but it is hard to engage all the barbs on such a long course needle. We decided to switch out my big needles for one of the smaller crown needles. This also helps with a comparison of Jan’s machine to mine as hers only holds one.  I like it. It is bigger than Jan’s and I like hers too.  I like the Chinese one the least. A lot of that is the way you hold it. It is a much slower machine and we all know that patience is not one of my stronger qualities. One thing I would recommend is that you get an awl or sewing stiletto or something similar to use to hold new fibres down so you are not getting your finger so close to the machine. Unless you have long talons like Jan for doing such things.


In this last picture, you can see how much ( the white fibres) gets punched through when you fully engage all the barbs of the large 36 triangle needles and how big the holes are even when you only engage the first barbs( yellow fibres).

You will get to hear about the rest of the testing later. Jan is making a chart and doing some analyzing of data. Better her than me. 🙂

First Tests of Ann’s and Jan’s New Felting Machines Part 3

First Tests of Ann’s and Jan’s New Felting Machines Part 3

Part 3:

This will be a “short post” since we have had a third machine to add to our investigation (which I hope will continue on next Monday).  Ann has received a package from Georgia, hopefully containing the Solar Bee she ordered. It is vary similar to the design of handle and motor placement of the Orange fly but instead of a single needle it can have up to 4 needles. We will let you know what we find out about it soon.

The continuing investigation into the first 2 electric felting machines (China and Ukraine)

A quick look at trying detail work on pre-felt:

I tried fine detail work on pre-felt with merino, first with the Orange Fly (Ukraine). I did not have trouble working along the edge of main branches but found that it felted much faster than I am use to. the increased speed of felting is especially noticeable when we tried felting the tiny branches. Although it worked well, I did not feel as confident in my control of wool moving, I suspect I just need more practice.

1- dry felting on dry pre-felt. creem prefelt, black winter bare tree, orange fly needle felting machene on foam mat with a cuple needles and a bit of black merino wool 1- dry felting on dry pre-felt.

Next I wanted to try a piece of pre-felt that had been wet felted by Ann. This was one of her tree prototypes that she did not use as her finished tree.

2-3 pre-felt with one of Ann’s wet felting tree tries. - During wet felting. 2-3 pre-felt with one of Ann’s wet felting tree tries.2-3 pre-felt with one of Ann’s wet felting tree tries.

   4-6  I wanted to try adding little cardinals (red birds) to the tree. adding red dots to tree branches to indicate cardnels (red birds) black tree branches on prefet with red dots, adding a bit more fiber suddenly got a lot bigger dot. 4-6  I wanted to try adding little cardinals (red birds) to the tree.

I found that the machine grabbed the fiber and pushed it with enthusiasm into the pre-felt. A bit more than I had expected.  Again I think more practice would improve the bird-ish-ness of my red blobs!

back of prefelt showing red wool penitration 7 the back of the pre-felt showing the red fibers pushed to the back.

 I also tried on the orange Fly on 2 more wet felted bases with good results and not as good results.

Our next test base was a felt Ann had made in two colours of brown.

It was about the thickness for a wet felted hat but could be a good surface for a picture.

The single needle of the orange fly did not have trouble embedding fiber into the felt.

adding blue fiber to solid wet felted wool on a wool pad back of wet felted wool pad showing penitration of fiber. adding blue fiber to solid wet felted wool on a wool pad adding blue fiber to solid wet felted wool on a wool pad. using orange felting machine on an angle.8-11 working on solid wool felt.

I found that I felt more fiber movement when I angled the needle insertion. This would allow more barbs to engage fiber without having to imbed the needle into the wool felting mat.  (Angling the needle reduces the depth of insertion while still allowing more barbs to grab and entangle fiber.)

Having only one needle should be slower when laying in a general background colour. But, it is still quite quick, and there was no stress on my wrists, fingers, elbow or shoulder.  Ann and I should try a race between the felting machines vs. the 10 needle bar tool, which I find very fast for laying in backgrounds. But speed is not the only factor that the machines address.

We also considered the mettle machine from china. As you remember the mettle machine did not like most of the felting surfaces as much as the orange fly did. We used the fake clover brush (driveway asphalt painting bush from the hardware store) which is what seemed to be its favorite surface so far in our investigations.

mettle machine felting into wet felted wool on bristal brush 12 Mettle machine felting into wet felted wool on the driveway brush

Wet felted (Fulled) knitting as a felting surface.

Ann had fulled a piece of knit sweater and brought a piece to try felting into. the orange fly did transfer the white fiber through the knitting successfully but it was a bit more resistant than the firm felt.  (It is quite firmly fulled knitting.)

felting into fulled knitting on wool pad back of fulled sweater showing wool penitration 13-14 Orange Fly felting fulled wool knitting on a wool pad

Next I tried the mettle machine on the same surface. I noticed one of the screws loosening so stopped and tightened it. I suspect that you may want to check all the screws occasionally just so you do not lose one.

  15 mettle machine felting into fulled sweater on wool mat, 16 one of the tiny screws had started to loosen.15-16  mettle machine felting into fulled sweater on wool mat, one of the tiny screws had started to loosen.

There is less resistance when using the driveway brush  as a work pad but there was still the most resistance when we were felting on the fulled sweeter. Running with 2 needles was also less resistance than running the machine with 4.

  17-19 checking work angle and comfort holding mettle machine

I again tried holding the machine vertically and on an angle.  Both were comfortable to hold and there was less vibration/resistance when using the brush with this machine.

I have been making a chart for the 3 machines so next we will investigate the machine from Georgia and fill in the rest of the chart. We will open the package and put it through its paces next Monday (which is a holiday) and hope to have some test results ready for the next blog post!

For working on wet felting the orange fly seems to be a bit more enthusiastic towards embedding fiber into the felt/fulled 2D picture ground .  I will not give up on the mettle machine, I suspect we have not found its forte yet. I want to look further at 3-D sculpture. i am a bit concerned with the machines hitting armature wires (I may have to find some safety goggles before I try that!)

Until we can find out what’s in Ann’s mysterious package, Have fun and keep felting!

20 the mysterious package arrives at Ann’s

Machine Needle Felting a Wool Collage

Machine Needle Felting a Wool Collage

I have begun another class at the Gail Harker Creative Studies Center in LaConner, WA. The class is Advanced Experimental Stitch 301 and lasts for two years. Our first session was all about color, dyeing and then creating different fabric collages in a variety of color schemes. If you want to follow all of my progress and homework, you can take a look at my Permutations in Fiber site.

I decided I wanted to try a few of the color schemes in felt. I could use up some printed felt that were samples from my online courses and also use my Janome needle felting machine that has been languishing in a corner of my studio for years. A win-win!

I started out with a dark violet background and then cut out two partial printed leaf shapes and three circles from orange printed felt. The color scheme is violet, orange and green. It is hard to see the violet and green since they are both such dark values.

First I had to unearth my needle felting machine buried under a ton of stuff. I should have taken a photo of the buried machine but didn’t think of that in time. I began by felting in the two leaves. Since everything was felt, the machine handled it very well. The only issue is the edges get a little wonky and you need to start from the outside edge and work in. The felt leaf shrinks as you go and will get all bunched up if you try to needle felt down the outside edges first.

Here is the end result. The photo on the left shows the front side. Because the felt is printed, it is white underneath and I didn’t like the white showing through so much. I turned it over (middle photo), and liked the back side much better. But still a little too much white. What to do? I have no problem with mixing medias so I found an orange and green Sharpie and just added a little ink to the wool to get the colors the way I wanted them (right photo).

On to adding a little hand stitching with hand dyed thread. I had originally planned to do chain stitch and cover the green and orange completely with chain stitch as a filling stitch. But then I decided I like the colors of the mottled orange and green. So I stuck with just outlining. For the leaves I used stem stitch. I could add some veining in the leaves but decided to leave it as is for now. It’s not a color scheme I use all that often but I like it. Do you try different color schemes? Or do you stick with your favorite colors?


Is it Really Unfeltable?

Is it Really Unfeltable?

A while back I had purchased a bunch of scarves from thrift shops and some sample fabrics from the fabric store.  All passed the “breath test” but some did not felt when I did samples.  I wrote about it here:

https://feltingandfiberstudio.com/2016/01/20/to-sample-or-not-to-sample/

Since we have been going thru our UFOs for the last quarter challenge, I came across these samples again and decided to try something different and use my Simplicity Needle Felting machine which sits idle because I’ve never got a handle on how to use it.

So I took the three felted samples I thought would felt and didn’t and ran them through the needle felting machine with all 12 needles.  As you can see on the gold piece moving the machine back and forth created a shirring pattern.  But that particular piece the the fabric is so stiff it made for a very spiky texture on both the front and back.

20160608_161526 20160627_14221720160627_142232


Here are the backs:

20160608_161549


The flower scarf was the one I thought sure would wet felt. After the needle felting, it was a little stiff, but not as bad as the gold.  The green sparkly piece was also a little stiff but only on the top.

Since they were already wet felted. I tried another sample on prefelt of each of them. I also tried using hand felting, the needles just bounced off the fabrics. So, back to the machine. Then I wet felted it.

20160627_142243

20160627_142259 20160627_142306

20160627_142254

It was still very coarse on the gold organza, but the other two were fine.  I still wasn’t satisfied because it seemed like 12 needles was overkill. So, I took out six of them and tried again on another prefelt then wet felting it afterward.

20160622_144941

Here are some closeups:

20160710_202140 20160710_202125 20160710_202117

I guess the bottom line is that if you really want to felt something, there are ways to do it.  However, the “hand” of the fabric may be more important for the final project than just being able to felt it. I suppose I could have used a coarser fiber, but for nuno I think softer (merino) is better.  After all you don’t really want to shave nuno felt.

I’ve found that sampling is definitely worth the time especially with the unknown.  What has your experience been?  Have you used a needle felting machine?  What is your experience?

Just a note:  Rosiepink, Lyn and Annie are having a give away of three copies of their revised pdf “Creating Felt Art.”  Their information is always organized and they give wonderful examples, photos and step by step instructions.  You can enter to win and get more information here:

http://rosiepink.typepad.co.uk/

Good luck!


Felted Cityscape

Felted Cityscape

I was asked about my cityscape in gallery so  I thought I would tell you about it. I made it about 3 years ago so there are no pictures of it going together .  The base is wet felted. There are 2 layers of merino, then a layer of cotton gauze and then 2 more layers of merino. I added the cotton gauze to make sure it wouldn’t sag when the temperature and humidity goes up.  I do live in Canada and although many people think its cold here all the time the summer temperature gos up above 85 frequently and we get high humidity to go with it.  I also wet felted several rectangles in diferant colours for the buildings and the windows. To put it together I used a little feltcraft needle felting machine.

small feltcraft needlfelting machine.

I placed all the buildings on the background and then tacked them in place by hand. Just a few quick jabs to keep them where I wanted them. I then went over all over them thoroughly with the little machine. I only broke a few needles.

I put the windows in with a single  needle first. I was afraid they would disappear if the corners were not well anchored.  Then went over them again with the machine.  The moon and the haze around it where put in the same way.  The stars are pearl beads, hand stitched to the background . Originally I wanted to sell this one so I made a smaller one to keep. I ended up keeping them both. I never did  offer it for sale. The moon in the smaller picture isn’t actually blue. the felt I used to make it was quite thin and the black showing through it makes it look blueish.

wet and machine felted aprox 20×15
wet and machine felted picture aprox 10×10
%d bloggers like this: