Just Playin’
The last twelve months have, as my Irish granny would have said ‘put manners on me’. Cataracts, which were a ‘by the way’ diagnoses in my late 40s finally and quickly caught up with me. Eight increments of sight deterioration over a three month period! No more night driving, reading became a challenge and my creative curiosity disappeared. And so, the waiting game began. I am currently recovering from surgery on eye number 2. What a difference it has made and while it will be some time before I get my new glasses, I can function without them for the first time ever! Also, life in all its facets is so beautifully colourful.
So why do I mention it in my post. It feels awkward mentioning it as I am a very private person. Awkward, but necessary. Many of us go through times in life where we lose our creative mojo. Initially, I found myself angst ridden and questioning my abilities. The feeling never really went away but I had to find a way to go with the flow and tap away at bits and pieces for a while.
So now that the eyes are fixed I have started playing. Nothing too serious (well except for my last piece but more of that later). I am now a week and a half after the operation and here is what I have made over the past week.
Sample 1:
First up, a bit of a back story. I have committed to a felt swap later in the year. The theme is brooches so I thought I should start thinking about this. I used to like felting with basic resist shapes and distorting them so I thought this might be a starting point for this experiment.
First of all, I cut a 15cm square resist and rounded the corners. Then I covered both sides of the resist in eight thin layers. I started and finished with a rich orange colour and sandwiched in between were two layers of mustard and two layers of green. I used 16 micron merino which I purchased from Leiko Uchiyama https://www.leikofelt.com/merino/. Leiko’s fibre is hand dyed and the colours are sublime. She is based in Ireland and ships worldwide.

I made a prefelt in the usual way. I wanted the prefelt to be strong so I kept working it until it started to distort the resist.

Then I made a small incision on one side of the resist, extracted the resist and sewed the raw edges back together with some nylon thread:

Then it was time to play with the square shape. I brought the edges of the square to the front of the piece and I started playing and shaping it. Once I was happy with the shape I handsewed them to hold them in position. Then I worked hard at felting the edges together and to the flat back side of the piece.
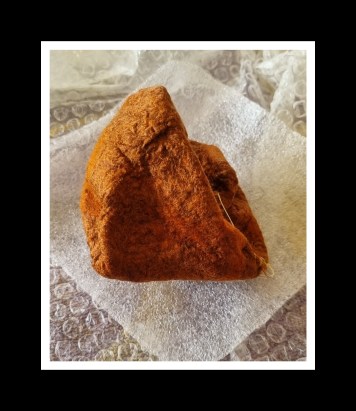


Once it was felted, fulled and rinsed, I removed the threads and started cutting. Lots of cutting!


Here is the finished piece. I have popped it on top of its original resist to give it perspective:

Here is a close up of the piece. The inch ruler underneath gives some perspective on size. Do you think it would make a suitable brooch?

Sample 2
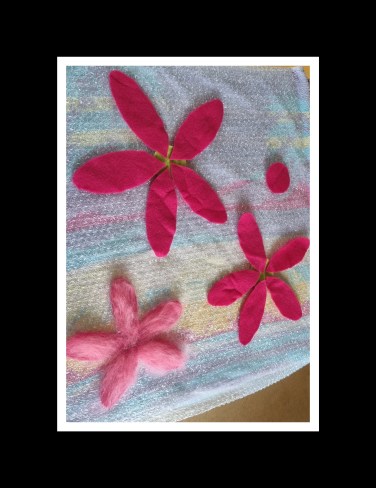
Next up, a flower. This year sees the 20th anniversary of the founding of the Irish felting group Feltmakers Ireland, by our esteemed member and incredibly creative Elizabeth Bonnar. There is a celebration planned for later in the year where members will focus on making pink flowers. I thought I might take this down time to make at least one. But I wanted to play and not produce my usual style of flower. I wanted to make a three layered flower but I also wanted to do some free motion embroidery on each petal. I decided to make the three layers separate, felt them to my satisfaction then attack them with the sewing machine. I cut out a template for the petals (small, medium, large) and then cut these shapes from prefelt as a foundation. I laid different tints of pink merino on top and finished it off with some tints of pink viscose. Once this was wet felted and fulled, my work with the sewing machine began as I did free motion stitching on each petal. After that, I needle felted the layers together and added a central yellow disk which I needle felted and then cut back the fibre until I was happy with the dome shape. Here are some photos I took of my progress. I was really getting into it so forgot to take photos as I went along (maybe the mojo is returning):


Sample 3
My last piece this week is a personal piece I felt a compelling urge to complete. When I left the hospital I was given instructions and bits and pieces to help the eyes heal. Among these were non woven swabs which I found were really soft and well aerated. I have no idea what they are made from but I reckoned they would work nicely on felt and I had lots left over. So I made a bowl using two layers of undyed merino. I wet this down, and then placed the non woven fabric on top, cut the pieces to size so that they fitted around the curves. I then felted it in the normal way. I cut a hole in the piece and removed the resist. Then I sealed the raw edges. When it came to fulling the pot I threw it quite energetically as I wanted to get additional texture on it. Then I dried it. There was nothing particularly spectacular about the result except that it was really soft and tactile. I did not take any photos of this process as it was just the result of some personal urgency. Using the 3cm hole at the back of the pot as an access point, I did some free motion embroidery stitching on my sewing machine. It was as close as I will ever come to performing keyhole surgery! It was challenging but I am pretty pleased with the result, Again, the ruler at the bottom of the photo gives size perspective:


Back to the question of creative block. I don’t know if it is lifted but I think two things are helping me at the moment. The first is making that commitment, whether it is to a person or a project, the second is keeping things small and manageable, that way I can handle complexities if a notion hits me on how I might enhance a piece. Oh yes something else too, I have started to consciously seek not to be too precious about these pieces. I have thrown paint and ink on pieces and woven stuff through them. Not always producing happy little results (to paraphrase the artist, the late Bob Ross) but the process is freeing.
Have you had issues with creative block? I appreciate that it is a personal journey to find what will work to free yourself up. What may work for me may not necessarily work for someone else but if you would like to share your journey I would love to hear from you. Together, we may be able to help others free themselves up and immerse themselves once again in this beautifully creative world we occupy.
hugs
Helene x


