Browsed by
Tag: mixed media

Inspired by the Northumbrian Countryside

Inspired by the Northumbrian Countryside

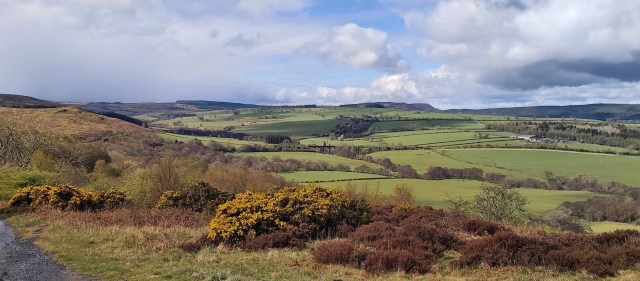
Two weeks ago I took advantage of Covid restrictions being lifted for self catering holidays in England and took off for a weeks holiday in one of my favourite UK destinations. Rothbury in Northumberland is a small, picturesque town nestled in the Coquet Valley.

Looking towards the town centre from south of the river
Heading downhill from my apartment into town

Unfortunately the weather forecast was looking bleak but I was going to make the most of it. I set off with my car packed with as much crafting gear as I could fit in i.e. fibre and felting equipment, fabric, sewing machine, etc, etc the plan being to have a relaxing break, do a little walking and create a piece of work inspired by the Northumbrian countryside. I would return home feeling refreshed, fit and with a finished piece of work…..if I only managed two out of those three (and I did) I wouldn’t have guessed which would have fallen by the wayside!

The view from the patio was pretty good.

Although there were occasional (very) heavy showers and lots of cloud the weather turned out be a bit better than I had expected so it made sense to pack a rucksack and walk during the day and leave the creative stuff to do in the evenings.

Rothbury is a great base for anyone who likes walking with beautiful scenery and lots of trails in the surrounding hills, forests and along the riverbank. Plus it’s only a forty-ish minute scenic drive to Beadnell on the coast, another favourite haunt, with almost deserted beach walks to Dunstanburgh castle heading south or Seahouses and Bamburgh Castle heading north.
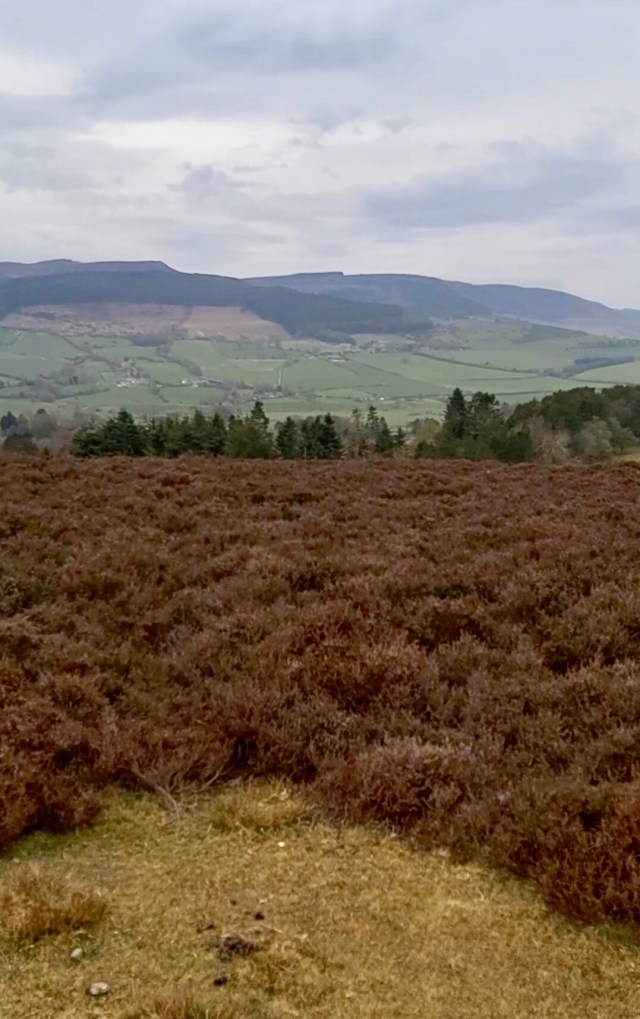
Climbing the hill behind my accommodation gave stunning views of the Simonside Hills on the opposite side of the valley.
Crossing the river and heading for the Simonside Hills
A terrific downpour has just passed over!
One of my favourite lunch stops on the riverbank
Harbour at Seahouses
Pace Hill is a tiny spit of land jutting out into the sea just to the east of Seahouses Harbour.
After clambering over the rocks I reached the curious stone construction which turned out to be a Grade II listed building dating back to 1886. It was built to store gunpowder used in blasting when the Long Pier and New Harbour were being built. On the horizon to the left you can just make out one of the Farne Islands.
Lunch stop on the Harbour Wall on my way to Bamburgh Castle
Approaching the imposing Bamburgh Castle from the south on an almost deserted beach.
This is one of my favourite images of the castle and will definitely inspire a textile piece. I’m seeing the background and castle painted and the foreground grasses stitched.

I also came home with lots of dry stone wall images…..as if I don’t have enough already!!

Although I had every intention of being productive in the evenings the combination of loads of exercise, beautiful clean air, wine and a well stocked book shelf in my apartment, meant I didn’t get much creative work done at all while I was there! Who cares!! I had a terrific time and came home with a few of what I refer to as my ‘bacon rashers’ (lengths of abstract felted pieces, often with fabric included) in colours and textures inspired by my walks. Plus all the inspiration I needed to produce a large abstract mixed media piece based on the Northumbrian countryside including those beautiful rolling hills.

‘Bacon rashers’ formed from a variety of fibres and silk fabrics drying in the sun
Pinning together with sheer fabrics to try different layouts.

Since getting home the rashers, plus various other slivers of sheers and painted Lutradur, have been assembled onto a background of painted Lutradur measuring 110cm x 60cm and are now being stitched in position.

So far so good but the top left corner needs some thought.
A few extra pieces of felt have been made to fill gaps while a fine tip soldering iron is used to cut the slivers of painted Lutradur.

Now I’m happy with the placement of all the pieces it’s just a matter of adding more free motion stitching until it tells me it’s done. Lastly I will make a wooden framework to mount it on and then it’s ready to include in the ”Final Show” (of the now defunct CCN group) Exhibition at the Sam Scorer Gallery in Lincoln from the 8th June.

It’s still a work in progress but the end is in sight!
Fourth Quarter Challenge

Fourth Quarter Challenge

Although I don’t normally make a big deal out of Christmas the one thing I’ve always enjoyed, and can’t imagine not doing, is decorating my tree. The bigger the tree the better….in fact if it doesn’t touch the ceiling it isn’t up to the job! At this point I will come clean and admit that, as the trees got bigger and bigger, I made the shift from real trees to an 8 foot artificial one. I can hear the groans from those who wouldn’t dream of buying artificial, that used to be me, but it is what it is!

Most of my tree decorations have been homemade or received as gifts with some of the quirkiest, and most meaningful, coming from my Aunty Das who sadly isn’t with us any more. These lovely wooden decorations were gifted from Das to my partner who’s hobby is flying.

And these are a few I’ve made in the past…..

These rosette paper baubles took hours to make and won’t be repeated! The dark one is 17cm diameter and was made from black and white photos cut from magazines, the other two are 11cm and made from an old book.

With a big tree there’s always room for more baubles and with the fourth quarter challenge being Christmas Decorations it was the perfect excuse to make more. I found some 10cm and 8cm polystyrene balls locally and covered the large ones with four coordinating cream/black fabrics and the small ones with four green/red fabrics.

Some of the balls have been cut into eight segments and others have had extra horizontal cuts to create a patchwork effect.
I’ve found a stash of old baubles in the loft and these are getting a makeover this year, drawing on them with the hot glue gun and then covering them with Matt emulsion.

One of the first wet felting workshops I attended was run by Robyn Smith who taught how to make these gorgeous fairy boots…..I’ve made them as gifts every Christmas since then. With more time on my hands this year, and prompted by the Challenge, I’ve made myself some plus a few extras to sell.

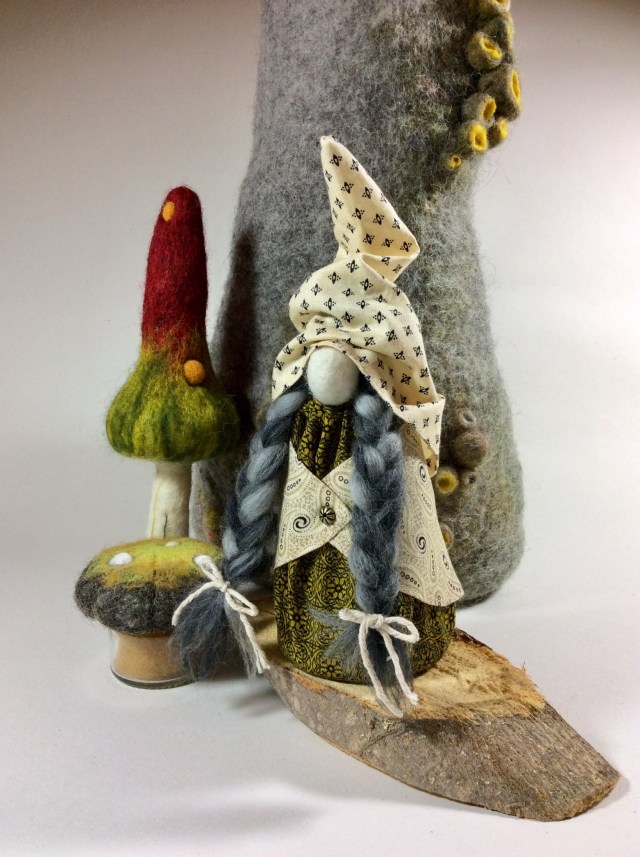
As it’s the season to be jolly, and gnomes have always made me smile, I’ve had a go at making some of those too. The Scandinavian gnome is typically associated with the Winer Solstice and Christmas season so I thought I’d have a go at making my version of a Scandi gnome.

The gnomes came about by accident really. Spurred on by the challenge I’d ordered some 14cm high polystyrene cones online (by this time we were in lockdown) with the intention of making Christmas Tree shaped table decorations. When they arrived every one of the ten cones was damaged.

Rather than send them back, the challenge now was, what could I make with them that didn’t need to be a perfect cone shape? That’s when the gnomes came to mind….the wonky cones would make the perfect base!

Originally I thought about making flat felt for their clothes but then decided to use the same cream/black fabrics I had used for the large baubles, plus a few others. Being in lockdown and wanting to get straight on with them I searched around for something to make the beards out of and found an old cardigan at the back of my wardrobe that had a faux fur collar…..needless to say it doesn’t any more! The first beard I cut didn’t look right. With trial and error I’ve discovered that the way to cut faux fur is by working from the back and only cutting the backing fabric, not the fur itself, using a scalpel blade. That way you get a nice shaggy beard.

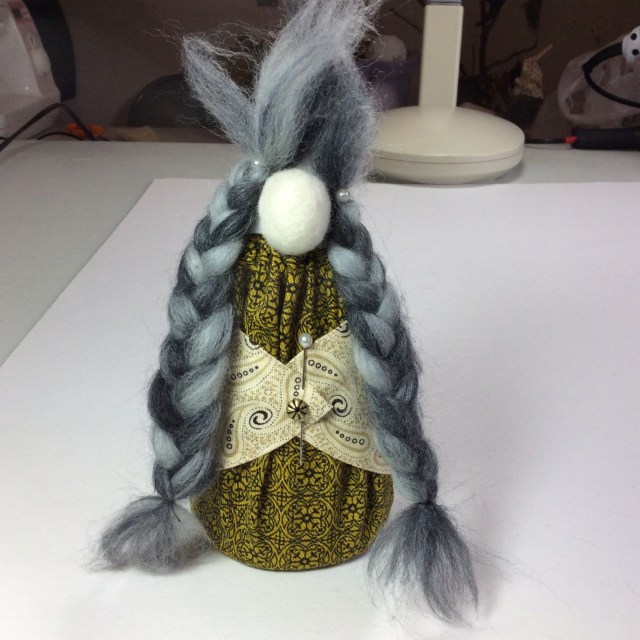
The females have Merino wool plaits and both sexes have felted button noses. I’ve machine sewn their outfits but if you were making these with children they could be made just with the glue gun for a quicker finish.

The clothes are simply a triangle for the hat, a semicircle for the jacket and a circle for the dress and/or gents undergarment.

The dress circle is simply hand stitched around the circumference, put on the cone and then pulled tight and the thread knotted. The front of the dress is then pulled up to approx 10cm from the base and hot glued in position.

I decided to use a belt and braces method to attach the nose as I was afraid it might get knocked off (really??) It’s been hand stitched to a strip of white fabric and that in turn is glued onto the cone. Thinking about it now, was this over engineered? Definitely!

The waistcoat was finished with a metal bead and the Merino fibre plaits attached either side of the nose using hot glue. The oversized hat has been glued in several places to create the sloppy look. To finish them off I’ve stood each gnome on a slice of wood.

I’ve had fun making these and I’m keeping a male and female on a shelf in my studio because I can’t look at them without smiling! Besides, a gnome isn’t just for Christmas!

Whatever you get up to over the Christmas period have fun and stay safe!

Work in Progress.

Work in Progress.

Last year I joined a group of creative ladies who meet once a month at Waltham Windmill. As well as working on our own projects we have a number of set “challenges” requiring us to work to a certain theme. This week I began one those challenges which is to produces three A4 size pieces of work using just three colours. Each piece is to have one predominant colour, plus a small amount of the other two. The format can be landscape or portrait but all three will be displayed together. The design, techniques and materials are entirely up to the individual.

My first thought was that I wanted my 3 pieces to be joined together and initially I was thinking along the lines of a leaf motif, using the veins to span the gaps between the work. The first design was for a very simple “spear” shaped leaf.

The second idea was to simplify it even more and loose the outline of the leaf. The background would possibly be heavyweight interfacing or Lutradur and the veins would be free motion stitched, spanning the gaps by stitching onto dissolvable fabric.

In the meantime I happened to take my dog for a walk in the woods at Hubbard’s Hills in Louth when I had a lightbulb moment! There were some wonderful exposed tree roots at the top of the hill and I suddenly saw these as being the joining element of my 3 x A4’s. The design now was for a “forest floor”.

I realised that I would need a sturdy backing so I’ve wet felted these using Bergschaf fibres and they will be individually mounted onto stiff card…..at least that’s the plan so far! There will be little background showing on pieces two and three but far more on piece one so I included some thick cords under that sheet of felt to indicate buried roots.

The tree roots above ground have an aluminium wire as their core, wrapped with wadding and strips of medium weight Lutradur before being painted grey.

I’ve started making the weeds using free motion stitch on dissolvable fabric but I will look at alternative materials, possibly Lutradur, to introduce different textures, create more bulk and not least to speed up the weed making process!

The fallen leaves at the base of the roots will be FM stitched on Lutradur. Once they’ve been cut out using a soldering iron and heat distressed to make them curl they will be painted in varying shades of gold.

I’ve managed to get a couple of other group members to send me images of their work in progress…..

Jacky approached the challenge by choosing blue, green and gold as her colours and using the “stack and whack” method to cut them up. After selecting her fabrics they were cut up quite randomly and then machined together in strips. The three sets were then layed on top of each other and sliced through again. The yellow and green shapes in the resulting strips made her think of plant pots and this led to her theme of “neglected pots and plants”. In this piece Jacky has added an appliqué cactus and free motion stitched the neglected straggly plants on the left. This one isn’t far off being finished but Ive been told the other two are still piles of fabric on the workroom table!

Carole has chosen to use a combination of plain and patterned fabrics in her chosen colour scheme of red, blue and yellow. Each of her A4’s feature a different piecing technique i.e. strips, curves and crazy patchwork. Again this is a work in progress but already you can see how individual members are putting their own mark on their work and how different everyone’s finished work is going to be. I will post images of the completed challenges next time.

Out of the box Part 3

Out of the box Part 3

This is the 3rd and final set of pictures from this exhibit. http://mvtm.ca/?exhibition=colour-unboxed   the first is here:  https://feltingandfiberstudio.com/2017/01/18/colour-unboxed-by-out-of-the-box/ and the second here: https://feltingandfiberstudio.com/2017/01/26/out-of-the-box-part-2/ Again I apologise for some of the odd angles as it was very crowded with people enjoying the exhibit. In the last picture you may find it hard to see but the is a very long weaving draped across  the ceiling.

This slideshow requires JavaScript.


Out of the Box Part 2

Out of the Box Part 2

Last time I showed you a sub set of the Out of the Box Show.  https://feltingandfiberstudio.com/2017/01/18/colour-unboxed-by-out-of-the-box/

This time I am going to show you about half of the rest of the show. It was a really big show. Some of the shots are not great but it was so crowded that there were a few that always had someone in front of them and I never got a picture. I made them into a slideshow  so you wouldn’t have to scroll down to far..  If there is any artworks you would like the artist info on let me know I took a picture of all the cards that went with the artworks so I can get the info for you.

This slideshow requires JavaScript.

Finally Finished the Last Quarter Challenge.

Finally Finished the Last Quarter Challenge.

I finally managed to finished Zeds 4th quarter challenge form 2016. Only 3 days late.  https://feltingandfiberstudio.com/2016/10/08/fourth-quarter-challenge-2/

A friend of mine, Shirley, taught a dyeing class at the guild. After the yarns are dyed they cut the knots off to share them around the class. She saved me the knots.

knotts knotts-close

The next thing I did was create a neutral background.  I think the colour is called  antique

background-knotts

Next I had fun picking the knots to use an lay them out in a spiral

knotts-overhead-shot knots-angle-shot

I was quite pleased with the layout until I took a picture to show someone else. Then I thought that’s really boring. I went home and added some yarn and lots of little bits of throwsters waste.  Throwsters waste is a by-product of reeling silk.

Here it is all wet down.

finished-layout-wet

During the felting process one of the knots came undone. There was no way to tie it up again so I untied all the knots.

felted-and-dry-knotts

I really don’t like that. All the pattern is gone and you can’t see the background very well. Nothing ventured nothing gained so I decided to trim all the knots  short. It still need ironing to block it out to 12×12 but I like it much better. Friends say it looks like a pond with flowers.

knots-cut-short


A Peek at the Knitting and Stitching Show in London 2015

A Peek at the Knitting and Stitching Show in London 2015

Our guest artist/author/photographer today is Leonor Calaca from Felt Buddies.

If you’re in Europe and a fibre aficionado, you’ve probably heard of the Knitting & Stitching Show. It happens in a few different locations and dates in the UK, and is probably the largest fabric/fibre event in Europe when hosted in Alexandra Palace here in London.

As it happens, the Alexandra Palace (or Ally Pally as it’s also known) is only 45 minutes away, on foot, from my place; as it happens as well, I’ve been volunteering for the past two years as a member of the London Guild of Weavers, Spinners and Dyers, to work a few hours a day at a booth that serves as a hub for all such UK guilds. Not because I’m such a wonderful and helpful person, mind you, but because this means I get a free pass to come and go anytime during those 5 days (and, at £16 for entry only, I think it’s well worth my time).

Last year I got all mesmerised by the fibres and materials I saw, and almost went bankrupt. This year I decided to be good,  more sensible and buy only the things I absolutely needed, which worked to an extent. I also decided to focus more on my energy on the really good exhibitions, and that’s what I’m going to write about.

Let’s start with an embroidery. How lovely and detailed is that?

Photo 1

Art wasn’t just in 2D, the sculptures were very interesting as well.

Photo 2

A glass and wool sculpture by Helen Pailing. She aims to use remnants from the glass and wool industry and incorporate them in a way that makes them not only art, but something you can keep instead of take to a landfill.

Photo 3

The Wishing Tree by Eileen McNulty. Just look at those little details.

Photo 4

I don’t know the author of this one, but here is ‘Palace,’ made with cocoon stripping paper and silk organza. The theme of this booth was vessels.

Photo 5

Elena Thomson embroidered a sieve. Would you have thought of that? I think this would be wonderful to confuse old ladies.

Photo 6

‘Stumpwork’ by Alana Chenevix-Trench.

Photo 7

And a lovely sheep by Margarita O’Byrne.

Photo 8

Then I went to Studio Art Quilt’s Associates (SAQA) booth that just blew my mind. I had no idea these detailed works of art could be made in that technique. The theme was Food For Thought and this is ‘Mushroom Frittata’ by Jean Sredi.

Photo 9

‘Pepitas’ by Vicky Bahnhoff.

Photo 10

‘Yum! Pineapple Upside Down Cake’ by Diane Powers-Harris. Yes, this is still a quilt.

Photo 11

‘Il Mercato’ by Jeannie Moore

Photo 12

‘Elegant Edibles’ by Jennifer Day.

Photo 13

Who doesn’t love dolls?

Photo 14

This one was my favourite: what a grumpy face.

Photo 15

These two sculptures surprised me, as they’re made from a traditional paper folding technique native to the Philippines.

Photo 16 Photo 17

And I saved the best for last: a fishmongers called Kate’s Plaice! Everything you see here is either knitted or sewn, and the details just make it extraordinary.

Photo 18 Photo 19 Photo 20


The artist herself.

Photo 21

Did you go to the K&S? What caught your eye? And am I going mad for taking more time to look at art instead of yummy yarn?

Thank you Leonor for taking us on this great fibre adventure!

Fourth Quarter Challenge 2014

Fourth Quarter Challenge 2014

For this Quarter, I have chosen ‘Land Art‘. I was initially going to choose a specific artist for this challenge, but in the end I just couldn’t choose just one, the whole ‘movement’ is so inspiring. In case you haven’t heard of it, Land Art – according to Wikipedia ” is an art movement in which landscape and the work of art are inextricably linked. It is also an art form that is created in nature, using natural materials such as soil, rock (bed rock, boulders, stones), organic media (logs, branches, leaves), and water with introduced materials such as concrete, metal, asphalt, or mineral pigments. Sculptures are not placed in the landscape, rather, the landscape is the means of their creation.” (i.e, not Christo)

colleen proppeThere are so many inspirational artists, one I really like is Richard Shilling, a flickr search gives you lots of great photos, have a look at this link: https://www.flickr.com/search/?q=richard%20shilling  He has inspired others to create land art too, such as Colleen Proppe, who made the Leaf Flag in the photo above. Andy Goldsworthy is another name many people might recognise. Scott Robinson was inspired by him to make this Leaf art:

Scott Robinson
I discovered the work of Tom Hare while I was looking up land artists and sculptors, he does some gorgeous work. This is his website: http://www.tomhare.net/portfolio This is a photo of one of his willow sculptures, a Horse Chestnut breaking open, taken by Jodie Brodie:

Tom Hare
Have a search on google for Land Art and Land Art Artists, I can guarantee you’ll be inspired! Feel free to post your work on the forum in the 4th Quarter Challenge thread: http://feltandfiberstudio.proboards.com/thread/1788/fourth-quarter-challenge-land-art  Have fun!

Third Quarter Challenge 2014

Third Quarter Challenge 2014

I have chosen (Oscar) Claude Monet as the artist for the challenge this quarter.  He was born in Paris, France in 1840 and died in Giverny, France in 1926.

MTIwNjA4NjMzOTE3NzY5MjI4Monet was named the creator of “Impressionism” because he was more concerned with light and form than realism.  The painting that inspired the name came from his painting “Impression, soleil levant (Sunrise), 1872,  which now hangs in Musée Marmottan Monet,Paris.

Impression, Sunrise 1872

He preferred outdoors to school and amassed a huge body of work based on studies of various landscapes at different times of day, season and weather conditions to study the changes in light and form.


Japanese Bridge 3
Japanese Bridge 3

Japanese Footbridge
Japanese Footbridge


Like many artists of his time, Monet suffered from depression, poverty and illness.  However, it never dampened his passion for his work.

My only merit lies in having painted directly in front of nature, seeking to render my impressions of the most fleeting effects.”
—Claude Monet

Sunflowers The-House-Seen-From-The-Rose-Garden2-small


Claude_Monet-Madame_Monet_en_costume_japonais Claude_Monet,_Grainstacks_in_the_Sunlight,_Morning_Effect,_1890,_oil_on_canvas_65_x_100_cm

There are several good sites of his work, but this is probably the most comprehensive,  cataloging over 1700 of his works.  http://www.claudemonetgallery.org/

There are many repeating themes in his work and also a wide variety of styles throughout his long career as his style evolved.  I think there is something for everyone and a lot of it will lend itself nicely to felting and mixed media.

claude-monet-irises-detail Claude-Monet-Water-Lilies-38-Oil-Painting claude-monet-the-artist-s-garden-at-giverny-c-1900


Still-Life-With-Pears-And-Grapes-small cliff-near-dieppe

Happy creating!

Remember to post your challenge pieces on the forum: http://feltandfiberstudio.proboards.com/board/18/studio-challenges


Around the Web

Around the Web

felting around the web 4

http://jill-harrison.webs.com/apps/photos/photo?photoid=165390738

http://gifeltro.blogspot.ca/2013/10/unaltra-grande-fatica.html

http://feltingannie.blogspot.ca/2013/09/working-on-felted-landscape.html

stitching around the web

http://anajskreativestagebuch.blogspot.ca/2013/09/filz-fur-tanja.html I had a hard time deciding where to put this it is great felt but the stitching is such a big part of it.

http://dogdaisychains.blogspot.ca/2013/10/prettiness.html

weaving around the web 300

http://www.ingedam.net/gallery.html she does card weaving on her loom as part of a loom woven piece.

mixed media around the web

http://red2white.wordpress.com/2013/10/04/leaf-press/

spinning around the web

http://www.spinartiste.com/can-you-spin-this-suzanne-corriera-says-sure-thing

surface design around the web

http://alisaburke.blogspot.com/2013/10/my-new-line-of-accessories-and-giveaway.html