I thought I’d show a few things I’ve been up to since my last post in December, starting with some pendants. A while ago I did an online workshop with feltmaker Aniko Boros to make her beautiful wet felted Fuchsia pendant. It wasn’t my intention to carry in making more fuchsias but rather to learn Anikos technique for making complex pendants so I could apply it to my own designs. And so the fuchsia led to this yellow/grey pendant which in turn has led to a recent request from Region 8 of the International Feltmakers Association to teach how to make it.
Yellow/grey necklace
I was concerned that some in the group I will be teaching may not be used to working with Superfine fibre on such a fiddly scale, so over the Christmas/New Year period I created three more sample pendants. Two of these involve some different techniques to Aniko’s, making them easier and quicker to create than my grey one, but they will produce a similar look. The third sample is made without resists and aimed more for absolute beginners, just in case we have any attend. The other obvious difference with these new samples is the addition of beading which can be optional. I’m looking forward to teaching this class on the 8th March.
Another project I’ve been working on recently is a planned IFA exhibition of Feltmaking titled Felt Connected: Bringing People and Fibre Together. It came about after we surveyed Region 8 members as to what they wanted from their Regional Coordinators and one of our members, Jo Cook, suggested we organise an exhibition of members work. Since then Jo and I have been working together to organise the event which will take place next month in Harding House Gallery in Lincoln. We have a total of 17 IFA members taking part with the aim of not only showcasing their talent but demonstrating the versatility of fibre and what can be done with it while at the same time promoting the IFA and hopefully attracting more members. If you are in the area we will be holding a Meet the Artists session from 1pm – 3pm on Saturday 14th March and it would be great to see you there.
Examples of our members work
Earlier this month I started work on The Passage of Time, my submission for the IFA 2026 online exhibition “Time” that launches during our AGM on March 28th. When I first read the theme title I have to admit that for a day or two I struggled to see anything other than clocks! Then I had a lightbulb moment, I’d make an Ouroboros, the mythical serpent that is often represented in Alchemy art depicted eating its own tail. It’s a symbol of the cyclical nature of time, the universe, and self-renewal and represents the concept of eternity and endless return. Image source: https://www.bbc.co.uk/culture/article/20171204-the-ancient-symbol-that-spanned-millennia
I created my 3D mobius wet felted version using Merino fibre but when it came to photographing it, no matter what angle I took it from, it looked really dull and boring. So I abandoned that idea and instead I’ve taken inspiration from the beautiful sandstone slabs on Seahouses beach in Northumberland. Coastal erosion and fossils are both dramatic indicators of the passage of time so seemed a fitting replacement for the failed Ouroboros!
My inspiration for The Passage of TimeExperimental piece depicting fossilsAnother fossil experimentWork in progressAdding free motion stitch
The base is a mix of Carded Corriedale and Bergschaf fibre with silk fabrics, wallpaper, Tyvek, free motion stitch and hand embroidery. I’ve included a piece of felt I made a few years ago which mimics fossils, it’s one of two experimental samples I made and didn’t get around to using until now. After auditioning both of them in the pre-made hole I went with the darker option, which doesn’t look as dark in the flesh as it does in the photo. I’ve submitted this piece for the online exhibition but I’ve since felted another slab to add to the first one. It will be embellished in a similar way, to create a larger piece of work for another exhibition that Jo and I are hoping to launch in July.
I’ll leave you with a piece of work that was created by a lovely lady called Avie, also known as The Curly Sheep. Avie came to spend a day with me last month to learn how to wet felt a picture and how to do free motion stitch. Turns out she’s a natural at both as I’m sure you will agree!
As I sit down to begin this post the sky has darkened and the rain (fingers crossed) is about to fall, heaven knows we need it, but what a fabulous summer it’s been so far here in sunny Lincolnshire! I don’t know about you but I tend to not do too much in the way of creative stuff through July and August as there are too many distractions and this year the intense heat has made me feel very lazy so lots of time spent relaxing, reading and watching creative videos. Consequently I’ve now got a table of projects I want to finish and a head full of others I want to start!
A couple of projects I did do this summer are two wet felted vessels. The first one, inspired by a shrivelled seed pod, was made at the İFA Region 8’s Summer School in Arnesby near Leicester. Our region encompasses several counties and is so spread out we struggle to get our İFA members to attend. On the other hand we have a regular group of creative ‘non members’ in the locality who are more than welcome to come along to our events, and thankfully they do! It was a busy and fun two days…..
My seed pod began life as five leaf book resist measuring 27cm x 36cm and various colours of Merino and Corriedale fibres.
It’s final shape was formed after lots of pushing and pulling and using strong clips to get it to stay as I wanted it.I decided to keep the opening as tiny as possible and, as a consequence, the resist had to be ripped to shreds in order to remove it! I’m wondering about adding some hand embroidery here and there in the shape of circles using a dull gold thread, I think it’s lacking something but is that it?
The second vessel was started last Friday when I was working at the Usher Gallery in Lincoln. I’d seen a post somewhere mentioning they were having their second Artist Studio Day and inviting local artists to apply. If successful it meant I would get the use of a table in their ground floor workspace and get to spend the day with four other artists. It sounded like a great opportunity and I’m so glad I applied! Only four artists turned up on the day and unfortunately one of those had to leave early. My other two companions were both painters and it was nice to get to know a bit about them and watch them work. We had a few members of the public come in to see what we were doing but for most of the time it was very quiet which allowed us to focus on what we were doing.
Knowing I wouldn’t get finished, but would need to get my vessel to a stable state before leaving the gallery, meant I needed to do a bit of prep the day before. So I decided on a size, cut my circular resist and made this piece of prefelt combining threads, fabrics and fibres to cut up and use as surface decoration.
Prefelt for surface decoration
By the time we had to leave I had a stable prefelt that looked like a pizza and could be folded into my bag….it was too large to carry it flat!
The finished rock inspired vessel
One of the Summer pieces I’ve yet to finish is an Iris which I started at the end of July. This is going to be for the Lincolnshire Textile Groups Bountiful Botanicals competition taking place in October. I’m creating it from hand painted Tyvek fabric and wire and the flower will be approximately 30cm dia by 115cm tall. I’ve just got the leaves to do now and then I’ve got the perfect spot for it in my lounge when it’s finished. I don’t want to reveal too much before the competition so this is a sneak preview for now…..
Finally I’ll leave you with some images from this year’s fabulous Asylum Steampunk Festival. As ever there were some outstanding costumes, some very strange costumes and some that looked like they’d missed the theme altogether but it really didn’t matter! There were steampunk enthusiasts represented from all over the UK and from various European countries. One lady said she had come over from Hong Kong especially to join in the festival! The atmosphere is the friendliest you could imagine and the whole Cathedral Quarter was buzzing!
True to form I didn’t make time to create a costume but this year I did dig out a long skirt and a waistcoat as a (very) token gesture in order to wear my oversized steampunk dragonfly brooch.
The International Feltmakers Association has been running an annual Felt Swap – setting a theme and linking members who’ve elected to join the challenge with a “swap partner” from somewhere in the world – since 2020. I spotted the invitation to join in the 2025 swap on one of the regular emailed Newsletters and decided to have a go. I started to write this post about the entry and remembered that I’d entered the first Swap and had posted about it. However, when I trawled back through my posts to find the link for you, I found that I hadn’t actually written the post, let alone published it. So we’d better start there.
The subject of that challenge was “Light”. I thought a lot about this as it seemed such a wide subject and I didn’t know where to go with it.
To begin with I listed as many things as I could think of that could have anything at all to do with light and came up with: Light bulbs; Bright light – dazzling – blurred; Rainbow; Prisms and light splitting; Dark area with light coming in from one side; Sun beams from behind clouds; Fire light; Moon light; Lighthouse; Northern Lights.
Clouds and especially stormy skies fascinate me and I thought that I could do something with this idea. Initially I went for a sun low on the horizon just showing through some dark clouds but with rays going upwards behind the clouds. For some reason this was not a success so was abandoned.
Then we had a thunderstorm and I had a lightbulb moment! So I looked through some of Mr Google’s images just to remind myself what forked lightning looked like and then went for a storm over the sea, and used this image for reference.
Lightning at Sea
I have a collection of fibres, yarns and fabrics in my “stormy” project sack – too big to call a bag – and my first thought was to use some of those in the picture I had in mind. I had already made a mixed media image of a storm at sea using various textiles and fibres and thought of doing something similar.
Storm at the Coast
So I looked out some of the fabrics and yarns and other bits and pieces to see what I might use.
Part of my stash of “stormy” textiles
Some stormy fibres and some sequins to give light?
But in the end I decided that I wouldn’t use these for a couple of reasons: 1. this was supposed to be a “felt” swap; and 2. using the mixed media would possibly need a larger picture than I was making – we were limited to A5 size – 5.8 x 8.3 inches (sorry I don’t work in “the foreign” if I can help it). I did use my stormy fibres though.
I was reasonably happy with the picture after it had dried, but decided to do a bit of tidying up and embellishing with some needle felting.
This is the final result
The swap picture of LIGHTning
My swap partner, from Denmark, sent me a felt bag, which was really good. I didn’t want it to get dirty or damaged before I was able to use it and show it off so I wrapped it up and put it in a safe place. So safe that …..!
Anyway, back to this year’s swap. The theme for this one is “Inspired by an Artist”.
Again this was a very wide subject, first choose your favourite artist then find a piece of their work that sparks an idea. I don’t actually have a “favourite” artist, I love the work of many: Constable; Canaletto; Turner; Rowland Hilder; William Morris and most of the Arts and Crafts artists and architects; Rennie Mackintosh…. I could fill up the page with names. I trawled through works by most of these, bearing in mind the maximum size of the piece I was to make (8″ x 8″) the while. In the end I decided that I would go with Charles Rennie Mackintosh.
I searched google and found several stained glass windows, one wall carving and a draft fabric design that I liked.
Stained Glass at The Willow Restaurant
Rennie Mackintosh Roses
The terracotta tiles on the wall of Queens Cross Church
Stained glass window thought to be by Rennie Mackintosh – the whole window
In the end though, I decided to go with a section of the last one, which I squared up and manipulated to make it the right shape and size. The window is typical of the Art Nouveau period and “attributed to Mackintosh”. I could not find out if it is actually his design but it is certainly very like his work.
Stained glass window thought to be by Rennie Mackintosh – the whole window
Picking the reference section
Squaring the image (sort of)
I picked the centre of the window to work on and the enlarged and reshaped (slightly) design was printed off in greyscale and laminated. I would be able to use the laminated design as a base on which to lay out the fibres.
All ready to lay out the fibres
While I was looking through my stash for suitable fibres and pre-felts for the project I happened to glance at the design which was inverted. I immediately saw a face with an extremely runny nose!
This was when I spotted the runny nose!
Nevertheless I thought it would be fun to use the design of the face, since we were to produce something “inspired by” a favourite artist, rather than copy what s/he had produced. This would allow me to get rid of the runny nose and I also wanted to change the colour scheme.
I had decided to use a piece of pre-felt which I had bought from Wingham Woolwork some years ago, especially as it was slightly moth eaten and I could use what I might otherwise have to throw away. This was a lovely strong purple colour so I decided that my colour palette should be purple, turquoise and orange.
Picking colours and materials
The basic design was laid out in reverse, that is with turquoise knitting/felting yarn “face down” on the design, with some fillings-in of orange fibres on top and two squares of turquoise where the “eyes” would be. The purple pre-felt backing was placed on top of that and the whole wet felted. Unfortunately this resulted in the straight lines becoming distinctly wavy – a good job this wasn’t a straight copy of the original!
After the piece was rinsed, dried and ironed, the remainder of the design was added by needle felting (which, together with the shrinkage during wet felting, had effectively removed the moth holes) and finally some simple embroidery stitches.
Beginning the reversed layout of fibres
Just finished wet felting
Needle felting more features
With more features added with a sewing needle
The piece has been mounted on foam board for stability.
In my last post I showed you my wet felted conch shell made from Merino and Corriedale fibres with ribs made from Sari silk yarn. I liked the shape of this and wanted to make another, this time in off white with pale coloured ribs. I found a site on Etsy selling a beautiful subtle coloured variegated sari yarn but unfortunately when it arrived it was so loosely spun I realised it wouldn’t be suitable for this particular project.
As I was in the mood for felting I didn’t want to have to reorder so decided to search for a pastel “slubby” knitting yarn which I knew was hidden somewhere in the depths of my yarn stash.
It turned out to be far easier to work with than sari silk as it was less inclined to move while felting and it had just the right amount of colour and texture for the look I was after. I was intending to leave this shell plain white but now it’s made I think it will benefit from a bit of shading so that’ll get added at some point.
I increased the size of this one to approx 31cm long x 15cm wide x 6cm high. My spinning group has a coastal theme for our 2026 exhibition so there will be lots more shells being made in various fibres, fabrics, techniques, shapes and sizes.
Wet felted spiral shells crop up a lot online and I’d been wracking my brain for ages trying to work out how these are made. I had a light bulb moment back in December when I made this small spiral shell from 10gm of carded Corriedale. Since then I’ve worked out another way of achieving a similar shape and so made this larger version using 20gm of carded Corriedale fibre and measuring approx 13cm x 9cm.
At one point the shell was sitting next to this bowl and I wondered how the centre piece from the bowl would look inserted in the shell…..
…..I quite liked it so I’m now wondering whether to leave it in there as an abstract hermit crab or make the effort to felt a more realistic looking crab, what do you think?
Another theme I’m working on right now is insects, particularly dragonflies and butterflies. It all stemmed from a tutorial by textile artist Anastasiya Goleneva to make this beautiful dragonfly brooch. It’s made from hand and machine stitched and painted calico. At 16cm long x 21cm wide it worked out a bit too big for me to wear as a brooch so instead I’ve put a Command strip on the back and mounted it to the wall.
Having enjoyed making it I decided to do another but using interfacing and my own technique for the body and legs that would allow it to stand and give it a more delicate, longer, slimmer look. One thing I’m not happy with is the “flat” face which suited the brooch but doesn’t look right on the standing dragonfly so version three is underway!
The dragonflies led to my friend Diane asking me to show her how to make a simple butterfly brooch so I made a couple of samples with body and wings made from painted cotton velvet. This fabric takes on a beautiful leather like look and feel when painted with fabric paints or acrylics and remains very soft and flexible. I was thinking of hand embroidering the wings but decided to keep it basic as Diane could add more detail if she wanted to.
I am out of time to do an original post today. So it’s a throwback post. This one is from the early days of 2012.
Doing samples is fun and I still have the last two. They are just fun to have.
I haven’t been doing much that is interesting to look at lately. Everything is white and is waiting for the dye pot. I thought I would show you some samples I made a little while ago. The first 2 are purple merino with some silk strips on them. I thought they came out nicely with lots of texture.
Purple wool with strips of silk before felting
Purple samples after felting
The second is orange merino with some silk and curls on it, here I wanted to felt the curls right into the background. I also wanted to see how it would stick if I put it over the silk. I really like the way the little blob of curls all became one with nice texture. The curls going across the silk stuck down very well. Enough wool migrated through the silk to grab the courser wool of the curls.
Orange wool with silk and curls before felting
Orange sample after felting
This last set I wanted the curls to be attached at the base and left loose and hanging for the rest of their length. I use a small piece of scrap floor underlay with a hole in it so the wouldn’t stick down. It worked very well. I am not sure how I ended up with one really long curl.
Small samples with curls with their resists on before felting
Small samples with curls after felting.
I am not sure what I am gong to do with these. I might make some buttons or hair clips. Do you have any ideas?
In December I was trying to supply lots of different places with felt things. In truth, I was a bit over-stretched. I decided to focus on making plant holders, with a few tea light holders and a couple of vases. Oh, and some cards. Here’s an overview of the things I made.
PLANT POTS AND VASES
First I made four plant pot covers from merino wool and silk pre-felt and incorporating different pieces of vintage lace
Strips of vintage lace laid verticallyVintage lace flowersTatted flowers from a vintage dressing table setA broad strip of vintage lace with textured flowersPlant pot covers with different types of recycled vintage lace
Next a couple of vases, also with a pre-felt base
Strip of broad vintage laceRecycled crochet pansiesThe left-hand one works both as a vase and a large tea light holder. For the vase on the right, I attached the pansies to the felt by felting over the strings that joined the flowers. I had to add a couple of stitches to the flowers on either end to secure them as there wasn’t any string to work with
On to some plant pot holders. When cutting the resist out of the vessel, I use the smallest hole I can that will allow me to fit the plant and its pot inside. All of these have a water proof plant pot holder inside, plus the plastic pot with drainage holes that the plants are supplied in. I like to start by looking at a plant and ‘asking’ it what sort of pot cover it might like.
A festive plant pot holder with green merino and red locks reflecting the leaf coloursA large nuno felted plant pot holderLayout of the under-side of the vesselLayout of the top of the vesselTop view finished pot holderSide view of finished plant pot holderRecycled silk from a very sheer silk beach dress I found in a £1 charity shop bargain binNesting bowls inside each otherNesting bowls separated out
These nesting bowls were made using a carded merino and silk batt and are very lightweight
A display of my work in Creek Creative gallery, Faversham
One of the galleries where my work was part of a month-long Christmas local makers market
PICTURES
Now we’re into the new year and I really have to focus on making some pictures. I mentioned at the end of my last blog that I’m delighted to have the opportunity to fill the walls of a lovely local Michelin starred pub / restaurant (The Sportsman in Seasalter) with felt pictures for 6 weeks in April / May this year. The ‘fill’ bit is something of a challenge. I tend to make enough work as I go along for my normal sales and exhibitions. Making an extra 35 to 40 wet felted pictures for this exhibition will take a lot of work. I’m finding the prospect of making all those pictures both exciting and rather daunting.
In preparation for the picture making, in November I ordered 2 batches of solid beach handmade frames from my lovely local frame maker: 10 at 63 x 63cm (approximately 25 x 25 inches) and 10 at 35 x 35 cm (approximately 14 x 14 ins). I will have to order more soon but I thought this would give me a good start. I had some serious studio-tidying to do last week before I set about the pictures… and finally I was ready to start. Where to begin?
First I made a ‘big wave’ picture for one of the larger frames. I say ‘big wave’ in inverted commas as the waves round where I live are generally very small so we’re not talking surfing potential. I’m endlessly intrigued by wave and sea patterns and have made this type of picture several times before. They always end up looking very different. I’ve taken lots of reference photos such as this one……
Example of a wave reference photo
…..that I use as a starting point.
Here’s the layout using lots of colours of (mostly) merino wool for the water; merino and kid mohair top, silk hankies, mohair and sheep locks and some vintage lace scraps for the wave; and hand-made pre-felt cut into pebble shapes for the beach. These were laid on 4 layers of merino for the base. I’m not really sure why I did 4 layers – it makes a lovely firm base but it’s a lot harder work to felt than 2 layers and as this is going behind glass, it was a bit over-kill. I’ll try not to do that again.
Once it was felted and dry, I used a small metal tool to pick up some sections of wave, to make it more 3D. Here’s the final picture and the picture sitting on top of its frame, waiting for me to get round to framing it.
Finished picture ‘ blue sea, big wave’Picture lying on top of its frame
I’ve worked on this for more than 12 hours spread over 4 days, not including making and cutting the pre-felt pebbles, which must have taken another couple of hours, and I’ve still got the framing to do. I’m very conscious of how many pictures I’ve got to make, so I decided to go smaller and quicker for the next 3.
One of the ways I can speed things up is to use recycled silk fabric to provide the pattern (and texture) for the water and the beach. As an avid buyer of silk scarves from charity shops, I have 2 huge bins of material to rummage through and upcycle.
Picture two – which I’ll call leopard print – I chose a sheer leopard print scarf for the beach and a small blue striped one for the water. Because the blue scarf is not very wide, I have to join two pieces of fabric. To reduce the visibility of the join, I first cut into one of the pieces so that the join would be staggered. You can see it in the layout but hardly at all by the time it’s fully felted.
Joining the silk picture layoutfinished picture finished picture sitting in its framePicture two – leopard print wave
I’m reasonably happy with this, though I think the wave is a bit too solid-looking.
Picture three – ‘dark blue sea’ – I go with a rather lovely dark blue patterned scarf for the water and a pale patterned beige one for the beach.
layoutfinished picture Picture three – dark blue sea wave
Again, reasonably happy with this. I like the sea effect and the less solid wave but the blue cobweb felt strip I put in front of the wave to look like the remains of a previous wave is a bit dense and straight.
Picture four – ‘reversible silk’ – I’m rummaging around for a different piece of silk to use for the water. I find one I like but I’m not sure quite how it will felt. It’s also reversible and I’m not sure which side to use. I decided to make a very small sample to see how it felts and it occurs to me also to see what happens if I cut strips to alternate the two sides of the fabric.
Here’s the sample layout. I’ve run out of merino wool in this pewter colour but fortunately have some Corriedale. I felted it very quickly and forgot to take a picture of the finished sample but it was enough for me to conclude it felted well and it was worth trying the reversed strips thing.
Quick sample layout to test the silk and laying out in strips
The beach fabric is also a little different – with a bigger and higher contrast pattern.
Here’s the layout and near-final picture. I say near-final as I only finished fulling it yesterday afternoon. It’s still damp (I think the silk will become a little lighter and shinier when fully dry) and I haven’t yet picked up any of the fibres in the wave.
Reversible silk sea big wave layoutReversible silk big wave near final picture – not quite dry
This is my favourite actual wave so far – I definitely like the variation in colour and greater impression of transparency. I’m pleased with the way the cut up silk worked for the water too. I’m not yet decided about the beach pattern – interesting or too much?
And finally, a photo of the large and a small picture side-by-side, so you can get some idea of scale
I’m framing the three small ones without glass and the large one with. People react differently to this. Some like to see (and feel) the texture and not have the reflections you get with glass. Others worry about dust. A few (me included) worry about moths. Most of the pictures will be behind glass but a few won’t. I’ll review this as I go along
By the time I write again in March, I should have lots more pictures made. Wish me luck! I will be making some large ones with sea birds but these take so long, I’ve decided to make some less complex ones first to see how long I’ve got to spend on the most time-consuming ones. I’m having to step-up my levels of planning and organising to try to make sure I have enough work to fill the venue.
Happy new year everyone. I hope it’s full of joy, peace and creativity.
September has been a busy and exciting month in contemporary textile art (specifically felting art) in Ireland so I thought I would feature what I got up to, I will call it my September Adventures.
Weather wise, the month started as we hoped it would continue (it didn’t by the way) with a return to fine warm weather – something we had not seen since last June. So I took the opportunity to visit our National Botanical Gardens (https://www.botanicgardens.ie/) which are situated on Dublin’s north side. The gardens (there’s free entry, if you ever visit Dublin, Ireland) opened in 1800 and are an oasis of calm with restored glass houses, magnificent specimens, bee hives and, of course, a tea room. There’s also a pedestrian access to the historical cemetery next door which I suspect is not seen too often. Glasnevin Cemetery also houses a genealogical archive for anyone wishing to trace their Irish ancestors (https://www.dctrust.ie/genealogy/home.html).
But, I digress. Let’s go back to the gardens. My visit coincided with their annual exhibition ‘Sculpture in Context’. The exhibits feature artworks in various media including ceramics, wood, metal. I decided to focus purely on the textile element of the exhibition and to photograph any pieces I came across as I wandered around. I was aware that some of the members of Feltmakers Ireland had pieces accepted for the exhibition; Clare Merry (http://www.merryland.ie/index.htm) an exceptional artist who quietly creates her pieces was featured. If you would like to see some of Clare’s work please check out her website, which, she tells me, is not really up to date, or Google her and feast over the images; Fiona Leech(https://www.instagram.com/feltathome/?hl=en) had three beautiful pots which were originally housed in the cactus house. Annoyingly two of the three pots were stolen within a matter of hours of their arrival and the remaining one was moved to a safer spot in the garden’s gallery. I thought I would show you the three pots as they were originally grouped together.
Fiona Leech’s three pots (source: Fiona’s Instagram page)
I searched but could not find Leiko Uchiyama’s beautiful work but here is a link to her website if you would like to check her out: https://www.leikofelt.com/my-felt-work/ I found two other exhibits from members of the guild. Their featured work while not through the medium of felt were equally stunning. Congratulations Mel Bradley (https://melbradleysilks.ie/) and Mette Sophie Roche (https://metteroche.com/)
I put together a slideshow of my textile finds in the gardens which I hope you enjoy.
Mette Sophie Roche; The vital matter of Fungi
Mette Sophie Roche; The vital matter of Fungi (detail)
Mette Sophie Roche; The vital matter of Fungi (detail)
Fiona Leech; Drought
Fiona Leech; Drought (detail)
Frances Crowe; Terrain
Frances Crowe; Terrain (detail)
Frances Crowe; Terrain (detail)
Claire Merry; Floral Path
Claire Merry; Floral Path
Ella Quinn; It’s nothing but a dead fish
Niamh O’Connell; Cocoon
Mel Bradley; Grasses
Mel Bradley; Grasses
We had our first meeting after summer in Feltmakers Ireland and as usual the committee put an incredible amount of preparatory work into making it successful. It was a busy morning as everyone beavered away felting flowers to create a tapestry as part of the 20th anniversary celebration for the guild. Much to everyone’s delight, the guild’s founder Elizabeth Bonnar joined us. I thought I would feature Elizabeth here as without her it is doubtful that there would be such a vibrant community of feltmakers today. Here she is with her granddaughter and with the committee.
Feltmakers Ireland founder Elizabeth Bonnar and her granddaughter
Feltmakers Ireland committee with founder Elizabeth Bonnar (3rd from left)
Here are some photos taken on the day.
Feltmakers hard at work
Breda and Elizabeth hard at work!
Lots of flowers were made that morning by members
Suzanne, Breda, Deirdre and Elizabeth catching up
The finished tapestry was revealed at Feltmakers Ireland ‘Bountiful’ juried exhibition which opened on 30th September.
Feltmakers Ireland members: The Floral Tapestry to celebrate 20 years.
The exhibition also saw the launch of the new book “Exploring Irish Wool for Feltmaking” The book is the product of a collaboration between many members of Feltmakers Ireland guild, sheep farmers, shepherds, shearers and suppliers and not forgetting the various washers and carders who took the raw fleeces, converting them into usable fibres for testing. I think this approach was quite unique and it will certainly be a worthwhile and useable addition to any textile maker’s reference library. Understandably it was a huge project so congratulations are due to all, especially Annika (Berglund), Breda (Fay) and Sinead (Doyle) who collated all of the findings into an invaluable resource on Irish wool. It’s so full of well written practical advice and it was made extra special by the presence of one of our Government Ministers, Pippa Hackett an ardent supporter of the project, who officially launched the book and the exhibition . Here is a quick look at the contents page to give you an idea of the scope of the book:
Exploring Irish Wool Contents page
An added bonus is that feltmakers/wool artists can now make direct contact with numerous artisanal suppliers so there is no excuse for any of us not buying closer to source and of course for anyone overseas who wishes to use Irish wool fibre in their work purchasing from source.
I hope you have enjoyed my September adventures. It has been an exciting month. Once again I would like to thank Feltmakers Ireland and their hard working committee who work tirelessly to maintain this vibrant community – it makes such a difference that, as textile artists, we can gather together and create regularly. I take my hat off to Elizabeth Bonnar and her decision to found Feltmakers Ireland twenty years ago; the catalyst for lifelong friendships, masterclasses, collaborations, exhibitions, networks and travel.
To complete September’s birthday celebrations, I thought I would produce a slideshow of the Bountiful exhibition which is running for the month of October in Phoenix Park, Dublin Ireland. I took photos on the day so I apologise where the light may be shining on the artwork. There are over 30 pieces of art and it will give you an indication of where Ireland’s vibrant felting community is at in its journey. I hope you enjoy it!
Annika Berglund: Variations on a Green Theme II
Astrid Tomrop-Hofman: Positive Vibes
Deirdre Crofts: A good Day’s Catch
Clare Brophy: Share the Bounty!
Helene Dooley: Visualizing the beauty of the Sunflower Field
I’ve been practicing my spinning skills for a while now, and although I have mastered the technique of spinning finer yarn, I have a true passion for the more bulky, art yarns. I’m not a great knitter, I do occasionally enjoy crochet but I much prefer to weave. When I first took up spinning, like everyone I found that my yarn loosely resembled an ‘art yarn’ more than a fine yarn. It lacked a sense of purpose and it didn’t have that look of “yes, I intended to make this”! So my priority was to be able to spin an art yarn that looked like it was meant to be an art yarn! However, at the same time, having read so many comments about people who can only spin fine yarn or art yarn I didn’t want to reach a point where I was only able to spin one or the other. So I have tried really hard to chop and change my ideas, to try and avoid the pitfalls associated with spinning only one style of yarn. I’ve also tried really hard to make an art yarn that looks like it is meant to be an art yarn. I definitely think I am making some progress on this front. Let me know what you think…
I started with a selection of merino wool top in various colours, including an orange, cerise pink and teal as a base for my art yarn. I then decided to jazz it up with some beautiful turquoise bamboo, which I thought would add some sheen and lustre to the project. Like all good art yarns, I wanted to add in some interest so decided I would use curly locks of various different colours. Finally, to finish the interest side of things, I decided to include some recycled sari silk that was made up of different random colours.
To start off, I began to add the base merino to the carder. Unfortunately, I have broken one of the belts on my carding machine – it’s the one that operates the smaller of the two drums. But for this project, it didn’t really matter as I was not wanting a fully blended batt. So I was able to add all of my fibre direct to the larger drum. I did use my little packing brush to flatten it down as I went along.
You can see some of the recycled sari silk running through this photo.
In this photo, I’m adding sari silk again to the the mix. It was helpful that it seemed to work using it like a bangle, wrapped around my wrist enabling me to place it where I wanted it. If I hadn’t done it this way, it would have been hanging down and could easily have got caught up in the drum.
Once I’d finished carding a nice thickness of batt, it looked like this…
I was happy with the way in which it turned out as I wanted to keep the definition and not have a muddy blend at the end of it. But before I started making any more, I decided to spin it, just to check I was happy with the way in which the colours turned out.
These are some shots of the spun art yarn on the bobbin but only after I plyed it! Unfortunately, I got slightly carried away because I was enjoying myself so much, I forgot to take any photos! For the main art yarn, I spun this using a fine mohair yarn to core spin around. I made a mixture of thick slubs and thinner spun yarn, so that when I came to plying I could make some nice twirly spirals to add interest. When spinning the core yarn I also added in some random curly locks, which were all sorts of colours, that contrasted with the base colours I’d used in the batts. I also added some extra sari silk into the spin at random points through the yarn when I felt it needed a bit of Va Va Voom!
I was quite pleased with the spin…but as I said, unfortunately I didn’t take any photos of the yarn before I began plying. However, I did take a photo of one of the fat singles in teal. I also spun some in orange but no photo sorry.
A fat single in teal merino.
As you can see, there was quite a lot of twist in this as I was scared it would all fall apart when I was plying!
This was my first attempt at core spinning, so I was pleased to see it coming together as I intended. I started plying the art core spun yarn with the fat single, and it looked promising…
As you can see, I’m using an Ashford Jumbo Bobbin with my Ashford Traditional wheel.
I then transferred it to my niddy noddy. I didn’t want to soak the yarn in case I damaged the slubby spirals, so decided to set it using a hand held steamer. These are a few photos of the yarn on the niddy noddy.
I tried to take different angles to show the range of effects.
All in all, I made two batts of art fibre, which were about 100g each that I used for the core spin. I didn’t weigh the fat singles but by the end, I had four skeins of art yarn, weighing approximately 300g.
Looking at three of the skeins hanging up together, it looks quite ‘jewel’ like. So pretty, I’m pleased with the colours…
These skeins look almost ‘jewel like’
I wanted to use my yarn to make a woven scarf. However, I’m not confident enough in my home spun yarn yet to risk using it as a warp. This was especially true as I was hoping to use this project for the blog. I was mindful that the art yarn was going to be quite chunky. I only had a 7.5 30/10 dent reed for my rigid heddle loom, which would have been much too small for the art yarn. This was another reason I had to choose a different yarn for the warp. Having used mohair in the core spinning, I toyed with the idea of using it as a warp. However, I had read that mohair is very ‘sticky’ when used in weaving, so I did some research first before trying it. I did find some advice that said you can use it, if you utilise a pick-up stick behind the heddle to help clear the shed. The only way to know if it would work was to try it! So, having looked at my reed, I decided that given the thickness of the art yarn I would only use every third reed. That way, I envisaged that I would be able to space the warp out evenly when I when I separated each strand. Also, it would allow more space for the art yarn to show in all its glory.
This is the warp before I started weaving. As you can see, I decided to use three different colours of mohair, just to see what the effect would be…
This photo show how fluffy that mohair really is!
I started to weave with the art yarn, and to my surprise it was far easier to weave with than I had anticipated. The ‘stickyness’ of the mohair really didn’t present any issues for me. I think that because I had only warped every third reed, it didn’t have the impact it could have had, which was good.
I only took these two photos of the actual weaving process. One thing that I discovered when doing this project, was that I don’t actually have the weaving loom that I thought I did. When I first got this loom, as I always intended weaving with art yarn so I also purchased a freedom roller. I didn’t want to have the restriction in length of weave that I would face when using really chunky art yarns. Having never used the freedom roller before, I decided I would fit it onto the loom for this project as I really didn’t know how bulky the final weave was going to be.
However, when I got the freedom roller out and started looking at how it would fit on the loom, I soon realised that there was no way it was going to work! I struggled to understand why, so I took some photographs of the freedom roller and my loom, and sought some advice on a Facebook weaving group. It was only then, I discovered that my rigid heddle loom was in fact a samplet loom!!! I realised that what I thought I had ordered, was not in fact the loom I did order! School boy error on my part, as a complete novice!
In the end, all was good as it turned out, I didn’t need the freedom roller after all (she breathes a sigh of relief!). When the project was finished, I removed it from the loom, and considered what to do with the ends. The mohair was very thin and sparse, so would not make for a good fringe. Having twirled the mohair into little tassels, I then decided to tie some additional curly locks to pad out the effect.
Here, you can see one end completed…
When I tried on the scarf, I realised that I had made it a little too wide to make it into a comfortable scarf. So it was at this point, I decided that rather than using it as a scarf, it would work better as a stole. However, this now presented me with another need…
If I was going to use this as a stole, it would need to have some sort of decorative pin to hold it in place. I didn’t want to have anything too colourful or fussy, as that would be lost in amongst the art yarn. So I decided to make a wet felted butterfly, with wings that were primarily one colour, with some accents of a different shade.
Here is my blue butterfly…who does have an orange body, just to make the body stand out a little…. The wings and body are made from merino and the accents of paler blue, are made of the bamboo, which I fixed with wisps of the merino to felt them into place. I decided to leave the resist inside, just to provide a little more firmness to him.
I did try to add some sequins as way of creating more sparkle, but as they were so small, I found them difficult to sew on (my fingers are not so nimble as they used to be!). I tried gluing them in place, but that didn’t work either! So in the end, I just left him as he was. I do intend making him some antennae, but I haven’t had time to add those in yet. He is attached to a large kilt pin, so he can be used to hold the stole in place.
I’m really happy with my first project, using my own spun yarn, hand woven, and completed with wet felted butterfly pin. I’ve used three different skills in this project, and I’m really pleased with the end result. I was surprised at how dense the weave turned out. Having only used every third reed, I expected it to be much looser than it ended up. Perhaps next time, I will try an even wider warp, using the whole loom and leaving a larger gap between the warp threads. It’s all a learning curve, but for now, I am really pleased with the results. It’s lovely and warm too! I’m almost sad summer is on the way, but I’m sure I’ll get lots of use out of it next winter,
Some of the first felt objects I made were vases: made around a flat u-shaped resist that I designed to try to get a good even layer of felt on the base (wobbly bases not being good for vases). Every so often I get the urge to make a few vases, so I thought I’d show you some I’ve made recently.
My felt pictures are often inspired by my coastal environment. So, I thought I’d make some coast-inspired vases.
Silk laid out ready to prefeltPrefelt pebbles cut outVase layout ready for feltingFinished vase (with glass inside)
I prefelted some recycled silk scarf pieces to make pebbles then added pebble shapes to the lower section. The sea area had a pewter-coloured merino base with blue and green wisps of wool plus some silky fibre for the sea foam. The wave was a combination of some sort of knitted yarn I’d also found in a charity shop, with added mohair and the same silky fibre (I’m not completely sure what it was, it was just hanging around and looked suitable!)
2 more coastal vases – in the wild
I made 3 in total – here are the other 2.
Sometimes it’s the materials themselves that suggest pieces rather than the local scenery. I put some beautiful bright coral-coloured dyed locks against contrasting duck egg blue and teal merino and thought that might be interesting
‘Locks’ vase
Continuing my vase-making spree: I’d dyed some merino for a workshop last year and I thought it might be a good idea to use up some of the hand-dyed wool on vases.
Purple 18.5 micron merinoBlue / green 18.5 micron merinoRed / orange 21 micron merino The purple vase with hyacinthsRed / orange vase with roses
Now enter stage left the plant pot. A friend who’d previously bought a plant pot holder from me asked about making one specifically to suit a plant she had. I wrote a blog a while ago about my love / hate relationship with commissions but that was about pictures – I felt much happier about a plant pot as it’s not such a big commitment.
I was keen to include her in the design so I did a couple of very quick potential design sketches and consulted her on the fibre colour choices. As the plant was only in a plastic pot with holes in the bottom, I scoured my local charity shops and found a beer bucket to make the plant pot water-tight.
We decided to go for coral / pink / burgundy colours to highlight the under-sides of the leaves and an overall texture rather than a leaf-shape pattern.
Inner 2 wool layersOuter 2 wool layers
I decided to do the top of the inner 2 layers green so it would show when you look down at the pot. With hindsight I should have done the whole of the inner layers green but I wasn’t sure I had enough of the green so did the lower section white. I carded together various colours of merino and silk fibre rather than use the fibre labelled ‘carded’ on the fibre picture – but keep and eye on that as it comes back later on….. Then laid locks on top.
And here’s the plant in its personal designer pot. My friend was very pleased with it.
Then it was back to the vases but with a twist. I recently found in a charity shop an old chemistry lab heavy glass 3 neck flask and, as ever, I thought….I wonder how that would work with felt. There’s a little corner of my brain that is devoted entirely to felting possibilities and it kicks into play whenever I’m mooching about charity shops, which is often!
On the same day I found some interesting yarn in another charity shop so I splashed out a further 20p and thought I’d bring these 2 finds together.
I was clearly wearing my sensible head that day as I made a sample with the yarn to make sure it would felt and see how it came out. Even more sensibly, I used it on both sides of my sample (I wish I always remembered to do that) so I could decide which effect I liked best
Interesting yarn – cotton?Sample side 1Sample side 2
I stared to ponder the engineering challenge of the 3 neck vase and decided I’d have to have a hole underneath. Usually my vase covers are solid on the under side and the glass slips into the top. With this I wanted the felt to fit tightly round the necks so I’d have the glass entry point on the base. I carefully measured and calculated at least 40% shrinkage then made my resist. This time an upside-down U-shape
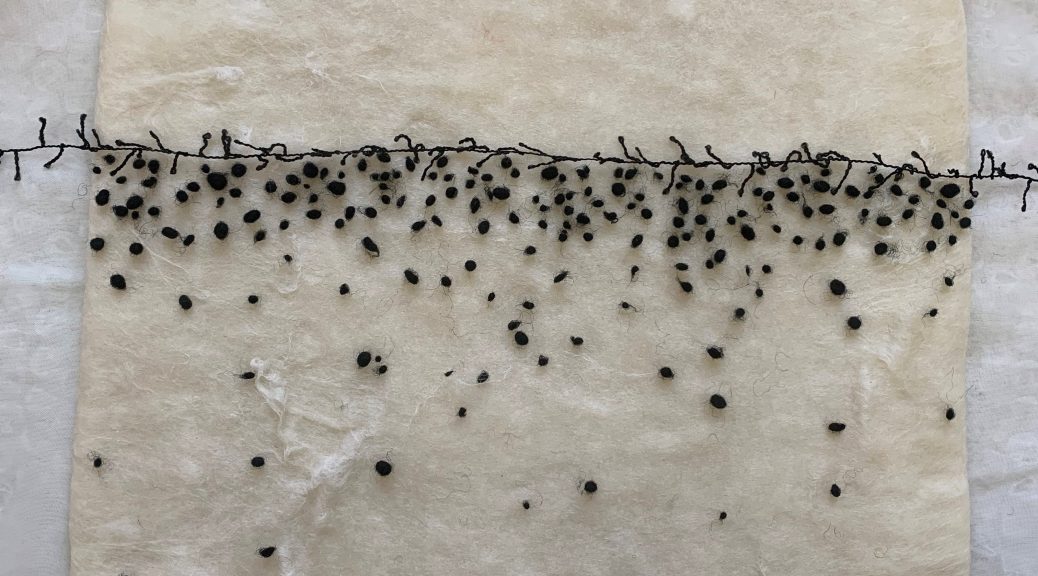
I laid 4 layers of natural white merino over both sides of the resist then ran a single strip of the yarn around. I then added single black nepps below the yarn line, more densely near the yarn and just a few further down the shape. This seemed like a good idea but it took absolutely ages to separate out individual nepps, pick out only round ones and of a similar size, and then place them where I wanted them to sit. One of those decisions you regret before you’re half-way through but can’t bear not to finish as you’ve already invested so much time in it!
Anyway, here’s the finished vase. Actually, I’m pleased with the pattern, although I’d intended the yarn to sit a bit further up the flask. I’d not properly taken into account how much of the felt would be underneath.
3 neck vase – with & without tulips
I thought I’d find some more old 3 necked lab flasks. Having consulted both EBay and Google it rapidly became clear that they are not to be had. I have not found a single similar 3 neck flask (there are new ones which are much thinner and tend to have domed bases, no good for vases). The nearest I could find was a similar heavy glass 2 necked flask which is on EBay for £40. £40! I now feel I can’t sell my vase as I don’t want someone to buy it for the flask and rip off the felt! So, that one is staying with me, at least for the time being.
And finally we come back to the pre-mixed fibre I mentioned (labelled ‘carded’). If you’re ever lucky enough to visit World of Wool in Yorkshire, you’ll see they have two huge skip-type bins full of ends of lines and wooly remnants (one with coloured fibres and one just cream /white). There’s a low fixed-price per weight for the content of each bin and you can ferret out all sorts of hidden gems. I can spend a long time almost falling into those bins. This mystery fibre-mix was one such find.
I thought I’d make a vase using that plus a piece of a pink silk scarf I’d just found in a charity shop. That day, alas, I was not wearing my sensible head and didn’t think to make a sample: partly because I didn’t have a lot of the fibre and partly, well, because I just didn’t think about it.
I laid out 2 layers of a matching pre-dyed merino, 2 layers of the mystery fibre and a strip of silk and set about felting. Fairly soon my error became clear. The mystery fibre was not felting at all. I persisted. It still didn’t felt. I persisted. And persisted. In the end it did felt, presumably with help from the 2 inner layers of merino. It shrank more than I’d expected and the fibre hadn’t been all that keen on pushing through the silk, which means the silk ruching is rather loose in places. But it’s fixed completely round the edges and anyway, I like a bit of loose ruching.
Fibres being laid outVase with tulips‘Raspberry Ripple’ Vase
So, here are my recent adventures in vase-making, with a little diversion via a plant pot. I hope you’ve enjoyed them. Do you have a favourite?
At the Waltham Textile group we normally have a biannual exhibition of our work but, due to Covid, it was cancelled in 2020 rescheduled for 2021 and then had to be cancelled again. It’s now been confirmed for August but in the meantime I’ve sold my main “Leaf” themed piece so recently made this mixed media “Monstera” to replace it.
I’m also thinking of submitting this piece for the 2022 IFA online exhibition which has the theme of Flora & Fauna. I’m waiting to hear if a mixed media piece will be accepted. I can’t imagine it being a problem but, if it is, I can simply crop one of the images to show the felted leaf.
I bought a 40cm x 80cm canvas with the intention of painting Monstera leaves on it and then adding a 3D Felted leaf. After drawing a template onto paper and offering it up to plan the layout I changed my mind about painting onto the canvas. It’s not something I’ve done before and the surface appeared to be a bit too textured for the look I wanted to create. Instead I sketched the leaves onto a piece of white cotton fabric, outlined them with an Inktense pencil and added a little shading. The aim was for very simple, very smooth, perfectly formed leaves looking more like curved metal than the foliage on my cheese plant. I think this was influenced by the very smooth metallic looking Tyvek seed pods I’ve been making lately. The Monstera in our lounge has been a bit neglected, to the point that I couldn’t bring myself to photograph it for this post!
I don’t consider myself a painter but I do like painting on to fabric. If you need to paint precise lines a good tip is to use aloe vera (by far the cheapest) or acrylic medium instead of water when applying acrylics on fabric. This keeps the paint where you want it to be and avoids it bleeding into other areas. I managed to get a tiny bit of black paint on the lower section of the fabric but stopped short of starting all over again when I realised the felted leaf would cover it up!
My paper template for the painted leaves was 13” x 18” so to make the felted leaf I multiplied by 1.4 enlarging it to 18.5” x 24” to allow for shrinkage. Layer one was a very yellowish green Merino (might have been lichen but not certain). Layer two was a combination of various shades of grey with the yellowish green running down the centre. This was topped with a layer of dark green Merino and Ireland Viscose all around the edge and snippets of gold Viscose down the centre. These images don’t give a true representation of colours but you get the gist.
After wetting out I measured the fibres and found they had spread to approx 20” x 27”. At the fulling stage, every now and then, I put the original template on top to check for size and ensure I was keeping to the right shape.
Once it had shrunk to the correct size it was left to dry. The next stage was to add wires to the back of the leaf so it could be shaped. This could possibly have been done with directional laying of the fibres and lots of fulling but I wanted the option of posing the leaf once it was attached to the canvas and wires are a good way of doing this.
The wires were spaced out and attached on the reverse using a zigzag stitch which also formed the veins on the front side. You can see that bright yellowish green colour on the reverse of the leaf. Once that was done it was just a matter of cutting into the felt to form the individual leaves and the characteristic little holes of the cheese plant.
After attaching to the canvas with a few strategic stitches the leaf was given its final shaping. It’s now hanging in the lounge above my cheese plant where it will stay until the exhibition…..although if I do get the chance to sell it I suppose there is still time to make another!!


 I tried to take different angles to show the range of effects.

 This photo show how fluffy that mohair really is!

 When I tried on the scarf, I realised that I had made it a little too wide to make it into a comfortable scarf. So it was at this point, I decided that rather than using it as a scarf, it would work better as a stole. However, this now presented me with another need…
 I did try to add some sequins as way of creating more sparkle, but as they were so small, I found them difficult to sew on (my fingers are not so nimble as they used to be!). I tried gluing them in place, but that didn’t work either! So in the end, I just left him as he was. I do intend making him some antennae, but I haven’t had time to add those in yet. He is attached to a large kilt pin, so he can be used to hold the stole in place.