Browsed by
Tag: Holiday exchange

A New Drop Spindle and the Holiday Card Exchange

A New Drop Spindle and the Holiday Card Exchange

In early September I came across the website John Galon Designs. I think I found the link in a spindle group on Facebook but I don’t remember. https://johngalen.com/  He makes beautiful spindles, many from old, timepieces. I didn’t get a timepiece one but I did get one.

Here is the reveal

Are you ready? here it is:

It is a very pretty and cool spindle. The acrylic in the middle is actually clear but the purple of the spindle radiates out through it. There are about a dozen colours to choose from. I am really pleased with it. Now I need to spin properly with it. I am not used to a spindle with such a small whorl.

The other thing I wanted today is to announce the 2020 holiday card exchange on the Felting and Fiber Studio Forum.  We have been doing a card exchange for several years now. Its a fun and easy way for us to share a little cheer at this time of year.

You can sign up on the forum, here: Holiday Exchange link

the deadline to sign up is Oct 24th, Partners will be assigned ( by random generator) on Oct 25th

You have to make a felt card and send mail it to your partner by Nov 14th

Once you receive your card you post a picture of it on the forum

The cards do not have to be Christmas cards they can be anything. There is a lot going on in late December and there is New Year too.   We are starting a little early this year and on a tighter timeline, having you ship earlier so the cards have a good chance to get there for the holiday season.

Here are a few I have made over the years


Thank You from Zed and the Holiday Card Exchange

Thank You from Zed and the Holiday Card Exchange

Zed wanted me to include her thanks to all of you for your generous support. Here’s what she had to say:

Ruth,
Please could you pass on my sincere gratitude to everyone who made a donation or bought an e-book or tutorial to support me at this difficult time. I was absolutely blown away by the kindness and generosity of so many people.

I’ve had very little motivation to felt or be creative at all for many months, and whenever I did try, it felt ‘forced’ so wasn’t really enjoyable. As well as the generous donations, I also received many comments and messages which have made me feel very appreciated and cared for. In fact, they made such an impact that I felt like a huge weight was lifted from my shoulders. I’ve been feeling so much more positive. And although I haven’t had chance to do any felting yet, (but who has over the holidays!?) I feel like I have a renewed love for it, and have had lots of ideas for things to make and write about. I hope everyone enjoyed the holidays, and I hope the new year brings great things for everyone. Thank you so much 🙂

Now on to my regularly scheduled post!

Every year on the forum, we do a holiday card exchange where members make fiber art cards to send to their assigned partner. It’s a lot of fun and you get a great small artwork from another member of your “tribe”. It’s always fun to see what everyone creates and the cards are always so different. You can see some of them here. You have to scroll down and go through all the pages to see all the cards that have been posted so far.

My partner this year was Antje. She is one of our regular contributors here and I correspond with her frequently so it was fun to send each other a card. Since I was working on the concept of using stuff up, I searched in my studio for felt that would work for a holiday card. I found some screen printed red and green felt.

The red pieces had almost berry like shapes and the green had pine needle shapes. Perfect! I just had small pieces so I cut and stitched them into strips and then sewed them all together. I butted up the edges and zigzag stitched them together. They were a bit wonky but I didn’t need perfection. Once I had a post card shaped red and green felt, I needed to add an element. So how about a tree? I found a piece of white felt and cut a fairly wonky tree shape.

Here’s the card after stitching around the edge of the tree to attach it to the background. I then found some star sequins and did a little French knot to hold each one down. I then fused the felt down to a regular white card blank.

Then I found a nice font on the computer, printed it in “matching” color and added a holiday greeting. I did add a little surprise inside but forgot to take a photo of that before I sent it off to Antje. It was a bit nerve racking because it took over three weeks to arrive. I sent a package of wool to Lyn on the same day and that was received in less than a week. But a card in a standard envelope took what seemed like forever. Just when I was thinking I would need to make another card to send, Antje received it. Yay!

Then, just after Christmas, I received a package from Antje, much bigger than a standard card. What could be in there?

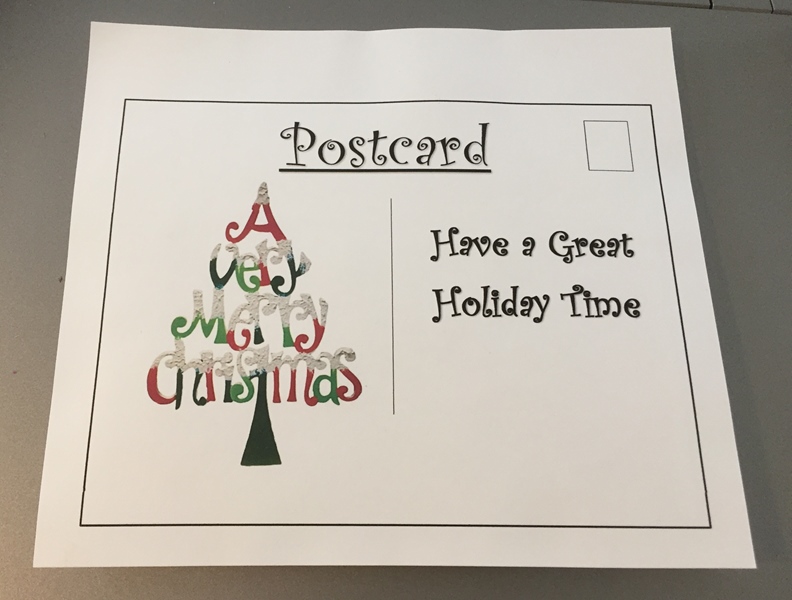
She did send this lovely card which is gorgeous. Such an innovative way to depict a tree.

But then, I also got these three items. The birch bark piece on the left is wonderful and since I love trees, it is going to find a prominent place in my home. I love everything that Antje sent me and it was such fun finding these extra surprises. Thank you Antje!

We would love to have you join us next year with our holiday card exchange. Join our free forum so you’ll know when to sign up.


Ruth’s Holiday Card

Ruth’s Holiday Card

It’s holiday time again and we ran a holiday card exchange with members from the Felting and Fiber Studio Forum again this year. People signed up a little over a month ago. I ran the names through a random name generator gave everyone their partners name and by now all the card should be mailed. I got Ruth this year.   I usually just do one card but I hedged my bets and made 2 this year.

Here is how I made it. I started with 2 layers of white prefelt. I added the sky and then the snow.

Then I used some darkish green prefelt to cut out triangles for the background trees. And some light gray to add some shading so the snow wasn’t flat.

Then I added the foreground trees using some blue faced Lester curls fluffed out. The one on the left is the one that ended up as  Ruth’s.

And some silk for the clouds.

This is what they looked like felted but still wet. They are very lightly felted. I had planned on felting them more but I liked them as they were and didn’t want to distort them.

Then I added more curls to fill out the trees and to make them stand out from the background. I tried to make them all a little darker on the right side. Then some snow. The snow did 2 things: first, it added some nice high lights but it also made the branches look like the go side to side and not up and down. I added the locks up and down and it was noticeable.

I decided the silk was too shiny for clouds and covered them in a very thin layer of the light gray wool.

I liked the picture but it was lacking something so I added some French knot sheep. They were tricky to do because the felt was not firm at all. The thread didn’t want to stay where I wanted it but pull over or sink in. If I had been thinking I would have put some stabilizer behind it.

I needed to make it into a card. I chose to do a postcard. I made one up to the right size on my computer following the basic template. I used iron-on facing to glue the card to the back of the felt.

I trimmed it and popped it in an envelope and sent it on its way to Montana. I crossed my fingers it would get there in time. We were having rotating postal strikes in here in Canada. Fortunately, the postal gods were smiling on it and it did make it there in about 2 weeks. I still need to add some sheep or something to the other picture. I do not know what I will do with it. I may just frame it.


Snowflake Holiday Cards

Snowflake Holiday Cards

Every year we have a card exchange on the Felting and Fiber Studio forum. Whoever wants to participate signs up, we choose partners and those partners exchange a hand made card. This year I had two partners as we had an odd number of people, so I made two cards. I like to do more of a winter card rather than a specific holiday card. So this year’s card was all about snow and snowflakes.


I started with a piece of felt that I had stamped with the spiral stamp shown above and then drawn on with thickened dye. I attempted to over dye the felt but it wouldn’t take any more dye. The photo on the left shows the back side of this piece of felt. (I forgot to take a photo before I fused the sheer fabric on the front.) I decided that I would stitch snowflakes over the stamped spirals with the lines in between stitched to look like frost or jagged ice. But the color wasn’t too good so I looked in my stash and found some sheer fabric in blues and purples that already had fusible on the back.

So I fused the sheer fabric down. I have started the free motion machine stitching in the photo above. I found the easiest way to stitch the snowflakes  was to get the 6 or 12 radiating lines down first and then add the rest of the structure. You can see that the one on the left that didn’t have the radiating lines turned out really wonky. But this didn’t really matter as it will be covered in the next step. This piece of felt is big enough for two cards so it will be cut down to size in a later step.

Here’s the piece after I stitched all the snowflakes. I was a little sad to cover these up. They do show through but not really giving you the full scope of the stitching.

Then I found some more small bits of sheer fabric that I added over the stitching to give more color.

This is hard to see but there is a very sheer, shiny “fabric” that I stamped with acrylic paint. I am not sure what this fabric is, it looks a little like Lutradur but is more shiny and more open “weave” than the other Lutradur I have. I can’t remember where I got it. That is why I need to use stuff up. It’s bad when you have no idea what the stuff is, where you got it or what it’s original use was. So use stuff up!

I then fused the top layer over the variety of colored sheers and then cut the cards down to size. I machine stitched around the printed snowflake for the top layer and then zig zag stitched around the edges of the card.

I only had brown card blanks and I didn’t like the look of the snowflakes against the brown background. So I used two of my numerous colored papers that worked with the colors in the pieces. I glued the fabric card down to the paper and then fused the paper to the card blanks. I mailed these two cards off to Ann and Diane. Hopefully, they will like them. Unfortunately, there is a postal strike in Canada and it may be a while before the cards arrive.

Do you make your own cards? We’d love to hear about it over on the forum if you do!


This and That

This and That

My plan was to show you the needle felted sheep class I taught a few weeks ago but it seems I took a lot of pictures of my hand and only ended up with two group pictures at the end. So here they are:

That doesn’t seem like much so I though I would show you what my house looked like on Sunday morning. It was so pretty and I may do a felt picture of using one of the pictures for inspiration. It was only -2c and all the snow is gone now.

I have a couple of new felting tools. The first I am told is for sitting on to help with some hip problem but I found 2 of them (cheap) at the second hand store. Value Village for those who live in the USA or Canada. I will attach a strap of some sort and give it a try.

Jan Found this great foot massager for me. It should be interesting to try out.

Lastly If you signed up for the Holiday card exchange the partner names are now up on the forum holiday-exchange-2018

As you Read this I will be at my Guild Exhibitions and Sale. It’s in Ottawa Ontario Canada if you are in the area drop by and say hello. facebook.com/events/

Also, I would like to encourage anyone who would like to learn how to make felt bags to sign up for Teri Berry’s online class. Registration is now open and class begins November 22. For more information and to register, please click on the link to the Felted Bags online class.

Who could resist learning to make a cute bag like this?


Time for the Holiday Exchange Again.

Time for the Holiday Exchange Again.

Hi readers, it’s that time of year again where we start to think of the holiday season. We like to do an annual holiday exchange over at the forum.  We will be doing a felt card or postcard. It doesn’t matter what you celebrate you can participate. Maybe you don’t celebrate anything , you can still participate. The idea is to have some fun and exchange with a fellow felt lover.
Heres the way it works:

You sign up over on the Forum by November 4th: holiday-exchange-2018 

On November 5 you will be given your  partners name. You contact each other through the private messaging system on the forum to exchange addresses.

You have until November 30 to  work on your card  and then mail it on or before Dec 1 so that it will arrive at your partners before the holidays start.

Once you have your card post a picture of it in the exchange thread on the forum. holiday-exchange-2018


If you would like to see more of the pieces from other years here are some links:

holiday-exchange-2017

holiday-exchange-2016

Holiday Card Exchange

Holiday Card Exchange

We are in the midst of our Holiday Card Exchange over on the forum. We’ve picked our partners and now I have to buckle down and get the card done. Tracey is my partner and I already warned her that I was posting this. I won’t show the finished card until after she gets it but I thought I would show part of the process. I decided to continue to try to use things I already have partially made around the studio. So I am using samples from my Nuno Felting with Paper Fabric Lamination online class.

I decided I would create three cards. Then if one doesn’t turn out, I don’t have to start over again. I have two other choices. This is the first layout. One of my paper fabric laminated samples over blue prefelt.

The second layout is a little hard to see. It is a white merino batt with the paper fabric lamination on top. I think this was from a print of some prior artwork of mine.

The last one is what I might call a fail on the paper fabric lamination front. It is silk chiffon but if I remember correctly the paper was dyed but I didn’t realize it hadn’t been set. So the dye ran everywhere in the midst of the lamination process. But this one might be interesting once it is felted and further embellishment is added.

Here are the three samples after being wet down and rubbed a bit.

And here they are after felting. I didn’t full these much at all as I didn’t want too much shrinkage. Now they need further embellishment. It might be machine stitch or hand stitch and I might even add some beading. Or I could go wild and add paint on top like I recently did with my bark sample. So many possibilities…

Which is your favorite? How would you finish them?

Holliday Exchange

Holliday Exchange

Hi all,  for those who may knot know we also run an interactive forum for felting and fiber folks. It’s a great place to share your work, ask questions and help each other out. http://feltandfiberstudio.proboards.com/

Each year we have a holiday exchange. You make a small felted post card or similar size card with some felt on it. We are doing it again this year.  If you would like to participate then hop over her and sign up. http://feltandfiberstudio.proboards.com/thread/3495/holliday-exchange-2017

Here’s the time line:

October 4-Nov 9: people sign up

November 10 partners are announced.

November: Make your card, contact your partner for an address

December 1: Mail your card

Here are some of the cards form our past exchange, there has been lots of variety.


MINOLTA DIGITAL CAMERA


%d