Browsed by
Tag: felted hat

Finished the Hat

Finished the Hat

I got my ha finished…Yay…  So naturally, it is raining. Oh well, I know the cold will come.

Rub, rub, roll, roll. You know the drill. once it shrank enough I popped it onto a hat form to see how it was doing size-wise. It is very hard to photograph because it is so dark and the silk by and large disappears once it is wet.

Top view, it looks a bit raggy around the brim but it isn’t. It has silk wrapped around it and it has shrunk up making wrinkles.  Except for one spot at about 11:00. I will have to sew or needle it down.

Side-ish view, You can just see the silk colour.

It is on my high dome block. It is much too tall but I like the slope of the crown on this one better. the height I want is the block in the back but it is much flatter on top. It is loose on the block too. So more rolling. It didn’t take much rolling to get the right size around but quite a bit to get it short enough.

and then it was time to roll the flower

I pinned it in place so it will dry rolled up nicely.

…..two days later and it’s dry. I am taking pictures quickly because I need my table to wrap presents. I have tried to brighten them on the computer so you can see them better.

This slideshow requires JavaScript.

It looks good but trying it on it’s a bit tight. Then I realize why, my high dome is a 22 and my other one is a 23. I need the 23 to allow for my braid. So I turned on the steamer and got it hot and stretched it out to 23 using the right size block. Now it fits properly.

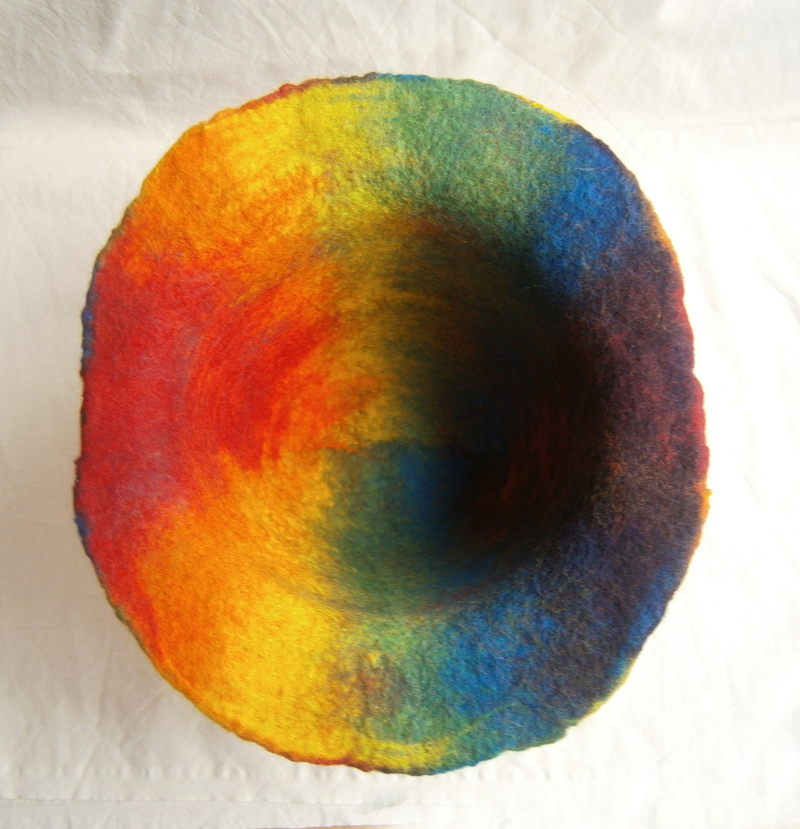
here’s the inside or underside however you look at it. again the dark colour is hard to see but I think you can see the texture of the silk with the Nuno felt.

the felting is finished but I think I will shave it to see if I can bring up the colour of the silk more.  I still need to make a couple of leaves out of this felt and sew the flower so it stays rolled up.

I hope that for the next post I will have something else to show you but also the hat with the leaves and maybe even on my head.

I hope everyone is having a wonderful holiday. It has been great to be able to stay connected to you all through the internet. It has really helped keep me sane through this stressful year of the pandemic.   I will see you in the New Year.

Ann


Early Celtic Art Challenge Project Begun

Early Celtic Art Challenge Project Begun

I finally had a little time to begin working on a piece for the 2nd Quarter Challenge. Ann chose the Early Celtic art period and so I followed the links that she gave in her post. I didn’t realize there was a difference in later Celtic art (which is what I always think of when I think Celtic) and earlier art. I have been wanting to make a hat for a while now. Not sure why but I haven’t made one in quite a while so I decided I would research hats from the same time period and add an early Celtic design to the hat.

I found my design on the Ancient Celts site that Ann recommended. Then I researched hats in that same time period and found the Pileus. Now I am not sure that Celts wore this type of hat but it is from the same time period and was made from felt. It actually was worn by freed slaves and is conically shaped with no brim.

So here is a printout of the design, I used the bottom one. And then I enlarged it to fit the brim of my hat. I drew it by hand and then used permanent pen so I could see which line I was to follow.

As you can see from this closeup, I changed my lines as I went along, drawing with pencil first.

Here it is after cutting it out. And again, I didn’t follow all my pen lines. If I felt that I had drawn an area so it was too skinny, I cut to give it more width.

Here is the resist I am using for the hat and the design where it will go along the brim.

I then pinned it down to prefelt so I could cut it out.

I folded the prefelt into two layers so that I would have prefelt pattern all the way around the brim on the front and the back of the resist.

And here it is after I cut it all out. These hats traditionally are white with minimal decoration. So I am going to make the hat white too. So it will be white on white. If the pattern doesn’t show up well enough, I will do either hand stitching or machine stitching to outline the Celtic pattern.

The plan is to make the hat to prefelt stage and then stitch the cutout prefelt on to the hat to hold it in place better. I don’t want to have to worry about the pattern shifting around when I am felting it. So next time, I will hopefully show you the finished hat.

Spiked Hat Class

Spiked Hat Class

Last month I taught the spiked hat class at the Ottawa Valley Weavers’ and Spinners’ Guild. I had 6 wonderful students. Some did hats with brims and some did hats with folded up bottoms. As usual I did not take as many pictures as I should.


hat-2 hat-2-rolling


Notice how she is putting dots on the inside of the hat so they will show later on the outside.


And lastly the finished hats. one person did not get the spiral for the spike to warp around in finished in class. I offered to stay but she said she would do it at home. I would like to see a finished picture of it. the paten around it was quite nice.

group-shot group-shot-2

Everyone liked making their spikes and learning how to attach them and then shaping in the swirl for it to lay in.  The spick does need to be tacked in place so it stays put or when you bend over it falls out. All in all a good class.


Felt Hat and Flower Delivered.

Felt Hat and Flower Delivered.

I did finally got the commissioned hat and flower finished. I decided to make two hats so she had a choice. One I put silk hankies on the other I left plane.

This one has the silk hankies. It was hard to get a good shot that showed the silk.

pink hat with silk 1 pink hat with silk 2

And the plane one

pink hat 1

I thought the plane one was …. to plane, so I added a silk band. I twisted the long piece of silk and then folded it in half and let it wrap around itself like yarn. You can see it in the final picture below.  After trying both on and looking in the mirror Rebecca chose the plane one and the lily flower. She really is a hat person they both looked great on her.

rebeca in hat rebecca in hat 2


Here is a picture of all the finished flowers.

flowers finnished flowers finnished back

I needle felted the layers together and then the needled the leaves into position. Then using invisible nylon thread I added the large safety pin. I sew through all the layers of felt in the center just to be sure it all stays together.


A busy week

A busy week

I have a show coming up this weekend (fiberfest) so I have been busy getting ready or trying to get ready. I have managed to get the soap felted. I have very clean  and wrinkly hands as I type this. 🙂

felted soap

I could list what I don’t have dome better than anything. I do not have these hats finished. I am hoping to do that today.  The red one needs the strings cut an then some buttons put on to hold the folds. The green one needs the feathers outlined and the veins sewn in. the orange one need reshaping.

hat collage

I have spindles made but they need painting and then the kits put together.

spindles waiting for paint

I have 2 scarflets, 2 sets of fingerless mitts and a pill box hat that are half felted. I don’t think they will be get those finished. No picture of those, sorry

To add to the chaos I got a part time job. I drive a van taking children to school. So I spent the week end working out the timing for the trips and this week doing them. Going back to school time is organised chaos. Excited and nervous children and parents, school busses and vans and we all want to be at the front door of the school at the same time.

Now back to the salt minds.

Another Hat

Another Hat

A couple of weeks ago, I posted about my first felt hat. I had a think about how I could improve on the design and resist and thought I’d give it another go. I also thought more about shaping it and blocking it to get a better shape. This time I used an upturned glass bowl with a couple of microfibre towels and bubble wrap on to finish the felting/fulling. Last time I said I’d used mt head and for some reason most people had a vision of me with soggy soapy roving wrapped around my head frantically rubbing for hours! 🙂 What I really meant was for pulling the hat into shape and the final fulling stage, I used my head. This was the finished hat:

OLYMPUS DIGITAL CAMERAAs it dried, I removed the bubble-wrap and added the lid from a storage tub, this gave the top a flatter shape. I kept checking the size, and removed another towel and let it dry with just one towel and the lid over the bowl. This is the flatter top.

OLYMPUS DIGITAL CAMERAI increased the size of the resist slightly, but this time only used 2 layers of wool, I thought this would keep it softer, and not shrink so much. The idea worked in theory, but the amount of fulling I had to do to get the correct shrinkage caused a lot of wool migration which makes the hat look very fuzzy and the colours are dulled. This is the wool migrating through and over silk:

OLYMPUS DIGITAL CAMERAYellow and red wool migrating through blue:

OLYMPUS DIGITAL CAMERAWool over silk and cotton gauze:

OLYMPUS DIGITAL CAMERAI might shave it carefully to remove some of the fuzz. You can see the shape a bit better from underneath, and I had the narrow sides again, where the edges of the resist were, I’m working on ideas to prevent that for next time.

OLYMPUS DIGITAL CAMERAI mentioned in my bag post last week that I’d been looking at eyelet kits, but couldn’t decide. I’m glad I couldn’t, because while I was out on Friday I had a good look around a ‘bargain’ shop and found myself a kit for £2.50. I also found a pack of 2 rainbow luggage straps, which I’m hoping will be perfect for the drawstring channel of my Pollock bag. If not, they will be perfect for something else! I also found some woven cord too, which will be ideal for drawstrings. I got a couple of different colours of this.

OLYMPUS DIGITAL CAMERA

My First Felted Hat

My First Felted Hat

Last time I posted, I’d been working on a hat template. A couple of days later I got a chance to work on it. I made a resist out of a large piece of dense plasticy foam stuff I had, probably some kind of packing material.

OLYMPUS DIGITAL CAMERAI made a batt from some browns, greens and rusty orange Merino for the first couple of layers. I laid the first layer on the resist, wet it down, flipped it over then folded the wool in and finished the first layer on the other side. I repeated this colour on the second layer, but laid the wool at 90 degrees. For the third and fourth layers, I used more greeny shades, then I added some torn silk pieces (bottom right photo)

hat comp 1I felted it until it was holding together, then removed the resist. I knew it would be hard work, but hadn’t realised just how hard! I seemed to rubbing and shaping for ages. I thought a bowl I had would be good for fulling and shaping, but it was only good for a while, so I finished fulling and shaping it on my head. I didn’t consider that it would shrink some more so it ended up a bit too small. Using my head made it more of a cloche hat than a bucket hat too. But, not bad for a first go, I think.

OLYMPUS DIGITAL CAMERAThe brim wasn’t very even, though it did feel good being smaller at the back.

OLYMPUS DIGITAL CAMERAI don’t think the brim was wide enough, at the front either. Some of the silk pieces came off and I realised I should have worked inside out.

OLYMPUS DIGITAL CAMERAAnd, upside down it does look a bit like those moulded cardboard bed-pans 🙂

OLYMPUS DIGITAL CAMERAI might rework the template and try again. Maybe 🙂

Working on some Hats

Working on some Hats

I have been working on some hats. this week. A couple of weeks ago I sold my last Viking hat so needed to make some more. Theses are the 2 bases for the hats. They will have horns felted onto them.

viking hats start

I do not know what colour to do the horns on the blue one. Last time I did yellow but I do not have any yellow wool right now. What colour would you use?

I also finished the felting on 2 more pill box type hats.

hat sides hat tops

The purple hat has green blue faced leicester curls.   The pink one has silk throwers waist. I will sew them together this weekend.  I need to make scarves but what i really ant to do is more fingerless mitts. I am having fun with them.

Hat Making Class

Hat Making Class

I thought a hat making class last saturday. We had a great time and everyone had a wonderful hat at the end. I forgot to take pictures till the end. After a year of blogging you would think I would be used to taking pictures of everything I do. However I do have some pictures from the class I taught last winter. They were given to my by Jan who is in the class. I lost most of my pictures in a computer crash. The hard drive is off hopefully getting my pictures recovered.

Trolley for class materials.

This is my trolley that I use for class. My bins of wool for embellishment and my tub that has the little buckets, pool noodles, bubble wrap, resist material and other odds and sods.

Jan starting to layout of the wool.

Here is Jan starting to cover her resist with wool and the 2 halves of her hat finished and ready to put together.

Laying out the wool for a pill box hat

Here is another student who decided to do a pill box hat in cow print.


This is a red and white hat with a few embellishments to help it not look so Christmasy.

Red and white hat ready to wet.

Getting the wool wet using a ball browser. It is a bonsai watering tool that felters are using now. It sprinkles the water just where you need it.


Sorry no pictures of the felting everyone was to busy to take pictures. They did some rubbing and then some rolling then some kneading and throwing.

This is Jan’s hat ready to do some shaping.


The 2 pieces of the cow hat are ready to sew together once they are dry. The sides are a bit floppy with being wet.

Jan modeling her hat form 2 sides. She did more shaping and ended up twisting the tale and inserting inside the brim.

Jan’s hat finished

and now the red and white hat

Red and White hat finished

And last but not least is the picture of my student from last Saturday  wearing their hats

Hat Class Oct. 2012

Everyone had a good time and ended up with a hat that fit them in a style they wanted. Whenever I here someone saying their head is small or large of too round or flat or whatever I always say well come to a class and make a hat tat fits you. The best hat block you have is your own head. So give it a try on your own or in a class make the hat of your dreams.

%d bloggers like this: