Browsed by
Tag: fabric

Textures

Textures

Do you remember my green thing from the other week? Well, I finally got around to finishing it off. It started off as a fine, wispy, flat piece with lots of commercial art yarns through the layers. I gathered it and stitched through to secure then re-wet and finished fulling it. I usually work them on bubblewrap and my felting board at this stage, but I just put it in the washing machine with a quick wash, and it came out pretty much the same. I did finish off the top between my hands though:

OLYMPUS DIGITAL CAMERA
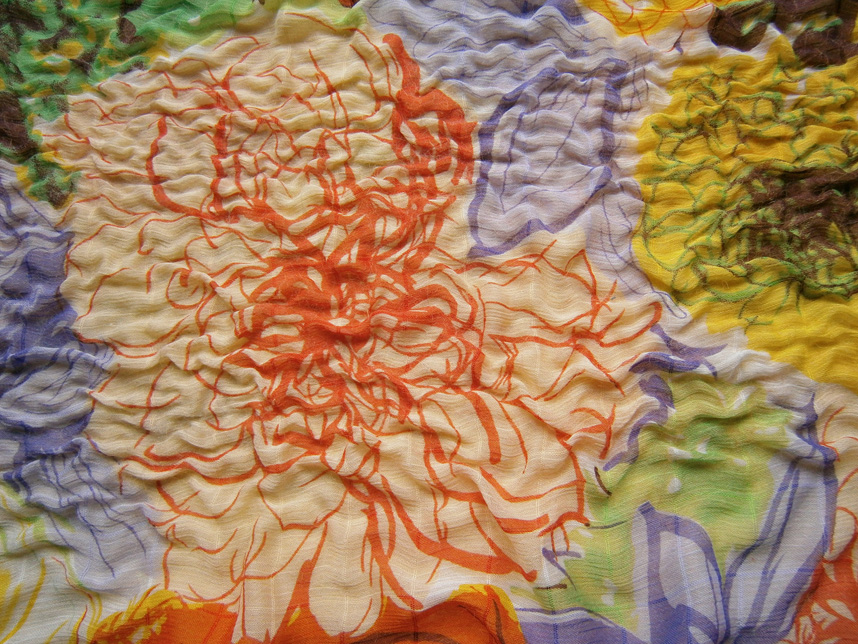
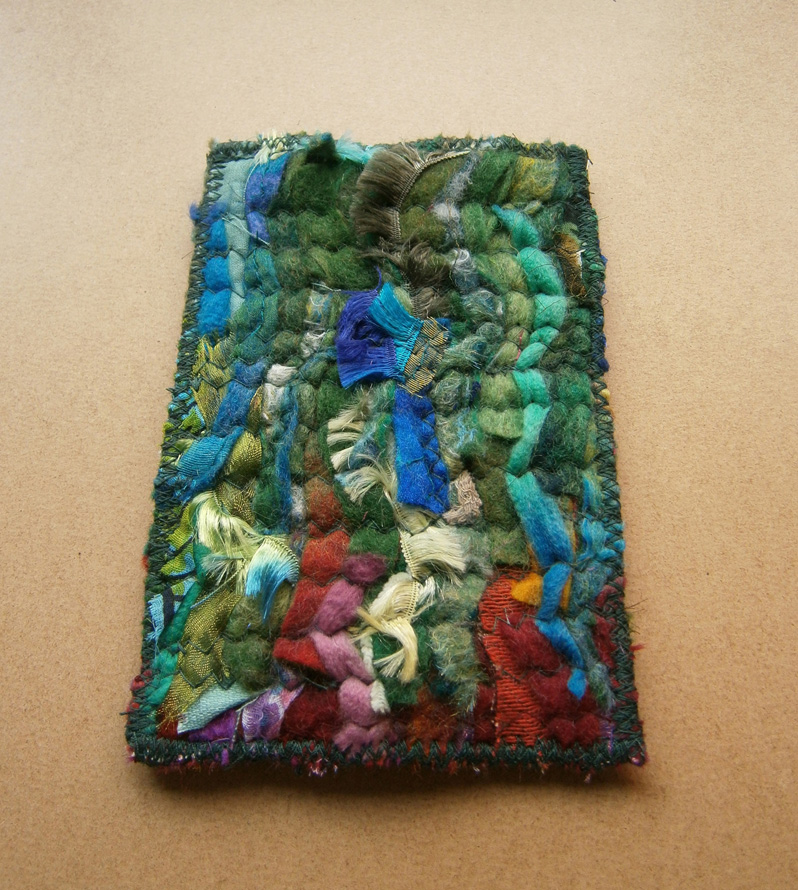
I thought it’d make a nice hanging decoration. This is a closer look:

OLYMPUS DIGITAL CAMERAI love all the textures on these pieces with the yarns emerging through the wool and the surface embellishments:

OLYMPUS DIGITAL CAMERA
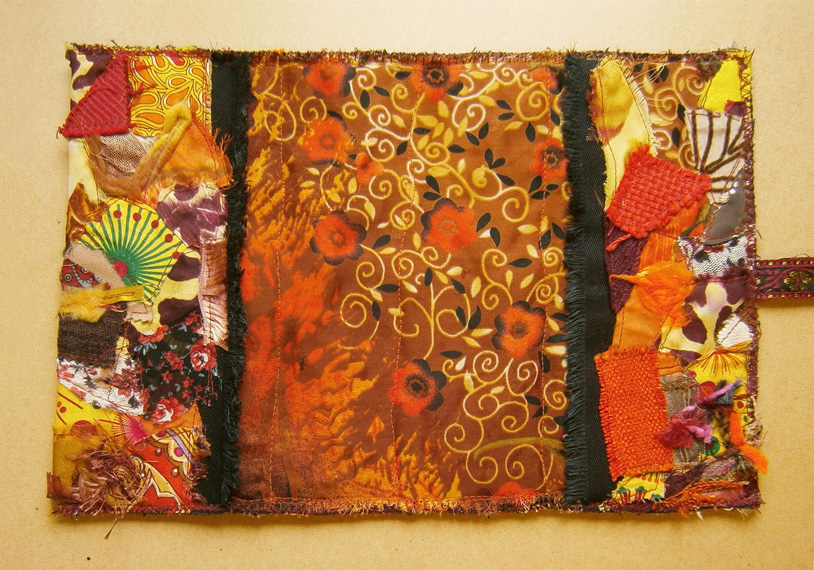
You can see the ripples better from this angle:

OLYMPUS DIGITAL CAMERA
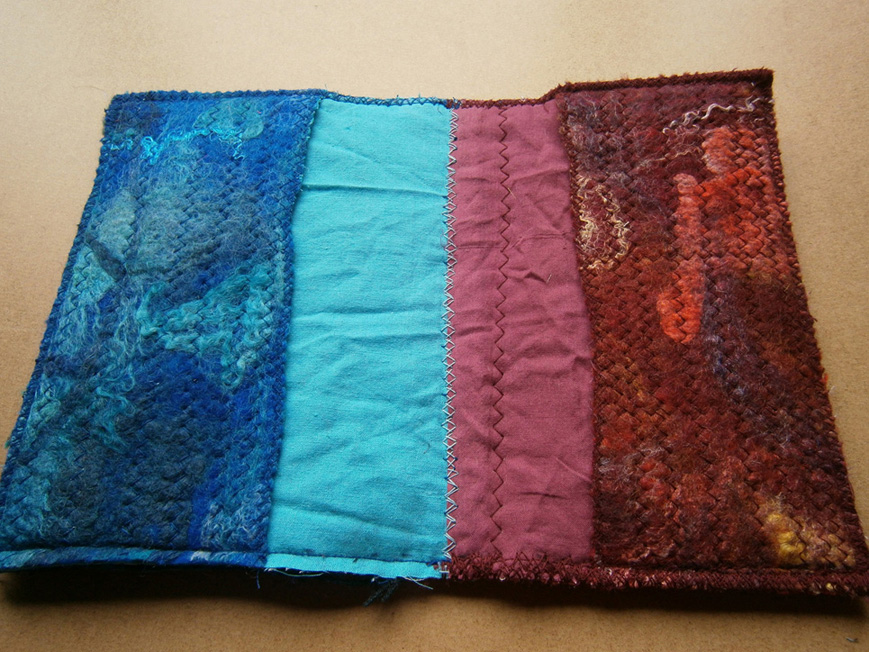
The back looks good too:

OLYMPUS DIGITAL CAMERA
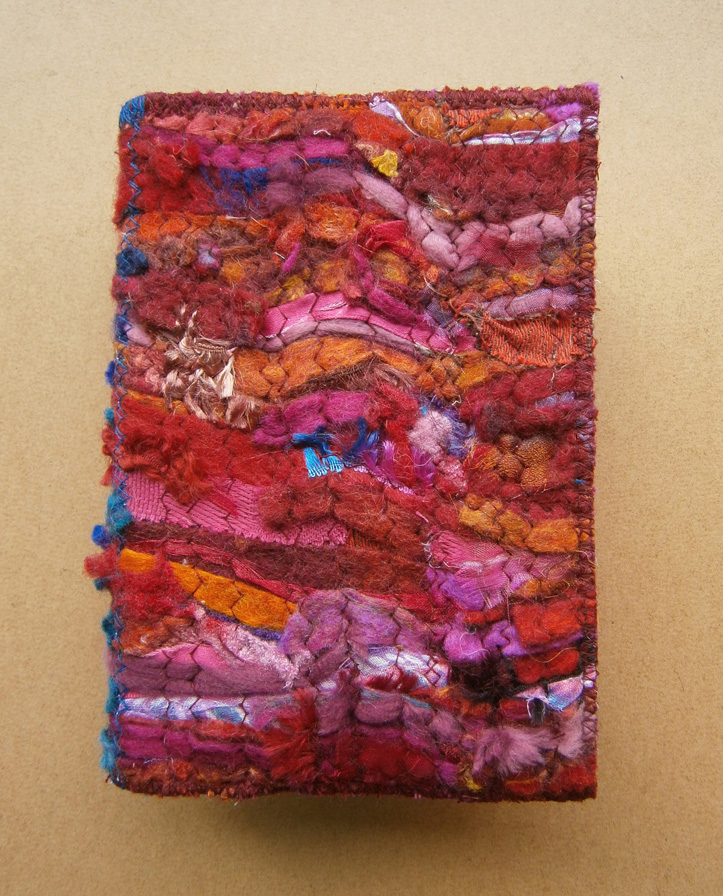
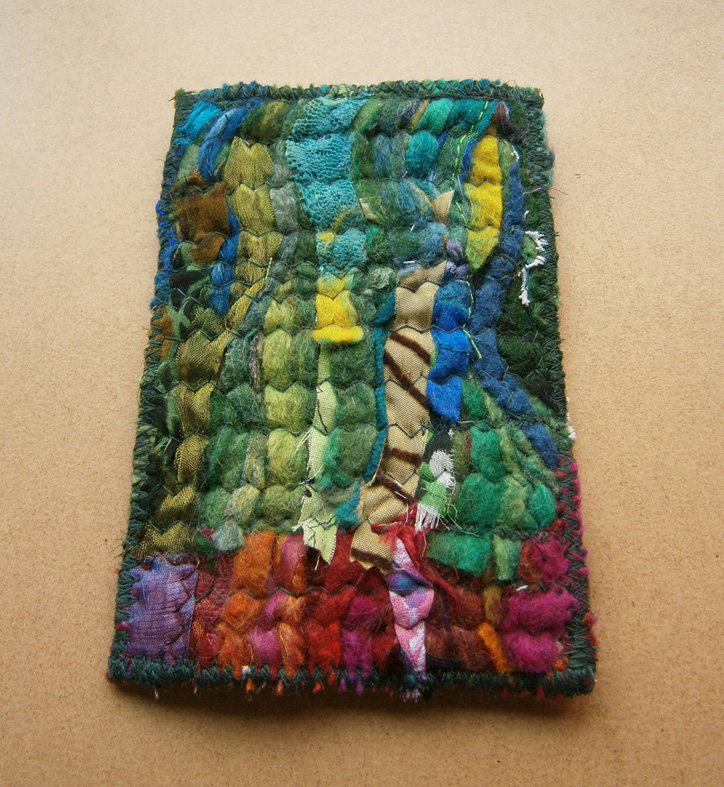
Talking about textures and emerging, this is a piece Cath made at the Well Being centre. She didn’t have anything particular planned, just wanted to make a piece without too much thought for the fun of it. Felt is great for that, it’s like a whole load of therapies rolled into one and great to lose yourself in for a while. She used some grey Merino, tassley yarn and some fabric strips:

OLYMPUS DIGITAL CAMERAA slightly closer look:

OLYMPUS DIGITAL CAMERAThe fabric strips look different depending on their angle:

OLYMPUS DIGITAL CAMERAMore texture:

OLYMPUS DIGITAL CAMERAI did finally have a go on my spinning wheel last week, hopefully I’ll get a chance to spin some more and take some photos for next time 🙂

Looking Ahead 2015

Looking Ahead 2015

I suppose I should start with my usual plan of trying to be more organised this year  🙂  This usually just means buying more bins and boxes to put supplies in, but I tend to use stuff less if it’s tidied away, so I want ‘being more organised’ to mean having things more accesable this year. That’s not easy when it’s fibres though, I worry about carpet beetle bugs. I discovered a few pieces of fabric I’d bought a while ago that I still haven’t tried out because they were tidied away so I need a compromise.

OLYMPUS DIGITAL CAMERAAnother thing I say every year is that I plan to work on more tutorials and a new e-book, and how I’ve been working on my ‘other fibres’ project for years and want to work more on that. I did do quite a bit of work on that and really just need to get back into it, it shouldn’t be that hard since I like playing around with wool and fibre combinations so much 🙂

OLYMPUS DIGITAL CAMERAOne thing I always look forward to is our studio challenges. If you didn’t see Ruth’s post, have a look here. This year we are focusing on colour, not just colour themes though, but learning about colour and playing with it. We’ve already started talking about it on the forum: looking at colour wheels and making our own out of tufts of wool. And Zara was talking about blending different shades and tones by adding white, grey and black to green, you can see her post here.

OLYMPUS DIGITAL CAMERAOLYMPUS DIGITAL CAMERAThat’s it for plans, I think I’ll just see how things go and try and go with the flow and stress less 🙂

Sewing and Bargains

Sewing and Bargains

I’m doing another Craft Fair at the beginning of November so I wanted to make a few diary covers. This usually involves my desk getting covered with embroidery threads, and the only exception this time was that I decided to tidy them up too. I made cardboard ‘bobbins’ for some of them and spent ages untangling and winding and then putting duplicate spares in a bag. Then a couple of days later I decided to clear some more drawers and spread the threads out a bit, make them even tidier and easy to choose. These are all the drawers:

OLYMPUS DIGITAL CAMERAOne of the pieces I’m using for a book cover is a piece I made years ago. I wanted to see if I could make a subtle plaid design by laying out bold stripes of colours on my two layers, it was more subtle than I thought, but I like it. I’ve cut to size and sewn the inside pocket edges so far:

OLYMPUS DIGITAL CAMERAYou might remember this next piece from when I tried some commercial pre-felt from Heidi Feathers. The silk hadn’t attached in a couple of places so I added blanket stitch, then decided to add some more simple stitching in the blocks of colour. I’m still working on this, and have added a bit more since I took the photo:

OLYMPUS DIGITAL CAMERAI went in to the city centre this week, which I don’t often do, so made the most of it looking for bargains. I found a couple of elasticated summer dresses for £1 each so got them because I liked the pattern, they were only tiny though, so once I cut the top off, the bottom was a bit bigger than a pillow case, but well worth £1!

OLYMPUS DIGITAL CAMERAIn the same shop I treated myself to a ‘scarf’ because I liked the pattern, it’s actually the size of a door!

OLYMPUS DIGITAL CAMERAI saw this scarf in a bargain shop and thought I’d see if it nuno felts well:

OLYMPUS DIGITAL CAMERAAnd, I couldn’t go to town without a trip to Abakhan fabric shop, where I got some more braiding (I took a photo of the back for you, Ann!)

OLYMPUS DIGITAL CAMERAAnd probably the best bargain of the day, I found a roll of silk fabric, down from £10 a metre to £3, so I had to get some 🙂

silk 2

Recent Things

Recent Things

I made some mixed white wool batts on my drum carder recently. I like to use different wool breeds together because they felt differently to each other so you get interesting results and it’s different every time. I made 3 batts altogether and used Lincoln, 23 mic Merino, 18 mic Merino, Norwegian, Texel, Cheviot, Devon, Teeswater and Shetland wool tops.  I also added in some carded mixed lambswool and Falkland fleece for texture, and Border Leicester, Mohair curls, Bluefaced Leicester, Wensleydale, and Alpaca for crimp and curl. I also added some silk for extra shine.

OLYMPUS DIGITAL CAMERAI thought I’d use the batts as the inspiration to put together another wool and fibre pack, using white/natural as the theme. I added some cotton scrim and some of the ‘luxury’ embellishment fibres I have: Bamboo staple fibre, Egyptian cotton top, Ingeo, Banana, Ramie, Flax and Milk protein fibre. And also some silk fibres: silk threads and throwster’s waste, silk carrier rods (don’t they look so ugly before they’re soaked and separated?!) and one of my favourites, silk noil. I love the way it felts, but I also love the way it smells and sounds as it’s separated and stretched out 🙂

OLYMPUS DIGITAL CAMERAI went to Abakhan on Wednesday for some supplies (they were out of delrin clips!) and I couldn’t resist getting some gorgeous georgette fabric in a few designs. This is one of them:

OLYMPUS DIGITAL CAMERAI also couldn’t resist the braiding, so got 3 designs:

OLYMPUS DIGITAL CAMERAI hadn’t had chance to do much over the last few weeks so I decided to make time on Friday and laid out and felted a nuno felt piece with one of the new fabrics I bought. I knew I should have added some wool around the edges of the fabric, but I laid it out upside down, with the fabric on the bottom and knew I’d mess up if I tried to flip it 🙂

OLYMPUS DIGITAL CAMERAI picked colours from the fabric to make a muti coloured patchwork back:

OLYMPUS DIGITAL CAMERAIt textured really nicely:

OLYMPUS DIGITAL CAMERA

Fabric Collage Notebook Cover

Fabric Collage Notebook Cover

I had 3 more pieces to finish before I could put my sewing stuff away. They are all notebook covers made from fabric collage pieces I made a few years ago. I thought it was a waste to have them all rolled up and put on a shelf out of the way. I managed to get the parts that needed to be machine stitched all sewn up, and now I just need to finish off the edges by hand. I did finish one yesterday. It was from a collage of autumnal rusty colours. It’s mostly fabric, but has some art yarns sewn in too. I used some braid and delrin clips to make a closure.

OLYMPUS DIGITAL CAMERAThis is the back:

OLYMPUS DIGITAL CAMERAI had a really nice fabric piece that I’d used as part of the collage  and used this for lining to hide all the stitches:

OLYMPUS DIGITAL CAMERAI thought I’d have a few pictures of the other part finished pieces, but it’s raining today and really dark, but they were made from multi coloured collages. Hopefully they’ll be finished over the weekend, but here’s a supermacro just because 🙂

OLYMPUS DIGITAL CAMERA

Mixed Media Piece From Felt Scraps

Mixed Media Piece From Felt Scraps

Last year I was talking about sorting my felt and fibre scraps into categories. I sorted my felt offcuts by size ranging from long and wide to short and narrow. This photo shows them. I was trying to work out what to do with the smallest pieces. I wondered how it’d look if I just pushed them close together on top of a piece of fabric and sewed them into place. So, I tried. I started in the centre with some red pieces, and they worked alright, so I added more. I kept to similar colours and added some pieces of fabric too because I liked how the nuno felt pieces looked. I also added some art yarns for a bit more texture. I kept adding and sewing until the red section was done, then I worked on the blue part and did the green part last. When it was finished it looked like this:

mixed mediaI kept turning it around, folding it, measuring it. I made sure the piece of fabric I worked on was big enough for a book cover, but the finsihed piece was too thick for that. I turned it over, folded it again and measured a bit more, then decided I could make a book cover out of it if I cut it and used different felt for the inside flaps. So, more measuring, hunting for felt and sewing of felt to fabric. This is what the inside looked like before I’d quite finished the bottom edge:

insideAnd, this is what it looked like once all the edges were finished:

outsideI’m not sure whether I prefer it with the red part on the front:

redOr whether I like the blue better:

blueI had quite a good sized piece left over, and I actually really like the green part the best, so I thought I’d use it for a gadget/camera/phone case. This is one side:

frontAnd this is the other:

backI don’t feel so odd now for saving all the tiniest bits of felt scraps ‘just in case’  🙂

Works In Progress

Works In Progress

I feel like I’ve been working on a production line recently, making lots of pieces of felt that will eventually be made into something. Some of the pieces were made with specific things in mind, some were just for the fun of it or to try things out. I never really enjoy making felt during the summer when it’s hot, so around about this time of year I start working through my stacks of felt, working out what I want to use them for, or having an idea and searching through to find the perfect piece. After measuring, cutting, pinning and sewing, I then have a nice pile ready to making a start on stitching and adding buttons etc.

One piece of felt that I found when I was searching through, was a sample I’d made using silk throwster’s waste, rainbow trilobal nylon and nylon fibre that I’d dyed. It wasn’t a pretty piece, but then it was only a sample 🙂 The first piece I started to make out of it is a pouch just the right size for holding a pack of cards, small notepad and a pencil-perfect for train journeys with young kids. There’s silk throwster’s waste on the left and dyed nylon on the right.

The second piece I started to make is a camera case. This has silk fibres at the top and rainbow trilobal nylon at the bottom.

Both the camera case and card pouch are lined with cotton fabrics. The 3rd piece is a pouch for earbuds. The front has trilobal nylon and the back has silk fibres. All 3 of these pieces have a loop of elastic on the top for using with a button to keep them closed.

These next two pieces are a camera case and an ipod case, made from a nuno felted piece using muslin. I added machine stitching in an uneven zig-zag pattern to the felt for the camera case, just for a little extra thickness. I’d made this for my new camera, but I’m torn between this and the one above. These pieces are the only ones I’ve finished with blanket stitches so far.

These last two pieces are coin pouches. I first made one of these a couple of years ago because I was tired of reaching into my back pocket and trying to find coins, but getting a handful of keys instead.

Now all I have to do is find a few films to watch while I get started on blanket stitching the edges of all of these! Do you have a particular way of working? Do you like to streamline your process, work on a few items at once or maybe complete a project before starting another one?

Supermacro

Supermacro

My camera started to die a few weeks ago, I could hear the focusing mechanism straining and the majority of photos were blurred, even more than I usually get trying to focus on soft fibres 🙂  So, a lot of my time has been taken up with a photography backlog, taking photos, retaking them as I work out my new camera settings, checking and editing photos, and getting distracted a lot with the Supermacro setting! It is so cool, it can see things I can’t see with the naked eye, tiny fibres on fingerprints, tiny cobwebs in the holes of volcanic rock, eyelash roots…. Oh, and the weave of fabrics or a dark guard hair on a piece of white felt, even tiny strands of fibre on the individual threads of a fabric 🙂

I thought I’d share a few of the fabric and fibre photos I’ve taken recently, I’ll upload them to flickr aswell in case you’d like to click on the full size images to see in even more detail. This first photo is cotton gauze and a chiffon scarf felted with merino prefelt.

This is a photo of just the cotton gauze and blue chiffon.

This is part of a pattern on printed cotton, it is about 55mm wide.

This is a synthetic fabric nuno felted, and some organza at the bottom of the photo.

This is one small piece of organza, aproximately 25 mm top to bottom.

 This is one piece of silk paper aproximately 25mm wide. It is taken from this piece of felt, I’ve added a note to show which square it is.

This is nuno felted silk.

This is Bamboo and Teeswater.

This last piece is blue nuno felted fabric.

I hope you enjoyed the photos, I love seeing the detail and texture of fibres, so I’d love to see your photos if you have any to share.

Dyeing Cotton Fabrics

Dyeing Cotton Fabrics

A few weeks ago I decided to dye some of the cotton fabrics I was using in felting: Cotton Gauze, Cheesecloth, Muslin, a few lightweight cottons and some cotton/synthetic mixes. I started out using some Scarlet RIT dye and I was really pleased with how easy it was to use and how well the colours turned out. I used the ‘Hot Water in a bucket’ method. I weighed the amount of fabric I had and then ran some really hot water into a bucket and measured out how much I needed. I poured this into the dyeing bucket, saving a little in a jug to add to the dye I’d measured out  into an old glass jar. I added salt to the dyeing bucket, then poured the dye solution in, and gave it a stir around. The instructions had said to wet the fabric before adding to the dye bath, so I’d put the fabrics in the other bucket while I prepared the dye bath. The instructions said to stir constantly for about 30 minutes until the desired colour is reached, but I just stirred occasionally. I also added fabric at different stages or tied/scrunched to get different shades/effects. Using the instructions on the RIT packet, I made some calculations for dyeing smaller amounts of fabrics and used this as a guide for dyeing the fabric a medium shade.

The second dye brand I tried was Dylon, I bought the 50g hand dyeing pack. I used to buy the Dylon Multi purpose dyes years ago, they were meant for using in a pan on the stove, but gave excellent results just using hot water in a bucket, so I expected these Hand Dyes to be really good. The instructions were pretty much the same as for RIT except no laundry detergent was used. I bought a dark brown so that I could add fabrics at different stages and get lots of gorgeous natural looking shades. What I actually got was a load of fabrics all very much the same pale shade of beige 🙁  I think I would have got richer colours using tea or coffee. I made some calculations for dyeing smaller amounts of fabric for the Dylon too, though I’m not sure I’ll use it again.

The next time I dyed some cottons, I used a RIT dye again, Navy Blue. I was really pleased with the way those fabrics turned out too. I even dyed some egyptian cotton top, which turned out nice, the photos didn’t though 🙂

Do you have a favourite dye for cottons or maybe a favourite method? Do you have any hints or tips to share with us? We’d love to hear your opinions. Click on the pictures for bigger images.

%d bloggers like this: