Browsed by
Tag: abstract

2014 2nd Quarter Challenge

2014 2nd Quarter Challenge

At the beginning of last month, Ann posted her 2nd Quarter Studio Challenge, the work of artist Stewart Stephenson. His work is very diverse, and I must admit I prefer his more abstract works, maybe because they are similar in style to my own oils and acrylics. I played it ‘safe’ with the first piece I made for this challenge, using one of his ‘sass’ flower paintings: Sassy Wildflowers:

sassy wildflowersI drew myself a little sketch, marked down which colours to use where, then laid out the wool. I did a similar thing for both pieces and the colours were quite a bit off! This is before felting:

OLYMPUS DIGITAL CAMERAAnd this is what it looked like after felting:

OLYMPUS DIGITAL CAMERA
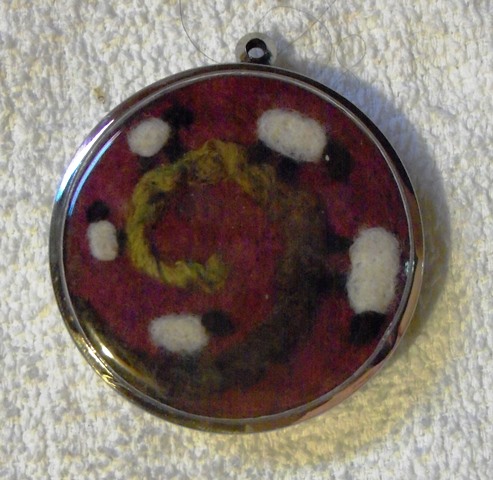
The other Stewart Stephenson pieces I quite like are his mixed media ‘line’ pieces. I’m not sure which mediums are used, some look to be just paint, some seem to be digital images or at least digitally altered. They all seem to be based on the idea of having a centre and working out from there. The one I mostly used for reference was ‘Line Up Now’.

lineup nowAgain, my colours were a bit off, and also his works don’t appear to be mirror images, but I liked the idea of that, so that’s how I did mine. This is a close up of one part before felting:

OLYMPUS DIGITAL CAMERAMy girlfriend suggested I use some very dark blues and black on it, to give it more depth, so just before felting, I added those colours. This is what it looked like after felting.

OLYMPUS DIGITAL CAMERAI really like the way both pieces came out. I made them of a size big enough to make notebook covers, but I think they’ll stay as they are 🙂 We’ll be adding the entries to the Challenge Galleries, so if you’d like to be included just let us know. We also have a post on the forum where you can see other entries too.

Small Felt Art

Small Felt Art

A little while ago I ordered some pendant blanks in a variety of shapes and sizes. They open up so you can put pictures in them but you can see the picture when it is closed.  I made some small art works. I used pieces of felt I already had and needled  and sewed on the designs. Do you recognise the spiral sheep background? It’s the “hole” form the round bird house with the spiral design.

cityscape sheep spiral purple tree abstract 1

You can se about how big they are from the keyboard in the city scale picture. I changed the black and pink sheep into a white and pink sheep before putting it into its locket. The black doesn’t show as well in person as it does in the picture.

locket 1 locket 2 locket 3 locket 4

I didn’t have another round one the right size for the city scape. The one with the purple curls in it is just that, some Blue Faced Leister curls. The locket is about one inch across and I didn’t think I could really make a picture for in it.  I like making these small pieces but now I have to decide what to charge for them.

group locket

Changing the Design of a Nuno Felt Shrug

Changing the Design of a Nuno Felt Shrug

In the spring I made some shrug jackets using a pattern I saw in a book about making simple garments with your weaving. I don’t weave but I can felt a rectangle instead of weaving it.  You would think that I would read what to do instead of just going from memory but that would have been too easy. I made some nice looking shrugs.

Orange shrug after over dying

They look nice enough but they didn’t really fit as well as I would have liked. They were to puffy at the back so not very flattering. I think the problem is the rectangle they are made from was to wide making the shrug to long.  I decided to change them. I unpicked them and gave them a wash to get rid of all the thread holes.

I folded the top down about 1/3 to create a kimono sleeve. You end up with something that is more like a shawl that doesn’t fall off as you use you hands and go about your day.

If you would like a larger collar you can wear it the other way up.

You could also just sew a line down the edge or just the other direction to have a larger sleeve opening. I like these much better. I hope other people like them too. I am going to my guild exhibition and sale this weekend and I will have them there.  On that note if you are in Ottawa this weekend  Drop by the Glebe Community Center to see what we are up to.

Australia Challenge

Australia Challenge

I recently spent a few days working on the Australia Challenge. There are so many gorgeous photos on flickr that it’s possible to lose quite a bit of time on there 🙂 I finally settled on a couple of photo sets from Arnhem Land and Kakadu for my inspiration. For this first piece, I was inspired by the photos with orange and red tones-the rock art, sunset, fire.

For this second piece I was inspired by a couple of photos from the Arnhem Land set with pale blue and red colours, particularly this photo of rock art.

The photographer, Jon Connell has lots of great photos from Australia on his photostream, if you get chance, do check them out.

My last piece was inspired by the Aboriginal Flag designed by artist Harold Thomas.

Harold Thomas was one of the Stolen Generations, taken from his parents at the age of 7. He won a scholarship to the South Australian School of Art and later worked at the South Australian Museum, the first aboriginal to be employed by a museum in Australia. He has been a campaigner for Aboriginal civil rights and land rights. If you don’t know about the stolen generations, Wikipedia has some information, and Doris Pilkington Garimara’s book ‘Follow The Rabbit Proof Fence’ is excellent. I should warn you that it’s heartbreaking.

Have you made anything for our Australia Challenge? If you have, we’d love to see it, join our Felting and Fiber forum or our flickr group to share it and anything else you’ve been working on. This is Lyn’s excellent piece.

Felt Bubbles

Felt Bubbles

A while back I went to a felting friends for a few days fun.  She showed me how to make bubbles and cut them  open to great effect. Here are the pictures of what I did.

First of course I laid out some wool to felt. But these are samples so plain felt won’t do . I added silk threads and a silk square and some silk roving and other wools to see how it would all go. This is the underside.

This is what the top side looks like

Then of course there was the usual rolling and fulling.

rolling rolling rolling

Here they are all finished and ready for the marbles.

The next step is to put marbles in while it is still damp. You pull the felt tightly around the marble and secure it with an elastic and now it is a bubble. We used the elastics they use to put braids in horses tails and manes because they are small, stretchy,  strong and cheap.  You put in as many as you like and what ever sizes you like. You can also use felt balls. the felt balls are good if you want to leave them uncut. Marbles are to heavy for that.

Here they are all tied up.

Felt with marbles tied in to make bubbles

Here they are cut.  I cut the tops off , I cut x’s and star patterns and some I tuned inside out. if you cut more off you see more of the inside and you can stretch them flatter too.

Bubbles cut open

You can see how the underside becomes the inside of the bubbles. These samples started out about 6×8 inches and the finished pieces are about 1.5 by 2.5 inches. They take up a lot of room. I only have 2 of them left my friends dog ate one. I think I will glue them to some leather and make broaches out of them. They are lots of fun to do. I made some wrist cuffs with this method and I will blog about them next week.

Colourful Sheep

Colourful Sheep

Just a quit little post to show you the sheep I have been working on for my Christmas sales. They do stand up so you can use them as a decoration but they will all have a pin on one side so you can wear them.

Colourful Sheep

They are made with a combination of wet felting and needle felting. The ears are cut from a wet felted piece of fabric and I wet felt the snakes I cut for the legs.  The body and head are needle felted. The ears, eyes and all the curls are added with needle felting.  I hand dyed the curls. They are Border Leicester or Blue Faced Leicester I can’t remember.

Works In Progress

Works In Progress

I feel like I’ve been working on a production line recently, making lots of pieces of felt that will eventually be made into something. Some of the pieces were made with specific things in mind, some were just for the fun of it or to try things out. I never really enjoy making felt during the summer when it’s hot, so around about this time of year I start working through my stacks of felt, working out what I want to use them for, or having an idea and searching through to find the perfect piece. After measuring, cutting, pinning and sewing, I then have a nice pile ready to making a start on stitching and adding buttons etc.

One piece of felt that I found when I was searching through, was a sample I’d made using silk throwster’s waste, rainbow trilobal nylon and nylon fibre that I’d dyed. It wasn’t a pretty piece, but then it was only a sample 🙂 The first piece I started to make out of it is a pouch just the right size for holding a pack of cards, small notepad and a pencil-perfect for train journeys with young kids. There’s silk throwster’s waste on the left and dyed nylon on the right.

The second piece I started to make is a camera case. This has silk fibres at the top and rainbow trilobal nylon at the bottom.

Both the camera case and card pouch are lined with cotton fabrics. The 3rd piece is a pouch for earbuds. The front has trilobal nylon and the back has silk fibres. All 3 of these pieces have a loop of elastic on the top for using with a button to keep them closed.

These next two pieces are a camera case and an ipod case, made from a nuno felted piece using muslin. I added machine stitching in an uneven zig-zag pattern to the felt for the camera case, just for a little extra thickness. I’d made this for my new camera, but I’m torn between this and the one above. These pieces are the only ones I’ve finished with blanket stitches so far.

These last two pieces are coin pouches. I first made one of these a couple of years ago because I was tired of reaching into my back pocket and trying to find coins, but getting a handful of keys instead.

Now all I have to do is find a few films to watch while I get started on blanket stitching the edges of all of these! Do you have a particular way of working? Do you like to streamline your process, work on a few items at once or maybe complete a project before starting another one?

Second Quarter Abstract Challenge

Second Quarter Abstract Challenge

I have been working on Ann’s abstract challenge throughout the quarter but haven’t had that much time to put into it. If you didn’t see my earlier posts, here is the first one and the second post. Basically, I took one of my sketches and then “abstracted” it in Photoshop Elements. I’m not sure it is really that abstracted but it is certainly a change from the original sketch. I was planning on felting a piece but just didn’t have the time. Instead, I machine stitched a piece and can use it for my stitch class homework too.

This is the original sketch in my studio journal done with watercolor pencils.

Here is the photo after being “abstracted” in Photoshop.

Here is my interpretation on fabric. The colors are off as this was taken indoors. I fused a lightweight cotton to heavy Kona cotton and then stitched the outlines of the trees. On the foreground trees, I stitched outlines of the black marks on the trunks. I then colored in the piece with permanent markers and added the shadowing with colored pencil. I forgot to take any photos just showing the stitching.

Here it is in my sketchbook. I stitched around the edge and trimmed it. This is closer to the true colors of the piece. I like how it turned out but it isn’t really that abstract.

Here’s closer view so perhaps you can see the stitching. You can click on any of the photos to see a bigger view. I really enjoyed this challenge and for me, it was a challenge. As I said in my prior posts, I don’t feel comfortable doing abstract work. And I’m not sure that this piece would be really classified as abstract but it is certainly different from what I would normally do. So thanks Ann for the challenge!


Not quite what I’d imagined

Not quite what I’d imagined

I mentioned the other day that I’ve been working on Ann’s Abstract Challenge. I had a folder full of ideas and photos that I’d worked on, but couldn’t quite see how they’d translate into felt or maybe fabric. After looking at the photos with me, my girlfriend suggested looking at something more simple and bold, like maybe a cup. So I started looking at different photos, found some with simpler shapes and lines, bolder features. One that I really liked was a simple photo of a shell. It was almost colourless so I gave it a blue tint.

I then played around with it until I was happy with an abstract design.

This seemed like a perfect picture to try with my idea of layering organza. So I worked out how many layers I’d need and what shapes those layers would need to be. I wanted a black background, so I thought it’d be a good idea to have a base layer of white felt the same shape as the first organza layer.

I then made the shapes into outlines, so I could print them out and trace the shapes onto the pieces of organza for cutting out.

I chose the colours of organza I liked and layered them together to see if they would work.

I then traced all the outlines onto the organza pieces and cut them out. It was then that I started to realise this wouldn’t be quite as simple as I’d first thought. Some of the organza was very thin and distorted while I traced, so I had to re-do a couple of pieces.

Layering the shapes together wasn’t easy either, they just wanted to slide about, so I started with sewing the first couple of layers together. That seemed to go alright. It wasn’t looking as tidy as I’d hoped-the organza was fraying, but the abstract design had outlines around the sections/layers, so I hoped these would hide the edges. When I started to add the 3rd and 4th layers, my sewing machine (hand cranked ancient Singer 🙂 ) started to make weird noises. When I looked at the back of the piece, it was a mess, all the thread from the spool had looped up underneath. I don’t know if there was a tension problem, but I decided to abandon it as a failure.

I left it on my work table and tried to think of other ways I could interpret the design with the supplies I’ve got, but all I could think of was using 5 shades of blue cotton fabric, which I don’t have. Looking at it in daylight this morning, it didn’t look quite as bad as it did yesterday, so I decided to put a bit of effort into finishing it. I had to patch up the second layer, as it had frayed so much it wasn’t attached at the edges. I also had to recut the top layer as when I was sewing it on by hand, the thread caught on it and tore it. It didn’t really turn out how I’d expected and hoped it would, (maybe some fabric stiffener and a bigger scale would help?) but it wasn’t the complete disaster I thought it was yesterday 🙂

How would you have interpreted the abstract shell picture differently? Would you have used different fabrics, or maybe wet felted or needlefelted the design? If you’d like to use the design, please feel free to do so. I’d love to see what you come up with.

Nuno Felt and Abstracts

Nuno Felt and Abstracts

I’ve been doing a lot of nuno felting recently, mostly a lot of samples for reference, but also quite a few pieces for using to make into things at a later stage. One thing I like to do with nuno felting is use different types of silk together. I think the differences in thickness, sheen and texture work well together and highlight each others’ properties. These two pieces use hand dyed silk ponge 5mm, which is floaty and shiny, and also silk chiffon 3.5mm which, though lighter, almost seems heavier than the ponge because of its ‘rough’ texture. For this first piece I used strips of silk in roughly equal widths.

This close up shows the difference in the textures of the two types of silk, and also the differences in the way they felt. The silk chiffon seems to sink into the felt, becoming more a part of it than an embellishment or surface texture.

For the second piece, I used smaller pieces of silk to create a kind of mosaic effect.

Close up:

Another thing I’ve been working on lately is Ann’s 2nd Quarter Studio Challenge. I’ve been looking through photos for inspiration, taking photos, editing, altering… trying to think what technique would work best with different pictures etc. One of my favourite photos is of a bunch of tulips in the snow. I tried a few different techniques in Photoshop to alter the photo and make it more abstract. This is a collection of the original (top left) and 3 abstract versions.

Thinking about the simplest way to achieve all the different shades of pink, I thought about organza and how using 3 pieces of the same colour can give 3 shades when layered. So I got out my organza collection to have a look through the shades. I hadn’t realised I had so many until they were all out together!

Seeing all the shades brought me back to one of the first pieces I started working on, a photo of a Mahonia bush. My first thought was to make different colours of prefelt, cut the shapes out then felt together, but I think this could be achieved more effectively with a combination of fabrics and organza.

Have you thought about joining in with the Abstract Challenge? It doesn’t have to be figurative. Do you often make abstract pieces from fabric, fibres or felt? Do you have any good tips to share? We’d love to see your work if you’d like to share with us 🙂

%d bloggers like this: