Announcements, Announcements, Announcements…

Announcements, Announcements, Announcements…

First up, the announcement of the winner of the free space in my upcoming Nuno Felting with Paper Fabric Lamination online class. There were 38 people who commented that wanted to be in the class. The random number generator chose number 13 who is Linda. Congratulations Linda! I will be sending you an e-mail with further information.

Module 1 of Embellishing Felt with Surface Design Techniques - A Mixed Media Approach, Online Course by Ruth Lane

For the rest of you who commented and wanted to be in the class, you can sign up here. The last day to register and pay for the class is May 13 which is only two days from now. So go ahead and sign up, it’s going to be a fun class. Remember, you do need to have nuno felting and wet felting experience to take this class.

Also, there have been a few questions about when the Nuno Felting with Paper Fabric Lamination online class will be repeated. The plan is to complete all four modules and then repeat the entire 4 modules again next year. So it will be repeated.

The next announcement is to not forget that registration for the next Wet Felting for Beginners online class is open. Go here to register. If you know someone who wants to learn to felt, please pass the word to them. This is a very affordable class and is perfect for someone who has never felted before.

Layered, burned synthetic fabric, Ruth Lane

And I hate to do a post with no eye candy. So here is what I made on Friday with my local art group. We layered synthetic fabrics and then stitched them all together. The last step is using a soldering iron to burn out portions of the fabric.

Layered, burned synthetic fabric, Ruth Lane

Here’s a closer view so you can see the holes and the stitching a little better. I think I will put this on to some kind of background but haven’t decided yet how to finish it. What do you think? Would you add a color behind it?

Don’t forget to sign up for Nuno Felting with Paper Fabric Lamination online course beginning May 15th!

Dyeing with Plants

Dyeing with Plants

Our guest artist today is Cathy Wycliff (Luvswool).  She shares her adventure into dyeing with plants.

Recently I went to the Ozark Mountains in Arkansas for a two-week artists’ retreat. My plan was to spend two whole weeks felting with some time out for photographing the natural beauty of this area (think NW Arkansas, closer to Tulsa OK than Little Rock, AR. ) I also contemplated doing some natural plant dyeing, but it was the wrong season for collecting some of the natural plant materials in the area, such as oak galls and walnut hulls. I ended up ordering some botanical material from The Woolery, which amazingly arrived two days later!

While awaiting delivery, I got going with natural pine needles from the huge pine tree growing in the backyard. I snipped about two dozen clusters and began boiling them, later adding the white wool (domestic 56’s). The ending color did not jump out and grab me, but still I was pleased with the natural beige color which the pine needles produced–and a bonus was that the smell was heavenly.

IMG_0503

Once my dyes arrived, I got to work rinsing and mordanting the wool (all of the wool I used was domestic 56’s from RH LINDSEY.) I began with madder, but this was quite a lengthy process of soaking the wool for over an hour, then mordanting the wool by cooking the alum and cream of tartar. Later when everything had cooled down, I then added the madder and wool.

IMG_0511

Each dye I used required this lengthy process, and unfortunately, I had only one usable pot. After the first wool was dyed in madder, I changed the composition by adding iron, which developed a deeper color of red/orange.

I continued with the logwood as above, also developing a second shade of purple by adding iron.

IMG_0522Overnight drying time was needed, and here you can see the pine, madder and logwood drying in the kitchen.

IMG_0525

I continued with osage, which achieved a golden color, not orange as is sometimes possible.

IMG_0529

Next you see the osage and deeper shade of logwood drying.

IMG_0530

Although I have done other kinds of dyeing previously–including indigo, food colors, acid dyes and even beets–natural plant dyeing is a whole new level of dyeing. I began thinking about the Native Americans and their use of natural plant dyes, as well as other very early ethnic groups around the world who had no other choices. And they didn’t even have gas stoves!

I was pleased with all of the results, which you can see here:

IMG_0543

Left front –pine needles; Left rear  — osage; middle two shades purple  (+ iron), Middle rear — osage, Right —  two shades madder (+ iron); Right front —  cutch

I am looking forward to additional dyeing this summer, and perhaps even growing some of my own dye plants.

Thanks Cathy!

Wet Felting For Beginners Online Workshop

Wet Felting For Beginners Online Workshop

Our next “Wet Felting for Beginners” online workshop will start on Friday June 19th. It’s a 3 week course developed to give absolute beginners a good foundation on which to develop their wet felting skills. Not only are there the expected ‘How to Felt’ instructions, but there are also simple exercises designed to show what happens when wool felts under different conditions so you can control the outcome. There is also lots of info on using different types of wool and animal fibres, tips for inexpensive tools, alternate techniques etc. For more info on the course, have a look here: http://feltingandfiberstudio.com/classes/wet-felting-for-beginners/ There is all the information you need, including what ‘equipment’ and supplies you’ll need and there’s also a link to a simplified supplies list.

wet felting FOR BEGINNERS flyer JUNE 2015 SMALLIf you’d like to sign up for the course, please use the Contact form at the bottom of the Class information page. Don’t forget to include your PayPal email address in the specified field. Once payment is received, you will receive an email with all the information you’ll need.

Our first class was really successful, if you’d like to read testimonials from some of the students, please have a look on our main Online Classes information page: http://feltingandfiberstudio.com/classes/  You can also have a look at some of the work produced by students on the gallery page: http://feltingandfiberstudio.com/classes/wet-felting-for-beginners/wet-felting-for-beginners-student-gallery/

Please feel free to contact us if you have any questions.

Felted Flower Samples for a Class Next Week

Felted Flower Samples for a Class Next Week

I got a request for a felted flower class after some people in my guild saw a  picture of some very delicate flowers on Facebook.  It is going to be a short class done in the evening. I haven’t made any in a while so I had to do a sample.

I made a stem

rolling stem  stem

I also did some stamen. I wrapped them in plastic wrap so they wouldn’t stick to the rest of the flower while I was rubbing and rolling.

stamen

For the body of the flower I used a silk hanky and added a very thin layer of merino  wool.

silk hanky add some wool

and this is the result

finished flowers I also made some little rose like flowers to show them.

roses

Flowers are fun to make and do not take long.  I am going to work on some other methods and see what they want to do at the class. We will make them 2 different way in the class do to time constraints. I will take pictures at the class to show you how the students do.

Give Away – Win A Free Online Class Entry

Give Away – Win A Free Online Class Entry

To celebrate my new online class, Nuno Felting with Paper Fabric Lamination, I am giving away one free class spot.

Module 1 of Embellishing Felt with Surface Design Techniques - A Mixed Media Approach, Online Course by Ruth Lane

The class start date is May 15th and it is a four week class with 2 extra weeks on the forum. If you would like to win a spot in the class, please leave a comment below. The winner will be announced on May 11th and I’ll contact you at that time with all the details. I would appreciate it if everyone could spread the word about the class on social media and to all your friends.

For more information about the class, go here.  Just leave a comment below to win the free class spot and good luck!

One Artist’s Journey into Fiber

One Artist’s Journey into Fiber

Our guest artist today is Jill Chadek with Merino and Mulberry in Two Rivers, Wisconsin.  She is also our banner sponsor for May on the Felt and Fiber Studio Forum.

To touch something soft and silky awakens our earliest emotions!
The pleasure of the touch of silk started my exploration of silk painting. A few
years later I was introduced to felting, that magical process of transforming
dampened clumps of wool fibers into cloth! Then, when I discovered that I
could incorporate the two, working the fibers to lock into the silk I was hooked!

12 Sunrise on the Reef20120613_611112 Sunrise on the Reef20120912_6769

Through time, that magical process of felting has inspired and allowed me to
express my passion for color, pattern and texture. Felting, allows me to “paint”
with fibers to create personal accessories such as scarves, shawls, vest, hats
and handbags.

20 Laguna20120804_6493 38 Chimeralure20141112_0973

Prior to felting I had dabbled in many mediums but none have held my
attention and interest like felting has. I love working with my hands, the tactile
experience of painting with the fine and silky fibers. It still makes me catch my
breath when I wet the fibers down and the wool gets all loose feeling. I have to
remind myself that soon the fibers will start to migrate and tangle and the
magic of creating a fabric will happen right in my hands!

G6 Cloud Dreams20121020_6941If you are new to felting, have patience and have fun! It will be frustrating at
times! There are as many different ways to create felt as there are felters, and
you will find that everyone swears their way is best! So many variables are at
play: the type of fibers, water hardness and temperature, soap, pressure,
thickness, and added embellishments, just to name a few. No wonder no simple
equation will work! It is only through exploration and experience that you will
learn the “feel” of the fibers at the different stages. So have fun and play!

H7 Josie20130904_7157 H4 Ginger20130904_7131

Though I consciously have a design in mind when I start a project, my
unconscious, and the fibers influence my hands and the final outcome, which is
usually fabulous!

H32 Clea20141112_0861 H3 Daphne20130904_7115

I enjoy that even after all of my years as a felting artist there is still something
new to learn and to explore. Right now I am loving creating hats! I do not use
any hat forms but instead let each hat tell me what shape it would like to be. I
love that while making a fashion statement they are also keeping it’s wearer
cozy warm! I am truly grateful for the joy that I experience in the creation of
each item and trust that wonderful emotions are also awakened in the wearer.
Please feel free to browse my website www.merinoandmulberry.com. It is my hope
that my creations will inspire you to stretch and grow as a felting artist. Also on
my website you can view a video of me using the E-Z Roller Felting Machine of
which I am the international representative. This machine has allowed me to
continue felting when I was experiencing terrible vertigo and more recently
when I had shoulder and neck problems. It removes the 1 negative of felting –
the physical chore of rolling your project, therefore allowing you to focus on the
fun, creative aspect of this beautiful medium. If you would like to learn more,
just contact me!

Thanks for sharing your artist journey with us Jill!

Meet The Artist

Meet The Artist

Today we have a Meet the Artist post, with Leonor from Felt Buddies answering our questions.

Fibre 3,2,1
Q-3 Three types of fibre you can’t live without?
My first obvious choice would have to be sheep’s wool! It’s a lovely fibre to work with and oh so versatile – from felting to knitting, it’s wonderful for just about anything in my world. Although merino is a staple, I find coarser fibres are great for needle felting and love using them.
The second fibre would have to be alpaca hair, because the brown is just perfect for some animals I make, like horses. It’s just the perfect shade, but I have a confession to make: I don’t love working with it, it’s so fine it makes it hard to needle felt!

FB 7Q-2 Two tools you use all the time?
Can’t needle felt without felting needles, and I use aluminium wire a lot in my projects as well.
Q-1 One fibre art technique you love the most?
Can I say spinning wool? I know it’s not what I do for a living, but it is fibre-related and all things fibre just fascinate me.

felt buddies (6)
General Questions
What is your business?
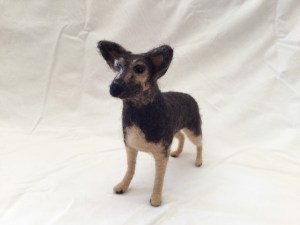
I own a handmade business (of mostly) needle felted sculptures called Felt Buddies and Co. I specialise in making people’s pets, particularly dogs.

felt buddies (5)bWhat kind of items do you sell?
My bestsellers are definitely my pet commissions, although I also make other things in felt: dryer balls, toadstools… I’d like to increase my ready mades in the future.

felt buddies (4)What do you think makes your business different from similar ones?
I can’t speak for other businesses, but I truly love what I do and care about the quality of items I produce, and that my customers are happy with my work. I try to create a more personalised relationship with them, because that’s what handmade small businesses should be about. I have also made friends along the way, so I’d say it’s a win-win situation.
I am also constantly trying to improve my technique and come up with fun things to make besides bespoke pets, which keeps my brain occupied for most of the day.

felt buddies (1)bWhere are you located?
I am in London, UK. I was born in Portugal and grew up in China.
Where can we find you on the internet?
You can find me here:
Shop – www.feltbuddies.net
Facebook – www.facebook.com/feltbuddies
Instagram – @feltbuddies
Blog – www.feltbuddies.co.uk

felt buddies (3)How did you get into fibre arts?
One day I was perusing a medieval fair in Portugal and happened to come across a stand that sold felting supplies. I was immediately drawn to the many colours displayed, and the items she had on display (3D fun looking animals). I just had to give it a go! It was an absolute disaster, as I didn’t quite get the hang of wet felting. I gave up.
It was when I switched to needle felting that things really started flourishing. I could picture the end result in my head, and my hands just had to follow my brain’s schematics – and the more I did it, the more I enjoyed the process.

Did you study art at college?
I did not. I have a college degree in Psychology because for some reason I got the notion it would be more “sensible” of me to pursue that than arts, but then I just went back to my lifelong passion, making things with my hands. Even my hobbies reflect that: knitting, spinning…

felt buddies (2)bWhat are you working on at the moment?
Right now I’m between pet commissions and enjoying the hiatus by making notebooks with felted covers. I’m also in the process of working on a tutorial for needle felting, so here’s hoping that happens quite soon.

FB 9What do you like to do when you aren’t creating art?
I think my brain melted a little with that question. Can time be spent without having my hands in fibre?
Seriously, though: I love reading and can lose myself in a good book very easily. However, if you read my first reaction, this will come as no surprise – I have been trying to master the art of reading and knitting at the same time. I also love baking bread and am enjoying coming up with different types of dough each time.
My final goal is to be able to read, cook and knit at the same time. I’m joking! Or am I?

FB 8Many thanks to Leonor for taking the time to answer our questions. Don’t forget to check out Leonor’s work on her sites and etsy 🙂

Birdhouse Class and Lambs.

Birdhouse Class and Lambs.

It is spring! Saturday I taught a Birdhouse Class.

Everyone had fun decorating their birdhouses.

Bernadette bird house 2

birdhouse 3 birdhouse 4

Of course there was rubbing and rolling and throwing

rubbing rolling

throwing

and everyone ended up with great looking birdhouses. Bernadette (second from the left) wanted a feeder so she made her opening much bigger.

birdhouses finishedThe other way I know that spring is here I we had our first lambs . We started with a bang, quadruplets. They are less than an hour old here, so not even cleaned up properly yet.

quad lams

and the reason my post is late this morning is because I have a visitor.

Fynn


Nuno Felting with Paper Fabric Lamination Class

Nuno Felting with Paper Fabric Lamination Class

Our next online class offering is the first module of a series of classes I will be presenting over the next year called Embellishing Felt with Surface Design Techniques – A Mixed Media Approach. The first module is learning how to do paper fabric lamination and then nuno felting with the result. The course will begin on May 15, 2015 and lasts 4 weeks with 2 additional weeks on the forum after the class. I have made a short video to tell you about the class.

You can find more information about the course and register here. This is a really fun technique and is a great way to personalize your work in your own style. If you are a wool purist, this course might not be for you but if you like to try new techniques, develop your own style and add other mixed media to your felt, I think you’ll enjoy the class.

Module 1 of Embellishing Felt with Surface Design Techniques - A Mixed Media Approach, Online Course by Ruth Lane

You can read a little more about the upcoming modules here. I do say in the video that the last module will include hand stitching. That is an error on my part, it will just be on machine stitching. I decided it wouldn’t be practical to try to include both machine and hand stitching in a 4 week course, there just wouldn’t be enough time. But if you are interested in a hand stitching course, please let us know and we’ll see what we can do.

Register now for Nuno Felting with Paper Fabric Lamination online class. The class start date is May 15, 2015 and the cost is $45.00 US for the 4 week class. It will be taught in a forum format and is not “live” so information can be accessed at any time during the 4 week class + 2 extra forum weeks at the end. The course is in English but can be taken from anywhere in the world as long as you have computer access. If you have any questions, just ask in a comment on this post. Thanks!


Wine Anyone?

Wine Anyone?

I wanted to try making a gift bag for wine in felt.  I first made a resist using the wine bottle as a model.  But I wasn’t sure about shaping the bottom.

2015-04-21 13.59.16

The base layer was black corriedale.  Then I used a layer of merino.  And finally I made a batt using forest green, a heather purple, sage and black bamboo for the last layer.

2015-04-15 16.09.08

For embellishments and design I made leaves from a nuno prefelt and used 100% Peruvian wool thick and thin yarn, locks and needle felted grapes.

I finished fulling the bag on the bottle, but because of the narrowing of the design it’s not an easy in and out for the bottle.

2015-04-21 11.19.22 2015-04-21 11.18.57

2015-04-21 11.18.48

2015-04-21 11.18.16

After it was semi dry, I cut holes at the top to thread some yarn through to tighten it around the neck.  Then I turned down the top and sewed extra leaves on and wound the excess yarn from the  closure around a small dowel to emulate the ringlet vines on a grape wine.

Also, the bottom ended up having “wings” so I tucked them under and sewed them to  the bottom. There was a hollow in the bottom of the bottle so it worked out well.

side finish front finish

2015-04-22 14.38

back finish

It was a little hairy so I shaved it.   Next time, I would only use two layers and redesign the shape.

Even with some problems, I think it will make a nice display on a bar.

Have you made anything similar?  Do you think it needs anything else?