Browsed by
Category: natural wools

Knitting and modeling a shawl

Knitting and modeling a shawl

After a big hiatus, my knitting mojo finally woke up, and it was craving complicated stuff, not just the customary stocking stitch pattern.
I’ve a soft spot for lace shawls, particularly those by British pattern creator Boo Knits (find her by searching on Ravelry). Bev also allows knitters to sell finished shawls, as long as they credit her as the pattern author – very useful for a fibre business owner like myself.

I set out to knit a shawl named Out of Darkness. The lace pattern is beautiful, yet simple enough to not drive me mad (as long as I pay very close attention to the instructions and count my stitches frequently).

Lace looks very underwhelming when you’re knitting it. The stitches don’t look defined or “pop,” it’s as if you’ve gone through a lot of trouble for not much.

6DA0253F-E699-4E3D-B695-C45DE89AE58D

Once you block it, however, the magic happens.

DSC_1861

Isn’t the transformation amazing? The pointy bits look on point (pun intended), the beads suddenly make sense and this is now a thing of beauty, luxurious even.

This was intended as the show stopper in my new online shop, so I went out of my way to create decent photos.

DSC_1865DSC_1874DSC_1868DSC_1873

Finally, I also gathered up courage to take some “lifestyle photos,” as they say. I even managed a straight face…

DSC_1845

You know how that classical novel ends with, “reader, I married him?” Well, my story ends with, “reader, I ended up selling this beauty before I finished setting up my shop!” Ah, well.

So here it is, my adventures in lace knitting. What have you created with your hands lately?

Todays task is dryer balls

Todays task is dryer balls

I got a call form one of my outlets that they are out of felted soap and dryer balls so todays job is dryer balls.

First I make middles out of old or failed felt experiments. They might as well help make some money.

Next is wrapping them in some wool and popping them into the cut off leg of some pantyhose.

I do 3 white and one with coloured stripes per set.

The coloured ball doesn’t nothing different but looks more attractive when they are bagged for sale.

Next is a trip through the washer and dryer.

When they come out you have to peal them out of the nylons.

Once they are all peeled its back into the nylons to go through the washer and dryer again to get rid of the fuzzies.

I will bag them and put a simple topper on them. Sorry no picture as I haven’t got that far yet.

Next is the soap. I get really clean hands.


Naturals For A Nature Lover

Naturals For A Nature Lover

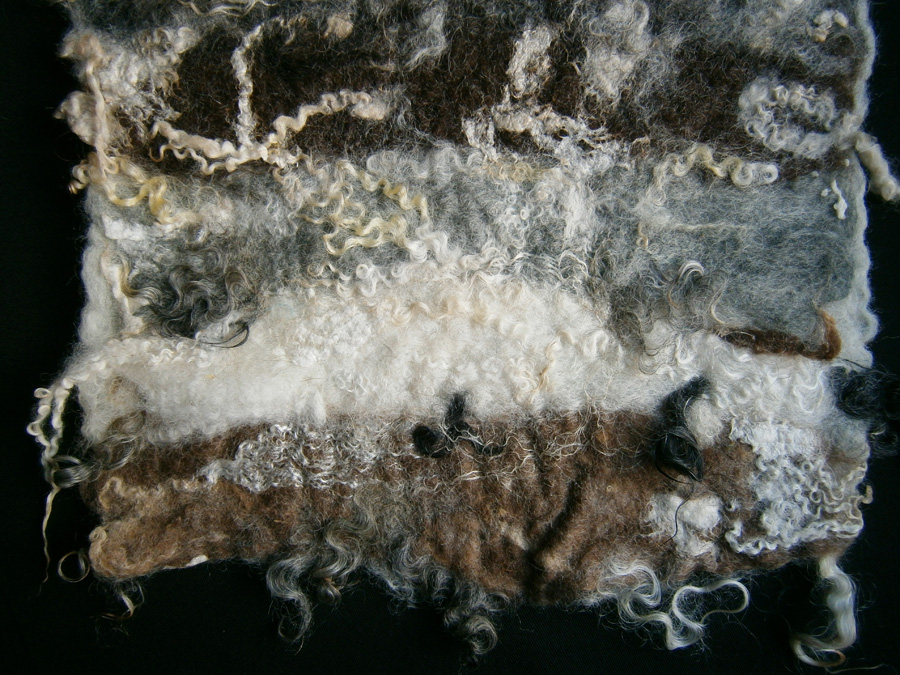
I wanted to make a piece of felt for one of my friends as a thank you for helping us out recently, he’s into the environment and nature, so I thought a piece using all natural wools and undyed fibres would be something he’d like. I really enjoyed not having to put too much thought into it apart from trying to use as many different fibres as possible. I can’t remember all the wools and fibres, but I definitely used: English 56s; Gotland tops, scoured fleece and raw locks (from Zara-thank you, again!); Brown Finnish, Grey, Brown and White Merino; scoured Shetland; Bluefaced Leicester locks; hemp; flax; soy tops; cotton nepps; silk noil; silk coccon strippings; Tencel; viscose fibre; bamboo fibre and ramie. Here’s the finished piece:

Close up of the top:

Close up of the bottom:

It’s not as textured as some pieces I make, but you can see how it is looking at it from an angle:

This is a close up of some of the flax:

A really nice, shiny Gotland lock with a gingery tip:

Another Gotland lock with some Soy top above and BFL locks at the bottom.

This is the BFL, I bought a bag of washed locks ages ago and forgot all about them until I went looking for something else!

The Tencel looked really shiny against the darker wools:

This is one of my favourite parts, because it has lots of texture, there are Gotland and Bluefaced Leicester locks, flax and hemp, Tencel, and cotton nepps:

Do you  have a favourite combination of wools and fibres? I didn’t get a photo from this piece, but I really like the silk noils and cocoon stripings on the dark brown wools, you often get little holes which look like a tiny bug made them, and the brown shows through the thin parts giving a ‘rusty’ look to it!

A brief glimpse into the Knitting & Stitching Show in London

A brief glimpse into the Knitting & Stitching Show in London

This weekend the biggest fibre and fabric-related event in Europe happened right here in London. Every year I volunteer for my spinning guild and, in return, I get a free pass for all days.

Although the Knitting & Stitching Show is mostly about the sales, there’s always a section dedicated to textile arts. Established artists as well as art school finalists exhibit their work every year, so that’s what I’m sharing with you today.

IMG_3593

Let’s admire this larger-than-life crocheted cow by TOFT. They also had a giant lobster and other animals. How many hours went into each?

IMG_3603

The artist Jenni Dutton had an exhibit about her Mother, called Dementia Darnings. You can imagine by the title how poignant each portrait was – we see this woman depicted from a young age to her final, frail days. I was very moved by it.
Look closely – can you tell how each work was created?

IMG_3602

It’s yarn. You can see it hanging down on the portrait above. Isn’t it wonderful? All this hard work, you can tell the artist loved her mother very much. I felt like hugging her for this dedication.

Next, quilts. I’m not a particular fan of the “traditional” ones but when this technique is applied to create something unusual, you have my full attention.

I’m afraid the pictures don’t do these works justice. Both artists are American I think you can feel a lovely sort of vintage US vibe to these images.

Finally, something that made me smile, by Libby Vale.

IMG_3564

Ironing is definitely not on my list of priorities, so I connected perfectly with the sentiments depicted in this board!

There was a lot more to show, but I’ll leave that to my next blog post. I hope you enjoyed my choice of art. Have you ever been to the Knitting & Stitching Show, or a similar event where textile art is shown? Let me know all about it in the comments section.

Chico the needle felted dog

Chico the needle felted dog

Hello, Leonor here. My guest post for today is going to be a simple “show and tell” as the weather here in London is too warm for complicated thoughts!

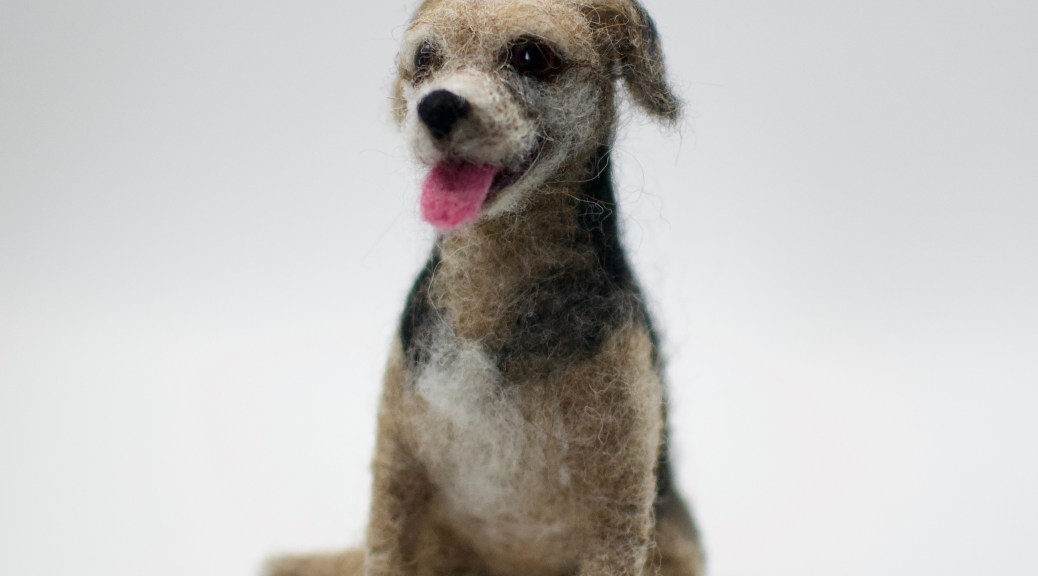
Some of you might be aware that I am a fibre artist by trade. Anything wool and I love it. I got into this business a little by accident, and making custom needle felted dogs was even more unexpected – basically, a friend asked me for a mini of his whippet, I took the challenge, and the rest is history!

I’ve now been playing with wool professionally for around 5 years, and I must confess there was one hurdle I was yet to conquer in my work – creating an open mouth. I’d tried once and it didn’t come out right, so I more or less gave up on it. That is, until I made Chico!

DSC_1102

At first I was going to make his tongue out of polymer clay (the idea of finishing it off with a nice layer of glossy varnish to mimic moisture was very attractive to me) but then I decided not to. I liked the idea of a 100% fibre sculpture better.

DSC_1106

I made the lower jaw separately, making sure the upper section was thin enough to accommodate both parts without looking weird. I added a layer of black around the edge to make it more realistic, and then a little white on the back for teeth. The tongue was made using two shades of purplish pink blended together. I made two mini tongues and chose the one that fit best.

DSC_1110

I received a few reference photos to make this little guy, my favourite was one where he was sitting with his leg to the side and smiling. I just had to make him this way.

DSC_1115

I love the detail of paw pads, the feet immediately look real. You can’t really tell from this picture, but Chico is er… anatomically correct. I like a realistic sculpture!

DSC_1114

Below is a picture of the original Chico. The mini version is off to a Spanish island as a surprise for the whole human family. I hope they like it!

unnamed

Have you ever created a needle felted animal? What wool did you use and how did you like your experience? Let me know in the comments section.
Questions? Happy to help, just leave a comment!

Natural Wools and First Quarter Challenge

Natural Wools and First Quarter Challenge

We made thick mats/placemats/coasters at the well being group last week. I took in some natural wools, partly to keep costs down, but also because I really like the combination of colours and textures they create when used together. I made my base out of some Portuguese Merino batts I’d put through the drumcarder. The fibre was really short and had tiny nepps in. This is how the back looked:

The edges were a lot thinner, I didn’t add the top ‘decorative’ layer of wools as thickly there, so I got what I can’t help thinking of as a ‘pie crust’ effect:

Some of the wools I used were raw so kept their character:

Close up:

The ‘pie crust’ edges reminded me of when I made another natural piece years ago. I used lots of different wools, with different shrinkage rates, which created a similar effect on the edge. I used my steam iron to firm up and shrink the edges before cutting it into pices for small placemats and coasters. It was alsmost 8 years ago, and the mat has sat on my computer desk ever since. I do use it as a placemat, so don’t look too closely because I noticed it needs a wipe! This is how it looks today:

I found an original photos of it, it was a bit dark so I brightened it, and the colours look a bit different on the white background, but here it is 8 years ago:

Those of you who read my last post will know I was asking about print-on-demand sites for t-shirts. I don’t have an update on that yet, but while I was asking around at local printing shops, one of them mentioned transfers, which reminded me that years ago (probably about 11 or 12) I bought a pack of transfer papers to make t-shirts at home. I found the pack, but had lost the instructions (typical!). I also found some prints I made and never used because of a tiny ink splash. I thought I’d combine experimenting with how long I need to iron the prints with trying them on different surfaces for the First Quarter Challenge. The first thing I tried a print on was a felt sample. I can’t remember what wool I used, but judging by the tiny crimp/texture, I’d guess it’s either 18.5 mic Merino, or one of the fine Swedish wools Zara sent me. This is how it turned out:

It felt crispy! I did get a nice imprint from the hem of the tea towel I used to protect the wool, though:

The next thing I tried was a transfer print onto Muslin. I used a print I’d just made which had turned out wrong. It looked ok in parts:

But in other parts I didn’t iron it long enough and part of the transfer paper came off, but some didn’t … still won’t even after soaking:

The last attempt on muslin was a bit better. I probably should have ironed the muslin first, so I could line the print up with the weave:

If I hold it up to let the light through you can see the weave still:

And here’s a close up of the edge, it doesn’t feel quite as ‘crispy’ as the wool, but is definitely stiff with texture:

Now, I just have to try the samples and see how they felt 🙂

Cat Cave Class part 1

Cat Cave Class part 1

I taught a Cat cave class a while back. It was great fun but it very nearly didn’t happen. There was a delay in the wool I had ordered getting here in time. But between my personal stash and our workshop coordinators stash we had enough wool to go ahead, 4 kg of Finnish wool. Here are some of they layout pictures.

A future beagle

Kimberly wanted a curly tail and curly spikes on her cave. these ones are for the top

She made a long fat spike for the tail. Here I am explaining how to attach it.

And then of course after all the wool was laid out and the embellishments added the was a lot of rubbing followed by a lot of rolling.

This is a big project. It took 2 full days to do. I think we made it to the first rolling at the end of day one. More form Day 2 next time.


Art Project

Art Project

This year is Canada’s 150th birthday. The guild I belong to is having an art show in celebration. We are making 150 12×12 canvases. Some are covering them in weaving or yarn or fiber pictures. I naturally am doing some felt pieces. I told you about one before.

knots-cut-short

The second one is sheep.

I started with 2 layers or merino prefelt. I put a piece of cotton gauze in between for strength.

green-layers

I then used head cut outs to decide on the positions of the sheep.

layout-spacing

Then I added all the curls. The white and multi coloured sheep are Blue Faced Leicester. One of the others is Gotland, one is Wensleydale and the other I can’t remember. I added the legs and ears.

green-sheep-wet

Once it was felted the legs and heads disappeared a lot so I had to fix  them with needle felting.  I then mounted it on a 12×12 canvas using velcro. I forgot to take a picture of them finished  with faded heads and legs. And then I forgot to take a picture of it finished because it had to go to get its picture taken. Fortunately Judy sent me one of the pictures she took so I can show it to you.

annsheepsmall

Judy sent me to close ups too

annwhitesheep-1 sheep1close-1

Now all I have to write up the info for the show and  decide on a price to put on it.

If you Are Canadian are you doing anything fibery to celebrate this special year? If you are not Canadian what did you do to celebrate a big event in your country or town?


Natural Wools For a Pod and Weaving

Natural Wools For a Pod and Weaving

I made another bird pod last week, this time using various natural grey wools. The pictures aren’t the best because when I went to take photos yesterday afternoon, it suddenly went really dark, then we had the most epic hour long storm with non-stop thunder, lightning, wind and torrential rain (basically the whole  city shut down for hours because of it). So, I had to redo the photos this morning, and they’re a bit flat.

OLYMPUS DIGITAL CAMERAI mentioned in my last post I was getting a spinning wheel, and it came last week (yay!) but I’ve not been upto having a go yet, so I did a bit of spindle spinning and then weaving. I thought it’d be nice for fairs or the well being classes to show how hand woven yarn can be used. This first one was made with fairly neat (by my standards, anyway) yarn, just single ply, and I didn’t wet and set the twist or anything, just wound it onto an old broom handle from the spindle. I wove it on a little kids loom I bought:

OLYMPUS DIGITAL CAMERAA closer look:

OLYMPUS DIGITAL CAMERAI was doing some of the weaving at night watching Parks and Recreation and thought I was using all naturals, but it was obvious in daylight I’d used some yarn I made ages ago from hand dyed Merino (green over orange, I think), but I think it matches alright.

OLYMPUS DIGITAL CAMERASince not everyone has a loom handy, I thought I’d make a few pieces with cardboard looms, so I cut some rectangles and then marked out sections and cut notches in the bottom. I also used some yarn I’d made from my carding scraps – the really wiry, scruffy, short and matted bits – and some coarser wools like Herdick (the bits I used looked like unpicked Brillo pads) and a couple I got from Wollknoll which look like shredded wheat, to show that yarn, and weaving, can still look good even if you don’t make smooth, even yarn. This is a tall one I made:

OLYMPUS DIGITAL CAMERAThat’s a dried pepper keeping it flat, I’ll probably have to wet and block some of these becasue they want to curl! Close up:

OLYMPUS DIGITAL CAMERACloser:

OLYMPUS DIGITAL CAMERAThis is a really small one I made:

OLYMPUS DIGITAL CAMERAA close up:

OLYMPUS DIGITAL CAMERAThis is the larger of the cardboard looms I made:

OLYMPUS DIGITAL CAMERAAnd this is a photo of the loom above with a smaller cardboard loom (it already has the warp thread wound on it) and how they compare to the kids’ loom I have. That is probably smaller than A4/printer paper:

OLYMPUS DIGITAL CAMERADo you remember the inside of my bag from last time? Well, I was watching Neighbours last week (an Aussie soap, for those who don’t know) and a character was wearing a jacket, just like my bag flap!

jacket-2jacket-3

I did some dying on the weekend.

I did some dying on the weekend.

I needed to dye some orange wool to make a flower for a customer so if I am going to get the dye pot out I might as well do a bunch of dying. You can never have enough dyed wool. I dye on the side burner of my BBQ outside when the weather is above freezing. Now it’s not much above freezing, it was only about 10c/50f  but that’s good enough for me.

I made a bunch of 100gram/3.5oz balls of merino top.  I heat up the big dye pot of water with some vinegar.  I Unwind a ball and soak it in warm slightly soapy water. I mix my dye and add it to the pot. I gently squeeze the water out of the soaked wool and pop it into the dye pot. I let it go from 20-40 min. If the waters clear I take it out early, if it’s not I leave it for the 40 min. While it’s cooking I start the next wool soaking and mix the dye. My water is very hard and it effects the dye process. I don’t think I have ever managed to get an even dye job. that is one of the reasons I usually recard most of my wool.  Dyeing with rain water is on my list for this summer. My rain water comes of a metal roof so I don’t know how much difference it will make but its worth a try .

This is the result of Saturday and Sunday.  The wind was not cooperating so excuse the sloppy display. I was just happy they stayed on the back of the chairs long enough to get  a picture.

whole group

Here they all are in groups

purplesI couldn’t get the colours one right no matter how I fiddled. There are 5 colours there. The middle 3 all look the same. Two are very close but one is purple and turquoise.

oranges This one is pretty close to true.

greensThis is very close to true.  The pale green is from an MX or fibre reactive dye used as an acid dye. Its called sage leaf. The one next to it, fourth  from the top is supposed to be olive drab but is more like sage leaf.  The yellow and green one is the exhaust batch after the greens and I quite like it. I think I will recard it to blend the small spots of green in to it. The blue is the exhaust after the purples.

While these where in the pot I added some yarns too. These are all form when I was learning to spin. I didn’t like the colours.

blue and brown yarn This was a natural brown plied with a white. It went into the bright blue dye bath.

brown and green yarn purple yarnThe purple one was white. The one on the right was natural grey plied with white. It went in the sage bath.. The one on the left was another brown and white and it went in the olive drab dye bath.  You can see the purple and the gray have gone all curly with not being plied properly. They are not balanced yarns. I think they will be fine to use for decoration on felt. It will add interest.

purple and blue yarn The one on the right is a commercial ladder yarn that was a horrible pale green. I had no idea what it was made off except it wasn’t natural. I tossed it into the bright blue bath to see what would happen. It came out great.  The top one went into one of the purple baths. It was a purple I mixed myself with turquoise and red. It spit into turquoise and purple. The others were ones that I bought mixed but they split too.  One of them started out pink but I can’t figure out which one now.

All in all a good weekend I didn’t even felt them badly like I usually do.