Browsed by
Category: Community

Joseph Banks Challenge

Joseph Banks Challenge

This weekend sees the launch of the latest body of work by Lincolnshire based textile group LINQS.  The group, which welcomes any gender and any ability, is now in its fourth year.  The only criteria for becoming a member is that you must reside in the county of Lincolnshire.  Members are given an annual challenge to make a quilt, or quilts, based on a particular famous person, place or theme.  It was being invited to join LINQS in 2014 that first got me started on the path to textile art so I have a lot to thank them for!

Our first challenge was Inspired by David Hockney.  The group had a terrific response from local ladies and secured a national tour with Grosvenor Shows with our quilts being displayed up and down the country.  Our work visited venues from Ardingley in the south to Edinburgh in the north and various places in between.

These are just a tiny number of the quilts in the first exhibition…..

By Wendy Skinner
By Mary Jackson
By Textile Lincs
By Carol Parkinson

Being completely new to this medium I was fired with enthusiasm and produced four quilts.  The first was a small black and white take on the painting “Woldgate Woods”….

My next attempt was based on a photograph taken by the river in Horncastle, keeping with Hockneys recurring theme of “trees”.

The third one was my take on a 1954 mixed Media self-portrait….

By now I was gaining confidence and moved on from making small quilts (30cm x 40cm) to making my fifth quilt which was 30” x 40”…..

The following year it was decided that in future we would make our person, place or thing “Lincolnshire” based and Isaac Newton, being born in the county, was selected.  These are a few of the quilts from that show created by four of the members…..

By Karen Lane
By Mary Jackson
By Jean Proud


By Pat Cave

Our third challenge was to make quilts inspired by the famous Botanist and Explorer Sir Joseph Banks whose family estate was at Revesby.  The first showing of this body of work will be this Friday at “The Village”, Lincolnshire’s only living museum, which is in Skegness.

Banks became the president of the Royal Society in 1777, where he remained until his death in 1820. He was known as a prominent endorser of travelers and scientific men. Many voyages of discovery were approved and carried out under his supervision. He was the first person to introduce the Western world to acacia, mimosa, eucalyptus and Banksia, a genus named after him. About 80 other species of plants were also named after him.

While researching Banks I came across an image of a Banksia Seed Pod which had been charred in a bush fire.  Anyone who knows my preferred colour palette will recognise why this provided the inspiration I needed for my Banks quilt!

I began by making a background using cotton fabric and painted tea bag paper……

Next came the individual “pods” (no idea of the proper technical term for these bits!) which were cut from painted interfacing free machine embroidered and wadded with thick felt…..

The main body of the Seed Pod was wet Felted Norwegian fibres, free motion stitched before adding the “bits” on top.  My finished piece measures 48cm x 30cm.

I can‘t show you anyone else’s work as I don’t have photos as yet but if you are in the Skeggy area this weekend why not drop in and see them for yourself.  For everyone else I will post an update very soon.

Painting with wool

Painting with wool

For today’s blog post, I am sharing with you a workshop I went to, where Dani Ives was teaching how to paint with wool. If you haven’t heard of Dani’s work, I highly recommend you check out her website.

Dani+Ives_Luna+Portrait
Portrait of Luna, copyright Dani Ives (taken with permission from the author)

Before we get started, what exactly is “painting with wool?” It is a 2D needle felting process whereby you pick a theme, copy the design onto flat wool sheets or another type of fabric, and then proceed to “paint” it with different colour wools using felting needles.
This term was coined by Dani Ives when she realised she was essentially using wool the same way painters use paint to represent an object.

IMG_3267
My “classmates” before we started

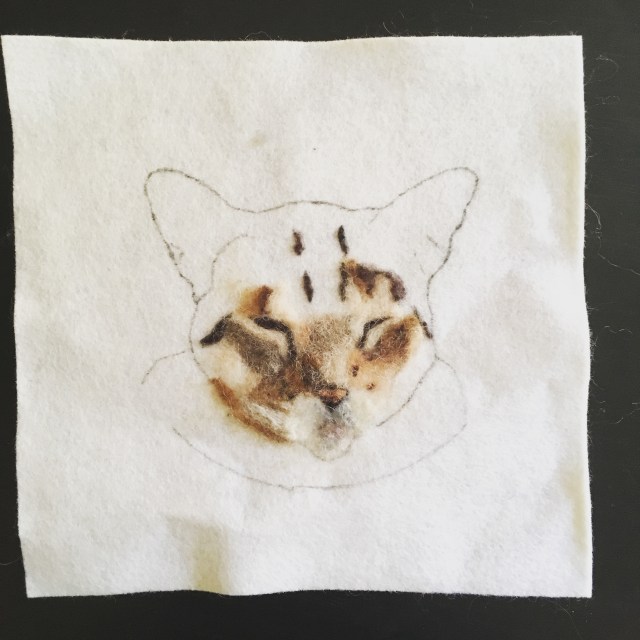
I was asked to bring an image to reproduce. My main goal with this workshop was to learn how to do 2D pet portraits, so I decided to be ambitious and chose a photo of my cat Marshmallow.

Marshmallow png
I’m being ambitious but not overly so – her eyes are closed

After transferring the image onto the felt fabric with an ordinary pen, it was time to pick the appropriate colours to use. I confess this is the part I have the most trouble with, because you have to think of the colour not only “as is” but also have a little sense of how it will look after it’s been blended with the others around it.

IMG_3268

We then proceeded to apply the wool onto the surface and needle felting it in place. You need to keep the reference photo at hand and look at it often, as it’s very easy to get carried away and start using artistic licence – you don’t want to do that when you’re going for a faithful reproduction!

IMG_3273
There’s more hours put into this than I want to admit

This is a slow, laborious process. Obviously you will get quicker as you become better but I sure took long to reach the above phase.

IMG_3315

This is my current progress. It’s slowly coming together. I can’t wait to see this finished.

Finally, I had to share my fangirl moment, a picture of me with Dani Ives herself!

IMG_3270

Have you ever done any 2D needle felting? Let me know how it went for you in the comments section. Thanks for reading!

Sew on Labels

Sew on Labels

Not too long ago the Dutch Label Shop from Pennsylvania USA contacted me to do a review post about their labels. www.dutchlabelshop.com/ There would be no obligation to do a positive review and they would give me a gift certificate to get some labels. I had been thinking about labels for a long time, what kind? what size? etc. This seemed like a good opportunity with no strings attached.

label group

The site was easy to navigate and I had no problem creating a label. Or so I thought. I had chosen much to small a label for what I wanted on it or I chose to much to put on the sized label I wanted, depending on how you look at it.  They contacted me very quickly to let me know and we went back and forth in emails to sort out what I was looking for and what would work. They were very helpful and very nice to deal with. They sent me a proof and I put in my order.

It arrived very quickly and I must say I am very pleased. They feel nice and they are not to stiff.

label in green hat close

I added them to some hats

label in green hatlabel in green hat closelabel in red hat close

and some scarves

label on purple scarflabel close on purple scarf


and on a lighter colour

label close on pale green scarf

They went on easily. I used fine invisible thread so I didn’t have to try and colour match thread.

I haven’t decided where I should put them on the small ruffled neck scarves. Where do you think would be good?

I have a code for you to use to get a discount.  shepherdsspringfarm15 It is good for 60 days from August 9 2018.

Do you have labels for your felt? Are they woven or printed? What do you like or not like about them?

Autumn Necklace

Autumn Necklace

Although we’ve got baking temperatures and scorched grass outside, indoors I’m amassing quite a collection of Autumn leaves made from Lutradur!  I’ve decided its time to start thinking about what I’m going to do with these leaves and incorporating some of them into new pieces of work.

This particular leaf has been painted with Dylan bronze fabric paint to give it a metallic look.

The leaf, top right, before painting.
Bronze painted Lutradur leaf

I decided to incorporate it in a very simple choker type necklace.  The leaf is quite intricate so anything fussy would distract from the detail.

I began by cutting out a 4cm wide crescent shape from a piece of white superfine Merino prefelt 20cm x 29cm.

This was overlaid with Oyster Merino on the left and Antique on the right.


I made the felt quite thick and really worked it hard to shrink it and firm it up which resulted in a very textural effect and a subtle change from one colour to the other.  The leaf was sewn in place using a bronze coloured linen thread.  There is a chain fastener across the back but for now you will have to take my word for that…….I didn’t think to photograph it and I’m writing this post sitting in my B&B in Scotland while the Necklace is back home!  I will take a picture and add the image when I get back.

Chico the needle felted dog

Chico the needle felted dog

Hello, Leonor here. My guest post for today is going to be a simple “show and tell” as the weather here in London is too warm for complicated thoughts!

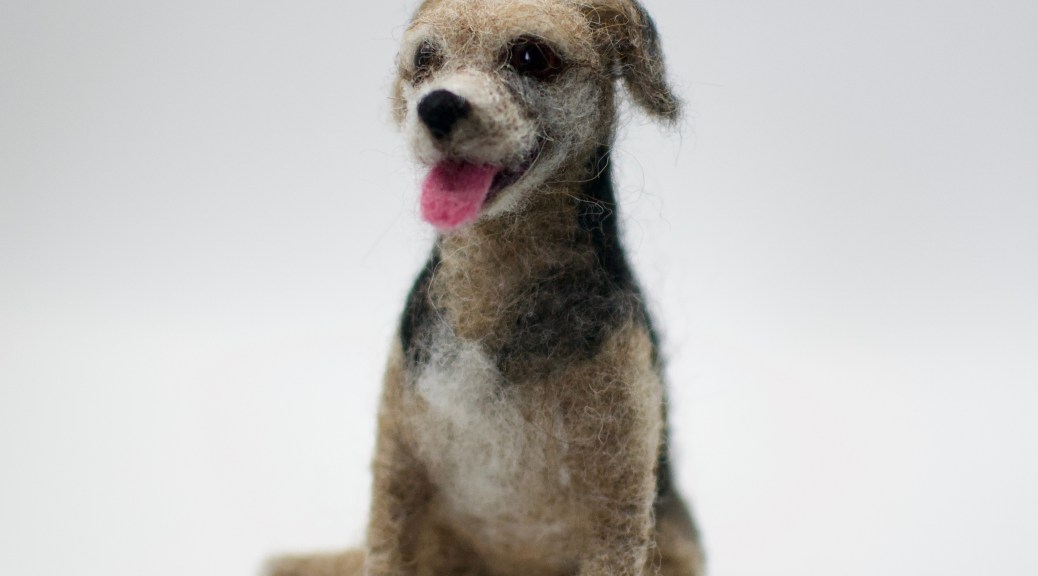
Some of you might be aware that I am a fibre artist by trade. Anything wool and I love it. I got into this business a little by accident, and making custom needle felted dogs was even more unexpected – basically, a friend asked me for a mini of his whippet, I took the challenge, and the rest is history!

I’ve now been playing with wool professionally for around 5 years, and I must confess there was one hurdle I was yet to conquer in my work – creating an open mouth. I’d tried once and it didn’t come out right, so I more or less gave up on it. That is, until I made Chico!

DSC_1102

At first I was going to make his tongue out of polymer clay (the idea of finishing it off with a nice layer of glossy varnish to mimic moisture was very attractive to me) but then I decided not to. I liked the idea of a 100% fibre sculpture better.

DSC_1106

I made the lower jaw separately, making sure the upper section was thin enough to accommodate both parts without looking weird. I added a layer of black around the edge to make it more realistic, and then a little white on the back for teeth. The tongue was made using two shades of purplish pink blended together. I made two mini tongues and chose the one that fit best.

DSC_1110

I received a few reference photos to make this little guy, my favourite was one where he was sitting with his leg to the side and smiling. I just had to make him this way.

DSC_1115

I love the detail of paw pads, the feet immediately look real. You can’t really tell from this picture, but Chico is er… anatomically correct. I like a realistic sculpture!

DSC_1114

Below is a picture of the original Chico. The mini version is off to a Spanish island as a surprise for the whole human family. I hope they like it!

unnamed

Have you ever created a needle felted animal? What wool did you use and how did you like your experience? Let me know in the comments section.
Questions? Happy to help, just leave a comment!

Felting Tools Part 2

Felting Tools Part 2

Here is part 2 of Jan Scott’s felting tool post. It was much prettier in the word doc format but I don’t seem to be able to transfer that to the blog.

I have a large selection (24 years of collecting) of Massage related implements that may have potential for Felting.   One of which are the I.T. Band rollers. They were once veryexpensive and rather limited to acquire. A few weeks ago I found a number of variations of surfaces on rollers at Dollerama for 4.00 each.

So I got a few and gave one to Ann. She tried it out at the Felt in using a pool noodle to mimic a rolling pin (a really big Rolling pin!)

Another massage tool you might like to consider would be the Bar, it is used on large muscles to work out knots.
It is similar to a rolling pin but has groves.

There are also foot rollers and trigger point balls. Not only are they excellent for getting tension out of Levator scapula or the plantar arch, they also work quite nicely to felt with.  They come in various stiffness’s for the knobby bits. There are similar balls with knobby bits at the dollerama for much less money. Check the pet toys and the kid’s toys. The tall purple cylindrical roller was from Walmart in the exercise section and was still cheaper than the massage supply stores.

If you find a theraband roller in a second hand store you might want to grab it. Not only is it wonderful for treating both Golfers and tennis elbow (a common felter’s complaint) it also is a cylinder with grooves so again good for felting. They come in different firmness in case you were wanting to use it to stretch your medial or lateral Epicondilitis.

I have been keeping an eye out for Fondant rollers with groves and patterns, they are a Kitchen implement which may also be useful in felting. I have also seen pictures of a regular wooden rolling pin with a bamboo place mat elasticed to it. It looks like it would work too.

Ann has been tracking down wooden facial massagers and foot rollers from Ali express out of china. It’s a very interesting site but be very attentive to the size of items some look much bigger in the picture than what they are when they arrive. They are good for getting into small corners but some of them have a bit of a squeak when rolling.

For needle felting too there are tools not originally designed for felting. I only started to try Cookie cutters for needle felting templates recently. I am not sure if I will investigate further since I really have enjoyed the sculptural aspect of felting but for a production felter it may be helpful to start with a standardized base shape.

I have a number of different sizes of dowels, Meet skewers and wooden scraper for rapping wool around. Most were acquired at the Dollar store in the art or cooking sections.

I have been wanting to try wax on felt to crate claw tips, beaks and noses. I have a suspicion that melted crayons may work. If I need more stiffness I can add paraffin wax.  If I need more flexibility I can add more Bees wax. To melt the crayons, I have been cruising the second hand stores looking for a melting device.  This is what I have found and am looking forward to trying it out.  I will let you know how it goes!

I have found the Extra-large Zipper Bags at Dollerama to be extremely helpful. The Foam pad I used for making the 3D pictures fits in it perfectly. The Foam is a chair pad I bot at Walmart. The 3” thickness I found to be safer than the smaller 12×12 by 2” deep pad I have also been using. I have been leaving the thin plastic over the foam, finding it gave me good separation from the wool and the foam.  As I continue to work in one aria the plastic eventually will deteriorate. I have just kept moving to a new section but eventually will add another layer of plastic over the foam.   The Foam I chose has no memory foam content. (I have heard rumors of needle felting and memory foam are not compatible.)

Have you noticed at Dollerama, the test tubes with screw tops? They have decretive erasers in them, but you can empty them out, add a bit of wool at the bottom and then they hold felting needles very nicely.  I have been keeping the needles I’m working with stuck in the side of my foam but the test tubes are grate to store extra needles. I have labeled each tube with the needle type size and source. I will add a label to the lid once I find a good storage box for all 16 reasonably available needle types. I am still tracking down spirals in a coarser size.

Now that I have most of the needles that are available it will be easier to determine what the Chinese supplier are labeling as small medium and large, or fine medium and coarse.

There is one last thing I think would be important to any art and craft person which is a comfortable table height. I was lucky to find a small adjustable table at Walmart. The top is 30”x19” so hold a table loom or all my needle felting stuff. It adjusts from 21 to 28 inches so has worked well for seated work.

16.jpgI also have a printer table that was not the height I had hoped for. So added leg extensions of PVC piping to raze it up.  I think Ann is using the same technique on her table to make it a good height to stand and work at. With a bit of height adjustment, you can have the table slope just enough to drip water off one corner and into a bucket or drain.

Ergonomics, in body position, comfort of tools and working height is important if you want to keep doing what you are enjoy for your entire lifetime.

I hope that I found something that was new to you and that you will share some of your best finds with me!

Felting tools (most of which were not originally meant for felting) Part 1

Felting tools (most of which were not originally meant for felting) Part 1

This is a guest post from Jan Scott. It is in 2 parts as she has many felting tools now. She is great at thinking out of the box.

One of the problems with delving into Felting is that there are very few tools that were originally created for the purpose of felting. I am starting to suspect a lot of felters have a similar form of dyslexic distraction as I have. Do you find while wandering through Dollarama or Walmart your brain will look at some odd item and declare “WOW that would be grate to felt with!” Sometimes it’s the boot tray or a van rubber mat (that lives over at Ann’s since I don’t have a big enough table for it) or it may be a cylindrical plastic dog toy with knobby bits on it. The person who made the item definitely didn’t have felting in mind as the end use but we can see its potential.

I have been collecting “Odd” felting tools for a while now. And thought you might be interested to see what I have found. You may already have a wooden scraper and a package of skewers for Needle felting and car mats for working surfaces. But you may have missed the Iliotibial band roller (massage tool) so let’s compare and see if we can inspire each other.

My first felting tools were a lid from a Tupperware Juice pitcher, some bubble rap and a piece of curtain sheer. I have expanded a bit since then.

Tupperware Juice lid – source Garage sales, second hand stores.

I have made quite a few hats with this and a pool noodle. Pool noodles can be found in many types of stores. Improvements in pool noodle technology has led to a variety of sizes and shapes which can either give a more aggressive felting experience or used to shape around when the felt is drying. The smaller noodles come in 3 sizes and were found at Dollarama in the craft area.

I added bamboo place matts but trying to replace them as the warp threads start to rot has been a bit more challenging. Dollerama has not been carrying them at the moment. If they don’t restock them I will have to watch the second hand stores for matchstick window blinds and more placemats. I have tried non-slip matting which comes in a couple sizes and longer lengths (and doesn’t seem to rot out). I found that it worked but was not quite as quick as the matchstick placemats.


I also found a Ball Brause Sprinkler originally used to water bonsai. I recently had one of those odd thoughts that occur rather frequently while shopping as I spotted a garden sprayer with a compression pump (4.00 at Dollarama). It has a much larger capacity than the Ball Brause and adjusts from a strong stream of water to a fine mist. Ann tried it out for me at the Felt In. She is very brave around water.

I am not that fond of getting unnecessarily wet, much to Ann’s amusement. I have been trying to perfect wet felting without getting wet myself. In this endeavor I have found boot trays effective. They come in many sizes, depths and various patterns on their boot surface. I have one that is extra-long with a trellis pattern and a much shorter tray with ridges. In the spring, Giant tiger stores often have their end of season sale on boot trays. Other spots I would check would be Walmart, Home Depot, Costco and Dollarama. They have worked quite well to contain the water and keep me dry.


Mainstays Manor Lattice Boot Tray Mat, 17” x 35” Walmart

Costco Deal: Bird Rock Home Rubber Boot Tray 34″ L x 14″ W x 2″ D

Winter car mats have the same usefulness to work over as the boot trays but don’t contain the water as well as they do. If you are lucky you might also find a van winter mat reduced for quick sale. Even the regular car mats have textures that may be to your liking.

I have also found that plastic gloves are helpful for keeping my fingers dry while wet felting! I have some from work and found some in the automotive section of Dollarama (they’re black but work great). I have tried the dish gloves but find they have poor palpation through the thicker gloves.

Part 2 next time.


Lutradur Leaves

Lutradur Leaves

In my last post I showed some of the brooches I’ve been making out of Tyvek.  This month I thought I would continue with the “man made” fabric theme and show you how I make my Lutradur leaves.

Lutradur is another exciting non woven product which was originally designed for industrial applications including construction substrates, landscaping materials, residential and commercial wallpaper, carpet backings, automotive floor mats and carpeting, and specialized filtration devices.  It is an incredibly versatile material which is available in various weights including 25gsm, 30gsm, 70gsm, 100gsm and 130gsm.  It does not fray, some weights are translucent, it can be painted with any paint medium, dyed, distressed with a soldering iron or heat gun, glued, stitched, layered and embroidered.  In fact, think of an application and you can probably use it!

Lutradur is available in packs of A4 size sheets or by the metre from various suppliers including Spunart in the UK.

My first attempt at using Lutradur was a couple of years ago when I made this leaf using 100gsm…..

I drew the shape directly onto the fabric, free motion stitched over the lines and then painted it with Inktense before cutting out the shape.

You can see how the colour altered once the Lutradur had been zapped with the heat tool.  I was pleased with the result but there was something not quite right which I couldn’t put my finger on…..until recently.

Its staring me in the face looking back at these photos, I shouldn’t have sewn around the edge of the leaf!  This is that same leaf after a little pruning of those edges and another blast of heat to curl the tips, it looks so much more realistic…..

The underside of the leaf

These are some of my more recent Lutradur leaf creations made from 100gsm…..

Lutradur provides a very stable surface for stitching into.

Each one is drawn first using a Frixion pen.  Next I use a heat resistant thread i.e. Rayon, Viscose or 100% cotton to add free motion stitching along the veins.

The fallen leaf which inspired the design.
Shaping with the soldering iron.

Once the stitching has been done the leaf is cut out using a fine tip soldering iron.  I wanted to retain most of the fabric on these particular leaves so I also used the soldering iron, rather than the heat tool, to target specific areas to cut holes.

The finished leaves painted with Inktense.

I wanted a more lacey look for this next leaf so after stitching and cutting out with the soldering iron this one was distressed using the heat gun.  I left it unpainted to suggest a frosty leaf in winter…..

The following photos show a selection of leaves made by students at my recent “forest floor” themed workshop…..

These leaves are fun to make but be warned, as with so many creative projects they can become very addictive once you get started!


The magic of blocking your hand knits

The magic of blocking your hand knits

Hello, Leonor here guest-writing for this week’s post.

After reading the title, if you’re not a knitter, you’re probably wondering what I’m talking about. What on earth is blocking and why am I writing about it?

Simply put, blocking refers to the act of stretching a knitted item with the aid of specialised wires and pins, with the intention of making it look a certain way. Think of all those airy, lacy shawls you’ve seen people wear – those have been carefully and mercilessly blocked into submission.

leonor1leonor2

Above is my latest project, the Banana Leaf Shawl. It looks nice-ish, but it lacks that finesse that one usually finds in store-bought shawls. The stitches look limp and you can see the differences in my gauge. Let’s make it right.

Firstly, soak the item in room-temperature water (add a nice wool wash if you want; I used Eucalan, a no-rinse Grapefruit-scented one). Let it sit for about 15 minutes and then carefully extract the excess water. Your knit needs to be damp but not dripping.

leonor3

Now comes the fiddly part. Using blocking wires, you’ll need to catch the edges of your project so it’ll keep the shape you want (in my case, everything’s a straight line, but it can be crescent-shaped, for example).
I decided to do this just before going to bed, thinking it wouldn’t take me long – how wrong I was. After one hour, I was losing the will to live. I’d need another hour to finish getting the wire through all the edges.

Next, you’ll need to pin the wires to a surface. There are special fancy mats you can buy for that, but I got some for home gyms that are a fraction of the price and do the job nicely.

leonor4

Because I have cats, I couldn’t risk them getting hurt on the blocking pins, so I had to move my blocks vertically for the night. I then used my desk chair to keep everything upright.

Once your finished object is dry, you can take the pins out and because fibre has memory (like the mohair and silk of this shawl), it’ll keep its shape… until you wash it again. Yes, blocking needs redoing every time a knit gets wet! Don’t you have a newfound respect for all the people who knit delicate lacy shawls?

leonor5

And here’s the finished product. I hope you can see how different my Banana Leaf now looks, comparing it to the first photo – from a slightly misshapen piece to one with sharp, well-defined edges. It’s grown quite a bit, too.

leonor6

leonor7

The stitches look so much better, too, neater. They’re suddenly really well defined. This shawl now looks like something one would see in a shop front, if I do say so myself.

leonor8

Even if you’re not a knitter, I hope you’ve marvelled, like I do every time, over the magic of blocking knitwear. If you fancy reading the technical bits about this particular project, head on over to my Ravelry page.

Have you ever done blocking? Can you think of any ways this technique could be used for other fibre endeavours? I’d love to read (and steal) your good ideas.

Spinning at Can Games

Spinning at Can Games


JAN’S BLOG POST; CAN GAMES Spontaneous Demoing 2018

For a number of years I have followed my husband to the local board gaming convention on the May long weekend (Can Games). In exchange for my support of his hobby, I get gardening help from him. I have been attending Can Games for quite a number of years always accompanied by my portable spinning wheel.

   Jan 2Friday spinning upstairs beside the Curling club kitchen. The Road bug spinning wheel fits in the trundle box for travel.


I have been there long enough that I am greeted by Gamers I recognized by face if not by name.

jan 03 jan 04

Glen plays various board games (many involving trains and vary complicated rules systems) and I sit with my wheel and spin, sometimes I use my hand carders. There are a lot of guys gaming, most of whom are interested in the way the wheel works. I hear lots of stories about wives and mothers who knit too. While the much younger kids just seem really interested in the turning wheel. I think it was last year that a very fussy baby noticed my wheel spinning and became mesmerized (and quiet).

The last couple years I have asked if they should add a live action RPG game of “Spin the golden fleece” or “Turn straw into gold” (well actually linen but it’s almost as good!). This weekend was the first time one of the volunteers who run the convention has mentioned that I should present a game description for play testing at next year’s convention.

He suggested I should have levels of difficulty to learn and earn experience (starting out with a skill and perfecting it). Then give them a greater challenge to learn and perfect. Maybe starting out with a regular fleece and moving up to a golden one? Maybe a silk and merino blend and then have a choice of alpaca or cotton for the really advanced spinners and to earn extra bonus points?

Character requirements would be high dexterity, excellent patience and a sense of humour.

I would suggest the chopstick Turkish spindles may be ideal for this purpose since you can increase the weight and rotational momentum by adding bulldog clips to the arms of the spindle and they are really cheap to make.

I could offer a second “Live action RPG game” for advanced level players who would turn straw into gold, which could cover bast fibres, if there was interest.


As you may remember, I did quite a bit of needle felting last year. I purchased a good quantity of super wash merino wool (mill ends from Black Lamb). The colours were amazing and enticed me into the purchase. Although I did successfully needle felt with it, I did find it was a lot more work than non-super wash wool. So I need to find a use for all this fabulously pretty fibre. Hum, I bet Mom would like a scarf for next winter. I bet I could make some very interesting slightly slubby yarn that would weave up nicely. I have a couple of table looms to choose from and could use that as a demo project for the next demo at the beginning of June. It will be nice to weave with my own handwoven again.

jan 05   Part of the super wash Merino acquisition.

I selected the blue and one of the greens tones in a slightly variegated top. I split the top into thinner strips and then intermittently spun one or the other colours then both together. It was fun to spin and I enjoyed the blending of colours.

jan 06  jan 07

jan-08-e1526940294613.jpg

I used the road bug travel wheel again. When I had the bobbin full I wound it off onto the blacksmith made plying tool. Glenn made it so I would stop using his paperback books to wind onto. It has 2 parallel arms that have a slight slope so I can slide the singles onto my wrist and then ply from the double ended ball that is now wrapped around my wrist. This tool also works for drop spindles and means I can put it down and go do something else (very handy).

jan 09 jan 10    Put the end of the singles yarn through one of the end rings and put your thumb over the tail as you start to wind on. (Alternating sections of diagonals similar to a Nostipine work well)

jan-11.jpg  Working at a distance helps to even out the tension consistency.

  jan-12.jpg  Wind off the bobbin onto the plying tool. You can put it down and go look at something then finish winding. When you get to the end, remove the beginning and the end from the rings and tie them together.

jan 13   I use my Left hand to slide through the double ended ball, gripping the beginning and end with the fingers,

jan 14   jan 15 Now slide the ball off the implement and onto your wrist.

jan 16After the bobbin of plied yarn was full (ok I played yarn chicken to get it all to fit back on the plying bobbin and won) l I used the cheap easy to make niddy noddy to wind into skeins. (PVC Pipe from Home Depot)

jan 17

Even with all the spinning I did while at Can Games I still had time to play a couple games (Chariots and A playtesting new game which hopefully will be available in August on Kick starter), some shopping a few board games, a couple for one of my friends, and a game of stacking miniature chairs) and watching some of the games that were running.

  jan 18  jan 19   The Chariot Race

jan 20jan-21.jpgjan-22.jpg

Lego mecs, Dice and Helms deep

jan 23jan-24.jpgjan 25

Pirates, chair game, sheep participate in Scottish fort battle.

I was not the only fiber arts person there this year. There was a lady knitting beside a miniature games with pirates being attacked by small green monsters.

The gaming convention is now over for another year and I hope next year I will be joined by more spinners, weaver’s, felters or knitters who would like to have fun on part of the long weekend. Maybe you will join me in an RPG to spin the Golden Fleece? We will make Turkish spindles out of chopsticks and elastics!