Browsed by
Category: Community

Abstraction

Abstraction

Last weekend I took part in an exhibition at The Creative Craft Show held in Manchester’s EventCity. I attended as a member of Jeudis, a mixed media textile group who meet monthly in the village of Rothley, Leicestershire. The group work to a different theme each year and each member creates either a large piece of work, or a series of small pieces, in their preferred medium. The current theme is Abstraction and so far I’ve made three pieces, two framed pictures using Merino fibres, Lutradur and sheer fabrics and a wall hanging in Bergschaf. As they are all on the large side I had to select just one to exhibit and went for the Bergschaf “Rockpool”.

Abstraction – 72cm x 40cm mixed media
Abstraction II – 80cm x 40cm mixed media
Abstraction – Rockpool 53cm dia Bergschaf and found objects

This is the work created by the rest of the group…..

Sue also works in fibre and created these wonderful pictures enclosed in tree bark
Christine is a book maker and creates mixed media collagej
Gill created a large bowl incorporating fabric, paper and stitch
Cathy’s work is very geometric and often features architectural imagery
Linda used her interested in yoga and the various associated symbols to create this colourful quilt
Hazels hand coloured and embroidered scroll
Jeans mixed media with fabric, paper and stitch
Elaine’s piece is hand painted and stitched on pelmet vilene

We had a lot of visitors to our stand and some great feedback which was very encouraging. It also led to me designing more “rockpool” inspired items for the sales table…

These are just a few more photos from the show…..

It is almost a year to the day that I gave up my day job of setting up clinical trials of new drugs for hospital patients to pursue my dream of making felt full-time.

Related image

A post on FB this week, prompted me to reflect on why I made that choice. One year in to my new adventure and the start of a new year, this seems like a good place to pause and take stock.

The post on FB asked us to choose the 3 main reasons why we chose to use our creative talents to go self-employed because lets face it, most of us don’t do it for the financial rewards, if economic security is top of your agenda, going self-employed in the creative arts is likely to be low on your list of employment choices.

This is the list of values to choose from but you are welcome to add your own, they came from Shannah Kennedy’s book: Simplify, Structure, Succeed.

No photo description available.

Which 3 did you choose?

Mine were:

Freedom and Health: being self-employed means I can go for a 2 hour run or a long walk in the middle of the day if I want to, being able to down tools and go outside when the sun is shining has made me far more physically active and the psychological benefits of spending more time outside, in our beautiful British countryside, means I am far less stressed. This also relates to biophilia (see below) which is also supported by working with wool.

I also love that I don’t have to get up a silly o’clock in the morning to sit in traffic jams with thousands of other equally miserable people trying to get to the office before 9 am. There’s a lot to be said for home-working!

Order/stability : I found working in the corporate world could be incredibly stressful, every 2-3 years we would have a new VP, none of them could ever accept that the systems installed by their predecessor worked just fine and so felt they needed to restructure the entire company in an effort to leave their mark, like dogs peeing on a lamppost. We were constantly working in a state of flux, trying to navigate new processes but never being allowed to do the same thing long enough to get good at it before a new VP would come along and change everything again!

I wouldn’t describe my life as particularly ordered; Einstein summed it up well, “If a messy desk reflects a messy mind, of what does and empty desk reflect?”. I am messy and proud! 🙂 But compared to the corporate world my current work-life does feel a lot more stable, my processes only change when I need them to, not because someone else is peeing on my lamppost!

Of course, one downside to being a self-employed maker is that many of us feel we have to take the work when it comes, this can lead to working 18 hour days but that is my decision to work long hours (not due to some arbitrary deadline set by a faceless manager) and if I don’t want to work that many hours, I can always refuse a commission or only accept it with an extended delivery deadline. There’s nothing to say you have to take on every piece of work that is offered to you, in fact I think there are some things you should always say no to, but that is a whole other post!

Biophilia: Not on the list I know, but I think it is very relevant for most of us. Those of you who make felt on a regular basis will understand the deep connection with nature and the past that it brings, taking natural fibres and thousands-year-old techniques to create beautiful works guided only by your imagination and what the materials want to do.

I recently discovered this connection with nature and the desire to surround ourselves with natural materials has a name; biophilia. It seems to be something of a trend in textile studies at the moment but of course felt-makers have been familiar with the concept (if not the name) for centuries 🙂

Felting Friendships

One of the respondents on the FB page also talked about how isolating it can be to be a creative working from home, she described how she has changed from an assertive, confident woman to feeling like a timid mouse. I felt so sad reading that but I can easily relate to where she is coming from. Working on your own, 7 days a week can be tough, even for introverts who are comfortable with their own company, I can only imagine it must be an impossible challenge for extroverts.

For me, while designing and making are where I find the most fulfilment in my work, I realise that attending fairs and teaching are what keeps me sane. I need that social interaction, while Pickle (my cat) is very chatty, his conversation is hardly what anyone would think of as intelligent.

If you mostly work alone, how do you find it? Do you have strategies for coping with the isolation?

I think we are social animals (even the introverts!), we need to connect with other humans and for me, I am finding I need to collaborate and share with others, Open Studio events and craft fairs are a great way to connect but are quite sporadic so I was chuffed to bits to spend a day with Janine and Nancy making winged vessels in Janine’s studio (she has a studio to die for!). I am already looking forward to our next play-date and hope this will become a regular event in our diaries. I have long admired Ruth’s creative textile gatherings and hope we can develop something similar.

These are the pieces we made:

Janine – green vase, Teri – cloche hat with rosette, Nancy – large winged pod

My hat after it was dyed:


Sneaky Presents

Sneaky Presents

This year one of my brothers-in-law decreed we should not give gifts at Xmas.  Oh no! But I love Xmas.  It’s so fun to see if I have guessed right what everyone will like.

So this year I did 5×7 Xmas cards for our Oakville Xmas. That technically isn’t a present it’s a card. I had a plan.

OOPS, I took Mom shopping 2 weeks before Xmas and had 3 bags of groceries; one was just a bit heavier than the others. Ok, as soon as I lugged it into the house I knew it was too heavy. I lasted long enough to get everything into the fridge and realized I wasn’t doing anything else. I was much better after spending most of a week in bed being very uncomfortable, frustrated and all caught up on Xmas movies.  So I was a week behind on Xmas and sure I had a bit longer until it arrived. (Surprise! It’s still on the 25th!) Drat!

My husband works for the post office so this year was going to be a very short visit. (The Post Office was open on Monday, Dec 24th.) The original plan was to drive for 5.5 hours arrive late on the 24th or early on the 25th drive back on the 26th so he could work on the 27th.  He had requested to have Monday off so we could leave earlier but we had to wait to see who else requested because it would go by seniority and there are a lot of more senior people working at his station. Thursday night he found out that he could have Monday off and we had a mad scramble to drop off Ottawa presents (before the freezing rain arrived) and gather everything for the trip.

Friday started out with freezing rain changing to rain. I had collected my portfolio a bag of various coloured fibre and a strip of the felted duvet that had been donated to the guild felters.  I think I told you about that a while ago. I finally got to use a bit of mine and it worked very well. So if you acquire a felted wool duvet do not despair take it apart and use it for a base to felt on!

The drive down started with light rain changing to vary heavy rain eventually stopping and changing to decorative wisps of snow north of Toronto but nothing stayed on the very green ground we found in Oakville. There was an amazing decorated Xmas tree and Glenn’s Parents to greet us.  so Green Xmas isn’t all bad.

1-xmas-2018.jpg
No Snow in Oakville but a spectacular tree!

So Saturday morning I pulled out my bag of fiber and sent Glenn to find a cereal box in the recycling bin in the basement.  I cut out part of one side and made a 5 x 7 window and sent the rest back to recycling. Then took over a corner of the dining room table. (My back still wasn’t very happy and decided that living room furniture was not to be tolerated but dining room chairs were fine – stupid back)

Hum, what would my in-laws like on their card? Well, we were definitely having a green Xmas and we hadn’t brought any snow with us (what little we had after the rain and freezing rain in Ottawa) ok, a snow scene it would be.

2 xmass 2018
swirly application of fibre


3 xmass 2018
adding a tree and a snowy slope

4 xmass 2018
another tree and more swirls to the sky and a winter sun

Again wisps of colour laid down this time in swirls of patterns to the sky, very van Gogh of me! I added bare trees (there is a golf course full of bare trees just across the street) then needed something to balance their weight.  The nephews had created a grisly snowman murder seen the last time they had visited but unfortunately no snow so no snowmen. Hum ok, a less grisly snowman with a scarf to blow in the wind.

5 xmass 2018
check with the cereal box frame for balance to the composition

7-xmass-2018.jpg
Ooh, a frame makes everything look better! One down 2 more to go

Yes, l think that will work.

One down 2 to go!

Next Brian and Alex like birds and there are lots of birds usually here.  But this visit seemed to be all about squirrel wars and retrieving the squirrel-proof feeder from where the Raccoons had taken it across the backyard. I hear there is an opossum visiting but I didn’t see it.

9 xmas 2018
Squirrel wars, a momentary pause

Usually, there are lots of cardinals and blue jays, sparrows, chickadees, morning doves and never enough crows for me. Ok, cardinals it is.

A quick trip to the internet since my camera wasn’t as helpful as it usually is and I had chosen a bird.

12 xmas 2018
cardinal underway

Again background blended with wisps of colour then started adding the detail work. Checking the size with the 5×7 window and a lot of poking (but not my fingers!) and I had Xmas card number 2 done.

It was Xmas Eve afternoon by the time I started the last one.  Bob and Judy were not expected until about 4 pm Xmas day.  So I had to felt my fingers off since I knew we also had turkey dinner, Xmas breakfast and a lot of presents to open!

21 xmas 2018
Christmas Morning! One more to finish!

13 xmas 2018
Glenn’s Christmas morning Blacksmithing hat and lots of pyjamas

14-xmas-2018.jpg
part of Jan’s Christmas tablet weaving books!

Hummm, now what might they like?  I had rectified the lack of snow and did one of the birds that we enjoy here.  Oh yes, the rabbits! We see them mostly in the spring and early summer but they’re very cute.  Bob would like them and make him think of his parents’ home.

So bunny it was. I didn’t have the photos I had taken of this spring’s bunny visitor but remembered what it looked like so off to the internet for photo reference. Much poking later I had a very painterly interpretation of an Oakville bunny.

18 xmas 2018
Framing of Christmas card #3

You may have noticed I tried a different base to work on. It’s the foam from the dollar store that kids’ play mats are made of. Mine was about 7 inches square and had a puzzle piece in the centre of each square.  The puzzle part in the middle tends to want to pull out but I would suggest not using tape to hold it together since the stickiness would transfer to the needle and make a mess. I found holding down the center worked fine and it wasn’t as annoying as it sounds to work on. When the bigger ones reappear I will get more. I did work 3 layers thick so had no poke through even with the top surface deterioration. If you haven’t tried this as a base you may want to experiment.

22 xmass 2018
Dollar store foam pieces

23 xmas 2018
3 layers worked well

All recipients seemed very pleased and surprised with their “Xmas cards” I had found frames at Dollarama with a white mat so they looked a lot more polished with the frame as presentation.

Now on to class notes for the 2 workshops I’m doing in January! I can see a lot more felting ahead in 2019! I hope you get a chance to try small format felting, it is relatively quick, doesn’t take much wool and it’s lots of fun!

Eco-printing

Eco-printing

A guest post by Antje Ream

Creating this post for the forum I’m being very loose with the term fibre – my excuse is that both paper and plants are fibrous.

A few months ago I attended a great eco-printing workshop by Jane Hare of Pippin Textiles with fellow members of our local textile group. It was a full day of very organised activity with each person having much to show at the end. In addition to what we ourselves had gathered from our gardens, we were greeted with a large pile of interesting plant material.

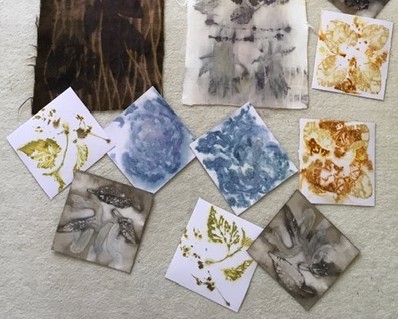
We were given clear instructions and then let loose laying out our plant designs on paper, cotton sheeting, wool blanket and Tyvek….even kitchen paper didn’t escape! We tried a vinegar mordant and boiling our rolled papers and fabric, then it was paper, fabric and Tyvek with an iron mordant using the steaming method before steaming our rolls of alum mordanted paper bundles.

Thankfully it was summer and we could open all the doors otherwise pegs might have been required for our delicate noses.

Needless to say most of us were very impatient to open our parcels and see the results of our minimal efforts combined with mother nature’s magic. We were all delighted with our results.

We each had this amount to show at the end of the day. The Tyvek pieces are the 4 light squares on the left hand side in the left photo. The dark long piece is the wool mordanted with iron.


Following any workshop comes the dilemma….What do I do with what I’ve produced? In August our group holds an exhibition of members’ work undertaken throughout the year. This event always galvanises my thoughts and with it fast approaching it prompted me into action.

A while ago I received a bouquet of flowers that came with a large almost cuboid box – far too good to throw out….I’m sure I’m not alone with hoarding potentially useful objects…taa daa! I used the Tyvek pieces which were almost square (13 x 13 cm) and machine embroidered them to some linen fabric, cut to size to wrap around the box.

I used a different embroidery stitch around each square

I then added some gold gutta to provide some highlights.

One of the results of our workshop was a set of ‘book’ printed pieces of thick paper/card stock with the front of the leaves on one piece and the back of the leaves on another. I trimmed these totally square (10 x 10cm) and backed each with very fine/thin fabric dot glued to the surface, just to hold until I had done the stitching. This allowed me to machine stitch onto the paper without ending up with lots of pieces, or holes, all torn at the perforations. I stitched each to highlight the details of the leaf (and even red cabbage) prints.

these are the pieces before stitching

On their own they didn’t look much (or more accurately – ‘what do I do with these!’) so I then decided to book bind them together.

A little blurred but you might just see how I joined the pages together
The front and back of the book

I mentioned kitchen paper above – this was only used to ‘protect’ some of our plant designs but I found it gave quite a delicate appearance, so I acrylic wax varnished it….warning – don’t then let it dry on a hard surface without laying cling film down first, otherwise hours of scraping can be enjoyed! I then used some of this paper to cover a tall Pringles tin (as the kitchen paper was translucent I covered the tin with plain white copy paper first), then added another layer of the varnish. My friend was delighted with her very simple gift.

Very similar to the tin, this is a work in progress on a white lamp shade it looks lovely when the light is on

Whilst at a car boot I purchased some unusual pictures – stitched suedette fabric on panels of wood. Playing with yet more of my stitched squares I added them to the panels.

the small panel is 20 x 20 cm

In the exhibition there were many lovely creations using our eco-printed products including a scarf, a cushion made using the wool and a box made from the Tyvek pieces.

The Tyvek box is on the front right – Oh, I’ve just seen the Pringles tin in the background!

Finally here are some pieces that are a favourite of mine done on wall lining paper, which I have coated with acrylic wax varnish each measuring 100 x 15 cm. They are two sided, the paler reverse side shows delicate squares – where the Tyvek pieces were laid and then all wrapped up tightly together. I like both sides and as yet haven’t come up with a way to show them off to advantage….any ideas much appreciated.

Since this very inspiring workshop and as a result of my book being in the exhibition I have been asked to do a workshop on bookbinding in January. I have a few examples of fun bindings done years ago so I will have to brush up on the techniques. I only hope that I can be as organised as Jane and enable my ‘students’ to produce lots of interesting samples.

Writing this guest post has been quite a feat and I owe a HUGE debt of thanks to the ever-so-patient Ruth who across thousands of miles (and an ocean) has not only held my hand but carried my entire bulk through what we thought would be a relatively easy process. I hope that she will continue to offer me the opportunity to post now that we have solved the problems.

Today is a special day and the bells are ringing out for Christmas so I wish everyone….

Joy and a Happy, Healthy and Creative 2019

….and will leave with a photo of the card I received from Pat Moore from Canada in the holiday card exchange….Thank you Pat it is lovely.
I’ve got rainbows on my mind

I’ve got rainbows on my mind

First of all, happy Thanksgiving to everyone reading this in the US! I hope you had a nice celebration.

Today I’m sharing some rainbow-y fibre I created, plus a “throwback” item that I hope you’ll like.

Being an indie dyer means I get to play with dyes fairly regularly, but it had been some time since I adventured into the world of saturated rainbows. I think it was the grey London Autumn that got me inspired, I just needed to get a colour fix. Off to the dye pot I went.

IMG_3780

One of the things I’ve been a little obsessed with lately is how yarns look when they’re in skein format – I love it when colours look cohesive and have a certain progression to them when displayed, so I went for a red “bottom” that would change as the eyes look up. Hopefully you’ll see that this was done consciously.

I knit this into a hat (complete with a pompom) that I think looks very cheery. It’s going to be a Christmas present so I hope the recipient likes it.

IMG_3887

I hope you’re not fed up with bright colours yet…

DSC_1358

Although not technically a rainbow, this wool top came out super bright and happy (to my eyes at least). If you’ve ever dyed wool top or roving you’ll know it can be an adventure to control where the colours go. This is superwash wool (it doesn’t felt) so it wasn’t as difficult to get “right” as non-superwash fibres, but I’m still perfecting my methods. Suggestions are welcome!

This being the Felting and Fiber Studio, there should be some felting, so here is a little Piglet I made a couple of years ago and gifted to a friend. I really loved creating this little guy and think he came out really well. I got to see the sculpture again a few days ago at a friend’s house.

IMG_3863

Have you done any hand dyeing or needle felting lately? Share your experiences with me in the comment sections.

More from the Knitting & Stitching Show in London

More from the Knitting & Stitching Show in London

The last time I wrote I shared some of the artwork I loved at the Knitting & Stitching Show. This time I’m sharing a bit more, with a special focus on my favourite artist this year.

*** Please note: this post will have verbal references to eating disorders in the context of an art exhibit, which some might find triggering; none of the artwork has any explicit imagery related to this mental health issue. ***

Remember Libby Vale, the artist with the “Ironing Bored” in my last post? She also created a doll that reflected our modern human self-absorption. Note the bag full of Stuff You Don’t Really Need in the her hand. This doll was posable and each day would look different.

IMG_3555

I love seeing textile art in 3D so these textures drew me in. I forgot to record who made them.

The next artwork reminds me of Zed’s creations. Do you agree?

More 3D art. I’m always drawn to wire creations, they look so ethereal.

IMG_3577

Now comes the exhibit that touched me the most. As someone who has struggled with an eating disorder in her teens, this was very powerful to me. The work of Caren Garfen gives voice to her former self and to those who can see themselves reflected in her words and creation.

IMG_3585

This size 0 dress tells the story of Anna. It was painstakingly stitched with human hair.

IMG_3578

A reflection of mood.

IMG_3582

The angry voices of the loved ones who don’t know how to deal with an invisible illness

IMG_3606

Caren created a dollhouse reflecting the mood of an anorexic. Everything inside it has a relation to eating. In the middle sits the artist, underweight, with a food-related unfinished artwork, looking lost.

IMG_3609.jpg

Finally, a piece of her handmade patchwork blanket. Knowing when to ask for help is what people with a mental illness struggle the most.

I hope you enjoyed this post, even if the last theme was a little heavy. Art isn’t just about the positive side of life, and its role needs to also be one of awareness about what surrounds us. If sometimes you feel you’re struggling – you’re not alone.

A brief glimpse into the Knitting & Stitching Show in London

A brief glimpse into the Knitting & Stitching Show in London

This weekend the biggest fibre and fabric-related event in Europe happened right here in London. Every year I volunteer for my spinning guild and, in return, I get a free pass for all days.

Although the Knitting & Stitching Show is mostly about the sales, there’s always a section dedicated to textile arts. Established artists as well as art school finalists exhibit their work every year, so that’s what I’m sharing with you today.

IMG_3593

Let’s admire this larger-than-life crocheted cow by TOFT. They also had a giant lobster and other animals. How many hours went into each?

IMG_3603

The artist Jenni Dutton had an exhibit about her Mother, called Dementia Darnings. You can imagine by the title how poignant each portrait was – we see this woman depicted from a young age to her final, frail days. I was very moved by it.
Look closely – can you tell how each work was created?

IMG_3602

It’s yarn. You can see it hanging down on the portrait above. Isn’t it wonderful? All this hard work, you can tell the artist loved her mother very much. I felt like hugging her for this dedication.

Next, quilts. I’m not a particular fan of the “traditional” ones but when this technique is applied to create something unusual, you have my full attention.

I’m afraid the pictures don’t do these works justice. Both artists are American I think you can feel a lovely sort of vintage US vibe to these images.

Finally, something that made me smile, by Libby Vale.

IMG_3564

Ironing is definitely not on my list of priorities, so I connected perfectly with the sentiments depicted in this board!

There was a lot more to show, but I’ll leave that to my next blog post. I hope you enjoyed my choice of art. Have you ever been to the Knitting & Stitching Show, or a similar event where textile art is shown? Let me know all about it in the comments section.

HOW TO MAKE PRE-FELT

HOW TO MAKE PRE-FELT

Pre-felt is quick and easy to make.  It’s used to make definite shapes in a layout – a shape that’s cut from pre-felt is called an ‘inlay’.  Pre-felt is firm enough to cut but loose enough to felt into other fibres.

Pre-felt can be bought ready-made, but if you make your own you can have the exact colour, plain or blended, that you want.  You can also add other fibres on top as embellishment.

We’ve used merino wool tops but any wool fibres can be used.  Shown below: merino wool tops blended colours and plain.

merino wool

To make a small piece of pre-felt you will need: merino wool fibres, a round-stick sushi mat, small-bubble bubble-wrap, net, 2 rubber bands, soapy water in a mister/spray bottle, a bar of soap, and an old towel.

Spread an old towel onto your work surface then put a round-stick sushi mat on it.  Place a piece of bubble wrap – bubbles down so they will not be against the wool fibres – onto the sushi mat.

Place a tuft of wool fibres, with the fibres running horizontally, onto the bubble wrap, shown below left, then add a second tuft of fibres slightly overlapping the first. Continue laying tufts of wool until you have completed a row, shown below right.

first tufts and first row

Then add more rows, each row slightly overlapping the one above it, until you have completed the first layer.

first layer complete

Start a second layer by placing a tuft of wool fibres, with the fibres running vertically (i.e. at right angles to the first layer of fibres),  on the top left corner of the first layer, shown below left, then continue laying tufts  until you have completed a row.  Then lay more rows until you have completed the second layer, shown below right.

second layer

Cover the wool fibres with a piece of net, then spray warm soapy water over until the fibres are saturated (but not swimming away!)

apply warm soapy water to the fibres

We prefer to use Olive Oil soap flakes dissolved in water because it’s low-sud, but you can use any soap flakes or dish-wash liquid.

Push down gently on the wool, with flat hands, to encourage the wool to take up the water and to eliminate air pockets.

flatten the fibres

Hold the net with one hand then carefully draw a bar of soap all over the net.  We prefer to use a bar of Olive Oil soap but any soap will work.

draw bar of soap across fibres through the net

Slowly peel the net off…

carefully peel away the net

…then cover the wool fibres with a second piece of bubble wrap, bubbles up so that they are not against the wool.  Gently press down all over to flatten the bubble wrap onto the fibres.

flatten the bubble wrap against the fibres

Roll it all up snugly in the sushi mat…

rolling up the fibres in the mat

…then drain off any excess water.

draining excess water

Put 2 rubber bands around the sushi mat to prevent it unrolling.

rubber bands to hold sushi mat tight

Using light pressure, roll the mat 100 times.

rolling the sushi mat

We count 1 roll on the sushi mat as going from fingertips through to wrist then back again.

Unroll the mat, smooth and flatten the bubble wrap and fibres, turn it through 90°, as shown below, then roll it up again in the mat and replace the rubber bands.

turn the pre-felt through 90 degrees

Using light pressure, roll the mat 100 times. Unroll the mat, smooth and flatten the bubble wrap and fibres, turn it through 90°, then roll it up again in the mat and replace the rubber bands.

Repeat twice more so that the pre-felt has been rolled 400 times (100 times in 4 different directions).

Remove both pieces of bubble wrap then place the wool fibres directly onto the sushi mat.  Roll it up, then using light pressure roll it 50 times.

Unroll the mat, turn the wool fibres through 90°, roll the mat up then roll again 50 times.

Repeat twice more so that the fibres have been rolled 200 times (50 times in 4 different directions).

Don’t worry about neatening the edges during felting – they end up looking lacey/cobwebby and can make interesting inlays.

lacey edges

This amount of rolling should result in a soft pre-felt that can be cut, wet or dry, into the shapes you want.  It will give you a solid block of colour but the edges will blur into the background fibres.

To achieve a firmer pre-felt, roll it more.

Two pieces of rectangular, turquoise merino pre-felt (inlays) were felted into yellow merino wool fibres, shown below.  The top one is a soft pre-felt and you can see how the edges have blurred during felting, whereas the other, shown below it, is a firm pre-felt and the edges are distinct.

differences in pre-felt

If you are going to use the pre-felt straight away there’s no need to rinse the soap out, but if you want to keep it for longer, it’s advisable to rinse the soap out.

The pre-felt is delicate, so take care when rinsing it.  The easiest way is to rinse it through the sushi mat until the water runs clear.

rinsing the pre-felt

Keep the pre-felt rolled in the mat, place it on an old towel then roll it a few times to remove most of the water.  Place the pre-felt on a rack to dry.

Tips:

If you want to make a lot of pre-felts, save rolling time by using a large bamboo mat with several lots of fibres.  You can keep them apart or lay them close together then you will get some interesting pre-felt from the joins.

multiple pre-felts

If you’re making a lot of pre-felts for your stash you won’t know whether you will need soft or firm pre-felt for future projects, so make all your pre-felts up to the soft stage then rinse and dry them.  When you want to use them you can then choose to leave them soft or wet them to re-work to the firmness you need.

Liberty Bodice

Liberty Bodice

This is a guest post by one of our forum members Antje Ream. 

Many women of a certain age will remember ‘Liberty Bodices’. These were the vests of the day. At the age of 7 or 8 I was not a fashionista, not like so many children today. We had more serious things to do like play doctors and nurses with our dolls or build dens with bed sheets over washing lines etc. All I remember about them was that they kept me warm but more importantly they had EXTREMELY fiddly rubber buttons down the front. Some bodices even had them on the side.

As already mentioned I am of a certain age, but to my surprise one of my bodices resurfaced a couple of years ago when my late father asked if I remembered this ‘cloth’. He had been using it for decades as a shoe polishing cloth.  Although badly stained it was still complete and somehow it set my creative juices going….which meant dad had to find ‘another’ cloth! Sadly the rubber buttons totally dissolved when I laundered it.

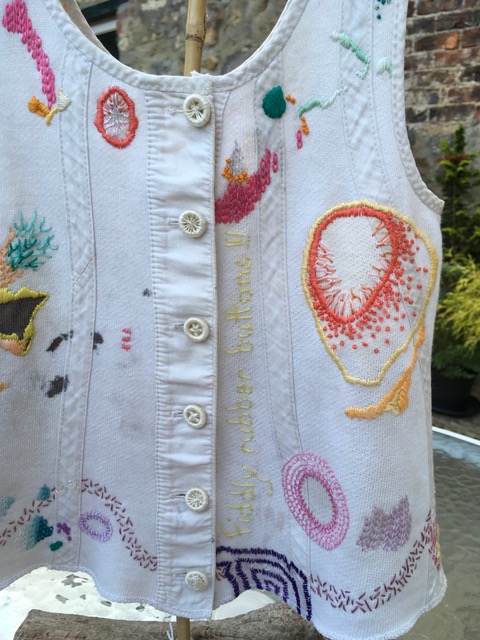
Above I’ve started stitching, although I didn’t like it. Nearly two years later and the juices had found the right recipe. I’m sure I’m not alone in this regard. I started to stitch around the stains using different colours and types of stitch, but nothing tooooooo complicated. It helped me remember many happy times growing up.

From my avid explorations and research on (read that as addiction to!) Pinterest I gleaned some useful ideas, combined with input from my EPH (Ever Patient Husband – he is a brilliant hobby painter so has a good eye) and others, I finally completed my slow stitch piece. The last few days were not quite ‘slow’ stitch as I wanted to enter it into a village show. Then came the method of presentation problem.

Using a piece of polished driftwood, I roped my neighbour into helping me create the stand – the night before!

I titled the piece….Polished Childhood. I could say more about the colours and continuous line of stitches but I’ll leave that to your imagination. Unable to replace the original buttons I recreated them by making individually patterned ‘Dorset’ buttons and stitching a comment about the rubber ones as a reminder. Dad would have loved the result and we would both have laughed and giggled at all the memories. Writing this has just made me realize the bodice is a tribute to him (and my still active mum)….totally by chance.

EPH and I arrived at the show just at packing up time….WOOHOO……..a red ticket I will certainly treasure!

Thanks for the wonderful post Antje! I am sure it will bring smiles to the faces of those who remember wearing the same type of bodice.


West Carleton Fibre Guild’s tour of the Puppet exhibit

West Carleton Fibre Guild’s tour of the Puppet exhibit

Although the Ottawa Valley weavers and spinners guild is the largest guild in eastern Ontario, we also have many smaller neighbour guilds. One of the closest neighbours is the West Carleton Fibre Guild who hold their meetings on a Tuesday afternoon in Dunrobin, Ontario (just a bit past the west end of Kanata).  But the September’s meeting was special.

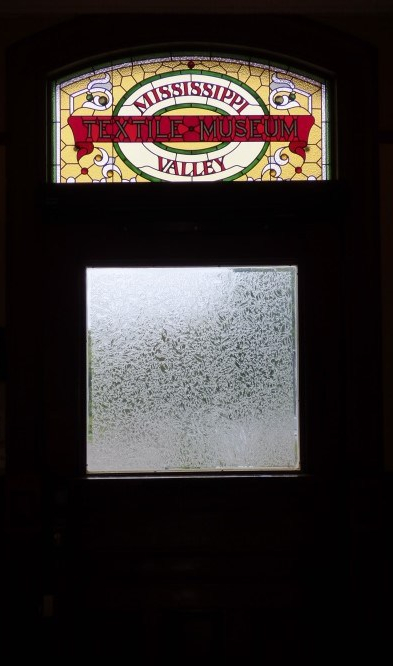
1 door of the museum

Back door of the Almonte Textile Museum


They had a field trip to the Mississippi Valley Textile Museum in Almonte. The trip was planned so they could have a special tour of the Puppet exhibit by Noreen Young.  At present there are 3 exhibits at the museum.  There permanent display of Mill equipment and modern weaving looms, a spectacular quilt exhibit and Noreen Young: a Puppet Retrospective.  With 150 examples of some of her life’s work in puppetry.  She is internationally known and has received the order of Canada for work with producing, writing and puppeteering in many children’s and educational programs.


2 Poster for the exhibit            3 fist puppet in the exhibit

Poster for the exhibit.                                   First puppet in the exhibition (a rod puppet with detachable legs

4 Noreen with her first puppet Noreen with her first puppet

She gave us a tour through the exhibit explaining different puppets and giving anecdotes of her work with them.  She was asked if she had a favorite and told us her Granny character, Mrs. Gertrude Diddle and Gloria Gopher she was particularly fond of.  She took some down from the display and showed us how they moved and what they voice sounded like.  She did the voices for most of her puppets but occasional had to lip sink to a voice actor which was harder.

Almost all her puppets were to be worked with the puppeteer below holding one arm up to operate the mouth and the other hand controls the rods to move the hands. She showed us how it was important to make the puppets bob as they moved or it looked like they were skating along or floating in the air witch just wasn’t right.


Her earliest work was in the 60’s “Hi Diddle Day” 1967 to 1976. These puppets are in a glass display case with a couple more the puppet cast.  Not all the puppets are in display cases though.


Displayed on shelves with monitors showing bits of the program they were used for beneath them were the Puppets for “under the Umbrella tree” which ran on CBC, Disney and Canal Famille from 1987-1997.

7

8

She explained about the studio being an old garage and having a lower ceiling than studios usually had.  So the puppeteers had to sit on rolling boxes since they could only raise the live actor up a certain height before the ceiling was a problem.  For most shows she said the puppeteers stood on the floor with the live actors raised on platforms so they could interact with the puppets.  The head bands the puppeteers are wearing holds their mikes.  This insures the mike is always the same distance from their mouth as they switch between looking up at the puppet and down at their scripts.


There were puppets from series I didn’t remember but am now sorry I missed. “Bats” from a 1987 Pilot.

12

Also “Wacky Palms” from 1994 about a small boutique resort in the Bermuda triangle.  Run by a cow with a theatrical past and with an eclectic staff.  Strange things happen when a time portal opens and havoc is unleashed upon the hotel.

13

She said that some of her most effective puppets had elements of movement such as the feathers for hair, parts that dangled or the way the fabric moved with the puppet.


Noreen was also known for her Caricatures of real peoples.  Her Prince Charles from 1975, created for “What’s new” a kids news show for CBC, is very recognizable.  She also made a copy of the mayor of Ottawa.


222324

She has made caricatures of may Almonte area people (about 50 on display) who have been used in various puppet shows in the area.  She was the artistic Director for “Puppets up!”; an annual international puppet show from 2005 to 2016. International puppet shows from across the planet performed in the tiny town of Almonte.

There are some puppets that can be interacted with.  It will take 2 people to run them one is the head and hands and a second person runs the feet.

She did puppets for and educational spot about food nutrition.

This is the Granny Bride puppet she made for a friend in 2000.

30

I didn’t recognize this group of puppets but it looks like an interesting cast.

31

Her last work was with a puppet opera called “sleeping rough” which was performed in Ottawa 2018 as part of the series music and beyond.  (https://www.youtube.com/watch?v=RVQGUjLM-WU&feature=share )
 

Most of Her puppets are made by sculptor the head in plasticine then casting it.  She uses the cast to create the flexible, expressive rubber faces she uses in her puppets.

She has given 3 workshops on making puppets during the run of the exhibit and has another lecture to do before the exhibit closes. My husband was lucky enough to get a spot in one of her workshops.  She said he was very well prepared and had amazing focus making his puppet Blacksmith.  He said he had a blast and was very glad he had gone.

40
Glenn Martin Blacksmith puppet


This exhibit made me smile!  I couldn’t help but feel happy looking at all the puppets many I recognized. I am sure you would enjoy seeing them too.  Keep an eye out for Noreen she says she drops by regularly to the exhibit.


The Exhibit runs to September 22 2018 so if you have a chance jumps in the car and ask the GPS to take you to the Mississippi Textile Museum https://mvtm.ca/?exhibition=noreen-young-retrospective


MISSISSIPPI VALLEY TEXTILE MUSEUM
3 Rosamond Street East, Almonte, Ontario K0A 1A0

Phone: (613) 256-3754
Email: curator@mvtm.ca

Fall/Winter HOURS

  • Tuesday to Friday 10am – 4pm
  • Saturday noon – 4pm
  • Closed Sunday & Monday

Museum Admission: $7.00
Members admitted without charge. Children under 12 are always free.