Browsed by
Category: Guest Writer

Green Man – Guest Post by Carole G.

Green Man – Guest Post by Carole G.

This is a guest post by Carole G. one of our forum members. You can follow her here: 

https://www.facebook.com/BagsaLicious/

https://craftybeetle.wordpress.com/

I love forests, the magical paths that lead you through oaks, birch, beech and ash and the faces, there are always faces to be seen in tree trunks.

It is this imaginary along with my curiosity about the ‘Greenman’ and the many ways he is depicted that has taken me along a path of my own. A path of experimenting with leaves, print, shapes to eventually create my own ‘Greenman’.

Part of this journey including using paints, hand dyed fabric, freehand machine stitch, trapping fabrics together with stitch, I even tried trapunto, my final attempt was using merino and bits of fabric with stitch then cutting out shapes. I’m not particularly happy with the final piece but I adored the journey and will revisit this in the future.

First of all I decided to paint paper and print leaf shapes on to it.

Then I decided to use sun dyes to create leaf shapes on fabric ( I haven’t tried this on felt but I think it would work the same way) and highlight the shapes using a freehand machine stitch technique called trapunto.

My next leg of the journey was to explore ways using freehand stitch and trapped merino and other fibres to create leaf like images.

Moving on I decided on the trapped fibre approach and made up a few leaves before trying them out as a Greenman face.

Moving on I needed a backing for this man of the woods, so I painted up some burlap to keep a rustic feel going and hung him from a branch.

You can follow my creative meanderings on both:

https://www.facebook.com/BagsaLicious/

https://craftybeetle.wordpress.com/


A Sweater Story…..Can You Help?

A Sweater Story…..Can You Help?

At the start of February last year I posted that I had had a go at felting a sweater with designs on turning it into a bag.  I had purchased it in a charity shop for the princely sum of £1.  It had a lovely cable pattern to it, and it reminded me of the sweaters my Mom used to knit for people for some extra money.  I remember being in awe that she could complete a sweater within a week,  not being a knitter I assume now that this is not really an awe inspiring thing after all……..the wonderful innocence of youth!  When they were finished she would put them under the seat cushions on the sofa for us to sit on and ‘press’.  She tried to teach me to knit but I don’t know whether it just didn’t sink in or I was too young to be bothered, I think it was probably the latter…….

The sweater went in on a 40 degree wash, just to be cautious, and it didn’t felt enough, so I did a second wash at 60, still not good enough, so it went in again at 90, luckily it had felted sufficiently at that point as I didn’t really have anywhere to go from there!

So then I had a felted sweater and I couldn’t figure out how to re-figure it into a bag shape.  Luckily I have a friend who is more of a sewer than me and she helped at this point, by cutting it in the correct places to maintain the pattern in a symmetrical way, and sewing it up using un-ravelled wool from the arms.  She also made a clever deep internal pocket by utilising one of the cuffs.  I am sure I would have just hacked at it randomly, she thinks deeper and in a more practical way than me.

20180124_142655

I wanted the bag to be an over the shoulder, sitting on your hip type of length and unfortunately the arms were of no use for this.  I came up with the idea of a bead/felted ball type of handle and sourced these lovely wooden beads online, and made forty felted balls, I think I used Corriedale wool.

BEADS AND BALLS

I had made the balls pretty tight, so it was a bit of a struggle to push a long, strong needle through them all, using wool salvaged from the sweater.  I didn’t line it as I wanted to see the cable pattern on the inside too.  Here is the outcome.

20170201_083442

Or I should say, it was the outcome for a short while…………I used it a couple of times then one day I had just arrived at a car park, I put the bag over my shoulder and SNAP! one of the lengths of wool sewing all the beads and balls together broke, and there I was scuttling around the car park trying to retrieve my wooden beads that were rolling in every direction! laugh? nearly!!

Now this is a sweater that has felted beautifully and I do want it to live life as a bag so Plan B is necessary.

I did like the felted balls with the addition of the beads.  However, if I am being really honest, the design didn’t sit the best on my shoulder……I really wanted a handle to compliment the soft, natural colour and pattern of the bag.

I thought maybe of producing a length of felt and encasing it in a pretty fabric, as I did here for my flower meadow bag that I made a while back.

20180124_140711

20180124_140732

Or perhaps I could use a twisted cord such as these but in a much better colour.  These examples are white with a blue fleck, black and a nice cobalt blue.  Or maybe two twisted together for thickness ?

20180124_142103

If I could knit, one solution would be to buy more wool and create some handles that way,  but this is not an option unfortunately as I do not have the desire to learn.

Those are the only ideas that I have come up with this far, so it’s over to you please, do you have any bright ideas to make my ex-bag into a loved bag again?

What would you do?

Felting with old sweaters

Felting with old sweaters

I’m a great recycler, as I suspect many textile lovers are. Much of my business is based on scouring charity shops and jumble sales for items that other people have discarded and transforming them back into desirable objects. Some old scarves get used for nuno felt; others are overdyed with indigo or overprinted.

Recently I had a go at darning an old sweater, after being inspired by an exhibition for a craft prize. But some of my sweaters have gone waaaay past the darning stage – so I thought I would try felting with them, using them as a kind of prefelt.

For the first sample I cut out circles and felted them on to two layers of white superfine merino. As they were 100% wool, they felted in really easily. I forgot to take any photos before felting, but the picture below shows the finished sample.

flextiles sample of felt with sweater circles

The circles on the left were covered with another two layers of superfine merino, as I wasn’t sure whether the base of two layers would be enough to support the circles. Obviously this felt was much thicker and you can hardly see the colour of the circles through the top layers.

The sweaters were knitted in stocking stitch, and the circles on the middle were laid out with the right side up, while those on the left were reverse side up. They looked quite different before they were felted, but after felting there was very little difference.

As you can see from the photo the superfine merino shrank a lot (around 50%) so there was very little space between the circles in the final piece. So in the next tiger stripe sample I left more room between the stripes.

flextiles felt tiger stripe sample before felting

You can clearly see the texture of the sweater before felting; after felting you can just about see the vertical rows of knitting.

flextiles felt tiger stripe sample

Although the stripes are also wool, they have not shrunk as much as the merino they are attached to. This leads to a pleasing texture of ridges, where the stripes are much higher than the base layers of merino. I’ve tried to show this more clearly in the photo below.

flextiles felt tiger stripe sample close up

After I made this sample I realised that white, green and purple were the colours of the Women’s Social and Political Union, which campaigned for women’s right to vote in the UK. White symbolised purity, green hope and purple dignity.

So to celebrate the centenary this year of some women in the UK getting the vote, I made a small suffragette neckpiece. 🙂

flextiles felt suffragette neckpiece

I really like using old sweaters this way – it saves me having to make prefelt!

What’s your favourite upcycling tip?


Polar bear for the 150th Anniversary Art show

Polar bear for the 150th Anniversary Art show

Another exiting felting post by Jan Scott

This is the Guilds display for the 2017 Ottawa Valley Farm Show in March of 2017. Lynda is hiding behind her loom, Ann is about to spend the day making felted beads with the kids, and Merilyn is spinning beside the empty chair where I was working. We do put on an interesting demo!

The Farm show is a huge display of farm equipment, seeds, antique display, farm oriented venders, trappers, government department’s booths, the wool growers co-op, and various breed and rare breed associations. It is really a huge event drawing people not only form the Ottawa Valley but the rest of eastern Ontario. It’s always early March so weather can be an issue. We had a blizzard the second day of the show.

I was getting lots of interest in the pieces I had already completed for the 150th Art Show.
It was time to start the next project. So before the demo it was time to decide what to do next. After much debate between Moose bison and polar Bear I decided to continue with the arctic theme.

By now you are likely starting to guess my working process. So yes it was back to the internet to find reference photos and work out a composition likely from a composite of pictures. Working with a square is a lot more challenging. The eye naturally is drawn to shapes that feel comfortable, shapes that follow the golden mean or Fibonacci to figure out stripe progressions (Rectangles). Shape that have proportions you find in nature. Squares are definitely more of a challenge. But I’m use to a good challenge, you should see my un-spell-checked spelling!

So the quest was on find an image I could made square. but not be too static. So either intensity or dynamic composition was what I was looking for. So find images that cought my eye, then crop to square.

As I perused the inspirational options I thought about the talk Robert Bateman had given at Halliburton last summer. He spent some time discussing some of his earlier work mentioning his frustration painting a polar bear in a snow storm then the next painting was a black timber wolf at night in a dark forest. He had mentioned that white wasn’t just white. So to look carefully and not assume you know your subject just because it’s “white”.

This slideshow requires JavaScript.

Some images were very interesting but just didn’t want to be square.

Then I spotted this one. The intensity of the look was amazing. The shapes were simple but if I could get the eyes it would work really well. The image dew you in, there was such contemplation and stillness. It was like looking a momentary paws in the action. I liked it! Ok I had my inspiration.

Day one demo
I brought my large foam pad, core wool (Rideau Arcott), and various shades of white grey browns yellow red and blue. (I as optimistic but didn’t think I would get the understructure done in one day.) I got dropped off around 7ish, parking can be very crowded so it was better to get there unusually early and I could set up and get started. Glenn had over time so it was a late pick up as well so I was there for over 12 hours. I got a lot done.

I had premade my background felt layer at home using my wicked 10 needles in a row tool. It was again impressive how well it worked on flat felting.

For the understructure I mostly worked upside down to help get the general proportions correct. I could have made a graph over the photo to make a more exact copy but I wanted the photo to be more an inspiration than an exact likeness.

I was explaining the backing layer that the understructure would be attached to.

I got a lot of “what are you making” in the morning, then by afternoon it was “is that a dog?”
Most said they would come back later to see what I had accomplished on their way out.

A couple more quick shots of the demo in progress before we go on to day 2.

This is a very cool loom from around the 1970’s. It was fascinating to see it working.

Ann had a lot of help making felted beads using pencils. She is really amazing!!

Merylin was busy spinning some of her Sheep’s wool she had dyed herself. She has a beautiful painted wheel.

Day 2 demoing
I had booked off 2 of the 3 days of the demo. So again I got there unreasonably early, got help to get the display set up again.

Today we had Gord with one of his great wheels (he has several)

I had the understructure to my liking and started working from the top down
Amada was spinning on her Hitchhiker wheel. She dose amazing natural dyeing some of which was on display.


As you can see in the foreground of the picture I had progressed to adding colour to my under structure. By the time I hit the eyebrows I was starting to get comments of “is that a polar Bear?”

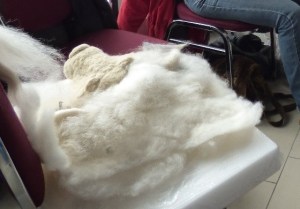
I chose blue face Lester since my memories of my Grandmothers Polar Bear rug is still vivid in my memory. Since I think the last time I slept on it was over 40 years ago it really did make an impression. It had a yellow tint to the white fur, the fur was stiff but not really course. It was smooth if you patted it in the direction the fur grew. It was a wonderful polar bear I don’t know what happened to it. I hope it is still being loved by small children sleeping on it.

This is the progress at about ¾ of the way through day 2. I was definitely felting faster on this one.

Day 3 of the Farm show demo.
I had a short day of work so rushed back for the final day of the demo. We had a pretty full demo team and the weather was a bit better than the previous days’ blizzard.

Laurie and Julie are Weaving, Merylin was spinning and I was still felting.

I got a lot more of the face done. But it was slow going due to hand blending each section I was working on. I was still finding the hand blending less uniform, which was what I wanted, than using the carders. Also with the different lengths of fibre I was blending with the blue face Lester it was a lot easier to work with it just by hand. I wound up with alpaca as well as wool to get the colours I had wanted.

I had a couple more evenings of touching up the colour and the Polar Bear was complete.

The pieces made another appearance at the demo for Dickenson day in Manotick Ontario.


This is my show and tell the meeting before the show.

Here are all the pieces I did for the 150th anniversary show.

While I was making Polar Bear I thought about my western Grandmother and about my brother who has done most of his work in the North so I am giving this piece to my brother Dave. This is his Bio so you will see why I was thinking of him.
(Dr. David J. Scott is the Executive Director of the Canadian Polar Commission in Ottawa. Prior to his current post Dr. Scott had a long career with the Geological Survey of Canada (GSC), finishing as Director, Northern Canada Division.
At the GSC he also served as acting Director General, Planning and Operations Branch, and led the GSC’s Gas Hydrates and Northern Resources Development programs. From 1999-2003, he was based in Iqaluit, Nunavut, as the founding Chief Geologist of the Canada-Nunavut Geoscience Office.
Dr. Scott holds a Bachelor of Science Degree in Geology (McMaster University, Hamilton, Canada) and a PhD in Geological Sciences (Queen’s University, Kingston, Canada) where his thesis research investigated the tectonic origin of two-billion year old oceanic crust in Arctic Quebec. He was a Research Associate in uranium-lead geochronology at the GEOTOP laboratories of the University of Quebec at Montreal. He has published and presented over 80 technical papers.
I am very proud of his many accomplishments. I wonder if he will put it in his northern office his southern office or keep it at home. Where ever he puts it I hope he enjoys it.

I have a PS to this Post Jan won the peoples choice award for her Polar Bear at our Canada 150 Show.

Mixed Media Surface Decoration

Mixed Media Surface Decoration

With the latest quarterly challenge being Surface Design, and “mixed media” in particular, I thought I would share a couple of the things I’ve made recently that might fit into this category.  The first is these wet felted Merino pendants with acrylic paper inclusions and hand embroidery.

BDA7B640-E134-408E-8513-C4A488C33F08
Acrylic papers in assorted colours and textures

I came across a stack of the papers while having a sort out in my studio. They had been sitting in a drawer for several years, being saved “just in case” they might come in useful! They are in a range of beautiful colours and have wonderful textures but my mind was in “use it or lose it” mode…….there was no way they were being thrown out so the pendants came into being.

751819F0-3D78-4A8F-A7F1-648B90586033
Wet Felted Merino Pendants

The second project was an experiment to see how acrylic and Inktense paints would work as a colouring medium for white Merino. I had seen an “elf” style hat and fancied having a go at making one so this became the base for my paint experiment.

Having seen on here that Ruth has a lot of success printing with acrylic on felt, and knowing that Acrylic and Inktense paints are both non toxic and colourfast when dry, (to be colourfast Inktense must be mixed with water, not used in dry form) they both seemed like a reasonable option for colouring a hat.

I started by applying Inktense to the dangly bits at the sides and all was looking good until I noticed I was loosing a lot of colour as the paint started to drip off the end of the wool and puddle on the worktop…..too much water in the mix! I blotted the dangles to remove a lot of the moisture and applied paint again but this time a lot more concentrated. It still ran a little but the wool retained more of the colour and it didn’t stiffen at all. I’m sure if I had applied that concentration of acrylic it would have been very stiff!

BCDA6FA3-0AF0-44F2-A62B-EA746B006BDE

Next I tackled the main body of the hat. For this I used watered down acrylic, my logic being that the more water I used the less likely it would be to make the wool stiff.  I wanted to avoid saturating the hat and having another puddle so I lightly brushed the acrylic over the wool, some of the fibres not being touched by the brush. Once the acrylic had dried I overpainted with Inktense and I really liked the mottled effect this combination created. Lastly I used thick acrylic around the base of the “tail” as I figured this is the one area that would benefit from being stiffened. After leaving it to dry for a couple of days I hand washed the hat to check it was colour fast and was relieved to find that non of the colour washed out.

16EC5F04-4616-478E-A516-35675B065BED
Acrylic and Inktense paints used to colour white Merino

To finish off I added a stem with leaves (coloured Merino – not painted) and some colonial knots at the base of the tail. I’m really pleased with the result so will definitely be applying paint to fibre again at some point. Have you tried painting your felt?

C91960DF-4432-4308-BA2F-BC505D1A96E6


Jan’s 3rd Quarter 2017 Challenge Part 3

Jan’s 3rd Quarter 2017 Challenge Part 3

Now the final installment of Jan’s 3rd quarter challenge.

Part 3 finishing

I had been working on pieces of the waves while waiting for my mom at various doctor appointments. So I was able to try out the parasol to see if the concept would work. I was pleased but most of the crowd looked confused.

The demo display of felting included Miaka’s Cat Cave Coelacanth fish and the sheep head I had made at a workshop with Wendo (a local felter who felts very quickly) everyone seemed very interested in the little balls of wool top. I think it was the bright colours.

I continued refining the colour on the octopus and adding more sections of wave pieces at the weekly Monday social at the guild. I also showed off the progress at Show and tell during the guild meeting.

It was getting close to Christmas and I knew I would have 2 days to finish the polar bear I was also working on and come to a decision about the boats and fishermen. I did decide to add the fishing boats but let the octopus play with…Er, “rescuing” them. I made the 3 long skinny canoe like boats underneath there is a keel and you may be able to see the upturned prow. Other than shape and general colour I did not do as much detail with them. I was pleased overall with the final look.

So let’s review the original inspiration and what has happened to it!

Into the box to be wrapped as my nieces Christmas present. She is good at swimming and likes the water so I hoped she might enjoy the octopus.


I hope you have enjoyed reading about how I finally got the 3rd quarter challenge finished if just a bit late. But I hope it was worth the wait. I do have a polar bear that I could show you if you are not too overwhelmed with pictures! Maybe I should save that in case Ann ever asked me to write you a note again!
All for now, Jan.

I hope you all enjoyed Jan’s story. I will share her other posts later in the winter.

Jan’s 3rd Quarter 2017 Challenge Part 2

Jan’s 3rd Quarter 2017 Challenge Part 2

Part 2 of Jan’s post: 

Part 2 create the base and start the octopus


Layout the background.
I had a bag of mystery white wool and some super wash merino, combining them together, I started my base layer. Then I lay in a line for the sky line and spent hours playing Runescape (AFK stuff like fishing and harassing trees) on the computer while hand blending the golden tan colour for the sky. I worked over the big 3 inch thick foam square I got at Walmart for the 12 x 12 pieces I did earlier in the summer. It again worked great with my wicked multi-needle metal tool to make a quick base from which to start.
     10 Needle Felting Tool – Aluminum

I had to put this project aside to work on the guild library, restructuring the Dewey Decimal Classification project, but was able to return to the Felting Challenge in September as my demo project at the carp fair.

There was a lot of interest in felting and lots of requests for Felting workshops this year. I directed them to the guild website and told them there would be more workshops for 2018 on felting so check the new schedule when it was up in November.

Carp Fair demo – the octopod is created…..sort of.
Carp Fair is an old fashion rural fair on a big scale. The Ottawa Valley Weavers and Spinners guild is in the Antique section. Usually we freeze since it’s the last weekend in September. We have spent many years demoing weaving, spinning and felting there, cursing the cold weather. (I can spin without feeling my fingers but not for too long or too well.) Well this year our pleas were answered. We had the hottest weekend of the summer, we were fine as long as we stayed in the shade of the tent and didn’t stand up! SO I got a lot of felting done.

Using my photo reference I chose the general shape and pose I wanted for the octopus to have. I had brought a package of pipe cleaners from the dollar store and had decided that 2 twisted together would make a good leg support armature and allow me to bend the tentacles as I wanted later.

Math is not my best skill it’s right down there with spelling actually but I can count to 8 twice. So I laid out 8 pairs of pipe cleaners beside me on the table, twisting them together as I put them down. (Are you having awful premonitions yet?) I pulled out my Rideau Arcott core wool and started shaping the slope back for the head, and adding the first leg. Then wrapped it with wool.

Friday is when all the kids come to the fair to do “research” for a questionnaire they have to fill out and to do the games and rides. They usually wander through the antique section in waves, it wasn’t too busy this year. We also had a canon being fired and a tractor parade in our area. So it was a bit busy in the early morning and later in the afternoon, it was quieter at the hottest part of the day.

Got to the last leg and started to build up the tentacles with more core wool to get the more triangular shape. By the end of the day I had what was obvious some kind of octopus like creature.

Saturday morning;
Once I had the general shape to my liking I started with the super wash to lay in the colour. I have discovered that super wash has exquisite colours and take forever to felt…. I will not be lured in by the evils of super wash again! It will felt with needle felting but it is a lot of extra work and it makes felting a lot slower! I will likely just save the super wash and blend it with corriedale or merino that still has all its scales.

One of the woman who was working at one of the other displays in the antique section came over and asked “does your octopus have 7 legs?” No I’m sure I put out 8 sets of pipe cleaners to start with. Oh no, one is missing, too late.


Sunday Carp fair;

The Octopus has its base colour layer, and one-sided blow-hole. I used a few fine skewers to rap the wool then Felted it quite firmly pulling out skewers as it shrunk. Thus making a hollow blow tube which I added to the skin fold just behind his/her eye.

You will have to wait for the next post to see how he/she turns out.

Jan’s 3rd Quarter 2017 Challenge Part 1

Jan’s 3rd Quarter 2017 Challenge Part 1

My friend Jan really got into the 3rd quarter challenge. She worked on it most of the summer and fall. If you have read other posts by Jan you know she is a great story teller. So, I had to break this into 3 posts. This post and the next 2 will take you on a journey with Jan from concept to finished challenge.

3rd quarter challenge part 1 the Plan

I was instantly intrigued by the third quarter challenge. I have always appreciated the aesthetic of Japanese prints and the Hokkaido wave had been particularly interesting to me. A bit strange when you consider I really don’t like getting wet. Ok, I am a bit hydrophobic. When I look at the Wave I don’t concentrate on the impending death of the fishermen in there precariously tipped boats, the fact that mount Fuji may be plunged into unpleasant wetness at any moment but that the repetitiveness of the design on the inside of the wave reminds me of a Japanese umbrella. Umbrellas are good. They keep you from wetness. A giant umbrella in the middle of the ocean sounds almost appealing, as if you might stay dry surrounded by all the wetness.

OK, I have a theme. Now who would need an umbrella in the middle of the ocean? Hmmm. An octopus!

The Great Wave off Kanagawa also known as The Great Wave or simply The Wave, is a woodblock print by the Japanese ukiyo-e artist Hokusai. It was published sometime between 1829 and 1833 in the late Edo period as the first print in Hokusai’s series Thirty-six Views of Mount Fuji. It is Hokusai’s most famous work.

As you may have noticed I tend to do flat pictures with a bit more thickness than flat pictures usually have. So the concept of taking a print you like and using it to inspire something from it but not make a copy will not be a problem. OK wave as umbrella, and octopus holding umbrella. Other elements of the print to work into the finished pieces. The sky, the other littler waves and maybe the boats with fishermen, or maybe not the boats with fishermen. I have nothing against fishermen, I really do like to fish. But I’m not to fond of boats. They are just tempting fate. Why leave nice solid ground if you don’t have to? So let us leave the boats for a later consideration.

I had a plan and all within half an hour of reading the email. A quick sketch (I thought I had lost it but found it inside my new needle felting box. This is why the original idea and the preliminary execution differs quickly. I lost the sketch by putting it somewhere safe.)

Then a trip to the wonderful internet to “acquire” reference photos and do a bit of research.

I’ve got the wave (I found 3 graphics of the wave one with the fishermen very easily visible) so let’s get umbrellas.

Now for some octopuses/octopi.

Phase 1 Planning is complete.

Felted Leaves

Felted Leaves

SONY DSC

Hi Everyone,

My name is Karen, and I run Big Sky Fiber Arts, an online store specializing in wool, effect fibers, and threads for felters and other fiber artists. I love adding three dimensional elements to my own work, and I’ve had a sneaking suspicion that dissoluble fabric might open some new artistic doors.  This past week, I decided to experiment by making some needle felted leaves on dissoluble fabric.  Making the leaves is very simple, and it is a good project for all levels.

To make the leaves, I photocopied dried leaves I collected this fall.  I traced an outline on the picture of the leaf.

IMG_0620

I placed my tracing under Sulky dissoluble fabric, and I traced the pattern. I began filling it in with wool.  To make these leaves, I experimented with different wool.  Mostly I used carded Maori  (Corriedale and Coopsworth) in yolk, orange, red, and soft fruits as the fibers are short and easy to control.  I added some additional color with bulky carded Corriedale in various shades (peach melba, whirlpool, and sour cherry). I also experimented with merino.  The Maori leaves came out a bit firmer, and they filled in more quickly than the merino leaves.

IMG_0549 - Copy

I added in veins.  Where the veins seemed too prominent, I added thin wisps of wool to cover the veins. I like to use all tools when needle felting. Single needles help you to add detail (such as the veins). I like to use the needle holder with five needs when covering a lot of territory.  I use the three needle tool the most as it gives a lot of control.

leaf on fabric 2


I cut around the leaf to remove the dissoluble fabric.  I put it in a bowl with warm water for about three minutes, swirling it around a bit.

leaf in water - Copy

When the fabric was gone, I placed it flat on a towel. Rather than wringing it out, I pressed it dry with a paper towel. I then propped the leaves on, yes, measuring cups.  As the leaf dries, you can give it a little shape by positioning it as you like.

drying leaf - Copy

In the future, I might consider doing some free motion stitching on the leaf once it is dry.  You could use a mixture of half glue/half water to stiffen the leaf.  You would paint it onto the leaf, and then form it. Here is close-up of a different leaf.

leaf

I decided to put the leaves on fabric, and I wanted to couch threads and yarns around the leaves.  I choose a stiff fusible stabilizer (Pellon 71). I covered it with a batik, and then I covered the batik with a hand dyed silk fabric. I used a spray adhesive to hold the silk to the fabric.  I couched sari yarn and hand dyed threads onto the fabric. I added a layer of batting and backing fabric. I used a few of my machine’s fun stitches to add texture, and I also quilted in some regular lines.  I then sewed the leaves onto the fabric with a row of stitches down the center vein.  I may still add more stitching and beads. If you want to learn more about this method of stitching and couching threads, check out the wonderful work of Carol Ann Waugh (http://www.carolannwaugh.com/).

SONY DSC


I can think of other leaves that might be fun to try with this method, or perhaps some flower petals.

Are there ways you could use dissoluble fabric and needle felting?

Feel free to get in touch with me if you have questions!

Karen@BigSkyFiberArts.Com

Big Sky Fiber Arts

BigSkyFiberArts.com

Finishing and Framing

Finishing and Framing

 Our Guest Artist today is Tracey Thompson who has several galleries interested in her work and offered to share some tips on finishing and framing with us.

So, you have created your latest pictorial masterpiece and now you have to decide how you wish to display it.  Here are a few options that I have tried, I am sure there are more.

Canvas

Deep or shallow edge canvases are very useful and can be used in a number of ways.  One suggestion is to make the piece big enough to stretch right over the sides and onto the back, then staple gun the edges of the felt to the wooden structure. Here is my 8×8 canvas example.

Then to tidy up the back I cut a piece of calico to size, ironed a neat hem and sewed it carefully to the back covering all the ugly staples, then added a D ring for hanging.

Another way to use canvas for displaying your work is simply to stick strips of double sided sticky tape onto the canvas and press your work onto the tape, this is useful if you want an organic look rather than a straight edge.

The last canvas tip I have is to again use tape to stick your piece to the canvas but this time, the work is slightly bigger than the canvas, so this creates the illusion that your art is ‘floating’ just off the wall.


Framing

Obviously your pieces can be framed, including a mount and glass. This is how I finish my pieces, choosing the correct colour mount to compliment the work, and using white wooden frames.

Another way of framing is to tape the piece to a complimentary coloured mount board and display it organically within the frame.

The last method I want to show you is a backing for a wall hanging.  Once the piece is finished, size a piece of calico for the back similar to the canvas above, and sew as before.  Then machine sew a strip of velcro (the fuzzy part) to the top of the work. Cut a slim baton and to this the loop section of the velcro is glued, and a D ring screwed midway for hanging.

The piece now has options available to yourself or the customer.  It can be hung as it is, using the D ring, or the baton can be taken off and the piece can be framed organically or with a mount as desired.

I hope that has given you a few ideas as to how you can show your work to its best advantage.

Thanks Tracey for these great framing tips!