This is an old post from several years ago of some fun bubbles I did with a friend. I thought you might like to see it again. This last weekend was our guild sale, and I have nothing to show you felt wise. Jan has so many pictures of the sale to show you, I will leave that post to her. I have such fond memories of this friend and our felt journey.
A while back, I went to a felting friend’s for a few days of fun. She showed me how to make bubbles and cut them open to great effect. Here are the pictures of what I did.
First of course, I laid out some wool to felt. But these are samples, so plain felt won’t do. I added silk threads, a silk square, some silk roving and other wools to see how it would all go. This is the underside.
This is what the top side looks like
Then, of course, there was the usual rolling and fulling.
rolling rolling rolling
Here they are all finished and ready for the marbles.
The next step is to put marbles in while it is still damp. You pull the felt tightly around the marble and secure it with an elastic, and now it looks like a bubble. We used the elastics they use to put braids in horses’ tails and manes because they are small, stretchy, strong and cheap. You put in as many as you like and whatever sizes you like. You can also use felt balls. The felt balls are good if you want to leave them uncut. Marbles are too heavy for that.
Here they are all tied up.
Felt with marbles tied in to make bubbles
Here they are cut. I cut the tops off, I cut x’s and star patterns, and some I turned inside out. If you cut more off, you see more of the inside, and you can stretch them flatter, too.
Bubbles cut open
You can see how the underside becomes the inside of the bubbles. These samples started out about 6×8 inches, and the finished pieces are about 1.5 by 2.5 inches. They take up a lot of room. I only have 2 of them left; my friend’s dog ate one. I think I will glue them to some leather and make brooches out of them. They are lots of fun to do. I made some wrist cuffs with this method, and I will blog about them next week.
This month Region 8 of the International Feltmakers held an Autumn Woodland themed wet felted picture workshop led by Susan Mulcock. As with many other regions we’ve been struggling with workshop numbers recently so it was great to receive so much interest in Susan’s class that we were able to fill two separate classes over the weekend. A big shout out has to go to IFA member Kerry Thomas who travelled 250 miles from Lockerbie in Scotland to join us on the Sunday.
Kerry
We were encouraged to bring our own photos to use as inspiration and I chose one I’d taken while walking a local section of the Viking Way between Horncastle and Woodhall Spa. The Viking Way is a 149 mile long walking route through Lincolnshire, Leicestershire and Rutland. The route opened in 1976 and its name recognises the influence of the Norse invaders on the east of Britain. The route is clearly marked with the recognisable signage of a viking helmet on the yellow disc.
I didn’t think to take photos of the process but this is my finished picture. Looking back at my original photo I think I must have been in a colourful mood when I was laying out my fibres! I’ve added some free motion stitch to help define the tree trunks and some of the finer branches but drew the line at adding hand embroidery. I feel I’d like to do some but I know that if I start I would have to add lots of it so I’ll live with it for now and maybe more stitching will be done at some point.
These are some of the wonderful pictures that were created over the weekend.
Something else I wanted to share with you, with permission from the bride, was my friend Sally’s wedding. Or rather the incredible textile/fibre creations that Sally produced for her wedding to fiance Chris. Sally joined the South Lincs Spinners, Weavers and Dyers three years ago where she learnt to spin and weave. She fell in love with both of these crafts and challenged herself to use them to create her own wedding outfit.
Chris’s mother is German and Sally has a thing for sunflowers so Sally aimed to combine both these themes for her big day. She began by purchasing green mulberry silk fibre from World of Wool which she spun. Next the spun fibre was woven and blocked before being cut out and sewn to create the beautiful bodice for her traditional German style dirndl outfit.
Extra fibre was spun and woven (just in case!) and this was used to make her usher, son Lewis, his waistcoat and to make the ring cushion. The gold apron features a white band made up of number of symbols, designed by Sally, that represent members of her family and these were crocheted using a fine thread to add a very personal detail to the outfit.
During our visit to Ampthill Fibre show this summer we saw a stall selling kits to create your own parasol. Sally bought a kit and had the fibre specially dyed to fit in with her sunflower colour scheme. She then crocheted her parasol cover and put the whole thing together to create a stunning accessory for her outfit.
Another beautiful touch was the wet felted Sunflower with Tyvek daisy’s that she made with me. It was attached it to her veil which in turn was lit from beneath with fairy lights.
At our Spinning meeting the month before the wedding we had a drop spindle demonstration and members that took part had the chance to spin a short length of fibre to take to Sally’s wedding. At the reception we took it in turns to add our yarn to a small piece of weaving which Sally and Chris will keep as a memento of their special day.
At the end of the ceremony I can imagine Sally breathing a huge sigh of relief that all her hard work had paid off and resulted in a day that was incredibly creative, unique and very much “Sally”!
In my last post I showed you my wet felted conch shell made from Merino and Corriedale fibres with ribs made from Sari silk yarn. I liked the shape of this and wanted to make another, this time in off white with pale coloured ribs. I found a site on Etsy selling a beautiful subtle coloured variegated sari yarn but unfortunately when it arrived it was so loosely spun I realised it wouldn’t be suitable for this particular project.
As I was in the mood for felting I didn’t want to have to reorder so decided to search for a pastel “slubby” knitting yarn which I knew was hidden somewhere in the depths of my yarn stash.
It turned out to be far easier to work with than sari silk as it was less inclined to move while felting and it had just the right amount of colour and texture for the look I was after. I was intending to leave this shell plain white but now it’s made I think it will benefit from a bit of shading so that’ll get added at some point.
I increased the size of this one to approx 31cm long x 15cm wide x 6cm high. My spinning group has a coastal theme for our 2026 exhibition so there will be lots more shells being made in various fibres, fabrics, techniques, shapes and sizes.
Wet felted spiral shells crop up a lot online and I’d been wracking my brain for ages trying to work out how these are made. I had a light bulb moment back in December when I made this small spiral shell from 10gm of carded Corriedale. Since then I’ve worked out another way of achieving a similar shape and so made this larger version using 20gm of carded Corriedale fibre and measuring approx 13cm x 9cm.
At one point the shell was sitting next to this bowl and I wondered how the centre piece from the bowl would look inserted in the shell…..
…..I quite liked it so I’m now wondering whether to leave it in there as an abstract hermit crab or make the effort to felt a more realistic looking crab, what do you think?
Another theme I’m working on right now is insects, particularly dragonflies and butterflies. It all stemmed from a tutorial by textile artist Anastasiya Goleneva to make this beautiful dragonfly brooch. It’s made from hand and machine stitched and painted calico. At 16cm long x 21cm wide it worked out a bit too big for me to wear as a brooch so instead I’ve put a Command strip on the back and mounted it to the wall.
Having enjoyed making it I decided to do another but using interfacing and my own technique for the body and legs that would allow it to stand and give it a more delicate, longer, slimmer look. One thing I’m not happy with is the “flat” face which suited the brooch but doesn’t look right on the standing dragonfly so version three is underway!
The dragonflies led to my friend Diane asking me to show her how to make a simple butterfly brooch so I made a couple of samples with body and wings made from painted cotton velvet. This fabric takes on a beautiful leather like look and feel when painted with fabric paints or acrylics and remains very soft and flexible. I was thinking of hand embroidering the wings but decided to keep it basic as Diane could add more detail if she wanted to.
I have been volunteering in the shop attached to our local Museum for several years now. I have to keep an eye on the Museum, welcome any visitors, dispense information (if I can) and serve in the shop. Visitors are infrequent unfortunately and, because I get bored easily and can’t stand doing so, I tend to bring in something crafty to keep me occupied between times. As I am using the Museum’s electricity to light and heat my work space, I feel that I should use the time to make something that could be sold in the shop to help to raise funds for the Sturminster Newton Heritage Trust which runs the Museum and also the town’s Water Mill, renting the latter from the Pitt Rivers Estate.
I have told you about the Mill before here and thought you might like to hear a little about the Museum and the things I have made (or attempted to make) over the years to sell in the shop. Though first I must show you a chap who, a few years ago, came to visit the Mill with his mates from one of the local biker groups.
Biker Dog – So cool! I’ve forgotten what his name was, though it might have been Jack, but he certainly attracted a lot of attention from others visiting the mill at the time, and he lapped it up!
This is the building which the Museum Society, as it was then called, purchased from the Town Council in 2007.
The building started life in the 1500s as a cottage. In the early 1800s it came into the ownership of the then Lord Rivers and was occupied by a farmer/baker and then a well known clock maker (we have one of his grandfather clocks in the Museum). After being sold in the mid 1800s it was occupied by an insurance agent and then an auctioneer, before becoming a sweet shop and restaurant as well as a home.
Infamously, before the Second World War, the restaurant was visited for a meal by Oswald Mosley, founder of the British Union of Fascists.
After the war the property was bought by a solicitor and eventually sold to the Town Council in 1996. The Town Council occupied the building until 2007 when it was purchased by the then named Museum and Mill Society.
The Town Council moved into purpose built Council Chamber and offices, which are part of The Exchange building. The Exchange was built and opened in that year on the site of what had been the largest Calf Market in the country but which had closed some 10 years previously. The Town has had a market/fair since 1219, having been granted a Charter by King Henry III, and we continue to have a (much reduced) market each Monday with stalls around the town.
The first of my donations which the Museum sold (eventually) were these two small felt pictures of the Mill. They were my versions of photographs which Graham, my husband, had taken.
Mill Picture 1
Mill Picture 2
Then I had a go at crocheting snowflakes, which did sell quite well in the run up to one Christmas. I seem to remember that I have shown you these before but I can’t find the link so here are some of them again.
A few Snowflakes
The Museum Shop has a number of items to sell which sport images of the Mill, Museum and, in the case of tea towels, our mediæval bridge over the River Stour. I did use one of the tea towels to make a Memo Board for sale, with the intention of making a series of these if they sold. Unfortunately that was not to be, the Memo board I made is still hanging on the shop wall. Though to be honest I’m not sorry that there’s no call for more of them because it took a lot longer to make and was a lot more complicated than I had anticipated, and I had actually made it in my workshop rather than in the Museum shop, so it didn’t really meet any of my criteria.
The “one off” Tea Towel Memo Board.
In fact over the months I have come up with lots of different ideas for items for sale which haven’t worked: Making books in boxes using unsold cards sporting very old photographs of Stur (as the locals call Sturminster Newton). Making Etuis, but I couldn’t work out how to get Mill, museum or bridge images onto them; I would have had the same problem with making chatelaines with fabric covered thread cutters, scissors and needle books. I did think of making pincushions to sit inside glass or ceramic pots or ornaments bought from charity shops but I couldn’t find a way to make sure the pincushions stayed inside them without using lots of glue, which I hate doing. I did try fabric paper weights and door stops, but obviously couldn’t use my sewing machine in the shop and hand stitching would have taken ages and probably wouldn’t have been strong enough to keep inside the grains of rice, which I was to use for the weights.
I was fast giving up on ideas for things to sell in the shop when my stint at trying to sell my scarves and fabric covered note/sketch books in 1855, our Artisans “Superstore” https://www.1855sturminsternewton.co.uk/ came to an end. I had not been able to sell much during the 6 months I’d allowed myself so the Museum Shop ended up with most of the unsold stock!
Some of my Scarves
More Scarves
Nuno Scarf with beaded flower scarf pin
The covered books and the silk scarves aren’t on display at the moment due do lack of space.
I have at last found some things which I can make in the shop and which are going on sale in the runup to Christmas – I have become addicted to making Norwegian Gnomes. Some people these days call them Gonks, but they are nothing like the Gonks that used to be around in the 70s. Here’s one I made back then – it still sits on my landing windowsill. I can’t bring myself to get rid of it. It is made out of a hat which was left over after one of our WI jumble sales. I stuffed it, putting in a scrap fabric base, and added eyes, ears, hands, feet and a tail, and have loved it ever since!
My vintage Gonk
For the gnomes I used scrap fibres, mainly scoured but unprocessed merino, to make the basic shape and stitched large buttons on the bases to help keep them upright. I stitched on noses, in most cases these were wooden beads, though there were a couple of needle felted noses.
Gnome “cores”
I covered the bodies in various unused fibres, mainly prefelts or carded batts which had become compressed in storage, or failed UFOs. I added “hair” – some of the large stock of locks that I found in my stash (I’d forgotten that I’d got so much!) and added beards and moustaches from the same source. Then I covered the pointy hats with more of the fibres used for the bodies. A few of the Gnomes were female – plaits from scrap yarn rather than curly hair and facial fuzz.
I started off making Autumn Gnomes but soon ended up making Christmas ones. There were quite a collection in the end as I was making them at home and at various workshops as well as in the Museum – I told you I was addicted!
Gnome Manufactory at an IFA get together
Autumn Gnome and yet another scarf
Here’s what the Museum Shop looks like at the moment in it’s Christmas finery and with all the goodies currently for sale.
Some of the Gnomes already on display
Shop Display 1
Shop Display 2
Shop Display 3
Some of the books by local authors about the area and its history; and the Children’s Corner
Christmas Hamper Raffle
Christmas Goodies 1
Christmas Goodies 2
The Museum proper has 6 rooms housing various alternating displays which at the moment include:
Our famous writers/poets Thomas Hardy (he wrote The Return of the Native while living here); William Barnes (his dialect poetry is famous – you might remember the song Linden Lea – if you’re old enough!); and Robert Young (he also wrote dialect poetry under the nom de plume Rabin Hill).
A fascinating display on the history of weights and measures (for instance a cricket pitch measures 22 yards long, or a “Chain”. I always wondered why a chain? Now I understand, there was an actual metal chain used as we have one on display.)
We have the earliest map available of the Sturminster Newton and surrounding area dated 1783.
Swanskin (as mentioned in the link at the beginning of this post)
The Hinton St Mary Roman Mosaic – this was part of the floor of a Roman villa found in the next village up the road from us, which is also the base of the Pitt Rivers Estate previously mentioned. The mosaic was discovered in 1963 and unfortunately was removed and is now in the possession of The British Museum. It was hoped that it could be returned to Dorset when the Dorchester Museum was enlarged but they won’t let us have it back!
As part of the Roman display there are a number of photographs showing what flora and fauna was introduced to this country by the Romans. You’d be surprised what plants and animals they introduced that we now consider to be “native”.
Upstairs we have a new working model of Sturminster Newton Railway Station showing how it used to look before being closed in 1966. Very few of the original buildings are still here. That will be a permanent exhibit (hopefully!) whilst most of the others will change from time to time.
Certainly the Museum is well worth a visit at any time of the year.
Hi All It seems I forgot I had to post today so I am late. I am reposting a post showing some of the past Holiday Exchange Cards that we have done. I did remove the links to sign up for this exchange.
Hi all, for those who may not know we also run an interactive forum for felting and fiber folks. It’s a great place to share your work, ask questions and help each other out. http://feltandfiberstudio.proboards.com/
Each year we have a holiday exchange. You make a small felted postcard or similar size card with some felt on it.
Here’s the timeline:
October 4-Nov 9: people sign up
November 10 partners are announced.
November: Make your card, contact your partner for an address
December 1: Mail your card
Here are some of the cards from our past exchange, there has been lots of variety.
I am making some progress. I refelted the cut diamonds
They are now in a bag waiting for me to work on the diamond project.
I did more work on sheep and shepherdess.
Jan made me a wire shape or the shepherdess for me. Then I wrapped it in some waste wool and used a felt ball for the head. than wrapped that in Corriedale.
Once I added wool it was not stable enough to stand. So I asked Jan about adding a piece of wire front and back to stabilizers. so she took it and started working on it. We added a ball in the bottom but then I decided she was too tall for the sheep I was making, and she cut the ball in half and squashed her down. Jan added a snail tail that stabilises her well. It will be covered by her cloak.
I have been putting sheep together. I make the parts separately. Long snake to cut into leggings and ovals for heads. I made some flat pieces in the 3 colours for the ears. I cut them out but I want to felt them some more.
After I add the ears to the sheep I will add the curls like the orange sheep on the right. I also need to make some clothes for the shepherdess. I think she will be a brunette but I don’t think she will get a face.
Lastly for today, is why felting small things and holding them with your fingers and talking to people is not a good combination.
A couple of years ago I was lucky enough to find a used Saori CH60 loom. That loom lives in a spare room in our house. I wrote this post Weaving a Cowl for a Christmas present about using that loom.
On the weekends we usually go to our cabin. The cabin is only a 30 minute drive from home so we go there, do yard work (amount varies seasonally) and then have a meal and a nice quiet night. We return home the next morning to 3 cats who are very happy to see us. The cabin is basic. There is no TV, though there is internet. While there I tend to do a craft of some kind. Last year we added a screened porch to the cabin and I began to dream about sitting on the porch and doing some spinning or weaving. Sadly our porch project started late (getting planning permission was hard) and was finished just before Christmas. So we have been waiting for warmer weather to arrive before getting it setup.
Cabin before adding the porch
Porch in progress
Finished porch, screened room on side (on left), unscreened walkway at front (on right)
Cabin from the front, unscreened porch
So I started shopping around for a folding loom. I had my eye on a Saori WX60. Luckily one of my friends had bought one and it didn’t suit her weaving style so I was able to buy hers. (My friend was planning to return to using her rigid heddle loom. Whereas I sold my rigid heddle looms after adopting my Saori loom because I no longer had time for them.) I picked up the loom at the end of March and I’m really happy with it. Here you can see the loom on the porch. I threaded it up the first day.
Threading the loom
Threading the loom
Folding loom setup on the porch, warp tied on
One of the nice features of the Saori WX60 loom is that it folds. And you can fold it up with a project on the loom. This makes the loom easier to store, and to relocate to another place. I am still getting the hang of folding/unfolding the loom, and find it easier to get help doing that. But I am sure that with practice it will become a solo task.
The loom weighs 13.5kg (29.8lb) and has the following dimensions:
When open the loom is 76cm (30″) wide, 76cm (30″) deep and 98.5cm (39″) tall.
When folded the loom is 76cm (30″) wide, 25cm (10″) deep and 106cm (42″) tall.
I cleared a space just inside the cabin where the folded loom could be stored. I also setup a nice rolling cart to contain my tools. This makes it easy to move the loom outside or inside as necessary. I use a regular chair with the loom and prefer to add a nice cushion to the chair as well. (Lifting your feet to treadle puts more pressure on the bony parts of your butt.)
Folded loom (front view)
Folded loom (side view)
Weaving cart to hold bobbins, yarn, etc.
The first weekend I had the loom I got it threaded. On the next visit to the cabin it was time to start weaving. This shows my porch and inside the cabin weaving locations.
Starting to weave
Loom setup inside. Note the warp on square tube on the beam near the floor.
Over the course of a few visits I proceeded to weave, changing colours and textures as I felt like it. This is a highlight reel of the resulting weaving progress.
I am now nearing the end of the warp. Originally the warp was on a square tube on the beam near the floor. (You can see more details about the Saori warps on square tubes in this blog post.) When the warp unwinds from the tube you transfer it to a rod so you can maintain warp tension. In the left photo you can see that the warp is tied onto a rod that is located close to the beam near the floor. As I continue weaving the rod is getting closer and closer to the shafts on the loom. I have just a few more inches of weaving to do. When I finish the rod should be just behind the heddles. This loom design minimizes warp waste. When I am done weaving I will be able to hemstitch my cloth and remove it from the loom. The remaining threads will be trimmed slightly and twisted into a nice fringe for my cloth.
Last year I joined Lincolnshire Textiles, a mixed media textile group who meet monthly at Cherry Willingham near Lincoln. This is an exhibiting group and I was really impressed when I visited their last group exhibition which was held two years ago in Lincoln Cathedral. As well as members exhibiting their individual pieces, central to the displays is always a group piece. Last time this was Sapphire & Steel which you can see here.
This year the main theme of the exhibition is “Water” and the group piece will represent a whirlpool with 30(ish) members having contributed a section each. Along with a template we were each given a colour swatch and asked to work in shades of that colour without going too dark or light either way. This was my template for shape which is approx 60cm x 15cm at its widest parts, and the little colour swatch of thread.
My first thought was to fill the shape with swirls or crashing waves…… But then I remembered seeing some of the pieces that had been submitted at previous meetings and two or three other members had already worked on that type of design, so I decided to rethink.
The other thing that came to mind was that my section might lend itself to being the shape of a fish so that’s what I decided on…..
The next step was to gather various threads that looked like they might be suitable and then look for different textured fabrics which I could colour. As we were asked to work in monotone it would be important to use as many textures as possible so I pulled out cotton, velour, interfacing, tulle, Lutradur, Evolon, gauze, elastic and crepe bandage.
I mixed up a shade of green that was as near as possible to the swatch and applied it to the fabrics in varying strengths. This gave me a nice variety of shades and texture to work with.
Knowing our exhibition isn’t until August I thought I had plenty of time but at our meeting this month I discovered I was one of only two who hadn’t yet handed their work in and it would be needed for the April meeting!! Panic set in and I didn’t think to take many photos of my fish once I’d got going with it….it was a case of head down and get on with it!
This is the finished fish with the addition of beads which I’m hoping will catch the light and add interest. I certainly don’t envy Hilary who now has the job of joining all of our segments together and making them fit!!
Meanwhile things are still progressing with Waltham Textiles “Making Waves” theme and I’ve added a Coconut Octopus to my exhibits. I came across some fabulous photos of the Coconut Octopus and just had to have a go at creating it.
The coconut octopus is found in the western Pacific and Indian oceans and is classified as a tropical water species. It can be found off the coast of southern Japan as well as Australia, New Guinea, and South Africa.
It prefers shallow coastal waters and spends the majority of its time on the sandy or muddy seafloor close to the shoreline. This species also shows a preference for calmer waters as opposed to the swifter seas of the open ocean, hence it is frequently found in bays, lagoons, and other inlets.
It commonly preys upon shrimp, crabs, and clams, and displays unusual behavior including bipedal and quadrupedal walking. It gets its name from gathering and using coconut shells and seashells for shelter and protection. What an amazing creature!
Photo Source: octolab.tv/species/coconut-octopus/
Another distinctive feature of the coconut octopus is its suckers. They are almost white and really stick out when the creature has assumed a darker color. The contrast in colour between its body and its suckers can create a fluorescent effect for the suckers.
Unlike Oli I which was completely needle felted, Oli II is mainly wet felted with the skirt being added once I’d got him stuffed.
I considered making the legs and body separate and joining them with needle felting but decided to go with a book resist instead.
He’s made with Corriedale Slivers from World of Wool which I’ve been using a lot of lately. They are great for both needle felting and wet felting and are available in a beautiful range of colours.
He’s nearly finished, just a few more needle felted suckers to add, which has become a bit of a ritual when I’m sat watching TV. With so many of them it’s the only way I can do it and keep sane!! Now where did I put that needle…………?
This is a guest post by Charlotte P. of The Craft Council of Newfoundland and Labrador. I thought our readers would like to hear about this interesting conference being held in September. Thanks for writing the post Charlotte!
The Craft Council of Newfoundland and Labrador has the pleasure to announce the
Made in Canada: Sustainable Fibre Arts Conference 2024. The Conference is taking
place from September 19 to 23, 2024, in Gros Morne National Park, a UNESCO
World Heritage Site, in Newfoundland and Labrador, Canada.
Last held in 2015, our Fibre Conference brought presenters, participants, and visitors
from all across the globe together to discuss the exciting developments in the fibre arts.
While sustainability is far from a new concept, sustainable textile practices are evolving
and being adopted by hundreds of artists in Canada and across the globe. Focusing on
sustainability and respect for the land, water and air, this conference aims to discuss
sustainable and ecological craft practices and materials, and how sustainability can
support rural and urban craft communities and move forward in the craft industry. For
more information, please visit www.fibrearts2024.ca.
Among the workshops offered will be foraged plant fibre weaving, animal hide tanning,
papermaking with recycled textiles and flax fibre, and block printing with natural dye
mordants.
If you need a break from the hands-on activity, there will also be lectures and panel
discussions on sustainable animal fibre harvesting and processing, Indigenous fibre
systems, and other topics! Attendees will have the opportunity to connect with other
fibre artists during the conference’s meet & greet luncheon and cumulative artisan
market. For more information on the conference’s schedule of events, please visit https://www.fibrearts2024.ca/program.
Registration is open now until July 31, 2024, with special early bird pricing open until
March 31!
This is a guest post by Dani D. Thanks Dani for your photography expertise!
Part 1 of 3: Telling the story
Hi! I’m Dani and this is my first post here, though 2024 marks my 20th (!!) year of blogging. I started blogging about raising my family, and then about photography. Now that my kids have grown up, I’ve moved my bloggy thoughts to a new home at Curious Crone, so feel free to come visit me there some time.
Ruth generously invited me to share a few tips about digital photography and I had so many thoughts it turned into a trilogy. Today, we’ll talk about telling the story and basic tips on using your smartphone to take better photos of your fibre projects. In later posts, we’ll talk about the two most important factors that will affect your photos: light and colour.
In many ways, taking photos of your fibre arts projects is easier than photographing humans. The fibre art doesn’t stick out their tongue when mom is not looking (this happens rather a lot in my family photography business) nor do they give that tight-lipped fake smile while stage-whispering out of the corner of their mouth to the other subjects in the photo “if you don’t behave for this photos I will take away your devices for a year!”
First, a few words about smartphones and apps. For this post, I’m thinking mostly in terms of taking pictures with your phone. There are two terrific free apps for editing photos: Google’s Snapseed and Adobe’s Lightroom. (And yes, you really should edit your images to polish them – it can make all the difference in the world.) I use Snapseed on my iPhone and Lightroom for editing dSLR images on my Mac, but there’s a great version of Lightroom as a mobile app and as an online editor. Both Snapseed and Lightroom mobile apps are available for iOS and Android. Did I mention free?
As every photography teacher will tell you, getting the image as right as possible before you press the shutter saves you time and effort at the editing stage. So whether you’re taking photos of a wet-felted vessel or your adorable two-year-old nephew, take a second before you click the shutter and think about the following things:
Is the background clear of clutter?
Do other elements in the frame complement or compete with the subject?
What story am I trying to convey?
Would a different perspective tell a different story? (Try shooting looking up at the subject, looking down at the subject, zoomed in to fill the frame, zoomed out to show something as small in a large background, shoot down from overhead, shoot at eye level, shoot super close to illustrate a fine point of detail.)
If you start thinking in terms of the story you are telling, your photography will improve immensely. In fact, as a successful licenser of stock photos to Getty Images, I’d argue the story is more important than the technical criteria of the photo. Every successful image should tell a story, whether it’s about the texture of the piece or the shape, the colours or the light. The photo is not just a static thing, it’s an invitation to interact with your creation or your creative process.
How do you begin to tell that story? Don’t just snap the photo as soon as you have your subject trapped in the viewfinder – compose your image deliberately and thoughtfully. For more tips and ideas around how to compose your image, search up ‘rules of composition’ for ideas like leading lines, rule of thirds, etc.
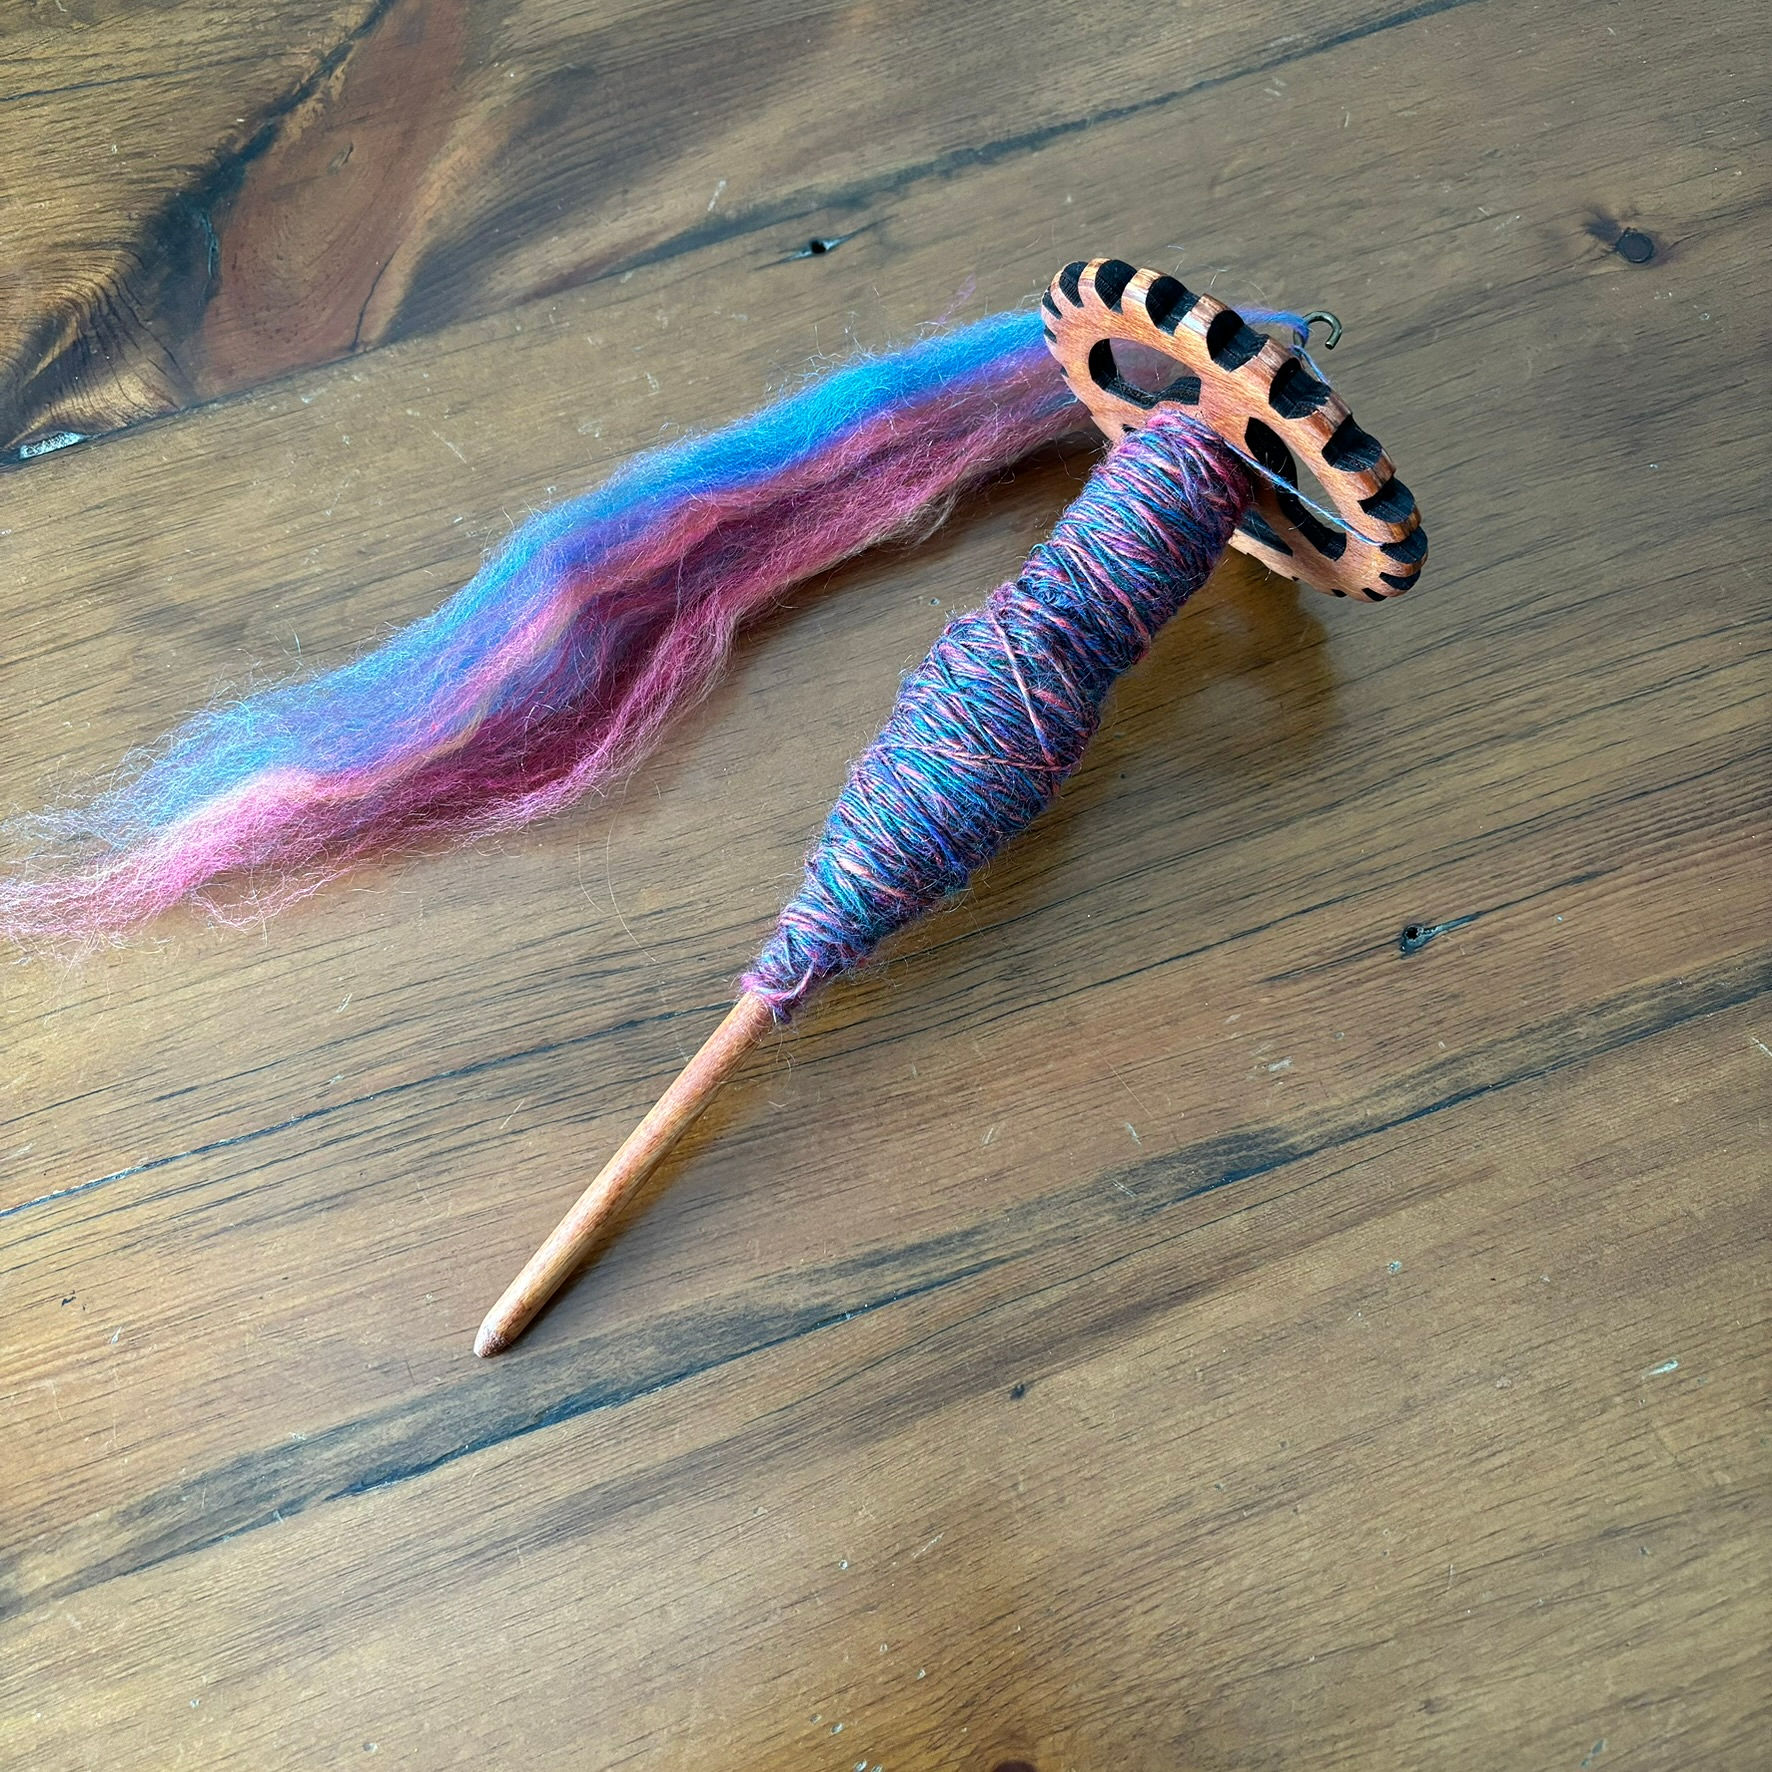
Here’s an example of me finding the story I wanted to tell. First photo, basic spindle and wool. Not very interesting.
What if I added some fibre to flesh out the photo? Nope, too busy. Background is distracting focus from the subject.
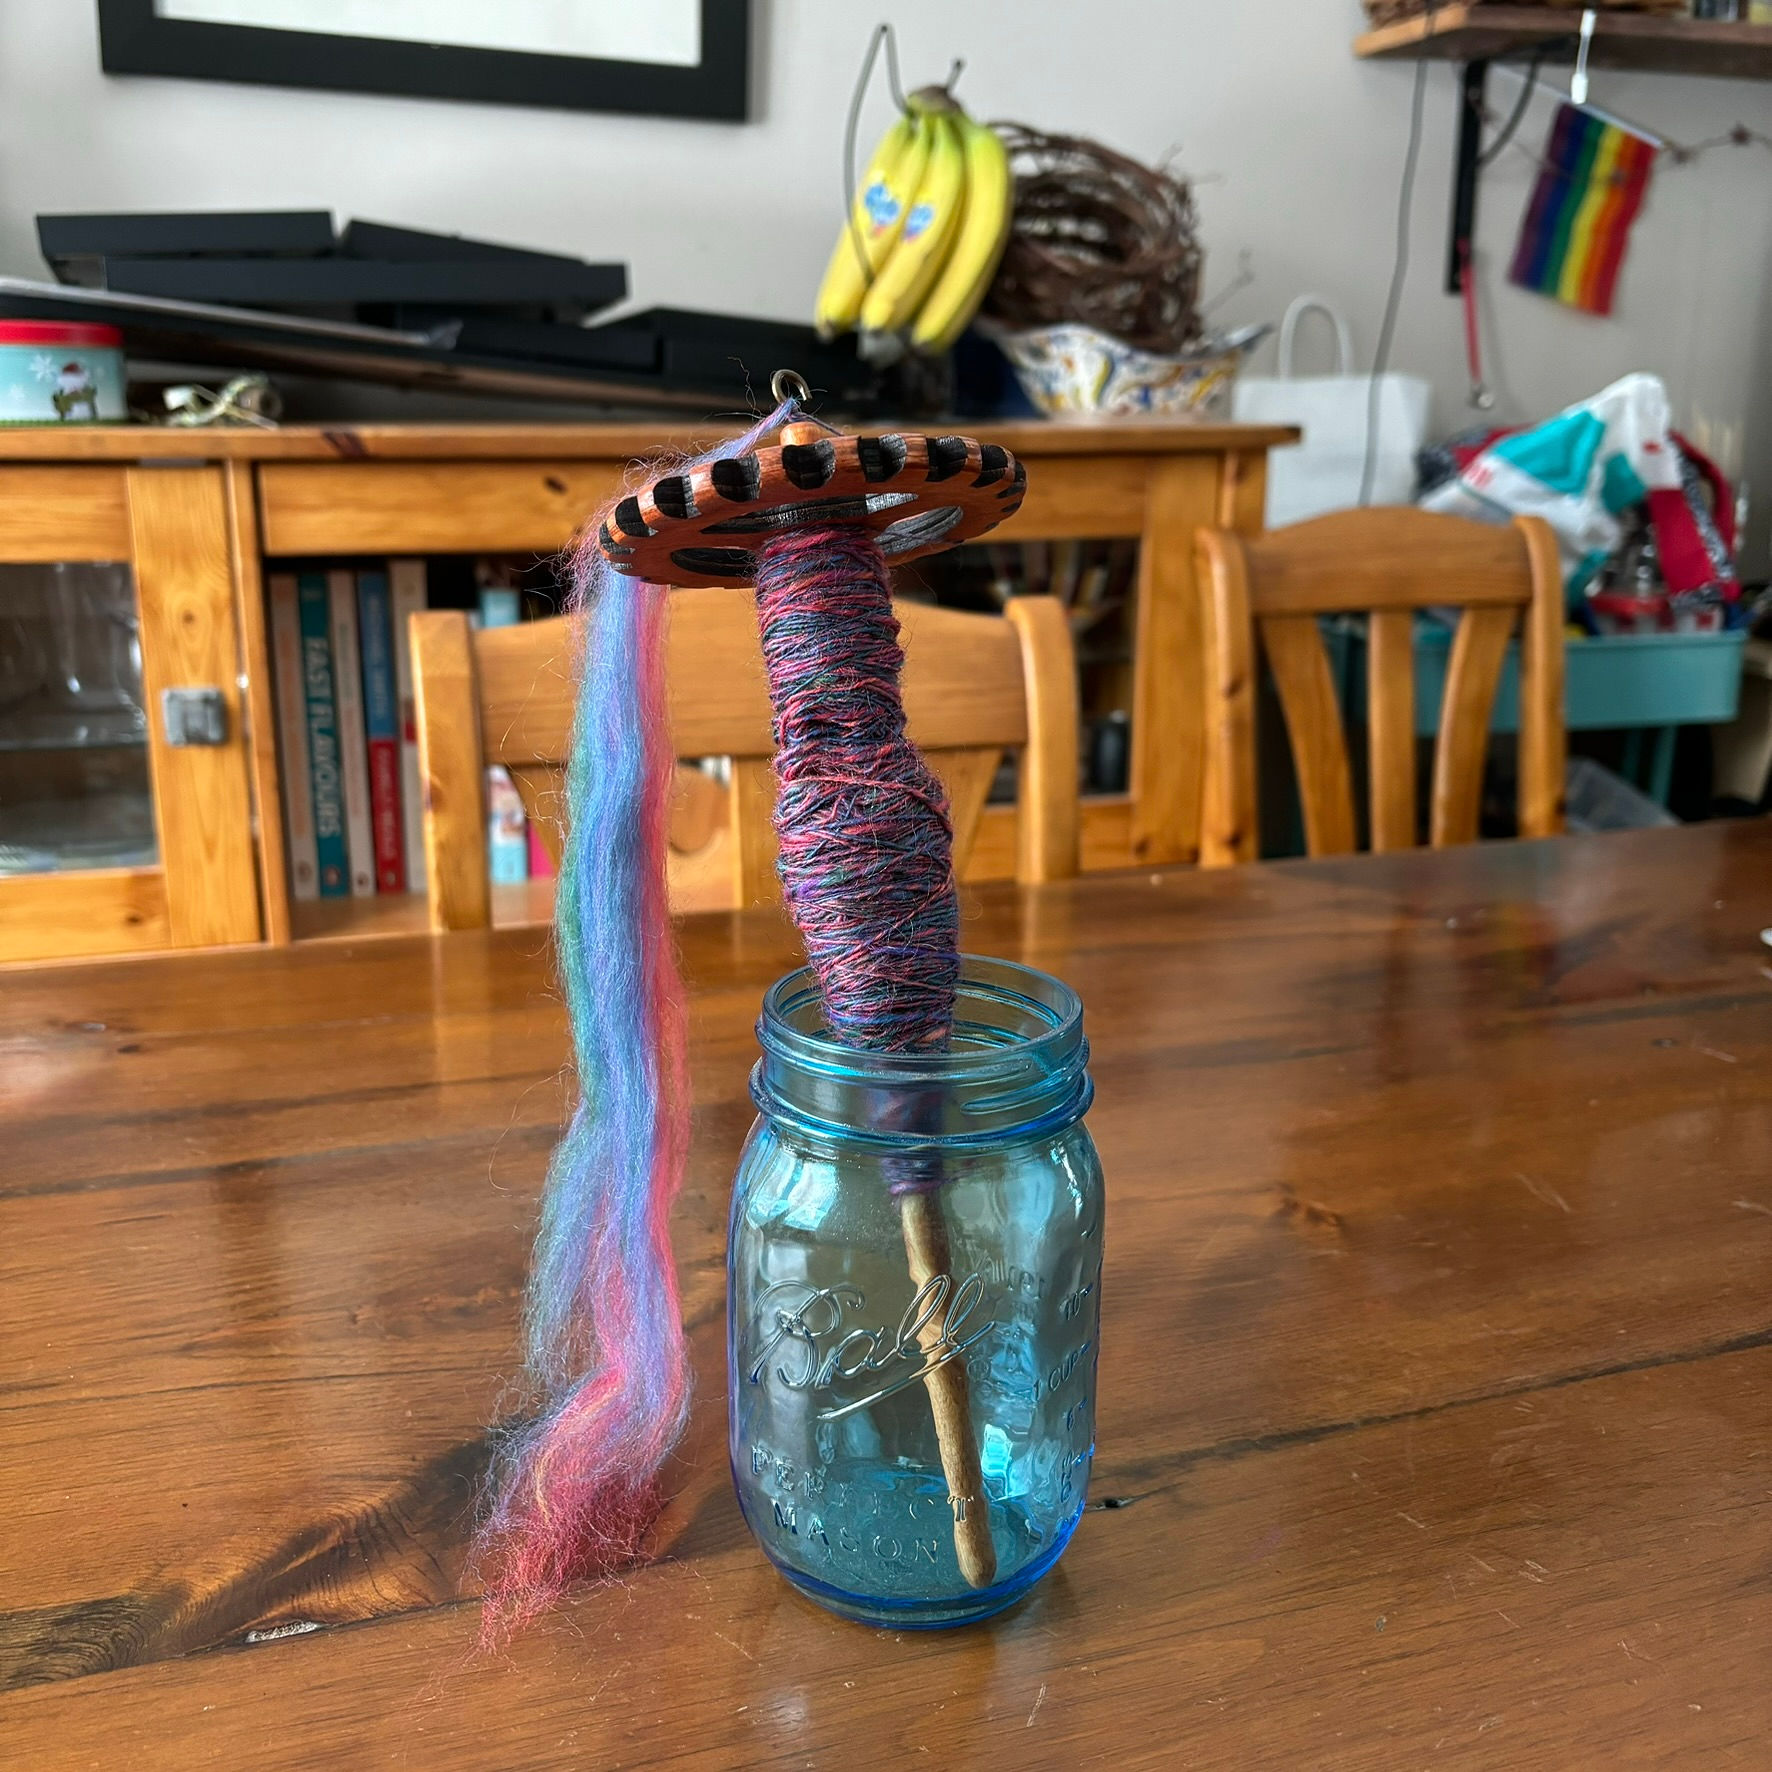
I love this blue mason jar. I could use it to stand the spindle up for a better angle. Except the background is too cluttered.
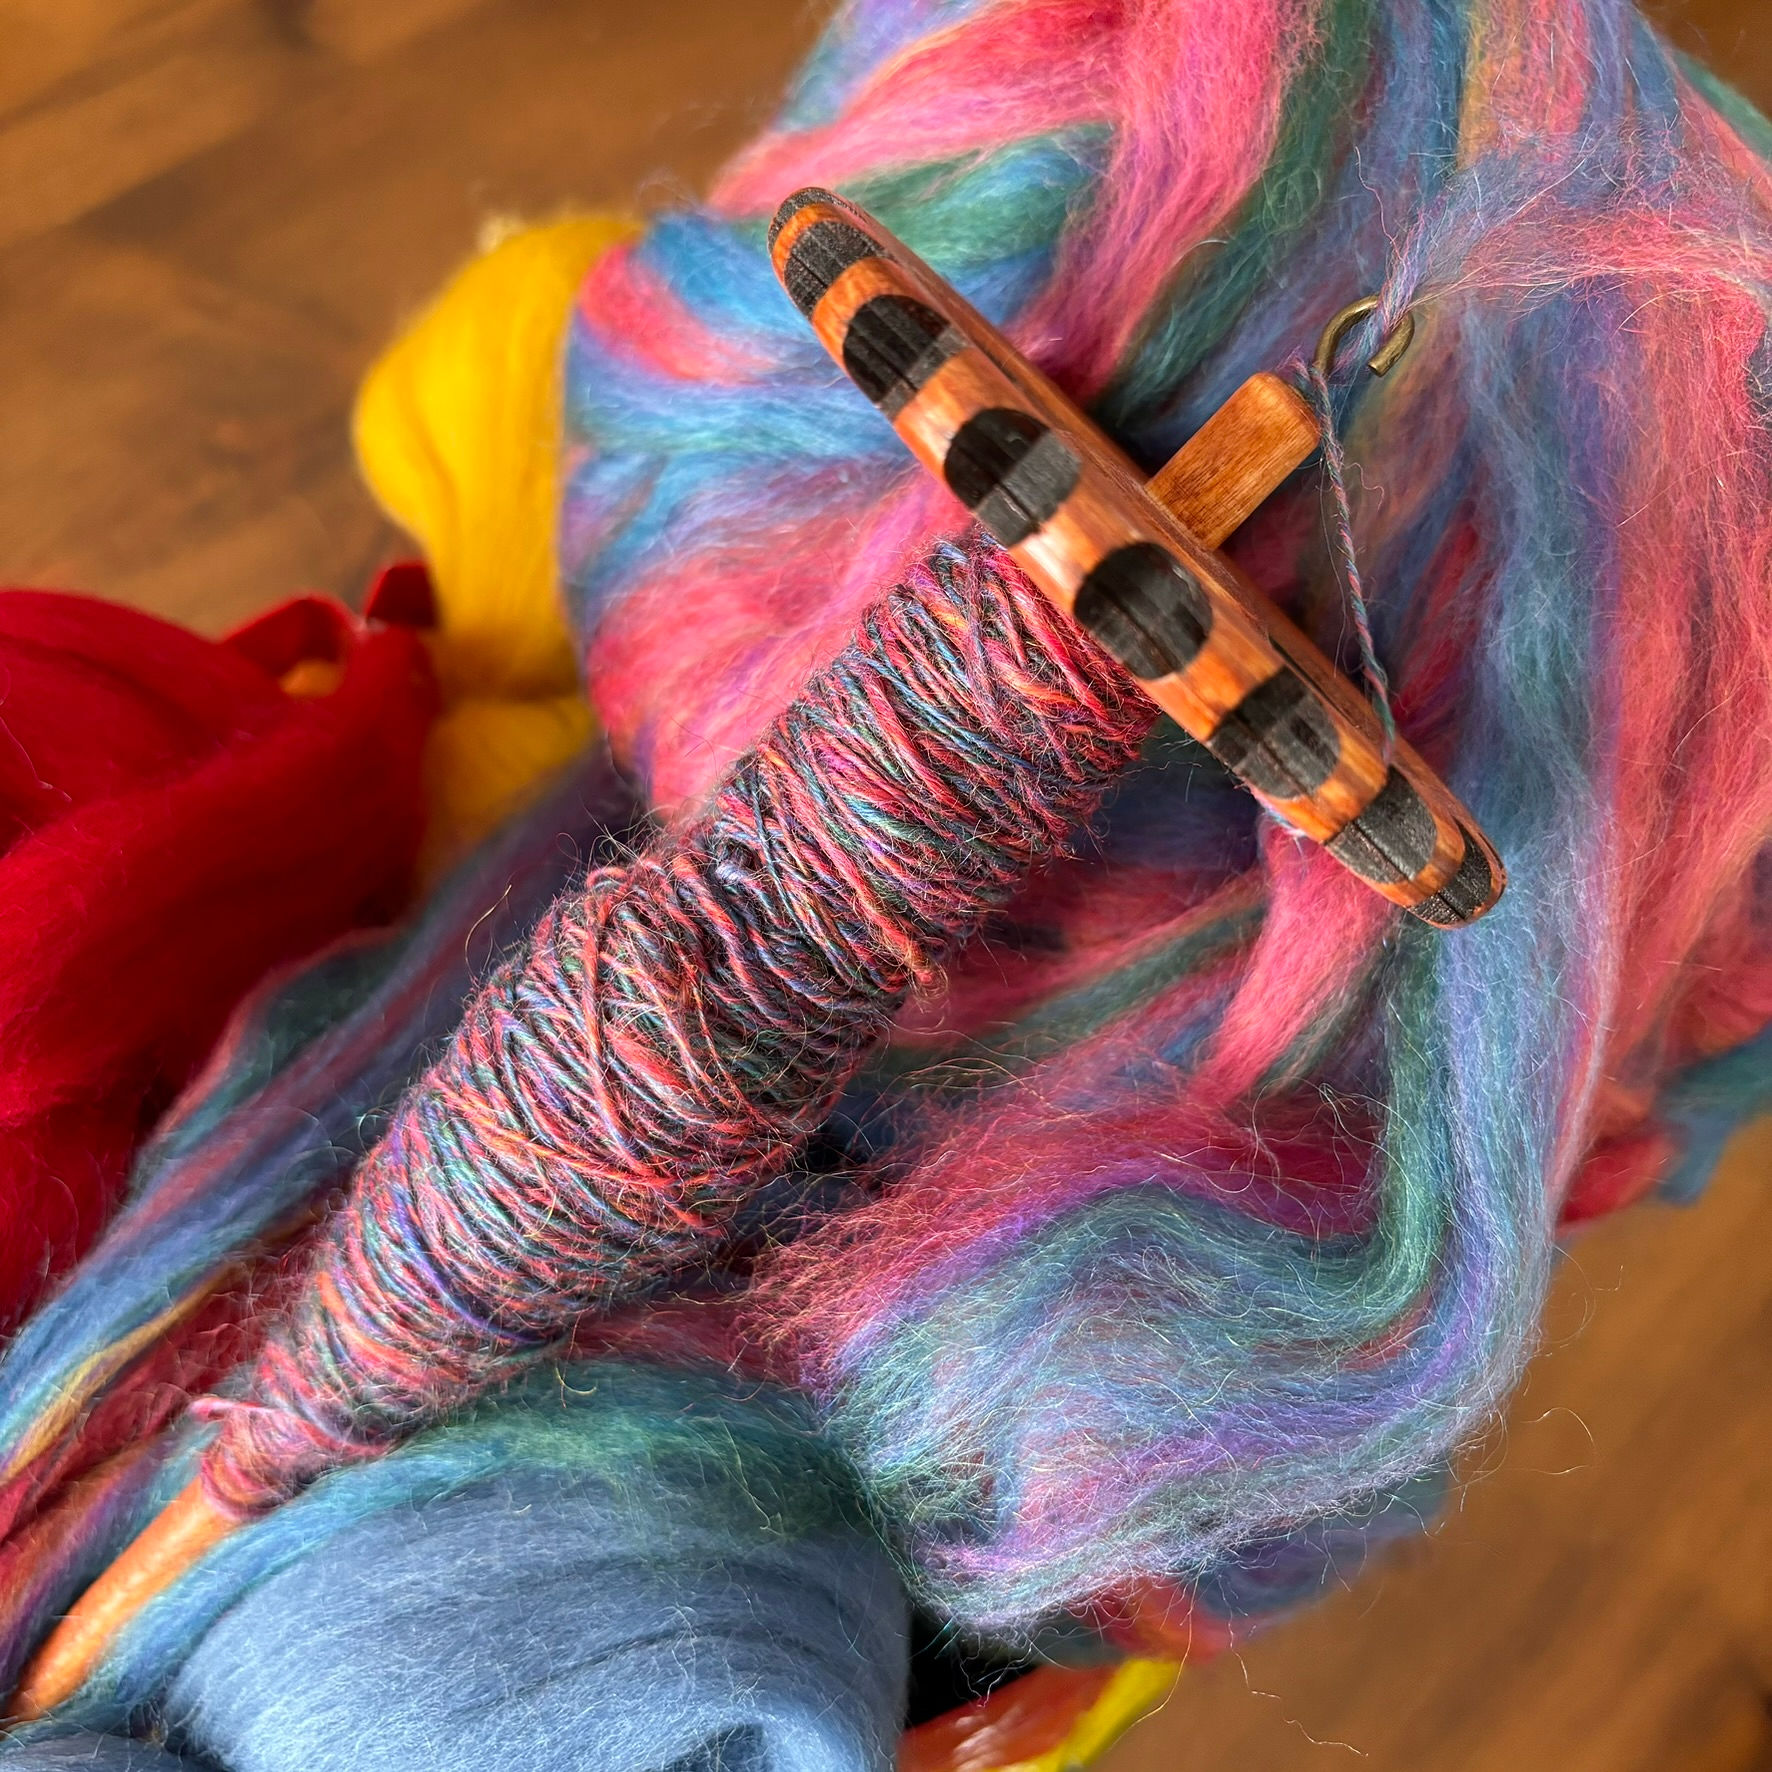
I’ve zoomed in and am playing around with the perspective.
If you’re making photos for an Etsy or other online shop, think about setting a mood with props and building a little tableau. An old piece of barn board and some cream linen evokes a sort of farmhouse chic mood, where a cup of coffee and an aloe plant set more of a lifestyle vibe. Just keep in mind that you want accessories to compliment your subject and not compete with it.
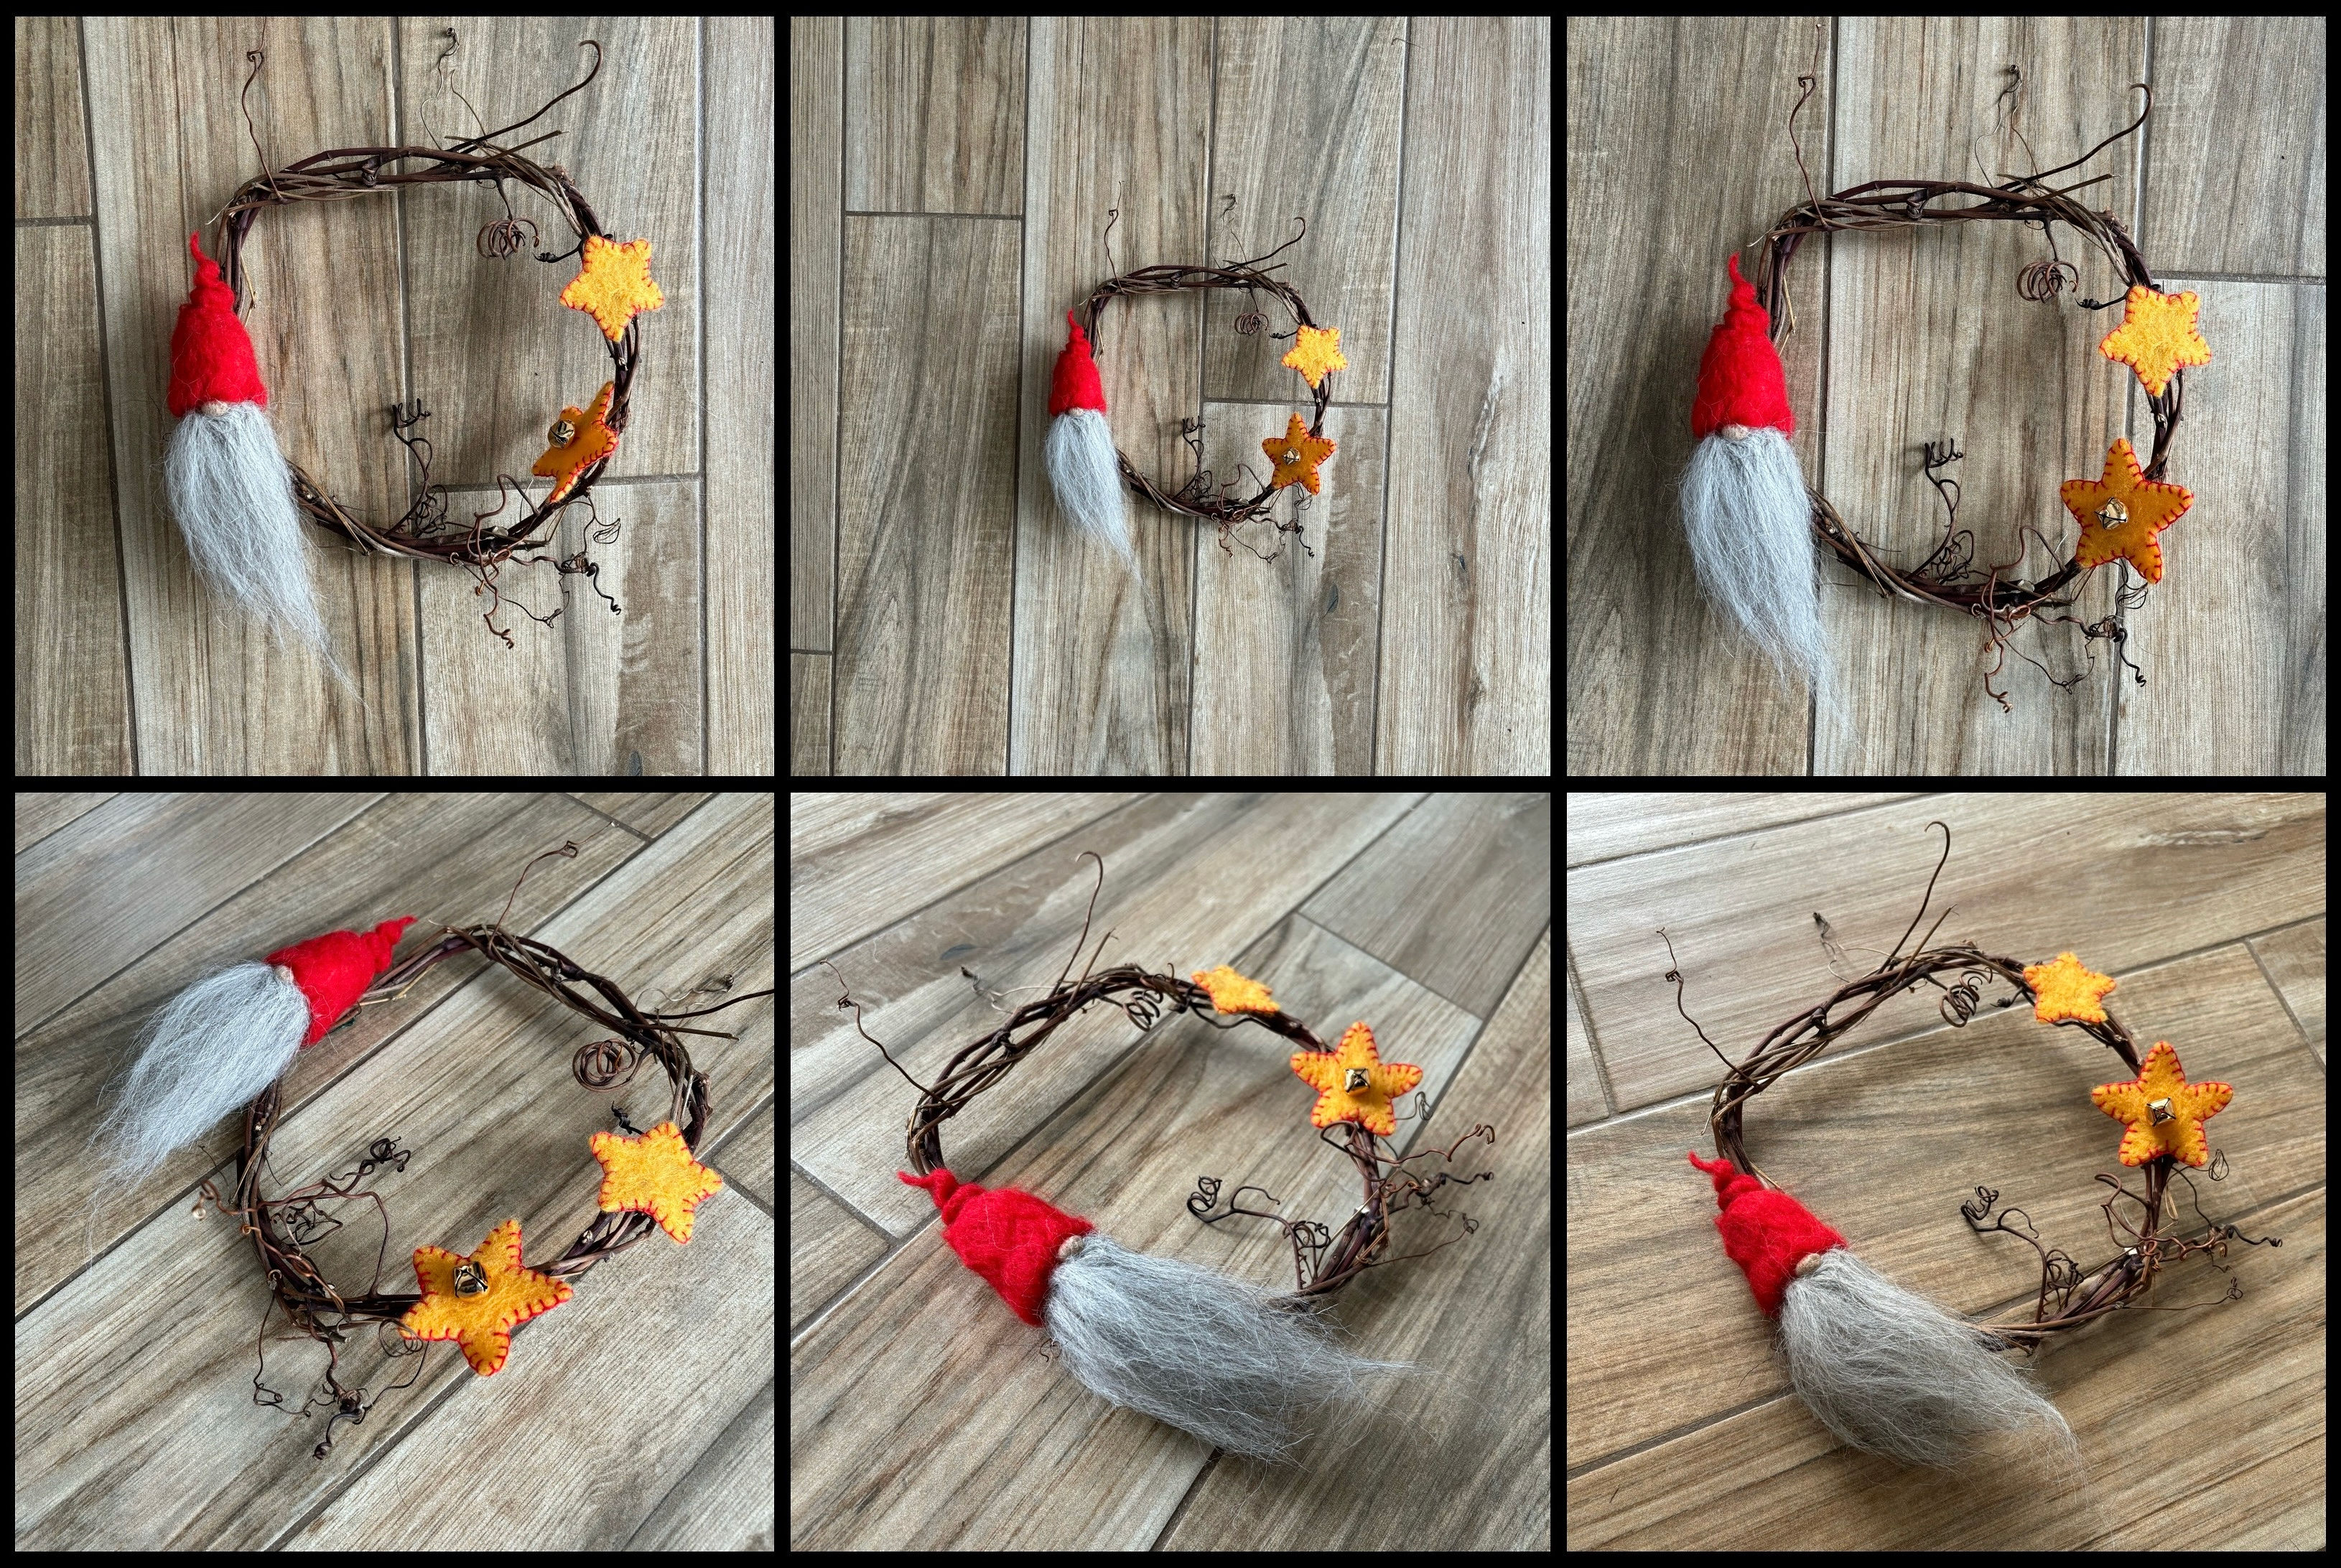
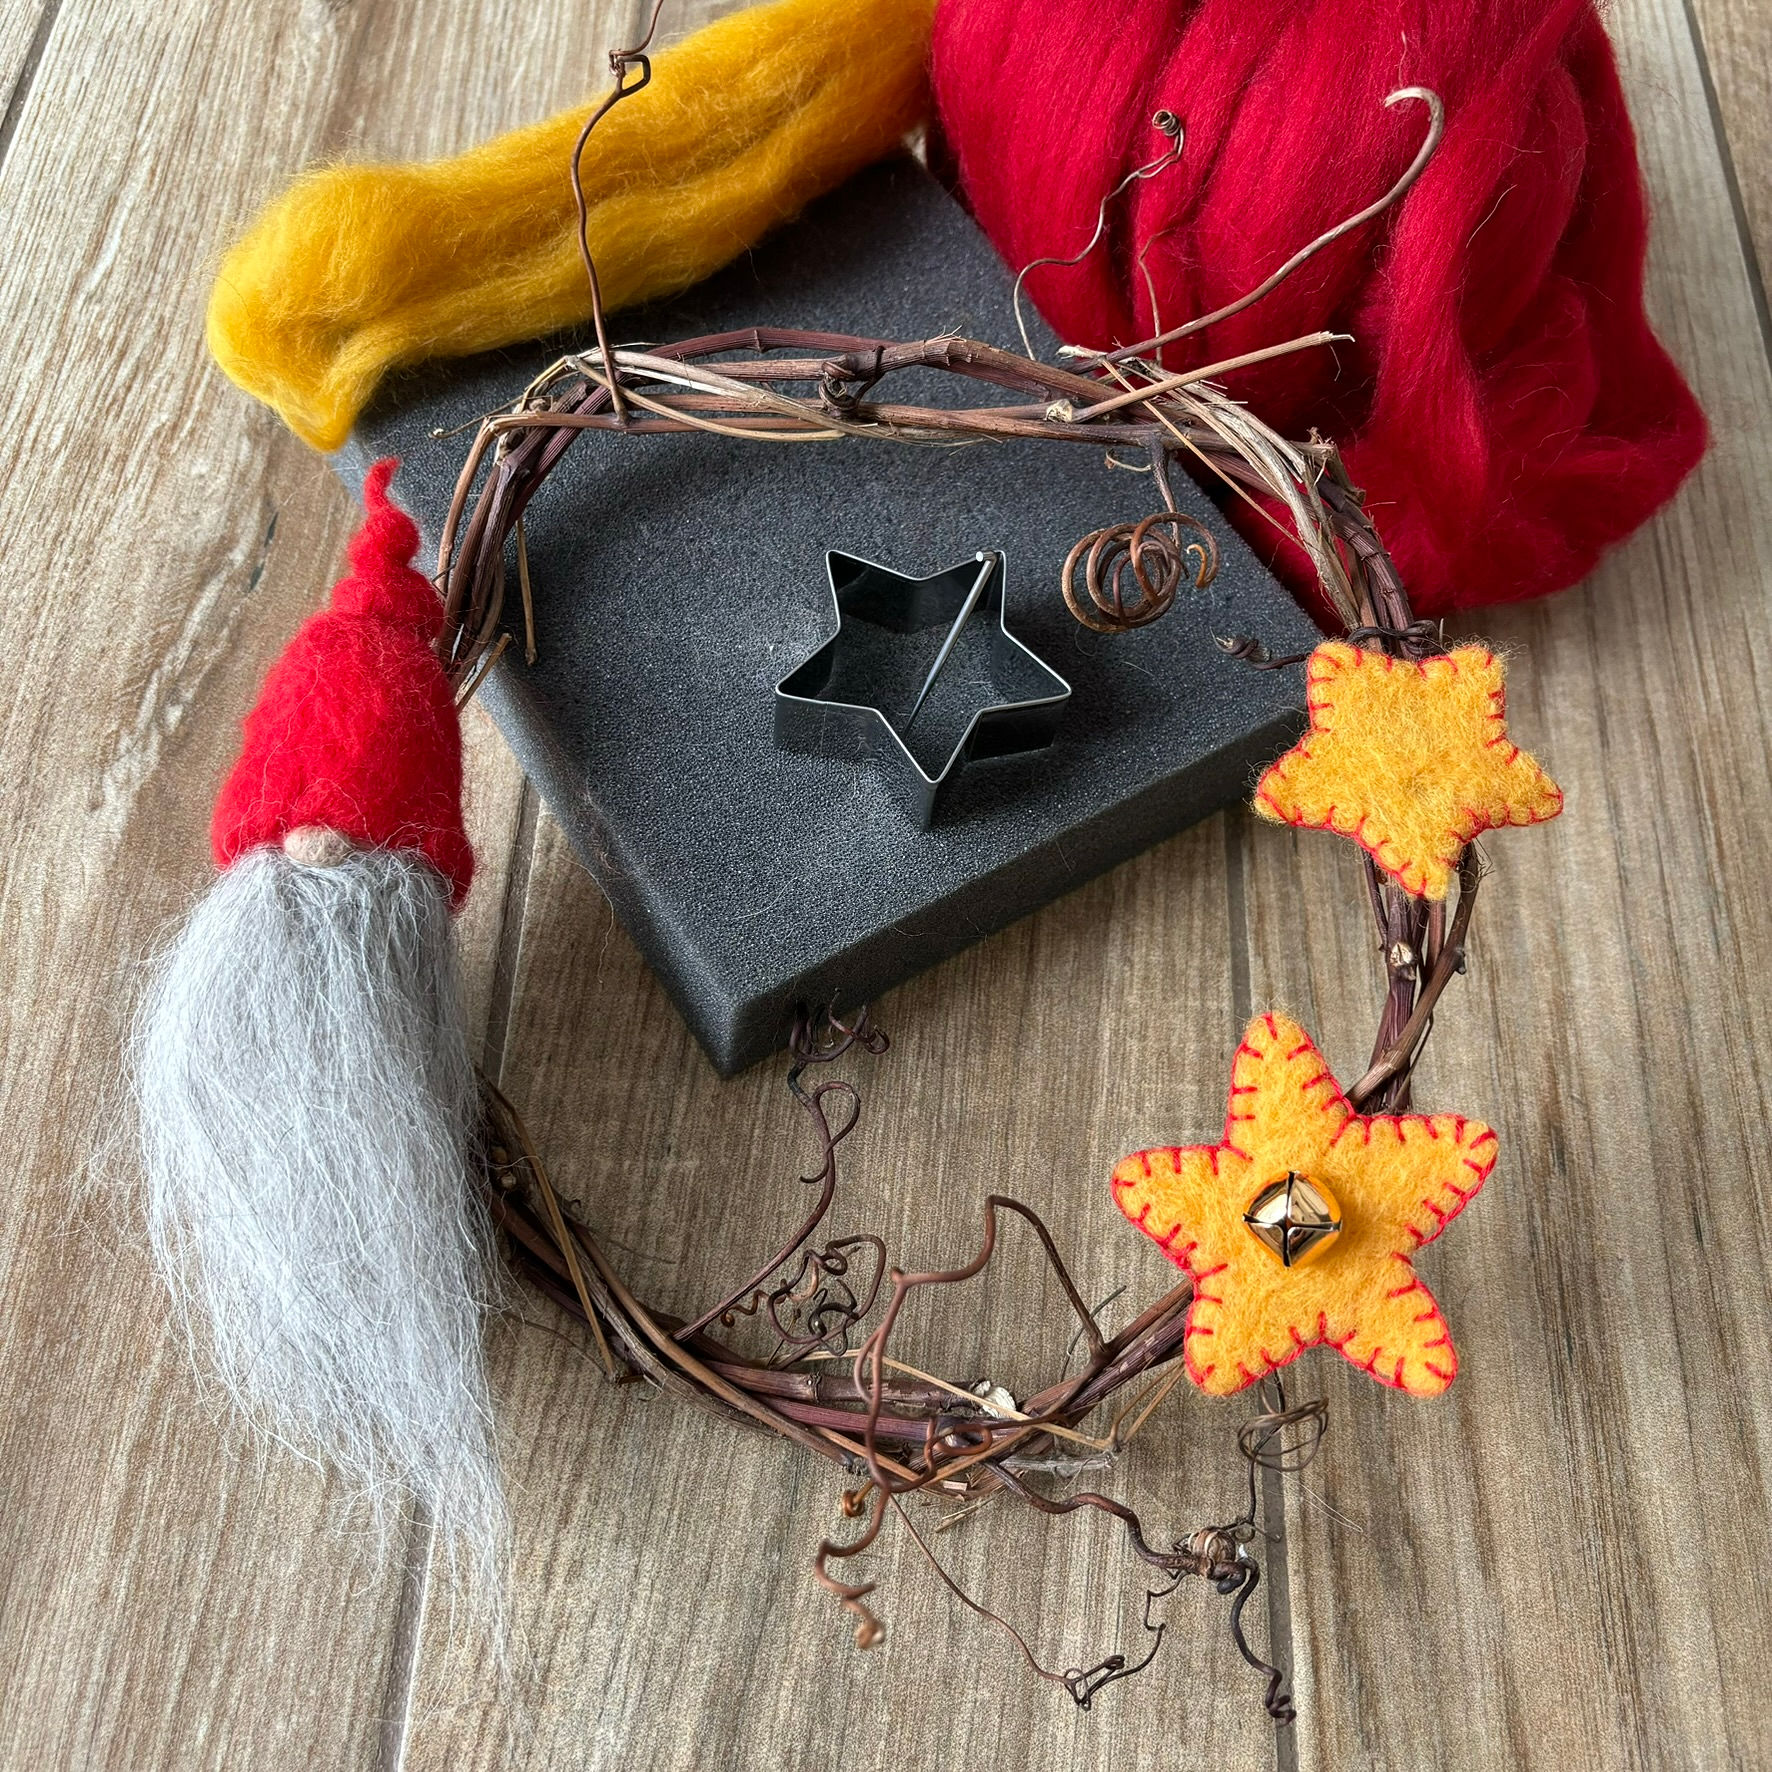
This is my kitchen floor, after a quick swipe to remove crumbs and pet hair. The first thing I noticed in the first photo was the seam down the middle of the wreath, which is a distraction. I played with the angles a bit but didn’t love any of these.
I pulled some loose wool and tools in to tell a bit of a how-to story. I liked that much more.
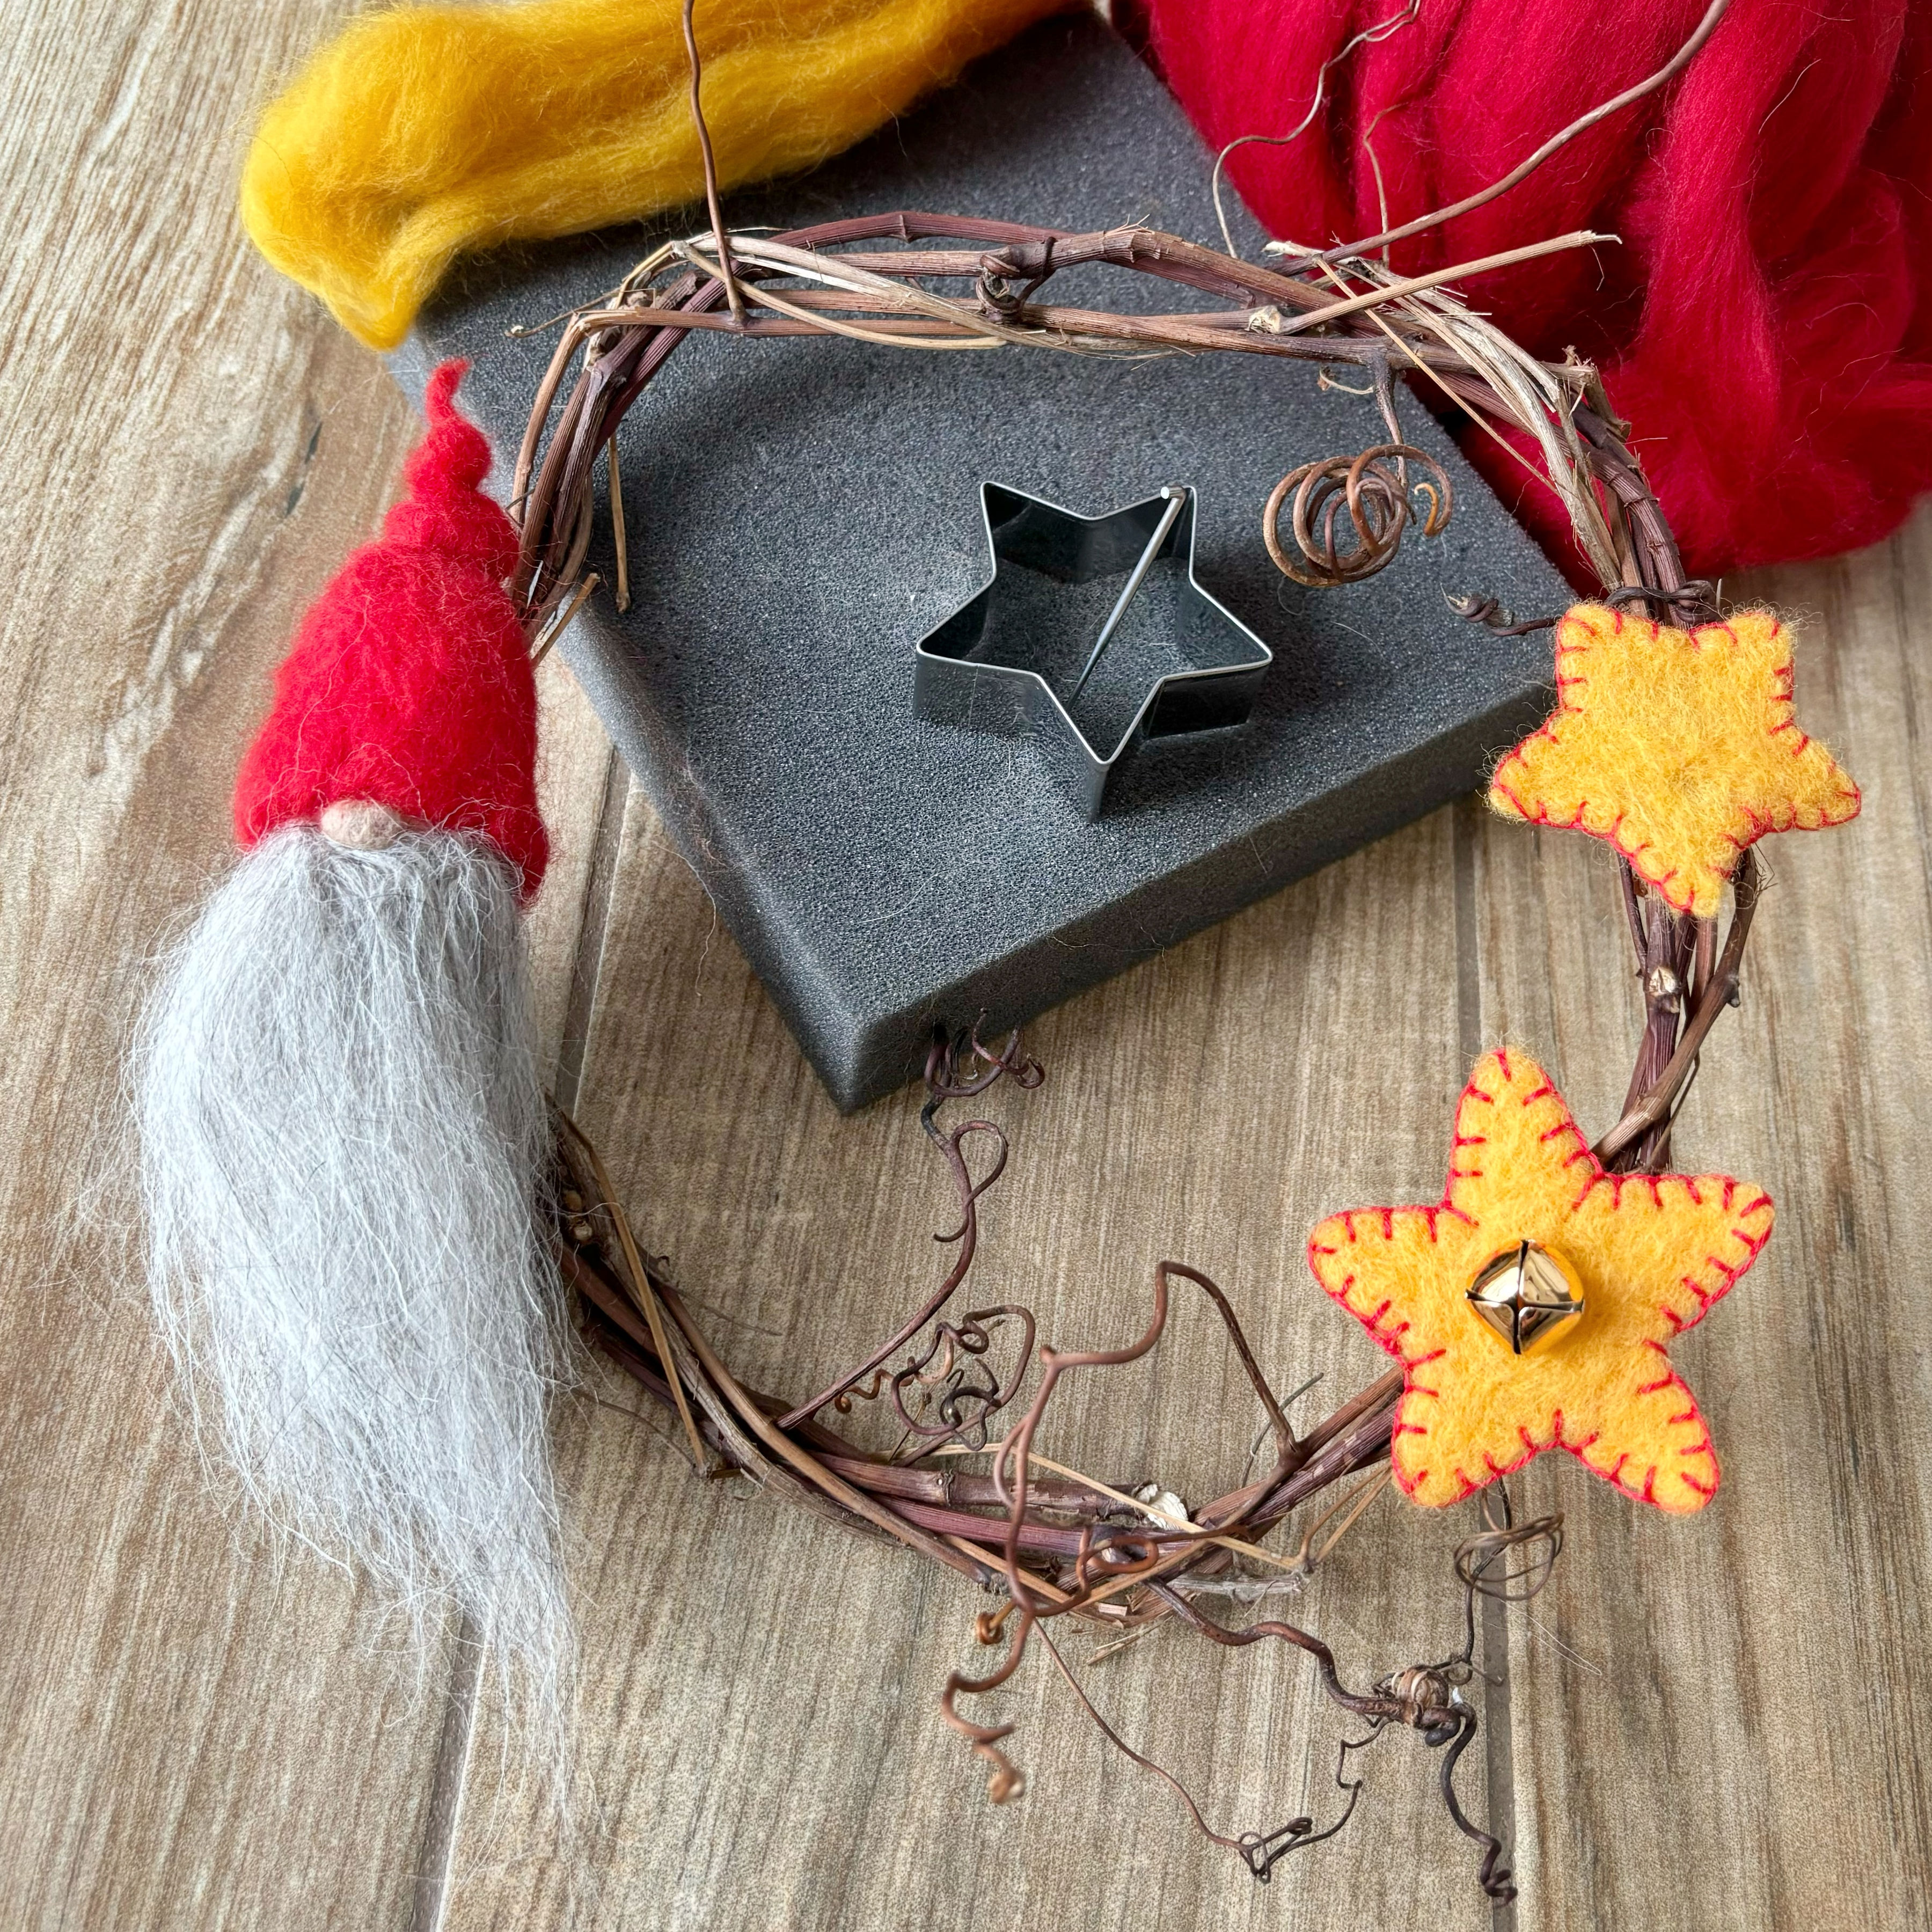
These last two photos show the difference editing can make. The first is straight out of the camera.
The one below has been edited for brightness (more), ambiance (more) and a slight rotation and crop to cut out the bit of gap at the top right to keep the viewer’s eye in the frame. Bright spots and colour will draw viewers’ attention, so use them deliberately.
I don’t like that I cut out a bit of the tips of the curly bits of grapevine, and I would have liked the gnome closer to the ⅓ line, and that the top of the felting needle doesn’t reach over the cookie cutter. But, if I don’t stop playing with this and get it to Ruth it will never get published!
Digital cameras love averages
A camera’s sensor pulls everything toward average, so it makes a bright scene more dull and a dark scene more light. The more dark the camera senses, the more light it tries to bring in, and vice versa. But on a sunny winter day, we don’t want it to turn all our lovely white snow to grey, and we don’t want it turning the closeup of our lush black felted hat to a murky grey either. Be aware of this and use the Brightness or Exposure setting in your editing app to make your whites bright (but not too bright!) and your darks proper dark.
There are three basic edits that will significantly improve most photos. In Snapseed, all three of them are under “Tools” (at the bottom) then “Tune Image” at the top left.
Swipe down to find Brightness (I often lift the brightness a bit since I am usually inside where the light is dimmer), Contrast (a touch more contrast is often pleasant), and Ambiance. I love the Ambiance slider. I’m not entirely sure what the special sauce is, but it’s mostly mid-tone contrast, and it makes colours pop. Just a little swipe to the right is often enough to give you a lovely bit of extra magic.
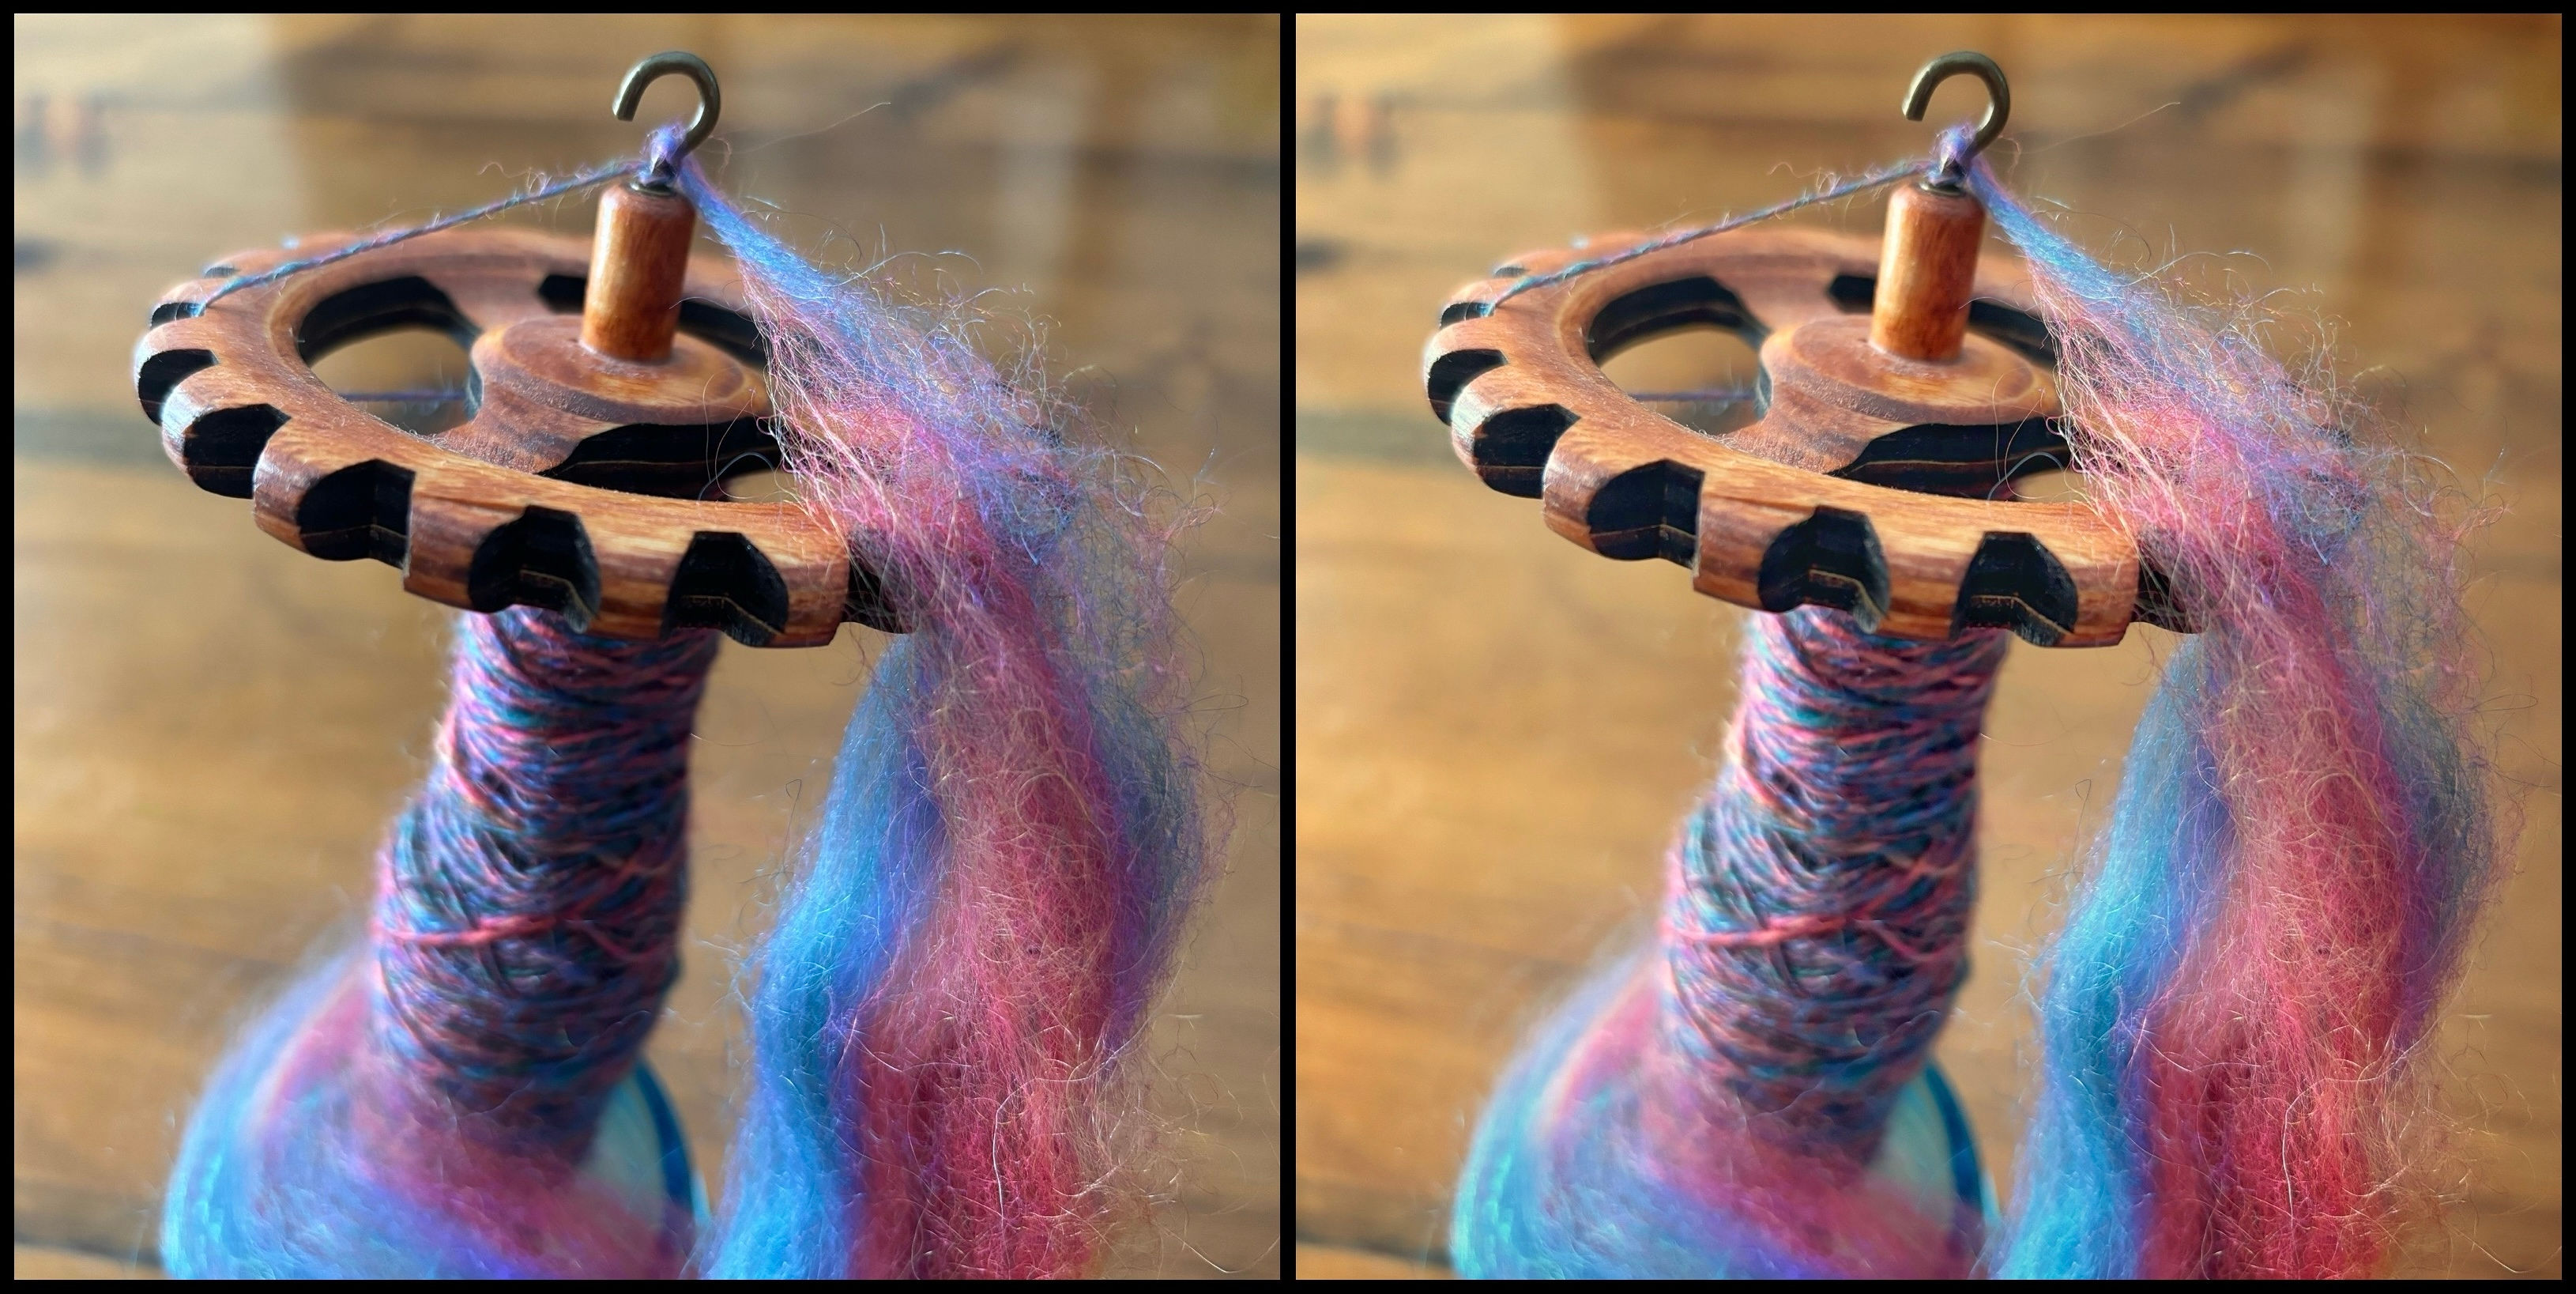
Here’s one of the photos from the series above straight out of the camera (left) and edited (right). I tweaked Shadows (less) , Ambiance (more), Contrast (more) and white balance (warmer). We’ll talk more about white balance in a later post.
So that’s my introduction to making the most of smartphone photography. First, think about the story you want to tell. Next, compose your image thoughtfully, and pay equal attention to what you include and what you exclude. And finally, give it a little polish with a photo editing app. But not too much!
Next time we’ll talk about the number one most important thing that can make or break your photos.


