Browsed by
Author: ruthlane

When I discovered felting in 2007, I finally found the creative outlet for which I had been searching. I love that the versatility of fiber allows me to “play” with a wide variety of materials including wool, silk, fabrics, yarns and threads. Creating one of a kind fiber art pieces to share with the world fulfills my creative passion.
Birch Landscapes Completed

Birch Landscapes Completed

When I last posted, I was working on two birch landscapes. I had finished stitching the branches on one and was working out what I wanted to do about leaves.

Blue and green felted background with silk paper birch trees and free motion machine stitched branches.

I stitched the branches on the second landscape with free motion machine stitching.

Two landscapes side by side before leaves are added.

These work very well as a pair. I didn’t do anything to emphasize the “lake” or “water” effect of the background. I thought each person could interpret the landscape as they see it.


Now for the leaves. The photo on the left shows the sheer green fabric I had in my stash. It’s a combination of polyester organza and silk organza that has been hand dyed. I ended up using the more yellow green silk organza choices.

Felted blue and green background with silk paper birch trees and cut leaves place on branches.

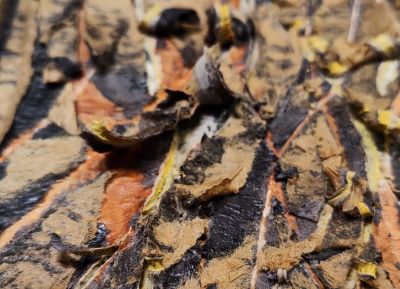
I cut a bunch of leaf shapes. I don’t use a pattern but just cut them out randomly. I have found that they need to be different shapes to look natural so I just start cutting shapes that are vaguely leaf like. In the photos above, I have laid the leaves on top, again very randomly, to see if I have enough coverage. I ended up adding a few more after I started stitching to fill in where needed.

Felted blue and green landscape backgrounds with silk paper birch trees and cut leaves stitched in place.

Here are the landscapes after stitching down the leaves. Now, I am going to work on stitching them to a background fabric and lacing on to boards, so they are ready for framing. What should I name the pieces? Any ideas?

New Landscapes

New Landscapes

I started a couple of small landscapes this past week using pieces of nuno felt for the backgrounds but using the wool side instead of the silk side. I thought the “backs” were more reminiscent of forest than the silk side.

I already had some of the “birch” silk paper that I made several years ago so I used it for making trunks. Here’s my inital layouts for the two pieces. They are both about 5″ x 11″.

I then stitched the trunks down with 30 weight cotton machine thread in a very light grey. You might have noticed that I added a few more tree trunks to the right photo as it seemed a bit bare.

Blue and green felt background with silk paper birch trees stitched to felt and machine stitched branches with dark grey thread.

Then off to the machine to stitch the branches with free motion machine stitching. I only got one of the pieces machine stitched as I got tired with machine stitching. I am out of practice, I guess. Now what to do for the leaves? I could hand stitch, or use some type of applique.

It could be like ‘Thick with Green’ where I used cheesecloth for leaves.

Or perhaps more like ‘The First Leaf’ with green leaves instead of yellow. Or I could hand stitch the leaves? What do you think?

Thanks Carlene for providing me inspiration to create more birch trees!

More Altered Tree Book Pages

More Altered Tree Book Pages

My altered tree book is moving along slowly. I made a few more pages and used some of my scraps from the word printing experiment.

Book pages spread on the work table after being gessoed.

I try to keep some page spreads that already have gesso on them so that I can sit down anytime to create a few collaged spreads. The one on the middle left is gessoed with clear gesso that Paula uses. I just have the white gesso so most of my pages will be covered first with that.

Book pages spread on work table after walnut ink applied.

I then added some walnut ink to tone down the whiteness of the page. I decided to add walnut ink to the edges of one of my miniature paintings too. It definitely helps to tone down the white edges for this project.

Book page spread collaged with various elements.

Then I have a bag full of scraps and papers in my chosen colorway. It’s fun putting the mark making and other papers together.

Book page spread collaged with various elements.

The eco printed leaf is one that Paula did and gave to me.

Book page spread collaged with various elements.

I was much happier with the miniature landscape once the edge was no longer white. The words are a poem about trees.

Book page spread collaged with various elements.

The old “papers” are such a great addition to the book.

Book page spread collaged with various elements.

I found this “tree” on the right that I had made but not used in a different collage. It’s made from printed black paper. I finally used my original color inspiration in this spread.

Book page spread collaged with various elements.

Here’s another one with the screen printed inspiration paper and some mark making from the word experiments.

I have to figure out how I am going to make my signatures. For those of you who don’t make books, a signature is a group of papers that are stitched into the binding in one “piece”. I don’t think I will have all the pages filled. I will leave a bunch of blank pages so that I can draw or write or make marks in the book later. I am also planning on adding some fabric pages into the book. Then those can be stitched when inspiration strikes.

Printing Words with Acrylic Paint on to Fabric

Printing Words with Acrylic Paint on to Fabric

My art group tried another technique with paper, acrylic paint and fabric. It’s mainly used to make fabric or paper that is then cut up and used in collage.

Louise, Paula and Sally working on word printing on paper and fabric around a wooden table.

It’s a simple process. You apply a “writing tip” to the paint bottle, write some words on paper and then press the paper with the acrylic writing on to fabric. You  then have printed words on fabric but the words are backwards on your fabric. I like this better since it makes the words hard to read. You can still see that it is words but it isn’t “a cute saying” easily read.

Here you can see Sally has written words in white acrylic paint on the brown paper and then she is pressing her fabric down on to the paper to transfer the words.

I wrote on book pages (which I will use later as backgrounds or tear up for collage) and then printing on to fabric. I used lines from the poem “Think Like a Tree” by Karen Shragg. You can see that the words aren’t really legible but it still conveys writing.

Louise writing with black acrylic paint on to book page.

Louise is writing with black acrylic paint on to a book page.

Paula's collaged page of printed words.

Paula was working only on paper this time. She collaged her pieces of torn, printed paper together on to book pages.

Here are a couple of pieces of fabric that Sally printed. The purple circles in the right photo are from eco printing with purple carrots. Sally then printed the words on top of that. It gives a graffiti look, doesn’t it?

Here are the two pieces that I created. These were done on pre-painted canvas (a light wash of grey) which had then been stained with tea in places.  Then I printed the tree poem on top of that. I will use these as some book pages in my altered book I have been working on.  If you’re looking for a fun and easy project, this technique definitely qualifies. You can write whatever you like and get those thoughts out of your brain, but it won’t be legible enough for someone else to read your innermost thoughts.

Registration Open for Felt Hats and Felt Bags Online Classes

Registration Open for Felt Hats and Felt Bags Online Classes

Teri’s online classes are open for registration today. The classes will begin on July 17. Teri teaches two great classes, one on how to felt concertina style hats and the other one on how to create felt bags. Both of these classes will teach you methods of improving your felting techniques so if you have felted around a resist before such as to make a felt pod, you should consider taking the next step on your felting journey.

For more information and to register for the felt hat class, click here. 

Have you taken a look at other student’s hats that have taken Teri’s class? There are some really fun hats and the variations are quite creative. Take a look at the student hat gallery here.

Teri’s felt bag class is an excellent way to learn how to create a variety of shapes of bags, as well as features such as straps, multiple compartments and pockets. You can find more information and register here.

And the student gallery for felted bags is here.

So what are you waiting for? Jump in and learn some new felting techniques.

Or if you’re just starting out and want to learn the basics, try our Wet Felting for Beginners class. This class can be taken at any time with unlimited access. For more information and registration, click here. 

Miniature Wool Landscapes

Miniature Wool Landscapes

A few posts ago, I showed you some painted miniature landscapes. Why not try the same idea in felt? So off to my stash to figure out what I had to create these.

Supplies for wool paintings laid out on work bench including various colors of wool roving, locks and colored prefelts.

I found a variety of green wool as well as white, grey and blue for the skies. I also had some locks in black and dark grey and thought they might work well for tree trunks. I had a few sheets of various colors of commercial prefelt to use as a base.

5" x 7" colored prefelts for wool paintings laid out on work bench.

I cut the prefelt into 5″ x 7″ pieces. I thought any smaller might really get difficult getting the wool to cooperate.

Beginning layout of wool on pink prefelt for mini landscape.

I decided to try one first before I made all of the landscapes. I used the pink prefelt and laid out a variety of greens for the foreground and white with a tiny bit of blue and grey for the sky.

Final layout of wool on pink prefelt for mini landscape.

I then laid out the trees with a very small bit of locks for the trunk and a bit of green for the leaves. Now on to wet felting it.

Mini wool painting of landscape after wet felting.

I wasn’t particularly happy with the locks after felting. They went right through the merino and I wasn’t careful enough, as they moved about. Now I had really hairy dark spots that looked nothing like tree trunks. But I was happy with the rest of the landscape. These shrank down to about 4″ x 6″. I probably could have shrunk them down further but since it’s a “painting” and not functional, I decided 4″ x 6″ was a good size. They will fit into 5″ x 7″ frames easily.

Mini wool painting after shaving off excess "hairy" fibers.

Since I wasn’t happy with the hairiness, I decided to shave the piece. I think it looks a bit better now. So on to the other six landscapes.

Final layout of wool on various prefelts for other six mini landscapes.

I laid out the other prefelts and added wool to create more landscapes. Then wet felting them all at the same time. The entire process took me about four hours.

Here they are completed. I like seeing them at thumbnail size as it doesn’t bring out any small details. But I will show you them in a bigger format for those of you who would like to see the details.

Wool mini landscape on red prefelt after wet felting.

Wool mini landscape on yellow prefelt after wet felting.

Wool mini landscape on red prefelt after wet felting.

Wool mini landscape on green prefelt after wet felting.

Wool mini landscape on yellow prefelt after wet felting.

Wool mini landscape on white prefelt after wet felting.

The plan is to get some frames for these and take them to the gallery. My bigger pieces haven’t been selling very well lately so I thought a smaller size option might be an easier purchase for people.

Altered Tree Book Page Spreads

Altered Tree Book Page Spreads

I have been slowly working on my tree book and got a few more pages completed. You can read about the beginnings if you missed it here and here.

Three page spreads from altered book about trees.

I start with pages from the old tree book that have been gessoed and then painted or dyed. I used walnut ink on most of the pages but I decided I would try the tumeric ink we made a couple of years ago. That was so bright yellow, I added a layer of walnut ink and it is still candescent. I will have to cover up most of the yellow so I don’t overwhelm the book with so much yellow. I have a pile of painted papers and some of the mark making we have been doing over the last 3-4 months.

Three page spreads from altered book about trees.

Then I move bits around until I am happy with the outcome. You can see that I tried adding my little landscapes that I painted recently but I didn’t end up using them. They didn’t feel right to me, most likely because of the very white borders.

Page spread try outs for altered book about trees.

Here’s one of the pages before I glued things down. The yellow and black paper are shreds left over from our paper layering experiments.

Completed page spread for altered book about trees.

Here’s a finished page spread. You can see the same paper layering end product on the right. This is the candescent yellow background page. It has been toned down by layering tissue paper over it.

Completed page spread for altered book about trees.

Here’s one that I used one of Paula’s eco prints on the right. It was perfect for my color scheme. The left reminds me of a feather but it is torn paper that accidentally turned out that shape.

Completed page spread for altered book about trees.

Here’s another layered paper one with some other off cuts and mark making.

Completed page spread for altered book about trees.

And here’s the layout I showed you above once it was glued. I like how the tissue paper allows you to see through to the original book page. I am enjoying the imprecise nature of this book and playing with mark making, color and shapes.

Painting Miniature Landscapes

Painting Miniature Landscapes

Our art group had another meeting and this time we painted miniature landscapes. These were so fun. They are quite small, only 1.5″ x 2.75″ in the painted part and the paper is cut to an inch bigger than that vertically and horizontally. These were painted with a limited palette of mainly greens, little bit of blue, browns, white and if you wanted, an accent color. Because they are so small, they don’t take much time and you can work on multiple paintings at one time.

Louise and Paula beginning their mini paintings sitting at wooden table with art supplies.

Here are Louise and Paula at the start. I didn’t get a lot of process photos because I got too busy and forgot.

Clear plastic board with taped pieces of watercolor paper in preparation for painting mini landscapes.

Here are my first two pieces of watercolor paper taped down to a plastic board. The tape is right up to the edge of the paper so that a border of white is left after removing the tape. We used acrylic paints, small brushes and palette knives to paint with.

Paula working on her mini paintings sitting at wooden table with art supplies.

Paula was painting three at a time and has the most experience in painting these. It’s just a few swipes of green for the foreground and then painting in the sky with scrumbled blue and off white (or you can use other colors as you like). You are supposed to deliberately be “vague” with your mark making to give a resemblance to trees and other landscape such as bushes or mountains. Because the piece is so small, it is difficult to get too precise anyways.

Here are Louise’s three. She used a bit larger piece of paper on two of them. It’s amazing to pull off the tape and the painting looks better.

Here are Sally’s landscapes. The one in the middle is framed by a white matte.

Here’s six that Paula painted. She is very good at the abstract methods of painting these.

One of Ruth's framed paintings with US penny for size context.

Here is one of mine. I put the US penny in to let you see the scale, very small!

Here are the other three that I painted. I enjoyed making these. Because they are small, I didn’t feel like I was “wasting” a canvas or watercolor paper like I sometimes do when creating/painting at a larger scale. This small, thumbnail size might be fun with wool too.

Travelogue – Boise, Idaho

Travelogue – Boise, Idaho

I am running late with my post today. We have been traveling and then got busy right away with class homework when I got home. I forgot my post! I hope you don’t mind but I will show you a few photos of our recent trip to Boise, Idaho to visit friends. Hopefully, you will be inspired by some of the landscapes and bird photos.

Landscape around Boise, Idaho off road up to Bogus Basin.


We took a hike on the road up to Bogus Basin (we were going to view the ski hill but the road was closed) and you can see that the area is high desert. Very different than the landscape I am used to in northwest Montana.

Landscape around Boise, Idaho off road up to Bogus Basin, close up view of rock formation.

These rock formations were interesting. You can almost see a sleeping beast if you look closely.

Landscape around Boise, Idaho off road up to Bogus Basin, close up view of rock formation and lichen.

The close up textures were fun too.

Lupine flowers blooming near Boise, Idaho.

Even some lupine blooming which is ahead of the blooms at home. “My” lupine aren’t blooming yet.

Walking along the Green Belt, Boise, ID

We also walked along the Green Belt in Boise. It’s a wonderful path along the Boise River that was much greener than our previous walk. Plus there are various places to stop and have a drink or some food.

Janine getting her wing span measured at The Peregrine Fund's World Center of Birds of Prey

Then we went to The Peregrine Fund’s World Center for Birds of Prey. This is Janine getting her wingspan measured.

Harpy Eagle at The Peregrine Fund's World Center of Birds of Prey

The center makes homes for birds that are injured and can’t return to the wild. I hope I get the right names for the right birds, please excuse me if I make any errors. This is a Harpy Eagle. He looks like a Dr. Seuss character to me.

Phoenix, red tailed hawk, at The Peregrine Fund's World Center of Birds of Prey

The center has a great educational program to teach you about the habits of different birds of prey. They also have a program to breed condors which are endangered. They have so far brought the population in the wild of the California condor from 22 to more than 3,000. You couldn’t see the condors up close as they don’t want the birds to be habituated to humans. This red tailed hawk is Phoenix. The person holding him is a volunteer. This seems like a great volunteer job!

Lanner falcon at The Peregrine Fund's World Center of Birds of Prey

This is a Lanner falcon.

This was my favorite. A barn owl whose name I have forgotten. The program was great because the owl flew over your head in a closed room from perch to perch.

We had a great visit to Boise, Idaho (thanks Howie and Janine) and I hope you enjoyed a few of my photos.

Paper Layering Experiment

Paper Layering Experiment

My local group had another “play” day and we created some layered paper experiments. We got the idea from this video.  I immediately thought it would give a good texture for representing bark and we decided to give it a try.

Layers of different colors of paper and string glued together with matte medium.

It’s a really easy process. Start with a background paper and then add layers of string and thin paper with matte medium glueing them together. By using different values and colors of paper, you can get an interesting look. We used painted tissue paper that we already had in our stash.

You can put as many layers as you would like but remember to leave the strings coming out the edges so that you can pull them once everything is dry. You also need to try and figure out what strings are the top layers and pull each layer of your strings as you work down. Use different thicknesses of string and thread and it gives different looks once the strings are pulled out.

Layers of different colors of paper and string glued together with matte medium.

Here’s one of mine when it was finished and drying.

Layers of different colors of paper and string glued together with matte medium.

And here are both of mine once dried completely. It took about 24 hours to dry completely.

Layers of different colors of paper and string glued together with matte medium.

Then you gently tear the strings out or rip them out. It helps to hold the paper around the string as you go so you don’t pull off too much paper. But you can’t really control what tears so it is very organic looking when you’re finished.

Layered torn paper complete

Here’s one of the results that Louise achieved.

Paula was very productive and took her photos with a matte around the pieces.

Here are my two pieces. I left the curly bits and they are quite textured.

Layered torn paper complete

You can see how textured with this close up angled photo. This was a fun process and gave interesting results. Now I have a few more pieces to add to my book.