Although we’ve got baking temperatures and scorched grass outside, indoors I’m amassing quite a collection of Autumn leaves made from Lutradur! I’ve decided its time to start thinking about what I’m going to do with these leaves and incorporating some of them into new pieces of work.
This particular leaf has been painted with Dylan bronze fabric paint to give it a metallic look.
The leaf, top right, before painting.Bronze painted Lutradur leaf
I decided to incorporate it in a very simple choker type necklace. The leaf is quite intricate so anything fussy would distract from the detail.
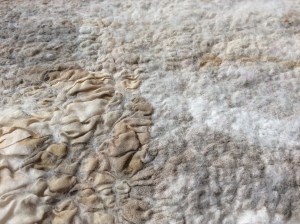
I began by cutting out a 4cm wide crescent shape from a piece of white superfine Merino prefelt 20cm x 29cm.
This was overlaid with Oyster Merino on the left and Antique on the right.
I made the felt quite thick and really worked it hard to shrink it and firm it up which resulted in a very textural effect and a subtle change from one colour to the other. The leaf was sewn in place using a bronze coloured linen thread. There is a chain fastener across the back but for now you will have to take my word for that…….I didn’t think to photograph it and I’m writing this post sitting in my B&B in Scotland while the Necklace is back home! I will take a picture and add the image when I get back.
In my last post I showed some of the brooches I’ve been making out of Tyvek. This month I thought I would continue with the “man made” fabric theme and show you how I make my Lutradur leaves.
Lutradur is another exciting non woven product which was originally designed for industrial applications including construction substrates, landscaping materials, residential and commercial wallpaper, carpet backings, automotive floor mats and carpeting, and specialized filtration devices. It is an incredibly versatile material which is available in various weights including 25gsm, 30gsm, 70gsm, 100gsm and 130gsm. It does not fray, some weights are translucent, it can be painted with any paint medium, dyed, distressed with a soldering iron or heat gun, glued, stitched, layered and embroidered. In fact, think of an application and you can probably use it!
Lutradur is available in packs of A4 size sheets or by the metre from various suppliers including Spunart in the UK.
My first attempt at using Lutradur was a couple of years ago when I made this leaf using 100gsm…..
I drew the shape directly onto the fabric, free motion stitched over the lines and then painted it with Inktense before cutting out the shape.
You can see how the colour altered once the Lutradur had been zapped with the heat tool. I was pleased with the result but there was something not quite right which I couldn’t put my finger on…..until recently.
Its staring me in the face looking back at these photos, I shouldn’t have sewn around the edge of the leaf! This is that same leaf after a little pruning of those edges and another blast of heat to curl the tips, it looks so much more realistic…..
The underside of the leaf
These are some of my more recent Lutradur leaf creations made from 100gsm…..
Lutradur provides a very stable surface for stitching into.
Each one is drawn first using a Frixion pen. Next I use a heat resistant thread i.e. Rayon, Viscose or 100% cotton to add free motion stitching along the veins.
The fallen leaf which inspired the design.Shaping with the soldering iron.
Once the stitching has been done the leaf is cut out using a fine tip soldering iron. I wanted to retain most of the fabric on these particular leaves so I also used the soldering iron, rather than the heat tool, to target specific areas to cut holes.
The finished leaves painted with Inktense.
I wanted a more lacey look for this next leaf so after stitching and cutting out with the soldering iron this one was distressed using the heat gun. I left it unpainted to suggest a frosty leaf in winter…..
The following photos show a selection of leaves made by students at my recent “forest floor” themed workshop…..
These leaves are fun to make but be warned, as with so many creative projects they can become very addictive once you get started!
Later this month I will exhibiting at an arts and crafts event at the Baumber Walled Gardens near Horncastle so I’ve been making various small items, including these Tyvek Brooches, for the sales table. Since it’s invention by DuPont, Tyvek has found uses in a huge range of situations. The fact that it is much stronger than paper and many fabrics, as well as totally waterproof, has led to it being used as a replacement for these materials in many applications. It is widely used in the construction industry but you may be more familiar with seeing it used as packaging, FedEx envelopes are made from Tyvek paper. If you don’t have the envelopes you can buy packs of Tyvek quite cheaply from Amazon.
Tyvek paper is extremely strong and durable and great for creative crafts as it can be easily cut, coloured using any paint medium, heat distressed with an iron and stitched by machine or hand.
I made my first brooch using this material when I was looking for a contrasting texture to use with my wet felted collars.
To make a brooch I normally cut out a piece of painted Tyvek in an oval shape approximately 4” x 3” and lay it between two pieces of tracing paper. You can use baking parchment or copier paper but I find I get a clearer picture of what’s happening to the Tyvek when I use the tracing paper. Once it starts to react to the heat things happen very quickly!
With the iron on its hottest setting I hover over the Tyvek, just touching the paper but with absolutely no pressure on it. The heat causes the paper to shrink creating bubbles on the underside and ridges on the top side.
Bubble side
When the paper is peeled back you will find that it has stuck a little but it cools down quickly and can easily be peeled off.
Ridges are created on the top sideThe underside of the Tyvek bubbles to create a pebble effect
The next step is to cut out a piece of felt slightly smaller than the brooch and attach it to the back using a hot glue gun. This allows me to add the hand stitched knots
Another piece of felt is cut out and has a brooch back sewn onto it before being stuck in place, again using the glue gun.
I love the fact that each brooch is totally unique as this method of working means that non of the designs could ever be repeated. My only problem is letting them go as I love them all!
When I read this week that the second quarter challenge is to be Nuno Felting I thought I would share the first of the few Nuno projects I have done so far. I say “few” because although I trawl the charity shops for silk and chiffon scarves on a regular basis most of them still reside in the plastic box under my table! I’ve actually done very little with them so this next challenge should see some of these lovely fabrics being put to good use!
My introduction to Nuno Felting was in 2016 when I attended a workshop at Artvango with a lovely feltmaker called Clare Bullock. Rather than taking the easy route (silk, muslin etc) we had been encouraged to try a wide variety of fabrics, some of which were going to need a lot of coaxing to get the fibres to migrate through. Clare kept a watchful eye on us to ensure we weren’t taking any shortcuts which meant everyone’s samples were successful. By the end of the workshop I took home five pieces of work incorporating a variety of fabrics including fine cottons, viscose, silks, wool and polyester.
Fabrics prior to fullingFulling complete
It seemed a lot of work at the time but there was something magical about seeing the textures emerging as the wool shrinks and I just loved the texture from the green woollen shawl…pity I didn’t get a “before” picture of the green/blue fabrics.
I came across the orange and the green/blue samples again when I was having a tidy up last year and decided, rather than putting them back in the drawer, to add some very simple stitching and frame them as landscapes.
Since then I’ve made several Nuno scarves but not really taken the time to be experimental with Nuno……this next challenge should provide the inspiration I need to have a play!
With the latest quarterly challenge being Surface Design, and “mixed media” in particular, I thought I would share a couple of the things I’ve made recently that might fit into this category. The first is these wet felted Merino pendants with acrylic paper inclusions and hand embroidery.
Acrylic papers in assorted colours and textures
I came across a stack of the papers while having a sort out in my studio. They had been sitting in a drawer for several years, being saved “just in case” they might come in useful! They are in a range of beautiful colours and have wonderful textures but my mind was in “use it or lose it” mode…….there was no way they were being thrown out so the pendants came into being.
Wet Felted Merino Pendants
The second project was an experiment to see how acrylic and Inktense paints would work as a colouring medium for white Merino. I had seen an “elf” style hat and fancied having a go at making one so this became the base for my paint experiment.
Having seen on here that Ruth has a lot of success printing with acrylic on felt, and knowing that Acrylic and Inktense paints are both non toxic and colourfast when dry, (to be colourfast Inktense must be mixed with water, not used in dry form) they both seemed like a reasonable option for colouring a hat.
I started by applying Inktense to the dangly bits at the sides and all was looking good until I noticed I was loosing a lot of colour as the paint started to drip off the end of the wool and puddle on the worktop…..too much water in the mix! I blotted the dangles to remove a lot of the moisture and applied paint again but this time a lot more concentrated. It still ran a little but the wool retained more of the colour and it didn’t stiffen at all. I’m sure if I had applied that concentration of acrylic it would have been very stiff!
Next I tackled the main body of the hat. For this I used watered down acrylic, my logic being that the more water I used the less likely it would be to make the wool stiff. I wanted to avoid saturating the hat and having another puddle so I lightly brushed the acrylic over the wool, some of the fibres not being touched by the brush. Once the acrylic had dried I overpainted with Inktense and I really liked the mottled effect this combination created. Lastly I used thick acrylic around the base of the “tail” as I figured this is the one area that would benefit from being stiffened. After leaving it to dry for a couple of days I hand washed the hat to check it was colour fast and was relieved to find that non of the colour washed out.
Acrylic and Inktense paints used to colour white Merino
To finish off I added a stem with leaves (coloured Merino – not painted) and some colonial knots at the base of the tail. I’m really pleased with the result so will definitely be applying paint to fibre again at some point. Have you tried painting your felt?


 I made the felt quite thick and really worked it hard to shrink it and firm it up which resulted in a very textural effect and a subtle change from one colour to the other. The leaf was sewn in place using a bronze coloured linen thread. There is a chain fastener across the back but for now you will have to take my word for that…….I didn’t think to photograph it and I’m writing this post sitting in my B&B in Scotland while the Necklace is back home! I will take a picture and add the image when I get back.


 Since it’s invention by DuPont, Tyvek has found uses in a huge range of situations. The fact that it is much stronger than paper and many fabrics, as well as totally waterproof, has led to it being used as a replacement for these materials in many applications. It is widely used in the construction industry but you may be more familiar with seeing it used as packaging, FedEx envelopes are made from Tyvek paper. If you don’t have the envelopes you can buy packs of Tyvek quite cheaply from Amazon.