
Paper Layering Experiment
My local group had another “play” day and we created some layered paper experiments. We got the idea from this video. I immediately thought it would give a good texture for representing bark and we decided to give it a try.

It’s a really easy process. Start with a background paper and then add layers of string and thin paper with matte medium glueing them together. By using different values and colors of paper, you can get an interesting look. We used painted tissue paper that we already had in our stash.


You can put as many layers as you would like but remember to leave the strings coming out the edges so that you can pull them once everything is dry. You also need to try and figure out what strings are the top layers and pull each layer of your strings as you work down. Use different thicknesses of string and thread and it gives different looks once the strings are pulled out.

Here’s one of mine when it was finished and drying.

And here are both of mine once dried completely. It took about 24 hours to dry completely.

Then you gently tear the strings out or rip them out. It helps to hold the paper around the string as you go so you don’t pull off too much paper. But you can’t really control what tears so it is very organic looking when you’re finished.

Here’s one of the results that Louise achieved.


Paula was very productive and took her photos with a matte around the pieces.


Here are my two pieces. I left the curly bits and they are quite textured.
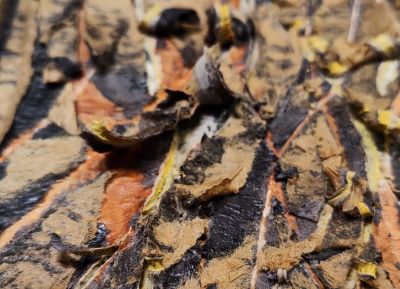
You can see how textured with this close up angled photo. This was a fun process and gave interesting results. Now I have a few more pieces to add to my book.
14 thoughts on “Paper Layering Experiment”
An interesting technique I’ve not seen done before and totally up your street Ruth from a tree bark texture point of view.
You used gel matte medium, but I’m thinking it would work with pva too. Oooh and if you don’t paint every bit of the surface evenly then when you pull out the strings, more of the unglued areas will come off….mmmm. NO – I must NOT go down another rabbit hole! And what would happen if it was slightly damp, not totally bone dry when pulling the strings🧐….NO….NO….NO 🤪
Love the piece you enlarged (totally you) and Paula’s are amazing.
Wouldn’t PVA look glossy in the end?
(Now that I put the question in your head, you’ll just have to go ahead and try… :p )
PVA shouldn’t be glossy if used this way. It usually only does that if it is against a very smooth surface, like polythene, and then only on the side that was against the polythene, so I definitely think it would work.
Ann
Thanks Antje, it was a fun process and could be explored much further. I think that you can use any type of glue that you want. I don’t have any PVA so I haven’t tried that. I’m sure some glues would be more shiney than others. And you have figured out that there are many variations to how this would work so yes, it could be a deep rabbit hole. I was thinking it could look like lichen if done correctly 😉
Loving the bark-like texture of all the pieces! I can see why Antje said it would be right up your street 🙂
Thanks Leonor, the texture was my favorite part. I am always drawn in by highly textured pieces.
I love this idea. Do you think it would hold stitches? Might I be able to wet felt it?
Time to play ❤️
Thanks Mariead, I hope you give it a try. It’s a fun technique, we would love to see your results either on the forum or on our community gallery page. I do think you would be able to stitch through it either by hand or machine. You would need to make it with minimal glue and very lightweight handmade papers to be able to felt it but it might work. Perhaps you could felt it in and then pull the strings?? Lots of avenues to explore…
Like your results Ruth, very bark like. Like Mairéad I was thinking about how it could be used in felting, but like Antje “I must not go down another rabbit hole. I must not go down another rabbit hole.” If I say it enough times I might convince myself. 😵💫🫣
Thanks Ann! I’m not sure how well it would felt as you will see in my answer to Mairead but it is a wonderful idea. Rabbit holes are my favorite place to be, I see no need to limit myself to only certain techniques. These ideas can be combined and lead to richer work for me.
Great video! The technique looks fun to do. Can see why you thought of bark!
Thanks, we loved the video too. Always something to inspire new ideas. The technique was easy and fun. And so many different ways to do it that it can look like many things depending on the direction you follow. Many of pieces remind me of peeling paint on old walls.
That looks like fun and bit nerve wracking when you pull the strings.
Thanks Ann, it was fun. You have to let go of controlling the outcome and just let ‘er rip! 😜