My next step in finishing the driftwood piece was to create lichen. I had made lichen before from Tyvek but alas, I had none in my stash. So I looked for other materials that could be shaped with a wood burning tool and that would shrink and make interesting shapes with a heat gun.
What I found was a fusible lightweight Pellon interfacing and nylon organza. The interfacing does not need to be fusible to work, it’s just what I had on hand. I can’t remember why I bought it but hopefully, it would work so I wouldn’t have to buy anything else.
I painted the small pieces of interfacing and organza with a light layer of acrylic paint. As you can see here, the paint was not heavy and the shade of blue green was very light in value.
Next, I got out my wood burning tool and a piece of glass to burn on. I made random lichen shapes in the interfacing. I also did the same with the nylon organza. Once they were cut out, I held the small pieces with a pair of tweezers and used the heat gun to make them shrink up and get curly. I also added a bit of brown marker to the edges of the lichen as there are definitely brown bits on the real stuff.
Here’s the result. Yay, it looks like I wanted it to. Success. Now to add it and the dead teabag leaves to the mossy driftwood. I glued the lichen in place as it was mainly on the wood itself. I stitched the leaves down to the felt in a couple of places.
Here’s the result. You can click on the photo to enlarge it.
And the close up views. I’m happy with how it turned out and it was a really fun project.
A wonderful 4-week holiday in Australia, Christmas markets and hosting lots of family visitors mean I’ve done very little news-worthy felt-making since my last Felting & Fiber Studio blog. ‘Production felting’ is my own term for making lots of similar things for shops and markets. I did a fair bit of this in November and December: mostly printed tea light holders, printed wool ‘pebbles’ and Christmas cards. These were my 2022 cards: handmade felt with hand-printing. I extracted the tree from a larger, royalty-free, public-domain image and added the heart before printing onto fine flat felt.
My 2022 handmade Christmas cards
I sold these through various outlets and sent a small number myself.
I’ve enjoyed making felt ‘pebbles’ for some years. Since learning to print on felt from Lindsey Tyson, I’ve been able to adapt photos of some of my Mum’s watercolour paintings to print onto the pebbles.
So, as I don’t have a lot of new stuff, I thought I’d contribute a few of my past makes and current thoughts as ideas for the first quarter and year-long challenges.
Alas, I left the base alone for a long time during a pandemic lockdown and it was attacked by moths. In a way, being eaten by moths was rather fitting: lifecycles in real life, but the moth holes meant I ended up cutting it up to make bookmarks (after some very hot washing). I did, however, recently sell the tree stump on its own and it now lives in Canada.
Pondering future projects for the tree challenge: I have a very tall, beautifully coloured ‘silver dollar’ eucalyptus tree in my garden.
The eucalyptus tree has potential for lot of other projects, including maybe using the leaves for eco printing onto felt. Eco printing is something I’d like to try, though whether I will get round to it remains to be seen. I don’t recommend any breath-holding for this.
Contemplating Caterina’s quarter-one challenge of making something practical that you can’t buy: one of my favourites is this case I made for my iPad mini. Nuno-felted with sections of recycled sheer silk scarf.
I know you can buy iPad cases but I like that this one is unique and fits perfectly without any fasteners. Because it’s an exact fit, the iPad stays put until you need it, then slides out easily. It’s getting rather battered now as I carry it around all the time so maybe it’s time to make a new one.
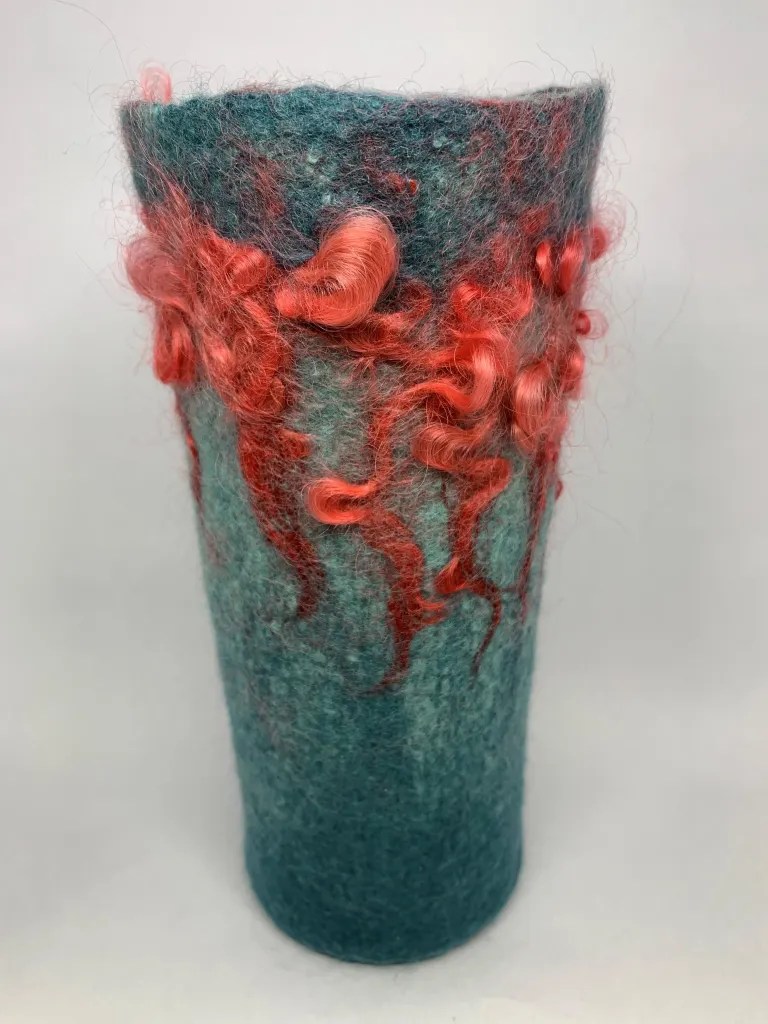
Felted vases and plant pots are also both unique and practical. Here are a few. I like that you can co-ordinate them to your décor, or to a specific plant or flower, or just go for colours and patterns you like.
And finally, here’s something that meets both last year’s challenge to complete some UFOs (un-finished objects) and this quarter’s challenge to make something that you can’t buy.
Here’s a pair of earrings that I started making a while ago using hand-dyed 14.5 micron Merino wool. I incorporated the earring post into the felt and some black sequin fabric inside using resists. These were inspired by the work of Aniko Boros and Judit Pocs.
The sequin section is more sparkly than in the photo
As you can see, I got quite a long way along, but while I finished fulling the one on the left, I stopped with the right-hand one in the pre-felt stage. I’m not completely sure why: probably it wasn’t quite what I had in mind. But it surely can’t take more than about an hour to finish that one, so I’m promising myself here that I will complete that second earring. The world will be minus one small UFO.
I hope I’ve given you a few ideas about different ways of taking on the challenges. How are people getting on with them? If you make something in response to these or any of our previous challenges, please do post your photos on the forum. We all love to see and be inspired by what other people are making.
November and December were incredibly busy but I am glad to say things have calmed down a lot in the last 3 weeks. The Christmas markets have closed and I have nearly finished writing the first draft of the much requested tutorial on how to make vessels with feet and lids. The lidded vessel pictured below is the main example I will demonstrate how to make in the new tutorial (with a few others for alternative methods to make lids etc):
I just need to write one more section, then edit and proof-read it. I hope to make it available in my Etsy shop in a couple of weeks.
Other than this purple vessel I have only managed to complete one piece of work between the markets, fairs and writing the new tutorial….
Back in September I was core spinning with the intention of using the yarn to experiment with adding twining to ceramic pots, you can read the post about that here.
This is the ceramic pot I made, after drilling out the holes I unintentionally filled with glaze. Drilling the holes has made the edges a little untidy but at least I can now get my yarn through them 🙂
I used paper yarn for the warp by threading equal sized lengths through each hole. I really like working with this material for the warp, it is stiffer than wool yarns and you can open it out to decorative effect.
Once all of the holes contained a strip of paper yarn, I cut 2 metres (6 feet) of a pretty boucle yarn to use as my weft. I folded it in half with one side longer than the other, this is so that when the yarn runs out while you are twining it only runs out on one side making it easier to add a new length of yarn.
Before looping the yarn over the first warp strip, I twisted the bottom of each pair of paper yarns to help hold them in position for the first few laps with the weft yarn. For the next pot I will try tying a knot in each pair of warp strips to secure them as the twist tended to come undone while I was twining, I really needed an extra pair of hands to hold everything in place while laying down the first layer of yarn.
Floki was only too happy to “assist”….
“What do you mean, that’s not really helping?”
“Your tension is way off, let me help…”
Even with Floki’s assistance the boucle yarn proved to be too fine for the space between the holes in the pot. I could have used 3 or 4 threads to bulk it up but it had proved so fiddly trying to hold the warp strips in place while twining the first layer I couldn’t face the prospect of trying to do that with 8 strands in the weft so I had a rummage in my stash and found some chunky grey yarn to use instead.
At this point I introduced some of my hand spun yarns, starting with the grey core-spun yarn from September (they are the grey bulges you can see at the top of the woven section) and then a yarn with colourful pink and blue beehives.
Happy with the height and shape of the weaving, I tied each pair of warp strips to secure the top of the weaving and opened up the paper yarn before trimming the ends.
The surface design on felt series of online courses are open for registration. The registration for the 4 modules of Embellishing Felt with Surface Design Techniques – A Mixed Media Approach opens today, January 5 for a class start date of January, 20 2023. Click on any of the links about the courses to learn more. The courses are four weeks of PDF and video information and two extra weeks of instructor support for only $45.00 US for each module. You don’t have to be present at any certain time during the course.
The second module is Experimental Screen Printing on Felt. Screen printing is loads of fun and you can obtain a huge variety of results with the techniques you will learn in this class.
Or you might want to try the third module which is Printing, Stenciling and Playing with Thickened Dye on Felt. You will learn how to make stencils and stamps as well as the use of thickened dye to decorate the surface of your felt and make your own unique designs.
The fourth module is Free Motion Machine Stitching on Felt. Have you always wanted to add machine stitching to your felt but didn’t know how? This course takes you through the basics of machine stitching on felt and works through to more complex techniques of using your sewing machine to embellish felt.
Want to start off 2023 learning something new? Then please click on the links above for further information about the classes and scroll down to the bottom of the page to register. You will also find the supply lists of what you will need for each class on the linked pages.
Our Wet Felting for Beginners online class is available any time. You will have unlimited access with this class. So if you’d like to know more about the basics of felting including laying out the wool, embellishments, shrinkage and a variety of felting methods this is the class for you. You can sign up any time at the link above.
I like slow stitching. Just stitching for fun and to relax. No big purpose or major projects. Just do it as you feel like it. This suits me as I am not a great stitcher and I can pick it up and put it down without any guilt. I belong to a group on Facebook and some people are amazing artists and some just do random stitching on a piece of cloth and everything in between.
I decided I wanted t make some snowflakes and at least one tree. I had seen an interesting one in my Pinterest suggestions. To this end, I took the ripped-up sheet out of the donations box. You know what they say if you want to know what you intended for something just give it away and next week you will know what you needed it for. I was lucky that we are very slow with these things and they hadn’t made it to their destination. I am still not sure what the original idea was for these wide strips of sheet.
One piece was a little grubby looking so I chose it for the proof of concept (practice) piece. I have a nice small free-standing embroidery hoop I got at a garage sale (I think). It means it’s hands-free and can sit beside my chair and the hoop doesn’t go missing.
Snowflakes. I drew 3 stars onto the cloth to use as patterns. I used some thick gold polyester thread from Gutermann.
That was easy enough so I moved on to some clean fabric
I drew the stars a little bigger and I did gold again
Then I moved on to what would be the problem thread. It is something I picked up because it was shiny but it has no markings it is just on a plane cardboard tube. It’s a copper/bronze kind of colour and it is terrible to work with. it seems to be a wrapped thread and it kept breaking. There are a lot more knots in the back of this one. and there was a lot more cursing with the rethreading of the needle. I would have liked to add more to this but I was done with the thread.
Next was some nice silvery embroidery thread. DMC rayon S712. I used 3 strands. It was very nice to use.
And here they are together
I switched back to the practice cloth to work on the tree. this is the trunk( obviously) I tried to do varying lengths of stitches to help it look more like bark. It is very hard to deliberately make random stitch lengths.
This is what the back looks like where the backstitching is. I think I like it better for bark. The problem is I am having a hard time wrapping my head around doing backstitch upside down. It probably has another name with you do it that way.
Next is the evergreen bows. I will see how that goes. As I said it’s slow stitching.
Our best wishes to you all for a happy, creative new year! And what better way to kick-start your creativity in 2023 than taking a challenge or two 🙂
The first challenge for this quarter is from a post by Caterina on the Felting and Fiber Forum after she had made some arm-warmers.
Quote: “Couldn’t we have a Quarter Challenge on felt things that are purpose made to address a need that we can’t find a way to address with store-bought stuff?
For instance, another thing that I would like to make is a sight-glasses holder with a belt, so that I can always have my other pair of glasses with me, but not dangling from my neck as I would have them with a store-bought glasses-holder, because I am forever banging them on some counter or getting them in a heated pan or dunking in the sink while I wash dishes with the normal necklace – type of holder. I keep saying that I need to make me one that will suit my life, but I have not gone round to it yet!” Unquote.
So could you make something, that you can’t buy in a shop, to make your life easier?
The second challenge is Jan’s idea and it will be carried through all four quarters of this year.
For this quarter’s challenge, find a tree that you like and depict it as it awakens in spring with buds/new leaves/blossom – it can be realistic or representational.
We would all like to see photos of challenge pieces and if you are unable to upload photos directly onto The Felting and Fiber Forum ‘studio challenges’ thread, then please use the link below.