The Other Ann had posted about a challenge in a magazine she gets. Inspiration Magazine. https://www.inspirationsstudios.com/product/inspirations-issue-116/ it’s a needlework magazine. It looks really cool. So, I thought it might be an idea to ask people what magazines they read for knowledge and inspiration. Everyone seems to really love the Christmas beetle brooch. So I thought I would edit in the price for the kit, $129.00. I am assuming that is Australian dollars.
I look through Ply https://plymagazine.com/ and Spin-Off https://spinoffmagazine.com/ magazines at the Weavers’ and Spinners’ Guild too. They don’t do felting but I spin and there are lots of colour inspirations.
I would love to see Felt Matters but can’t bring myself to pay $65 for a digital and $81 for a printed ( 4 per year) magazine.
I like to leaf through unrelated magazines too when I see them. art quilt magazines are inspiring. They are good at showing you how to break down and simplify a picture. Nature magazines of course are great for inspiration. I have an old National Geographic magazine that talks about wool. It’s packed away but I found a picture
So tell us which magazines do you read to learn, and/or get inspired.
I have had this idea on my to do list for a while so I was glad to give it a try. I have seen several different ideas of felting on a stick or piece of driftwood and wanted to give it a try. Then I am planning on adding further embroidery to give the “moss” more details.
I have a bunch of driftwood from my friend Deb so this is another way to use it. I pulled a bunch of different green wool from my stash and mixed it by hand. I suppose since this is all made from my stash, this qualifies for the 4th quarter challenge too!
I then used my hand carders to card the colors together but I didn’t want it to be a solid green. I just did a rough card to mix the greens slightly.
Then on to wrapping the wool around the end of the stick. I wrapped it diagonally with one layer, tacked it down with a bit of quick needle felting and then wrapped another layer in the opposite diagonal direction. I then began squeezing and rolling the stick around on a ridged surface before I wet it down getting some air out of the wool. I think if I had wet the stick first, that might have helped with wrapping the wool a bit tighter around the stick. I’ll try to keep that in my brain if I do this again.
Then I wet felted the wool by rubbing and then rolling the stick wrapped in a towel. I also did a bit of “bashing” the stick but had to be careful not to break off any of the wood bits. This is how it looks now. I am planning on adding a variety of hand stitching to give more texture. I also might cut back the felt in some areas to allow the wood to show through. I haven’t tried stitching on this type of surface so it might be a bit of challenge. But I’ll just give it a go and see how it turns out. Do you have any suggestions for particular stitches or how best to handle the stitching? I’d love to hear your thoughts.
I taught a new wet-felted bowl workshop recently so I decided I’d share my thoughts and ideas about developing and running that workshop in this blog.
I’ve taught a few different wet felting workshops over the years. I really prefer people to start with making good quality flat felt before moving on to other things, but sometimes I bow to the pressure to do something else. I try to remind myself that I’m not the felt police and neither can nor should be in charge of how other people choose to learn. (But, of course, there’s still a little bit of me that would like to be the felt police. If the vacancy comes up I will almost certainly apply!)
This time I decided to go even more 3D and do a basic bowl, working around a flat circular resist. I wanted the workshop to be suitable both for complete beginners and those with some felting experience who were interested in trying out a 3D make.
I dug about in the studio and in my photos to see if I could find some old bowl examples and came up with a few.
Bowls I’ve made in the past
I then walked my way through making a new sample bowl with a workshop hat on. By ‘workshop hat’ I mean focusing on what I think are the simplest techniques for inexperienced felt makers to achieve the best and most reliable results.
I decided on my layout: starting with a fanned-out layer from the centre then a second layer following the circumference of the circle. I intended the circular layer to overlap the edge as little as possible to reduce bulk in the middle, with the main overlap to connect the two sides on the ‘fanned’ layer.
I immediately realised I should have done the layers the other way around. It’s much easier to follow closely the edge of the circle if you can actually see it! I also realised it was better to start laying the wool around the edge and move inwards rather than starting at the centre and moving out.
I find it interesting how wearing a different ‘hat’ makes me think in a very different way from when I’m just making something myself. It’s a useful exercise.
I thought the sample bowl could demonstrate a couple of different surface design options so added some silk fabric, some locks and a little white wool to the grey area.
Sample bowl finished
It’s not the most beautiful bowl but it did its job. The collection of bowls then got me thinking about the size of opening. I like a small-holed bowl to look at but it’s not necessarily so useful and it is certainly harder to full, being difficult to work from the inside. I decided that participants could choose.
I gathered together a range of tools and smiled at the weird variety of odd things I own. This is only a small proportion.
Some of the ‘tools’ I use
Something these tools all have in common is that not one of them was designed for felt making. My most recent purchase was a job lot of 15 small plastic rattles bought second hand on eBay. Actually, these worked remarkably well, especially for the bowls with small openings, and the quantity would come in very handy if I was teaching a bigger group. That was £5.35 well spent.
The workshop venue was the Horsebridge Community Arts Centre in Whitstable. The Centre has a lovely workshop area: really light and spacious with good tables and lots of sinks. Ideal for our purposes. After welcoming the 4 participants and a short introductory chat I demonstrated the layout. Jenny, Suzanne, Jane & Ronn then chose their wools and set about their bowls.
I had decided to go for 2 layers of wool rather than 4 as I find most people lay the wool out quite thickly to start with. 2 participants had some felt making experience and 2 did not. All of them went for quite thick layers.
We wet the first 2 layers down before flipping to the other side as I find this helps to get the wool tight around the resist.
Next I showed them how to start to work the wet wool: paying lots of attention to the rim of the circle and encouraging the wool towards the centre to reduce the chance of creating an accidental ridge.
Once they’d reached the prefelt stage we did some rolling using just the bubble wrap and towel. Then they were ready to cut the opening & remove the resist. Jenny went for a small opening, Jane and Suzanne a slightly larger one, while Ronn had something more organic in mind. She made 6 cuts out from the centre to create a sort of flower / leaf shape that would hold a plant pot.
Plenty of chat, a little music and lots of elbow grease later ……..
….here are the ladies at the end of the day, delighted with their finished pieces.
And here’s a better view of their bowls (plus the one I’d made alongside them to demonstrate the different steps – 2nd left). I was very pleased not to see any accidental midriff ridges as I think a smooth transition between the two sides is one of the hardest things to achieve when starting to work with resists. The bowls were felted really well, which made my inner felt policewoman very happy, with just the plant pot holder needing a little more finishing at home to fit around its plant pot.
I always ask participants to complete a short feedback form at the end of the workshop. There’s a bit of admin then 3 boxes to complete: ‘what did you like about the workshop?‘; ‘what could be improved?’ and ‘any other comments?’.
I also make mental notes for myself along the same lines. So, here are my own observations
We had a really nice day. It was a lovely group with a friendly and relaxed atmosphere: everyone seemed to enjoy making their bowls. Judging by the feedback forms, people found me adaptable, clear, knowledgeable and helpful throughout the session so lots of positives there.
What could be improved?
The participants didn’t have any suggestion but for myself I thought the timing was a little generous. I’d allowed 6 ½ hours (including a lunch break). We finished slightly early so maybe 6 hours next time, though that may be different if there were more participants.
I realised I didn’t give enough thought to / instructions on the interior of the bowl design. Because my sample bowl had a small opening the interior isn’t visible so I forgot to think that bit through. In fact all the visible bowl middles were good but definitely more luck than judgement on my part.
My making a bowl alongside the participants worked OK but I had to work very quickly to get it to the next stage while spending most of my time helping and advising the others. It would have been simpler to have pre-prepared another bowl sample to pre-felt stage.
All in all a successful workshop with some notes for myself on how to improve a few things if I run it again. Hope you enjoyed your virtual visit to our bowl workshop.
In the first part of this post I wrote about finally making the decision to buy some tear away stabilizer, using the free motion function on my sewing machine to ‘draw’ some copyright free doodles I had sourced from Shutterstock onto white linen fabric I had in my stash. I did some slow stitch embroidery on one of the face designs. Here is a link to Part 1, in case you might have missed it. https://wp.me/p1WEqk-dUs
I wanted to do something a little different with the bird design. My decision is the focus of today’s post. Here is what the bird looked like once I transferred the design across onto the linen.
Just to recap, I had pre-washed the linen and attached some cotton batting to the back of the fabric prior to letting loose with the free motion embroidery.
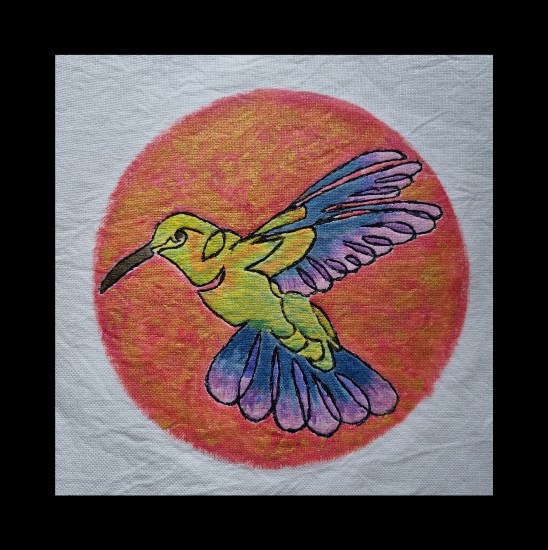
It reminded me of a hummingbird and, as a result I wanted vibrant colour to inspire its completion. I came across a set of iridescent acrylic paints in TK Maxx before the summer. I thought I might try to use these shiny paints on the embroidered bird.
Before doing so, I needed to play with the paints so that they would work on fabric. I did not have a Fabric Medium in my stash so I did a bit of research online and discovered that I could make one out of a few household ingredients. So I thought it might be worth experimenting. The recipe, which came from Paint topics, https://painttopics.com/can-you-use-acrylic-paint-on-fabric/ called for equal parts vinegar and glycerine mixed with two parts water. I mixed the home made ‘medium’ and added it in equal parts to the paint.
The first thing I noticed was that the paint became very easy to apply. I was worried that the iridescence would be lost in the mix but the vibrancy returned once the paint had dried. Also, the black thread used when at the free motion embroidery stage acted as a barrier between the colours. The paint itself was absorbed into the top layer of the fabric – there was no soakage into the batting. I left the paint to dry out for about 5 minutes in between layers. The different colours sat nicely on top of each other. I then left the picture overnight to dry completely and then ironed it to heat seal it.
I am really pleased with the result. The cotton backing adds an extra dimension to the work as does the iridescence. The texture of the paint is similar to what might be found on T shirt prints. The only issue is, because this is an art piece (rather than a ‘functional’ one). I have not tried washing it but I am happy that it is suitable for art work.
My only disappointment is that I could not get all the creases out of the pre-washed linen fabric. Next time I might opt for a cotton fabric.
Have you ever used acrylic paint on textiles? Have you used it with or without mixing with a textile medium? Could you let me know how it worked for you.
I was up to my ears in layouts for the upcoming guild sale when I got an email that inquired if I could make a door display for Halloween as I had for Christmas last year. Hummm…. Yes, I could probably figure out something. OK, add that to the to-do list!
For Christmas you might remember, I had made a landscape for the guild studio door with card stalk and wrapping paper. I populated it with 3 sheep representing the spinners, weavers and felters. I should again try to represent the guild in the decoration. I was considering spiders and ghosts, now I just need an appropriate background.
Off to Dallarama! Sure enough, I found a black commercial lace table runner and a tablecloth of the same cheap commercial lace.
1-2) Black Lace Table cloth draped over the front of the guild door, with the Black Lace table drape as a swage above the door.
I bought a bit more candy and found three googly-eyed “cute” spiders in black and black and silver. Perfect! They will cover the spinners and weavers. Ann Brought a large purple spider and a couple more of the smaller ones. (you will see those a bit further down).
3-4) One black and one black and silver googly-eyed spider sitting on top of a shopping box and teal plastic bag and wicker basket. Close-up of the googly-eyed spider with plastic legs.
I started 2 little people who would be holding up a larger ghost. To save wool I had Glenn buy a Styrofoam ball as the core of the ghost.
5 starting one of the little figures, starting to warp wool over the head of the armature.
My original idea was to make a ghost and have the little figures holding it up, sort of like the ghost girl I made in…. was it 2018. This time I was aiming for a larger ghost and smaller figures, I am not sure I got the scale quite what I wanted but it sort of worked. I will show you our door and then show you some of the other doors also decorated in Heartwood house.
6-7 OVWSG Studio Door, Black lace showing spider webs, 6 small spiders, 1 big purple spider and felted ghost and 2 figures underneath running the ghost. Close-up of Ghost and trick-or-treaters (Could it be the ghost is running away with them.)
8 ALSO black background, ghostly castle and pumpkins with bags of candy stuck to the door.
9 Heartwood house office door has paper ghosts
10 the Laundry Co-op has bats and had wrapped their door in white garbage bags leaving large yellow eyes peeking out between them.
11 ALSO Children’s room (it’s a daycare) has a black background, spider webs, a witch with purple hair and a bag of candy
12 World Accord had a creepy tombstone scene and bats with googly eyes
13 PWC ( People, words & Change) door with crows spider web and pumpkin lights
14 Multifaith Housing Initiative card with ghosts, cats, tombstones, trees bats cats on a card
15-17 Options Bytown has several doors on the second floor (Ghosts, bats, cats and lots of fake spider webs)
18 the Unitarian Sanctuary Door, 3 Ghosts and black candles
19 ELTOC (English Language Tutoring for the Ottawa Community) their door had a purple background, a scary figure, bats cabbages(?) and a fire. They had a spooky soundtrack playing and were giving out candy
When I returned to the guild studio I found that again one of our swag spiders had made a break for it!!
20 I am not sure where the spiders are trying to get to but it is odd these two keep making a break for it. Even stranger, they always land on their little legs.
21 All the groups were now ready for the kids from the daycare to drop by.
22 one of the black and silver spiders was set to guarding our Swiss milk chocolates in a white wire basket
23 there is a small Werewolf next door!!
24 Yes! It was a werewolf!!! I gave him Some of our Chocolates so the looms would not be chew toys!!
The rest of the day was spent prepping for the Guilds Sale and Exhibition with an early social. I think we are almost ready for next weekend!
25 grids, quilt wrack, boxes of things to go to the sale and one of the signs (we are not sure where the others disappeared too but we have 4 days to find them!!)
I hope you are having fun, have leftover Halloween candy to enjoy and not quite so busy!


 1-2) Black Lace Table cloth draped over the front of the guild door, with the Black Lace table drape as a swage above the door.
 3-4) One black and one black and silver googly-eyed spider sitting on top of a shopping box and teal plastic bag and wicker basket. Close-up of the googly-eyed spider with plastic legs.
 5 starting one of the little figures, starting to warp wool over the head of the armature.
 6-7 OVWSG Studio Door, Black lace showing spider webs, 6 small spiders, 1 big purple spider and felted ghost and 2 figures underneath running the ghost. Close-up of Ghost and trick-or-treaters (Could it be the ghost is running away with them.)
 8 ALSO black background, ghostly castle and pumpkins with bags of candy stuck to the door.
 9 Heartwood house office door has paper ghosts
 10 the Laundry Co-op has bats and had wrapped their door in white garbage bags leaving large yellow eyes peeking out between them.
 11 ALSO Children’s room (it’s a daycare) has a black background, spider webs, a witch with purple hair and a bag of candy
 12 World Accord had a creepy tombstone scene and bats with googly eyes
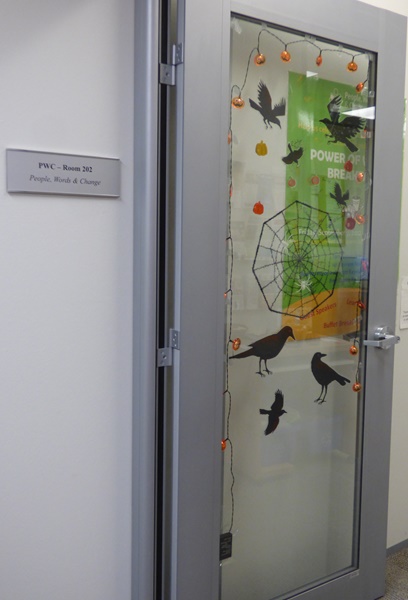 13 PWC ( People, words & Change) door with crows spider web and pumpkin lights
 14 Multifaith Housing Initiative card with ghosts, cats, tombstones, trees bats cats on a card

 15-17 Options Bytown has several doors on the second floor (Ghosts, bats, cats and lots of fake spider webs)
 18 the Unitarian Sanctuary Door, 3 Ghosts and black candles
 19 ELTOC (English Language Tutoring for the Ottawa Community) their door had a purple background, a scary figure, bats cabbages(?) and a fire. They had a spooky soundtrack playing and were giving out candy
 20 I am not sure where the spiders are trying to get to but it is odd these two keep making a break for it. Even stranger, they always land on their little legs.
 21 All the groups were now ready for the kids from the daycare to drop by.
 22 one of the black and silver spiders was set to guarding our Swiss milk chocolates in a white wire basket
 23 there is a small Werewolf next door!!
 24 Yes! It was a werewolf!!! I gave him Some of our Chocolates so the looms would not be chew toys!!
 25 grids, quilt wrack, boxes of things to go to the sale and one of the signs (we are not sure where the others disappeared too but we have 4 days to find them!!)