Experimenting with tear-away stabiliser – Part 1
I don’t make New Year Resolutions, there’s absolutely no point as I have the attention span of a puppy at that time of year. Instead, I opt for trying new things around my birthday. It’s a good way for me to treat myself to supplies that I normally would not try. There is a bit of a downside in that I soon won’t be able to open presses without an avalanche of goodies hitting me but we will push that thought aside and bury it, along with the passing years (under the goodies at the back of the press).
This year, I decided that I wanted to try tear away stabilizer. It’s one of those products I had heard about but it is not stocked locally. As a result it had fallen into that category of ‘mmmm that looks interesting’. Followed by a long period of totally forgetting it existed. So, when I finally happened upon it on Amazon, I decided I should make the purchase before I forgot all about it again!
I opted for 8 inch square sheets which came in a packet of 100 and cost less than Stg£9.00 (less than $10.00).
I love my sewing machine! It’s a huge heavy yoke from Janome that I bought comparatively recently. Like many machines these days, it has the facility for free motion embroidery. As a sewist, I have lots of coloured threads so I was ready to get to work.
Next, the design. I opted for copyright free doodles that I sourced on Shutterstock. I was attracted to two designs which are achieved without lifting the pen too often. This meant that there would not be too many gaps when it came to the free motion work.


I printed off my chosen designs and then transferred them onto the tear away stabilizer using a permanent marker. I decided to use some white linen from my stash as my background. I washed one of these pieces and left the other two alone.

I then pinned cotton batting to the back of two of the pieces of linen – the third piece of linen was left with no backing on it. I wanted to see if I needed the batting for extra structure. After this I pinned the pre-traced design/stabilizer onto the fabric and used the free motion embroidery function on the sewing machine to transfer the designs across. I worked my way slowly along the lines of the drawing going back and forward a number of times to get a thicker outline. Here are some photos of the back and front sides of my pieces:


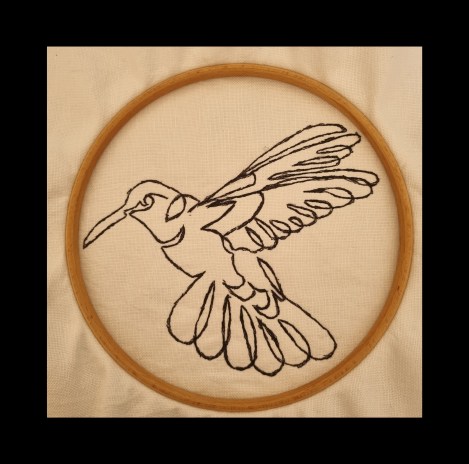
I was very pleased with the resulting ‘embroidery drawings’. The tear away stabilizer came away quite easily on the ‘face’ although I did use a pin to raise the paper on some of the smaller sections of the drawing. The ‘bird’ (more in Part 2 of this post) was a bit more of a challenge as there were a lot of small areas where the stitching crossed over the design so I needed a bit of patience to make sure these were all removed. The back of the pictures were quite neat too.


So, I had to make a decision on what to do next. I don’t have any embroidery thread but I have lots of cotton perle thread so I chose this.

I meant to take photos of my progress but got carried away. I stitched the eye with the free motion embroidery function. It is my first attempt at an eye and I am pretty pleased with the result.
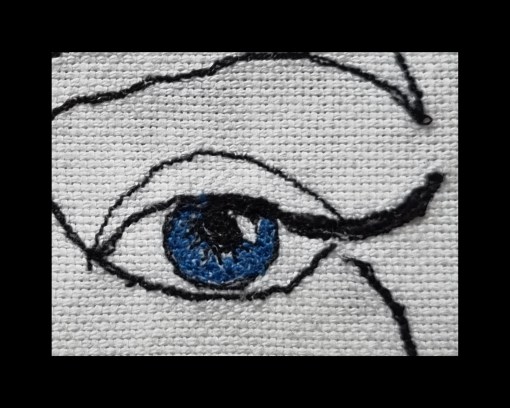
Here is the finished piece.

So far, the second face – the one that is backed with the cotton backing, is not filled in. I would welcome your suggestions on what approach I should take.

Thanks in advance!
I will show you how I finished the bird in Part 2 (November 20th). Here’s a preview of what he looked like ‘naked’.
21 thoughts on “Experimenting with tear-away stabiliser – Part 1”
I like the systematic way you approach the experiments to make sure you can learn from them and you’ve produced beautiful results. I particularly love the eye: it’s very effective.
Thanks so much Lindsay – sometimes my background in finance (and being at the receiving end of audits!) shows through lol. I like to show these experiments so that anyone reading it can feel confident enough to explore the possibilities with their machine or supplies and give it a go. 🙂
Wow Helene, I love the designs you have chosen & the completed face which is quite joyous & confident (Katie comes to mind!).
Mmmm, I’m at a loss what to suggest for your other face. Watercolour comes to mind but I don’t know how you would do that on the linen.
We’ll done for trying the tear away stabiliser….I personally used to find it too fiddly around the stitching (particularly a single line of stitching – not enough perforations!) & finally went for a similar, but dissolvable one. I could tear most away & simply wet it around the stitching.
I look forward to seeing part 2 & discovering what you have done with your bird.
Ps – just getting my few brain cells lined up….
Your completed face = unwashed linen, un-backed
To be completed face = unwashed linen with cotton wadding backing
Birdie = washed & backed
Have I got your experiment the right way around? I await the results with interest.
Thanks Antje. I will say that to Katie, it will make her day.
Since you have mentioned paint, (without giving the game away), I think you might be interested in part 2 Antje – it will publish at the end of November ….. watch this space lol!
Now you have put a thought into my mind. were the early stretched canvas’ made from linen?
Now you are tempting me to get dissolvable stabiliser!!! Actually it’s too late! I picked some up while I was surfing. I know from Ruth’s posts that she likes it a lot so I had to get some …… I better not put it in the back of the press!
I think you will enjoy watching the birdie.
Your brain cells are working perfectly. You just scored 100%. Super job! 🙂
That’s a fierce looking bird.
I like your process and admire your skill with the sewing machine. Because I will insist on jumping straight in with free motion sewing, I never practice enough to gain a skill like yours (or Ruth’s) and am uselessly envious.
I like the result of the one with the batting attached – back view. Next will you try it out on felt? I think that that would give a great result with the back view as the front.
Looking forward to Part 2 and the bird.
Ann
Thanks Ann
Birdie does look as if he’s on the attack now that you mention it. I don’t thing I would like to meet it down a dark alleyway.
I learnt how to free motion a few years ago at the Knitting and Stitching show when it came to Dublin (Ireland). I rarely use the facility so what you are seeing here is (to quote my dearly departed American Aunt Rose) kept for special occasions and bonfire night. I am having a little difficulty with my eyesight of late so here’s a trick I will share with you. When you draw on the stabiliser user one of those huge permanent markers – it makes it so much easier to follow the lines. Then work back and forth in small sections – that’s a trick the tutor at the K and SS taught us all. That way any errors will quickly disappear. Lastly relax at the machine, otherwise the shoulders can get very tight and sore. You will very quickly find it working for you and it opens up so many possibilities (using shiny threads …..). Magpie time!
Great idea on the felt front Ann. I must make a sample.
Part 2 will be published around the end of November. Birdie gets a makeover which does nothing to tone him/her down.
The finished face is pretty – great job on the eye!
The tear-away does look fiddly where the stitched shapes are small. Enjoyed reading your systematic experimentation.
Antje is right that watercolour wouldn’t work on the linen but fabric dye pens or acrylic paint would.
Thanks Lyn.
Removing the stabiliser was indeed fiddly – reminiscent when we used to remove those last bits of wallpaper during decorating when I was a kid. Somewhat satisfying when the job was done.
Birdie got a bit of a paint job using ‘converted’ acrylics. More to follow in Part 2.
Wondering if needle felting would work to fill in the colors on the second face. It wold also add dimension
That’s a really good idea Karen. I would never have thought of needle felting through the linen but the weave is loose enough to accept it. Thank you.
Very nice, Hélène! I’ve never used stabiliser but I definitely see the appeal.
Have you ever looked at embroiderers who make realistic portraits? They achieve this by using a lot of colours to create contours and a 3D effect on objects. Maybe you could try that on the second face and see how different it might look? That would also work with needle felting, as Karen suggests – all you need is different shades of the same hue and you’re golden 🙂
I’m beginning to like this idea of needle felting even more by the minute Leonor. I am in the middle of a course on Colour Theory and we have to mix our own from the primaries plus black and white. The possibilities are endless.
I bow to honour those who have such colour discernment and talent when it comes to 3D effect. Such amazing work. Thanks a million. The little grey cells are beginning to wake (after a very long sleep!)
Great job Helene! If you use a thickener, watercolor will work fine on linen. I’m looking forward to seeing what you decide on the next face and the bird. Some of the portraits that Leonor mentioned are fantastic. I have been enjoying your color theory photos too 🙂
Thanks a million Ruth,
It is great to know that the watercolours will work with the thickener. Birdie is ready to roll out but certainly the suggestions today have given me a lot of food for thought!
I am in awe of the creators of these embroidered/felted portraits. Such attention to detail.
Glad you are enjoying the colour theory photos. I started mentoring with the International Feltmakers this year and I have been asked to mentor this course going forward. I wanted to get the course contents under my belt before doing so and I am finding it really worthwhile on all fronts.
I love what you have done, and the hand sewing/embroidery makes the face and your work really gorgeous. I may have to steal that idea from you for future use! I was very wary of drawing or tracing a design until I did a class with Ruth – freedom! Looking forward to part 2.
Thanks Marie, it’s there for the taking. I love it when folk are inspired by the post.
You have me curious about Ruth’s class now…. do tell me more.
Helene, Ruth’s course is ‘Free motion stitching on felt’, I really enjoyed it once I relaxed about stuff, eg if my stuff was good enough etc. I did this studio avatar (mushroom) during her class, this is done on a piece of waste/spare felt, not the best colour, with some tear away paper at the back. I never thought about adding hand embroidery stitching to free motion stitching, great idea.
Thanks Marie, Ruth’s course is sounding very appealing. I will check it out.
Love the face. I am looking forward to seeing the second face and the bird. Free motion is one I keep wanting to do and never seem to get around to practising. Ruth’s course was good. We tried different things. The one drawback of wash away stabilizer is that you can’t draw on it with marker, it dissolves.
You could try a soft lead pencil or coloured pencil. I think that would work.
Ann
Thanks Ann,
I have yet to try the wash away stabiliser, The tear away is very durable and will take a thick permanent marker which makes working on the lie drawing less challenging.
Birdie has taken a totally different route. I still have to get to work on face number 2.