
Wooden handled 3-needle holders, part 1 while i wait, consider needle holders
Wooden handled 3-needle holder Part 1 while I wait lets consider needle holders (this may be of more interest to newer Needle felters)
For the armature study group, I wanted to find as many examples of different gauges of (mostly Aluminum) armature wire as I could. I found only a few gauges locally, so went online to find more. I spotted a few on Etsy and a couple in US stores but found the widest selection from China. The last option (China) had the best prices but had the longest shipping time. Ann had shopped there for various small wet felting items and had some suggestions. Similar to E-Bay, check the sellers’ record, read the reviews, check for free shipping and similar listings by other sellers and watch for the price to drop. Similar to early E-Bay, some sellers at Ali-express are selling Overruns (working items) others are selling seconds (substandard, not all there or not working) so watch closely for the comments.
 1 a few of the wire gauge samples
While I was shopping, I spotted a wooden needle holder with 3 needles I had not seen before. The design looked good, the reviews were mostly good with the worst being that needles had broken in shipping (so poorly packaged). Seeing as I have a good supply of needles and would really like a couple of the 3-needle holders, this did not deter me so I put in 3 separate orders and then waited.
While we wait, let’s have a look at a couple of questions and look at a few of the needle holders I have collected.
Now, why would I want a 3-needle holder? I have a similar wooden handed 8-needle version as well as the fake clover tool with the needle guard that holds 7 needles and the metal 20 needle holder from The Woolery. Or you can use the lower-tech – elastic wrapped around 2 or 3 needles and skip the handle altogether. The holder is there to make the needles easier to handle and work in a hopefully ergonomic and comfortable way. Both the multi-needle wooden handles and the plastic fake clover tool are comfortable for me to hold. I have two types of single needle wooden holders that I have not used often because I find the off center placement of the needle disconcerting. (I know if I would only use it a bit more I would get used to it.) The single needle skinny handled one (Ann got a couple of those) is not comfortable but the single needle slightly thicker handle is a big improvement. I may try to add a foam collar to both of them to make the grip more comfortable. Foam callers are used on pens or pencils to make arthritic fingers feel more comfortable when writing or for the very young learning to write. You can find them under a google search for “pencil grips” in case you got the skinny wooden holders (there are a couple of different sizes for primary and regular pencils).
 2 This I spotted at <store.schoolspecialty.com>. Dollarama and Dollar Tree used to carry something similar so check there too.
I already have 2 types of plastic 3 needle holders that look similar to each other. Both have a handle that is a bit bigger than a good quality pen and it is reasonably comfortable to hold. Unfortunately one has a design flaw. I should tell you quickly about it while we wait for the new wooden ones to arrive.
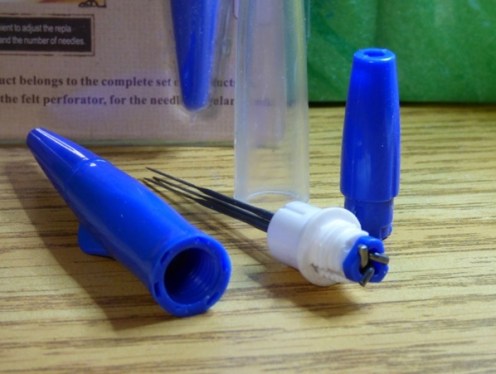
 3 Blue 3 needle holder (2 similar designs)
Since they are using the same packaging with a squirrel on it, let’s call the closer one with the see through arrow (A) and the one behind it with the Fin on the handle (F).

 4-5 A the hole in the handle
Option A. I have bought a few of style A and have had poor results with them. Along with a few odd breaks (the cover broke off and now that one can’t be opened.) It is also very challenging to change needles with the small holes you need to fit the needles through at the end of the cover. The reason that I am running with 2 needles in both of these is because it is so hard to change the needles.


 6-9 F handle with a fin on it
Option F. this is the one with the fin on the handle. Other than a jammed-on needle cover (which I eventually got off) these have all worked. With the open end of the needle cover, it makes it much easier to change the needles.


 10-14 Fake Clover tool
I have purchased a number of the 7-needle fake clover tools. Many have been assembled incorrectly or have been miss printed so the red dots that should indicate locked or unlocked guard position is backwards. Once you know that your holder is lying about being locked, you can just disbelieve it which makes it safer. After you safety check it, it’s wonderful for picture felting in 2D and some 3D work too.
 15 20 needle holder (the Weapon)
Let’s take a look at one more holder. This time the 20 needle holder from the Woolery. It’s made of aluminum which is more durable than the plastic ones. With aluminum, it’s important to not over tighten it or it may stick. I have 2 pieces of shelf liner stored with it just in case it is sticking. It is a bit heavier than the plastic or wooden ones but is not unreasonably weighty.
 16 the weapon unleashed!
All three of these tools have a maximum number of needles they can hold but as you can see I often load less. Again looking at the previous examples you can see the spacing of the needles varies between the holders too.
Why might this spacing matter to you? Well, the spacing of the needle and the gauge chosen will affect the ease of penetration as the needles are impacting the fibre. There is an increase in resistance after a short amount of poking in the same spot when needles are closer together. If you need to still increase the density of the area then shifting to a finer gauge needle or switching to a wider spacing of the gauge you were using will let you keep working in that area.
 17 20 holder with 12 needles loaded
As an example I have the 20-needle holder, It looks very scary when all needles are loaded. I was starting the background of a felted landscape and wanted to lay in a quick background. I usually use my 10-needle bar tool (also from the Woolery) but could not remember where I had put it. So I pulled out “the Weapon”! After a couple of pokes, there was too much resistance to continue. All 20 needles were trying to affect the wool beneath them and were quickly causing the entanglement to a point that it was difficult to push the needles into the fibre. Instead of swapping out needles to a finer gauge, I cut down the numbers of needles used going from 20 to 12, which worked very well. This allowed for more space between the needles and less likelihood of adjacent needles trying to work with the same fibre at the same time.
I started to review the mechanics, origins and variations available of felting needles. This started looking a bit more like a book again. (I am trying to be a bit less verbose, it’s not working.) So to review, the notches or barbs, on the edges of the needle will grab fibres as it enters the felt dragging the fibres with the needle as it continues into the felt. As you remove the needle, the fibre stays in the felt where it was pushed by the notches. The only exception is a reverse needle which pulls fibre from within the felt as the needle is removed (the notches are in the reverse direction).
After watching videos on the GroZ-Breckert (German felting needle manufacturer) website, I have a hypothesis for what my fingers are feeling (palpating) as the needle enters the fibre and makes the entanglement that is felt. We know a notch will catch fibre adjacent to it. With more notches, (3 per side rather than 1 or 2) or more sides, (a star rather than a triangle) you will affect more fibres in the adjacent area and create greater surface displacement (make a dent). Usually, you will reach a point where you feel resistance to the insertion of the needle. When you have adjacent needles working in one spot (affecting the same set of fibres) you also notice this resistance. The variables will be gauge of needles, style of needle and number of barbs per side as well as the length and type of fibre. (I bet someone has a formula for that!) As the adjacent needles are repeatedly inserted into a spot, you are likely to feel the resistance increase. This will be quicker with longer fibres, top, than with short disorganized fibres, roving or batts). My suspicion is that the adjacent needles are starting to try to interact with the same single strand of fibre. This will resist being pushed farther into the web of felting since you are pushing on 2 ends of the same fibre. Shorter fibre staple lengths will take a lot longer to get this effect than longer staple length fibre. NB: when working with dry short fibre, particularly wools, please wear a mask. No one wants to get wool lung. It’s kind of a career-ender. I wish I had a microscope to see if my hypothesis and what my fingers seem to be feeling is correct.

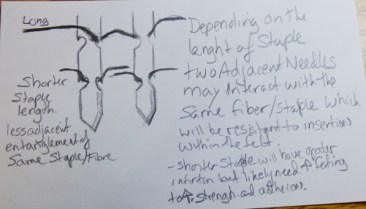 18-19 very poor sketch of the notches interacting with fibres (i am out of practice!)
I suspect my previous career and working with so many armatures made me sensitive to the feeling of the needle as it moves through the wool. If you too have been noticing this feeling of resistance and tension in the wool but have not yet achieved the density you had desired in your felting project, there may be a few things to consider.
To counteract this resistance:
- spreading the space between needles (having many different holders with different spacing’s is quicker to grab and keep working than taking needles out to space them.)
- working with fewer needles (just because the tool will hold 20 needles doesn’t mean it has to hold all 20),
- shifting to finer needles as an increase in tension is noticed,
- not working in one spot but trying to work across a larger section.
- Using an ergonomically comfortable handle will keep you from using a killing grip on your needles and will hopefully let you enjoy felting longer (doesn’t solve the problem of resistance but it is helpful to consider). You can also use different handles for different gauges to make them easy to identify.
Over the years I have collected various styles, sizes and types of needle holders to have a variety of spacing and number of needles. As well as to show students what options are available.
My one cautionary tale is one of my oldest holders made from a wooden round cabinet doorknob and a small block of wood with holes for the needle to pass through. The screw that connects the two pieces is on the outside of the part that holds the needles. You need a long screwdriver to undo it and your hand is just above the points of the needles. Don’t slip off the screw!! It is much more dangerous an arrangement than necessary!!! (Don’t buy one of those If you ever find one. it’s not worth the danger changing needles will eventually be.
 20 Some of my collection of needles and holders, there are quite a few more with my class stuff.
Now getting back to those wooden 3 needle holders I ordered from china… i will tell you that they have now all arrived (that’s the good news!) I will tell you about the bad news next post.
Have fun and Keep felting!!
13 thoughts on “Wooden handled 3-needle holders, part 1 while i wait, consider needle holders”
As usual Jan a very helpful post with lots of useful detailed information.
When I first started needlefelting seriously, I felt that I needed a multi tool so that I could do large areas more quickly. I had seen pictures of handles which would take 6 or 8 needles, so I showed my husband these pictures and asked if he could make me something like that with perhaps a wooden draw knob or even a door handle. He took on the job (eventually!) and handed me the result.
I should have known what to expect – at the time he was a professional model maker, working in metal. What I ended up with was a shiny brass door knob with brass fittings and 16 needles. It is so heavy that it is tiring to use, but at least the weight helps get the needles into the fibres. As Jan has so carefully demonstrated, lots of needles close together in a tool are a bit counter-productive, so I’m afraid it rarely gets used.
Ann
Thanks Ann.
It is wonderfull to have a supportive husband who wants to help you in your art. even if thay dont quite hit the mark with there help it is still wonderfull to know you have there suport.
can you take a few needles out, it wount lighten the weight but it may work for getting through many layers of wool maybe for thick backgrounds or adding appendeges?
if not it sounds like a faboulous burger deterent. anyone trying to brake into my house has just consented to let me play with all my toys on them. Viking comes would by my first go to but i think your brass door nob needle imbedder would be a good alternate!!! (you have to eventualy give them to the police so dont impaile a bergler too many times so it looks like you were having fun) on second thot maybe not its too hard to cleen up the tools better stick to wool.
Thank you for this really helpful post. I rarely use needlefelting except for adding detail to wet-felted items (and have an embellisher even less frequently used!) but it’s good to know there is something bigger than a Clover 5-needle tool. Wish the Woolery was in the UK. Does anyone know if there is an importer of their tools here?
thanks Nancy, thats just the tip of the ice burg of my collection.
while the 20 needle wepon is not used too frequently the 10 needle bar has been used a lot. for both picure felting; laying in the back ground, tacking down wisps of colour over a larger area and making flat shapes to be added to scultures (its a fast way to start an ear).
i havent seen the aluminum holders anywere except the woolery and only once second hand. you may want to see if there are other felters near you. (near is a vary relitive turm. Torornto is Near Ottawa but its still 5 hours drive from hear and its only near if your drive is from Ottawe, if you ask a Torontonian Ottawa is much farther away!) if you can get a group together to order the shipping it will be less painfully expencive. they have a lot of interesting felting spinning and weaving tools and other stuff its always fun to brows there web site.
i got to have a breef vist on the way to a blacksmithing conference (my husband was vary patent and wanted to have someting for me to look forword to as part of the vacation which was all about his hobby. so we drove from ottawa to scranton (the train museum) then west to Kentuky (the woolery) then east to Verginia (the confernce) then home. the deture was worth it!) i think i did a blog for Ann about the trip was that 3 years ago? ah found it! https://feltingandfiberstudio.com/2019/03/07/2018-the-year-of-the-workshops/
Have fun and definatly consider the 10 needle tool it has been helpfull. maybe you can make a variation of your own?
Very informative and interesting post Jan. Your drawings to explain the text are really good.
Looking forward to finding out about the Chinese parcel – intriguing.
Thank!! i have a love of good technical Illustration, i am just not a good Technical illustrator! i spent a year listening to my teachers tell me i should be in fine art so i switched. i havent picked up a pencil in years, i have been usiing the computer but without a drawing program it seemed better to go old school and find a pencil. i should have gone looking for my t-squares and stuff.. oh well as long as it gets the idea across i have had succsess! (but i would not have gotten a good grade on that one)
Ah Yes there is more to come!! (keep thinking some things are over stock and some things are seconds…….)
Have fun and keep felting!!
Wow, that’s one heck of a collection of holders you have Jan! I’m sure this info will benefit those who do a lot of this type of work. I must admit I don’t do a lot of needle felting but when I do I hold one or two needles in my hand. I did once buy the clover tool but didn’t enjoy felting with it so it’s buried somewhere and doesn’t see the light of day!
Thanks Karen! that is just part of it, i have more downstairs with the teaching stuff.
i tend to use needles both single and dubble with elastic then switch to the holders for 3,7,8, and 10. i have a number of foam peaces that hold needles and holders for me. i just got a new pool noodle that get choped up for neeedle holders (when i give needles to someone) or cut again in half thay become needle rests sitting on my table. sometimes needles just live in the foam pad im working on but then i start misplacing needles since i tend to work on multiple things at one time. hummm maybe that is why i have so many options for holding needles?
if you can find a needle holder that fits your hand comfortably it will make using it more apealing. you may not have found the correct one yet!
Keep felting whether its wet or dry!! (or even damp – a bit of both)
Really interesting post Jan and glad to see you emphasise the importance of storage, but just the same those needles scare the life out of me! You do great work and I love how you show the progress.
You definitely have quite the collection of needles Jan! I have a Clover tool somewhere and a wooden holder too. The one I like best is similar to wrapping two needles with a rubber band but the handle ends have been dipped in the plastic tool dip stuff which when dry, holds the needles together. It gives a nice grip in your hand too.
A great collection and explanations Jan. I don’t think I’ve seen the single wooden holders that are bigger. Most often I use 2 or 3 with a hair elastic.
I’ve just been down the rabbit hole again. Thanks for your link to your post on Moy Mackay and your wonderful vacation (for some reason it’s started to be called a “staycation” over here (UK) daft I call it)
I’ve a couple of Moy’s books too and had forgotten how quickly she works. I really must go back to more of the Studio posts from before I joined.
Thanks again
Ann
And I thought I had a collection. You should write a book. Thanks for doing the research and clueing us in.