Art Deco Lampshade (part 1)
The thinking cap went on in bed the other night over what to do for my current blog piece. I wanted to link it through to Lyn’s Art Deco challenge. Two words came to mind while lying in the semi darkness – Tiffany Lamps. Straight away I saw a big problem – I had happened upon the wrong period. That said, the idea of producing a lampshade stuck in my head so perhaps I should research designs from the art Deco period that might translate unto a lamp.
I already had a lamp in mind – one that is readily available to anyone who has an Ikea nearby. So I chose the Grönö table lamp. It’s cheap as chips and a constant at Ikea. Its dimensions are height 22cm and the width on each side is 9.75cm totalling 39cm. I intended to have my layout running in one direction only (top/bottom) and from previous experience (using a different set of materials that included scrim) I knew that I was working to c. 100% shrinkage in this direction with c. 30% shrinkage on the width.
First task was to decide on pattern. I had two criteria:
- Symmetry
- Geometric shapes
I felt that the main challenge was to produce a pattern that would end up resembling what was in my mind’s eye given that I would have different shrinkage rates on the finished piece (north/south 100% east/west 30%). So, I set about drawing up the pattern as it would look in the finished size and then ‘grew’ it according to the expected shrinkage. Normally, when I am upsizing a pattern, it’s a straightforward job. I pop my pattern piece on a larger piece of paper, find a centre point on the pattern and then, based on anticipated shrinkage, calculate and mark out my new pattern points to enlarge the pattern. Then join the dots.
First thought that came to mind was Kiss (keep it simple silly). I wanted to work in geometric shapes – I felt it was going to be difficult enough to grow the pattern without making it impossible.

After a few disasters I designed my pattern by working on half the height of the lamp. I settled on the following:
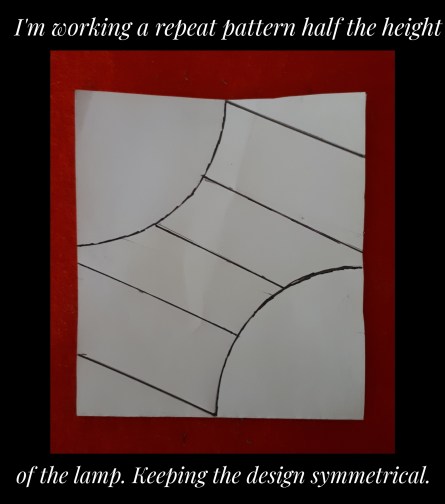
Choosing colour would be the easy part, it was now time to give this pattern a growth spurt! The pattern is about to grow from (cm) 9.5×22 to 14.5×47. Time to get out the calculator and put the thinking cap on…. The pattern doubled in height and grew by 30% in the width Here is the result:

When the two sides are joined together they match up perfectly (what a relief):

Time to start working on laying out the design. I wanted to try out Ildi’s technique using viscose for the colour. I was working from the outside of the design (laying out the pattern first). I had no pencil roving so had to improvise with my tops, sectioning off thin strands of the fibre. Next I laid down my pattern and some light decorators plastic so that I could see through to the design. I ‘drew’ the pattern with the black roving, spraying it with water so that it would stay in place. I was a bit unhappy with the edge of the roving as it strayed into the area which would be filled with colour and I spent some time pushing it back into place (there has to be an easier way to do this).

When laying out the viscose, I ‘tangled’ it rather than laying it straight. I wanted it to replace the bandage cotton I used in my earlier lampshade so I needed the fibre to run in all directions:

Here are pics of the colour building up on the design:

Next it was time to lay out the merino fibre. I used 20g for this purpose and laid out one layer in a ‘top to bottom’ direction, wetting it down with soapy lukewarm water:

Once a skin had formed, I added a light resist which I doubled over, placing it on top of the merino. I added some strands of dry merino to the section where the two sides would meet and then, using the light plastic decorators plastic, I folded my sides over to join the pattern:

I wanted to tidy up the joins a bit so I used some of the thin black roving on the lines and some viscose on where the colours came together:

I then covered the piece with the decorator’s plastic and rubbed it to seal the ends. Once I was happy that they were sealed, I removed the pattern from under the piece and inserted bubble wrap. I prepared my pre-felt (I like my sander). The doubled over light resist came in handy as I was able to rotate the piece as I felted it, making sure that it did not develop edges. Then I started rolling the piece (about 400 times each top/bottom, bottom/top; 200 each times side to side). As the piece began to shrink, the light resist folded on itself. I removed the decorators plastic. When I was happy that I could move onto the next step I removed the resist.

I added hot water and fulled the piece, kneading and throwing it until it reached the desired shrinkage, 100% top to bottom and 30% side to side. Once rinsed I ironed and shaped it. I noticed a lot of the merino had travelled through the viscose – more than usual. So I shaved it back.

The end result was mixed. I was happy that the design had stayed symmetrical and that the shrinkage had returned the oval to a circle which was great. Unfortunately the result was too thick for the piece to be used as a light shade (so I will need to find a suitably sized vase). I had used grey in previous lampshades so I was aware that it should work as I only used the normal amount 20g. Previously, my working lampshades weighed around 30g. It became clear what the issue was. This lampshade weighed over 50g – basically the light could not permeate the viscose! Lesson learnt! I needed to find a way to control my viscose lay down. Also, I was a bit disappointed with the transfer through of the merino fibre to the front of the piece, something I needed to work on. Also I needed to find a way to prepare the ‘pencil’ roving so that it would be quicker to lay out. Despite this, I loved the overall colour combination and it had sheen when it dried. So there were many plus points in this exercise.

In Part 2 (coming 22nd June) of this experiment I will show you how I sorted out my issues. Now I’m off to find a suitable home for my first experiment.
13 thoughts on “Art Deco Lampshade (part 1)”
I love the design and colors. Your process fascinates me, I feel inept like that.
Working with viscose does produce beautiful sheen.
Thank you Lillian. I do love the versatility of the viscose fibre. You should not feel inept. I hope you give yourself time to play and experiment – that’s where I find my best learning is done. 🙂
I love your design and how you take us through your process. Looking forward to part two.
Thank you Jane. It was a fun learning curve.
Really lovely, but I can see how it may not be suitable as a lamp. I love that model of lamp and have used it with white on white designs and botanical prints successfully. Looking forward to seeing your ‘way out’ !
Thanks Anna, yes the lamp is a great base for felted shades. I love doing the white on white too, sometimes I incorporate antique lace and the effect is gorgeous. I would love to see yours – they sound amazing. Please feel free to share anytime! 🙂
We enjoyed reading about your process and seeing your photos.
The design, colours and texture are beautiful – you have an Art Deco piece for sure!
Your method was painstakingly skillful and the result well worth it.
Thank you Lyn. I’m glad I hit the nail on the head so to speak! The method raised a number of issues which I hope I have sorted in Part 2. But all in all, I enjoyed the process and the learning.
Gorgeous in terms of the design & the lovely colours. And you’ve got the design shrinkage spot on….you clever thing.
I’m confused how you jumped from 20g to 50g! Was that due to the viscose?
Have you ever tried viscose paper? You would need to cut each design element out of it’s appropriate colour sheet though.
Also, could you dry felt a length of cord that you then wet as you lay it down, to creat the outlines?
Looking forward to seeing part 2.
Thanks Antje. Yes, I was overly generous with the viscose and ended up using 30g! Not great for transparency.
One the other front, would ya stop spoiling the cliff hanger!!!! (LOL)
Eyes are closed, lips sealed etc…. 😂
What a beautiful design! I think it’s perfect for the challenge whether it worked as a lamp shade or not. Having tried this technique myself, I can see how easy it would be to add excess fiber without realizing it. I look forward to seeing part two.
Thanks Ruth. I got a bit over-enthusiastic laying down the viscose. In retrospect I was a bit like a young child trying to stay within the lines. LOL