Browsed by
Month: June 2015

Featuring Tips on Beading from Artist Mary Stori

Featuring Tips on Beading from Artist Mary Stori

Mary  Stori is  a new forum member, but has extensive experience in quiltmaking and fiber art.  She introduced herself to us in January as “‘ a wanna be felter living outside of Asheville, NC.  For the past 25+ years I’ve traveled the national and international quilting circuit as an author, lecturer, workshop leader, cruise host…..bla, bla, bla.  The focus of my work began with wearable art, fine hand quilting, whimsical and highly embellished quilts.”

She attended a class with Chad Alice Hagen a few years ago and is now “hooked.” Her focus went from quilts to felt.  But one thing hasn’t changed — her love of embellishments, particularly beading which she has authored several books on. So, with her permission I have put together some of her tips from her blog on beading.

Storage

I’m often asked how I organize my beads……this method works well for me.

First of all……you won’t use them if you can’t find them, so take the time to gather them from all your hiding places, organize them, and then put them in a convenient place…no matter how many or few you have.

A location away from sunlight, heat, and excess moisture is best.

bead storage 1

Because there are no closets in my studio, my teaching materials are stored in a large walk in closet in a guest room nearby. The bulk of my workshops in recent years have focused on beading techniques or projects that incorporate beads. Therefore, I purchase a LOT of beads in bulk from a distributor for my classes. They generally come as strung kilos, which I repackage into kits and store in boxes and plastic bins.

Above is my own personal stash…… One entire side of the closet is fitted from floor to ceiling with shelves…and almost all are used to store my embellishments. I could consolidate them if the space was needed for other things, but as it is now, I’m easily able to walk in and quickly find what I’m looking for without having to dig through dozens of items stacked on top of each other.

floss cases2

I like to use plastic fishing tackle boxes, or embroidery floss containers. Beads are stored by style and color in see-thru plastic tubes or small bags. Here you see some seed beads.

hardware storage unit 3

Besides using beads, I utilize many other embellishments, trinkets, charms, buttons, found objects into my work. This unit has plastic pull out containers with large divided sections which are more suitable for these items. It too goes on my shelves in the closet.

slide.012 4

If tubes or small bags aren’t handy for you….try storing beads in small containers such as film canisters, pill bottles, or metal breath mint cases. If you glue a bead to the lid….you’ll always be able to quickly know what’s inside!

slide.016 5

Another big key to beading……is making your environment comfortable during the task. A table top or floor model Ott light will save on eye strain. As will a pair of ‘cheater glasses’. I always tell my students that one of the biggest secrets to successful beading is ‘spacing’….and the ability to see the bead and to judge the placement of the needle into the fabric is vital.

slide.017 6

Self-explanatory!

Bead Test

Many people are unaware that beads may not necessarily be colorfast. For instance, this beautiful blue bugle bead below may appear as if it’s blue glass. Not so……it’s clear glass that has been dyed or painted blue. Often the color remains secure on the bead, other times not. So…..if you think there’s a possibility that your project will be washed, become damp, or even require high steam for pressing…..take a few minutes and test your beads for colorfastness.

Most of the time, there isn’t a problem, but for that heirloom project….you’d be devastated if during a final steam pressing, the bead color ran into your fabric. The pricier beads may be just at risk as the less expensive ones…..you can’t tell by looking.

Here’s how to test:

– Fill a shallow dish with hot sudsy water….drop in a few beads….let it sit for 15 mins.
– Remove them…rinse and let dry on a paper towel.

Note….sometimes color will be visible in the water, other times….the color will slowly eek out as it dries. As you can see….this blue bead has run…..red is another color I check carefully.

Don’t let this scare you…….we are all aware that colorfastness can be an issue with fabrics……now you know that beads carry the same risk. Even if the bead color doesn’t run….sometimes the fancy coatings……that make a bead’s surface shimmer with various affects, (like rainbow) can dissipate……and the bead will lose its luster.

I’ve tested very, very few beads that I decided not to use……or that I’ve used with caution……beading is worth any effort….hopefully with this hint….all your projects will continue to shine brightly!

bead test

Beading Tip

I’m a stickler for good quality construction…..for me it’s not all about fast, rather…it’s about great design that has been executed to the best of my ability. If precautions aren’t taken, beading can cause fabrics to distort. Therefore, I ALWAYS secure my work in a Q-snap frame.  The only exception is when I’m beading the bindings/edges of my quilts.

DSCN2315

Q-snap frames are simply PVC tubes which come in a variety of sizes. This one is 11″ x 11″, my choice for smaller projects. The work is attached using clips that snap over the frame. Though you could use a round embroidery hoop…..I don’t because it pulls the fabric diagonally which can stretch the bias. I’ve found it’s best to keep the fabric ON GRAIN by using a square or rectangular frame when beading.

As for felt, unless the felt is super thick and sturdy, I always secure fabric (of any kind) in a Q-snap frame for beading and embroidery. However, I generally avoid using the plastic clips…….instead I attach the material using muslin sleeves or pin the fabric around the frame to avoid damage to the fabric and beads. There’s nothing more unattractive than distorted, stretched out wool!!!

DSCN2314

However, as the beading design develops, requiring repositioning of the fabric, I avoid using the clips in places where they could damage the beads. Instead, if the piece is large enough as it is in this sample, I wrap the excess snugly around the frame, and secure the layers together using straight pins or by thread basting. This keeps the fabric on grain, and well stabilized to assure good thread and fabric tension.

DSCN2313

My ‘artist’ inspired piece is now in the beading phase…. The piece is attached to an 11″x17″ Q-snap frame…note I used 1 clip at the top, where it didn’t interfere with the beads.

I also want to mention that I’m beading through 2 layers only…..the quilt top which has been stabilized with batting. This approach will hide and protect the threads once the backing is added later.

You can find more information on Mary’s website and blog.  She’s also the author of “Beading Basics,” “All-in-One Beading Buddy,” & DVD – “Mary Stori Teaches You Beading on Fabric” & “Embellishing With Felted Wool”

web: www.marystori.com
Blog: www.marystori.blogspot.com

Thanks Mary for sharing some of your beading tips with us!

Pencil Roving Mats

Pencil Roving Mats

I recently got some Pencil Roving when I did a World of Wool order. I liked the look of it, but couldn’t decide on which colour, so I decided to get a 500g bag of Pencil Roving waste. I expected more than 4 colours, but it still worked out cheaper. I wanted to see how well it worked layered, so I decided to make a ‘woven’ mat/coaster type thing. I started off with a 10 x 10 inch template:

OLYMPUS DIGITAL CAMERA

Then I cut the pencil roving a bit smaller, 10 strands of each colour:

OLYMPUS DIGITAL CAMERAI laid the strands across the template:

OLYMPUS DIGITAL CAMERAI then held the bottom of the strands down with a ruler and flipped back alternate ones:

OLYMPUS DIGITAL CAMERAI laid the strands across the columns and then flipped back the other strands:

OLYMPUS DIGITAL CAMERAI used a plastic knife to push the strands in to place.

OLYMPUS DIGITAL CAMERAThis is how it looked when it was finished:

OLYMPUS DIGITAL CAMERAI didn’t think it looked its best, so I took off a few of the strands at the ends:

OLYMPUS DIGITAL CAMERAI added a couple of layers of Merino tops, then felted it and fulled it quite firmly. It was about 7.5 x 7.5 inches afterwards:

OLYMPUS DIGITAL CAMERAI also made another mat with pencil roving, I used up some of the spare lengths left over from the other mat, and added rows and columns. This one ended up slightly wider as there wasn’t as much roving going across as there was top to bottom:

OLYMPUS DIGITAL CAMERAI thought they turned out really well 🙂


Prep and Finishing

Prep and Finishing

This last little week hasn’t been a felting week its been a preparation and finishing week with an emphasis on preparation. I carded up all my dyed balls of merino. You can see all my sheep on the top shelf.

caded wool on drum carded wool on shelf


I added the sheep to my little bag, it needs to be reblocked from having little balls of wool in it and hanging out in my purse for a few weeks until I got round to doing the sheep

sheep bag


and doing some doodling in my sketch book, I would like to do more felt art work.

sketch collage

The other thing is I have been  thinking or things that might sell in the summer. I made some felt laundry balls and some tea cozies and bags that might go well in the summer. What do you make for warm weather sales?


Guest Post – A Trip to Peru

Guest Post – A Trip to Peru

The post today is from one of our forum members, Elizabeth Sutherland, who recently took a trip to Peru.  I hope you enjoy this virtual trip!

Our Peru trip started with a week cruising on the Amazon, followed by a week of visiting Incan ruins at Macchu Pichu and the Sacred Valley of Cusco. The Amazon cruise was on a very nice riverboat – good beds, good food, good baths.

photo by Elizabeth Sutherland

We (my husband Doug and I) were accompanied by only 15 other travelers on a 29-passenger boat.

photo by Elizabeth Sutherland

Each day we took 2-3 excursions by small launches to view the wildlife. We had some phenomenal local guides who could spot a gnat on a mosquito because they knew where to look. They had also been guides for scientists and amazed me with their understanding and use of scientific terms and explanations.

It was the end of the rainy season so the rivers and side creeks were very flooded. We were sad that we couldn’t walk in the jungle, but the guides said that the animals were more closely congregated and we’d see more. One morning they fed us breakfast on the small boats. Another day we visited a local village (they rotate among them) where we delivered school supplies and sang songs with the children.

photo by Elizabeth Sutherland

The women there were rolling & twisting palm fibers into string that they would then use to sew into bags, plates, and fanciful creatures for us to buy. It wasn’t weaving or crocheting or knitting, but they used a needle to form the bags. I didn’t ask what dyes they used for the fibers, but many of the colors did not look natural.

We had an excursion into a local market and saw lots of fruits, grains, potatoes, and fish for sale. One afternoon the guides gave us a demonstration of the local fruits. I must say that most of them were not very tasty and had little edible flesh. One afternoon we also fished in one of the creeks. We mainly caught piranha, which the chefs cooked up for us. It tasted like dark meat chicken with a little fishy overtone. We also had a chance to kayak for a few hours up a side channel.

We had happy hour every night, accompanied by a band formed from the boat crew, variously called the Chunky Monkeys, Dung Beetles of LiverPoop and Amazonian Rat Pack. They layed a selection of Peruvian music as well as classic rock tunes arranged for pan flutes. They also got most of us to try a few salsa steps.

photo by Elizabeth Sutherland

Most of the animals we saw were birds and monkeys, but we were able to take one walk through the forest and see snakes, arthropods, and frogs. I was a bit frustrated as a horticulturalist since I wanted to know more about the flora I was seeing. We didn’t see any orchids on the Amazon, but a few bromeliads blooming. The pink and gray river dolphins were very good at eluding the photographers, but were quite active. Our trip was topped off with a float plane ride to see the Amazon from above.

After the wonderful week on the Amazon we returned to Lima and dropped off most of our fellow travelers. One couple stayed with us to travel to Cusco and Macchu Pichu, and we picked up another couple and our guide for the rest of our tour. I had been working out on stairs to prepare for the trip, but there was no way to prepare for the 11,150-foot altitude (3,400 M) of Cusco (Dallas is only 500 feet). I could feel it as soon as I got off the plane, but as long as I took it easy I was OK. They had coca everything for sale – tea, cookies, gum, candy. I’m not sure if it helped or not, but I tried most of it.

photo by Elizabeth Sutherland

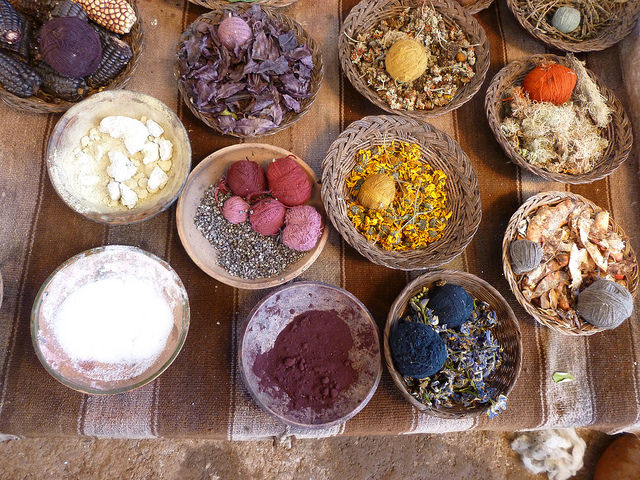
What really helped was the trip to The Center for Traditional Textiles of Cusco where we had the raw fiber to finished product demonstration that I had been hoping for. I was fascinated at the range of dyes they could get from the traditional plants. Their products were beautiful and very intricate. They said that it used 500 warp strands and took over a week to weave. I think the altitude was getting to me because I only purchased a little fiber instead of asking for a bale! I did purchase beautiful poncho (S/500 = $155) and some other souvenirs. They were very interested in the nuno scarf that I brought along. They had a few alpaca there, as well as guinea pigs (dinner?) and some other traditional food – dried beans & quinoa, potatoes.

We went to another small market and saw more varieties of potatoes, including naturally freeze-dried potatoes that could be rehydrated and eaten 20 years later We also purchased some coca and chewed on it like natives (or not – yuck!). We ate lunch at a lovely buffet where we could taste many of the local foods. They also had llamas, alpacas, & a couple of vicuna. Sadly, none would let me close enough to pull of the scissors for fiber samples. Macchu Pichu was the next day. It is lower than Cusco, at 7,972 ft (2,430 m), so we had a night to acclimate a bit.

Our day at Macchu Pichu started off beautifully. I was able to take some post-card quality photos. We hiked along the Inca Trail up to the Inca Bridge; we were not allowed past it. The trail was not too dicey; the guide took suitable breathing breaks. The scenery was beautiful. As usual, I wish I knew more about the flora in the area.

Nights were at the Inkaterra Lodge – a beautiful property that I wish I could call home. If you didn’t like the color green, then you were out of luck. Even though orchid blooming season was past, there were plenty of beauties to look at. The staff regularly ‘baited’ trees with bananas to attract birds, as well as keeping the humming-bird feeders well-stocked.

After Macchu Pichu we returned to Cusco via Ollantaytambo and Saqsaywaman, two more amazing ruins. Our guide for this part of the trip was just as knowledgeable as our Amazon guides. I regret not taking more notes, but I enjoyed all of it. We saw where the quarry for the stones at Saqsaywaman was across the river and up at the top of a mountain. These multi-ton stones were moved by a civilization that had not invented the wheel yet. Amazing what a LOT of person-power could do. At Ollantaytambo the granaries also were across the river and up the mountainside. I guess the women couldn’t send their husbands out for a cup of quinoa very easily.

photo by Elizabeth Sutherland

From Cusco we flew back to Lima and modern-day civilization. I was sad to say goodbye to Peru, but looking forward to my own bed and getting back to family, friends, fiber, and furry cats.


Stepping Out of My Comfort Zone

Stepping Out of My Comfort Zone

Lately, I’ve tried to step out of my comfort zone with color and fiber and try some new things.

While this first example doesn’t look like it’s outside of my usual color palette, I did use some silk for nuno on this clutch and some coarser fibers like Corriedale that I made for my daughter in law.  The nuno is not as noticeable as I’d like, but I think it still adds a nice texture to it.

2015-04-13 11.21.45 2015-04-13 11.22.27 2015-04-13 11.22.42

Revisiting pods, I decided to really jump out of my comfort zone and use bold primaries on a black background. (It is a bit like some of Pollack style pictures I did for last year’s challenge.)

2015-04-14 16.28.52 2015-04-15 12.33.13 2015-04-15 12.33.19


Another project I’ve worked on was  hand dyed silk I made a while back.  I decided I didn’t want a long scarf so I cut the piece in half.  I used very little wool wisps on one side.  The joke was on me when I was finished felting.  It could be a scarf for a doll!  It had been a while since I did nuno and evidently forgot about the big shrinkage rate for silk gauze.  I do like it though.  I think I could wear it as a collar if not a scarf.

2015-05-11 15.36.46 2015-05-11 15.37.52


Most recently, I decided to play with some neutrals and coarser wools.  Cathy (Luvswool) was nice enough to give me some of the Domestic 56  wool she had dyed in Arkansas with plants. I really liked the colors. I made a batt with cream and brown Corriedale and another with some of the  hand dyed Domestic 56 for added color. I used a resist open at the top and bottom. The cream and brown became my inner layer.

2015-05-09 14.21.55 2015-05-09 14.11.55


I really liked the subtle colors against the neutrals.  The coarser fibers also added to the texture for a natural open look.

2015-05-13 15.27 2015-05-13 15.28


Having progressed through these projects, I have a whole new outlook on textures and colors that I hope to incorporate into my future art.

What have you done outside your comfort zone lately?