Browsed by
Month: May 2013

Preparing to Teach

Preparing to Teach

If you teach classes, you already know how much work it is to prepare for a class. But for those of you who haven’t tried your hand at teaching, I thought you might be interested in the preparations that go on before a single student is taught a thing. My friend Paula and I are going to teach a couple of classes at our local community college, FVCC in early June. Today we spent all day preparing. That doesn’t count the time we have already spent planning on what to teach, filling out forms for the college and making a Power Point presentation.

Power Point Presentation

I worked up the Power Point presentation over a month ago and it would have been fairly straight forward if I remembered how to use the program. But I hadn’t used Power Point in a number of years so it slowed me down a bit. I spent at least three hours putting it together and then I had to have someone else upgrade it to Power Point 2010. The equipment at the college seems to be a bit ahead of my Power Point 2003. I never see the point in upgrading software if it still works.

Readying Class SuppliesWe headed down to Camas Creek Yarn as Paula works there and has an in for getting our supplies for the classes. The supplies are included in the cost of the class as that’s the way the college wanted it. In my prior classes, supplies were purchased in advance and just a supply list was given. So we spent several hours getting all the supplies together to put in bags so each student will have a “supply kit”.

Paula Measuring Pre-YarnHere’s Paula measuring out different colors of pre-yarn for the kits.

Confusing Ourselves

We were picking different colors to go with a variety of colors of roving. We needed 4 yards per pack but somehow got confused and started doubling the amount of pre-yarn we needed. Who knew counting was so difficult?

Picking Out Silk Roving

Next we added in some silk roving and silk hankies. So downstairs we went to figure out what colors would go with our color combinations we already had.

Silk HankiesHere are the colors of silk hankies that we chose. Paula dyed these.

Assembly LineThen we set up an assembly line to make our packs. Each pack contains Imperial wool roving, silk hankies, hemp fiber, silk noil, pelsul locks, silk roving, merino roving, pre-felt and pre-yarn. We are going to be doing three projects in the class and there are probably enough embellishments to do 20 projects. But we thought the students would appreciate extra embellishments for later use at home.

Ready to be BaggedThese are all the supplies in one kit.

All Bagged Up

Here’s our pile of bagged kits. I am making a supply list that will be stapled to the bag. But I need to make up some business cards to go in them as well. I’m not sure why I don’t have any of those yet?? (I guess I don’t listen to my own advice after writing all those Marketplace Monday posts.)

Felt Trivet Sample

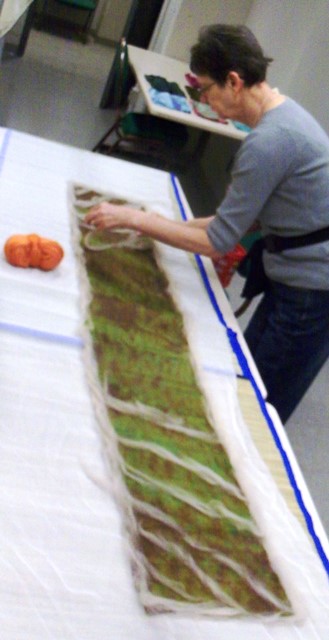
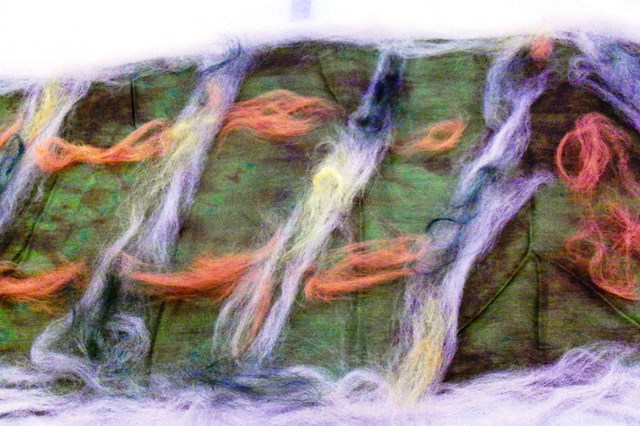
Then Paula and I spent the rest of the day making samples for the class. We’re starting with a flat piece of felt with embellishments. This one is mine with a silk hankie, hemp, pre-yarn and pelsul locks.

Felt Trivet Sample

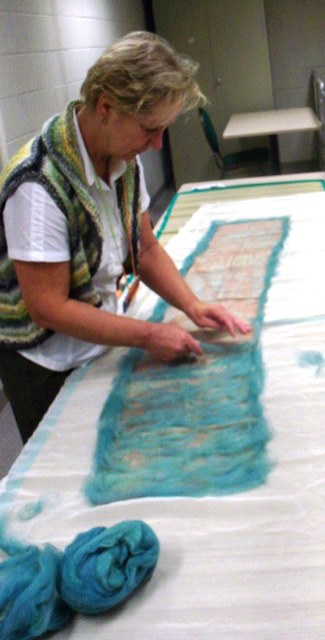
This one is Paula’s. She always adds more embellishments than I do. She used pre-felt, silk roving, silk hankie, pre-yarn, flax, silk noil and pelsul locks I think.

Finished SoapsThen we made felted soap. Mine’s orange and Paula’s is green.

Felted RocksAnd the last samples are felted rocks. Paula’s is on the left and mine is the hairy one on the right. All in all, we’ve spent around 12 hours preparing for a 6 hour class. This doesn’t include the time we’ll spend gathering up all the equipment needs, packing up the car and the preparations of setting up the day of the class. I like to be prepared, so I’m not complaining, just letting you know that the time a teacher spends is not just in the classroom. Hopefully, we’ll get enough students signed up for the class to run. Right now, we still have openings so if you’re in northwest Montana, we’d love to have you join us. Just click on the link in the first paragraph to sign up. 

Are you teaching classes? What are your thoughts about class preparation? Any tips for other teachers? We’d love to hear your thoughts. Do you take classes? Do you have suggestions for how teachers could be better prepared or suggestions for better teaching methods? We’d love to hear those too.

Purses and Designs

Purses and Designs

I’ve done a little bit more work on a couple of the purses I started. I’d already sewn up one of the slubbed white ones, and now I’ve added the button and button-hole. I thought doing large-ish blanket stitch around the button hole would suit the colours and style of this purse.

purseI used some slubbed wool I bought quite a few years ago to make the felt for this. I added some extra threads and bits of silk to the felt. I can’t find a photo of it, but this piece is very similar, and this is a close up of the texture.

backI used a cream vintage button, and kept the natural uneven edges again for the back pocket.

insideThe other purse I worked on was one made from a piece of felt and squares of silk paper. It was one of my favourite pieces, the silk squares are so shiny. I’m still undecided about the button, I’m thinking of using this vintage one:

frontThis is the back:

backAnd the inside, I like these purses with two pockets because you get to see more felt than on the zipper ones:

insideThe other thing I worked on last week were some collage sheets. I’m working on designs for sheets to sell on etsy and maybe even do some designs for fabric through Spoonflower and some printed silk. I hoped I might get some feedback on the designs, so I’ve made some samples and uploaded them here. Feel free to print them and use them, but please don’t sell/redistribute the designs.
image comp

Classes at the Conference

Classes at the Conference

This last weekend I was teaching at the Ontario Handweavers and Spinners biannual conference. Here are pictures of the Nuno felting class. There where only 3 people in this class. It was a preconference class. The full conference started that evening with the workshops the next day.

Here they are putting the wool around the edges.

putting wool around the edge of the scarf 2 putting wool around the edge of the scarf

Then laying out the pattern.

making the pattern making the pattern 3 making the pattern 2

Close up

layout close up layout close up 3 layout close up 2

Fixing a spot that didn’t take. We needled it down and gave it a little rubbing on both sides and it was all fixed.

fixing a spot

Finished scarves

finished scarf 2 finished scarf finished scarf 3

And the happy ladies with their scarves and a sample done on cotton that they had time to do at the end of class.

happy felters

At the last minuet the needle felting teacher had to pull out with a family emergency so they asked me to fill in. I didn’t take any pictures of the process we only had 3 hours to complete a project so we really had to move.  Here they are at the end, happy with their projects. Four sheep ( I supplied the legs so they would have time to complete them. ), one pincushion flower and a little person.

Happy needle felters

All in all it was a great time with lots of friendly people. I will share more about the conference in another post later.

Ice Dyeing – A Quick How To

Ice Dyeing – A Quick How To

My local fiber art group did some ice dyeing yesterday and I thought you might like to try it. It’s a simple process, doesn’t take long and gets great results.

MINOLTA DIGITAL CAMERA


The supplies needed are ice, cotton or silk fabrics, fiber reactive dye powders, soda ash, water, a container for the soda ash liquid, a container about gallon (3785 grams) sized to dye in, dust mask, gloves and a spoon to apply dyes. I have not tried this method with acid dyes but it would probably work. You would just need to steam the fabric before rinsing it out.

The first step is to mix 1 cup of soda ash with a gallon of water, stir until dissolved. Place all your fabric in the soda ash water and soak for at least 30 minutes. Take your gallon container, glass jars work really well for this, and place a layer of ice on the bottom of the jar. Put one piece of fabric on top of the ice and just squash it down into the jar. Put more ice on top of the fabric. With your gloves and dust mask on, sprinkle about 1/4 to 1/2 teaspoon of dye powder over the ice. We used 2-3 colors per layer.

ice dyeing 4


Place another piece of fabric on top of the dye powder layer. Put more ice on top of that fabric and sprinkle more dye powder on top. Keep layering fabric, ice and dye powder until the jar is full. I used reds, blues and blacks in the jar seen in the photo above. You can use any colors that you wish.

ice dyeing 3


You can see Carole layering her fabric, ice and dye powders.

ice dyeing 2


Bunny used a large dye pot to work in and it worked just as well as the glass jars. Plus it holds more fabric so you could do larger pieces easily this way.

ice dyeing 7


Once your jar is filled to the top, do a last layer of ice and dye powder and then close with a lid. If you don’t have a lid, use plastic wrap over the top. Then set the container aside for 24 hours. The ice will melt and the dye powders will mix with the melting ice and dye the fabric with fantastic patterns.

MINOLTA DIGITAL CAMERA


Here are my two jars after melting for 24 hours. The hardest part is not disturbing the fabric. Pour out the excess dye liquid and then rinse the fabric. I rinsed three times in cold water in the sink and then put the fabric in the washing machine with a small amount of Synthropol and washed with a regular wash cycle. Then iron the fabric. 

MINOLTA DIGITAL CAMERA


This is one of the pieces of fabric that was at the very bottom of the red and blue glass jar. It’s very dark but I think it will be really nice with stitching using a light-colored thread on top.

MINOLTA DIGITAL CAMERA


I used a variety of small pieces of cotton of various weights that I had handy. 

MINOLTA DIGITAL CAMERAThis is 90# cheesecloth and this is just a small portion of it. It dyed beautifully. You could also put cotton thread in the dyeing jar but I didn’t have any white thread to try. You can also over dye fabrics this way so if you have a fabric that you don’t particularly like, try over dyeing it with this method.

MINOLTA DIGITAL CAMERA


I loved this one. It was on the very top of the red/blue jar.

MINOLTA DIGITAL CAMERA


This was some cotton muslin that was stitched together prior to dyeing. It reminds me of sunlight through the tree tops.

MINOLTA DIGITAL CAMERA


The ice melting really gets different reactions of the dye with the fabric than you can get in other methods. This works with snow too but for those of you that rarely get snow, ice is simple and gives good results.

MINOLTA DIGITAL CAMERAThe colors will be lighter if you use less dye powder and darker with more dye powder. You can mix a variety of colors or not. The results will always be different and you won’t be able to duplicate your results but that to me is the best thing about this method. Each piece of fabric will be unique. I didn’t have any silk but this will work with silk as well. I think this method would be really good to use on silk that will then be nuno felted. 

If you try out ice dyeing, please post photos on the forum or on our Flickr group, we’d love to see how it worked for you.


Sewing and Experimenting

Sewing and Experimenting

I’ve been trying to continue with the things I learned during Ruth’s challenge for getting 5 minutes of fibre time into each day. I don’t always manage that and often end up with one or two days where I have a couple of hours fibre time, and 3 or 4 days without, but I’m organising my time better and having projects at different stages, ready to work on when I do have the time. On my desk I have a box of  felt pieces that have been measured and cut and are waiting to be sewn. I also have a box of part made up items; things like purses, glasses cases and coin pouches which have been sewn on the machine and are waiting for me to finish off with blanket stitch. These are a few of the purses at various stages, the blue ones just have the back pocket mahchine stitched into place, the white piece on the left has some stitching around the pocket edges, and the one at the front is just in need of a button and buttonhole.

pursesThis is one of the camera cases I’ve been working on. The gray fibre is carded silk carrier rods. I blended some of the silk ‘fluff’ with merino and used some for surface texture.

carrier rodI mentioned last time that I had one more felted piece using the pink synthetic fabric. It isn’t really meant to be anything but an experimental piece, combining nuno techniques and using a resist. This is a compilation of images.

4 imagesAnother experimental piece I did was one using some crimped acrylic fibre that looks like a synthetic version of laps.

lapsIt produced a really nice effect.

acrylicI have managed to finish off a few pieces and must get them photographed for listing on etsy. This ring pouch is one piece I finished. I first made some heart ring pouches a few years ago so I had somewhere safe to put my rings and bracelets when I take them off for felting. I’ve made a few more for gifts. They’re only small, about 2 inches high and 2.5 inches wide, this photo makes this one look huge!

ring pouchIf any of our UK readers use a lot of fabrics (I know we have some who are doing City and Guilds courses) you might be interested in a post I did on my blog the other day, about Abakhan, the fabric/craft shop I buy most of supplies from. I’m always interested in learning about others though, so if you have a favourite, feel free to share it, we all benefit from others’ experiences, especially if it saves us money 🙂