I taught a Nunofelt Scarf class a couple of weekends ago. I had a fun group of ladies who were really interested in learning this technique.
Here are a couple of pictures of the setup with the ladies working on thier layout. They used hand-dyed silk blanks and Merino wool. Then there were lots of extras for them to add, lots more merino in many colours, handspun yarn, speciality wools and several types of silk, silk top, silk hankies and silk throwsters’ waist. A few brought some of thier own alpaca too.
and the scarves they were working on.
This slideshow requires JavaScript.
And then we were too busy enjoying the felting for me to remember to take more pictures. Well, I thought I took more pictures, but I guess I didn’t do it properly.
I had two ladies who had to leave early as they had a long drive. They worked diligently to be done before they had to leave. They did a great job, and I hope to see them again.
Here are the other 6 ladies and thier finished scarves. I am pretty sure they had a good time.
After that fun I had to get to work myself. I had to resupply The Log Farm store. They sold the last of everything during Sugar Bush. I have been busy making Dryer Balls and Felted Soap
Next are some drop spindle kits.
All 3 of these are fairly easy to put together and sell well at a relatively low price point. What do you make and sell in this price category? I have been thinking that cards with pictures of my felt might be a good idea.
Hi all, although I haven’t been doing much felting myself I have been teaching others to do it. I ran my Nunofelt scarf class again this last weekend. I had five lovely ladies at the Ottawa Valley Weavers’ and Spinners’ Guild classroom.
The first part of the class is talking about all the fibres. Students are amazed at all the kinds of silk. I usually bring hankies, tops, throwsters waste and recycled sari silk along will wool BFL locks and sparkly nylon. They get to pick their hand dyed scarf blanks and then spend at least 15 min trying to decide what embellishments they want to use. It’s lots of fun watching and helping with colour and texture choices.
Silk hankies
Silk Tops
Dyed Silk Throwsster’s waste
sari waste
Sparkly nylon
It is so hard to pick.
Then it is on to lay out the wool. Once this starts I put the silk blanks away so no one is tempted to change their mind halfway through the layout. I keep all the wool and embellishments out until they wet everything.
Everyone enjoys using the ball browser sprayers to get everything wet.
In this group, they all stayed together during the different stages of felting. Often they become staggered; someone wants to be first done and another will be very relaxed and go slower. In the end, they always finish and it’s interesting to see the different styles of learning and doing the same thing.
rubbing
rubbing
rolling
rolling
I didn’t get any pictures of the gently squishing and tossing to full but here they are finished.
nuno scarf
nuo scarf
nuno scarf
nuno scarf
nuno scarf group
nuno scarf group
All in all a great class with happy students.
The only odd thing that happened was one lady had brought her own wool, marked merino and she was sure it wasn’t superwash. She added my embellishments. One of her colours did not stick to the scarf anywhere. My first thought was it was superwash. However, it did seem to felt and grab the silk embellishments on top of it. Nowhere she had used the copper coloured wool stuck to the silk backing. It was attached by other colours surrounding it so it’s all one piece but I have no idea what was/is going on with the wool, any ideas?
I am out of time to do an original post today. So it’s a throwback post. This one is from the early days of 2012.
Doing samples is fun and I still have the last two. They are just fun to have.
I haven’t been doing much that is interesting to look at lately. Everything is white and is waiting for the dye pot. I thought I would show you some samples I made a little while ago. The first 2 are purple merino with some silk strips on them. I thought they came out nicely with lots of texture.
Purple wool with strips of silk before feltingPurple samples after felting
The second is orange merino with some silk and curls on it, here I wanted to felt the curls right into the background. I also wanted to see how it would stick if I put it over the silk. I really like the way the little blob of curls all became one with nice texture. The curls going across the silk stuck down very well. Enough wool migrated through the silk to grab the courser wool of the curls.
Orange wool with silk and curls before feltingOrange sample after felting
This last set I wanted the curls to be attached at the base and left loose and hanging for the rest of their length. I use a small piece of scrap floor underlay with a hole in it so the wouldn’t stick down. It worked very well. I am not sure how I ended up with one really long curl.
Small samples with curls with their resists on before feltingSmall samples with curls after felting.
I am not sure what I am gong to do with these. I might make some buttons or hair clips. Do you have any ideas?
In December I was trying to supply lots of different places with felt things. In truth, I was a bit over-stretched. I decided to focus on making plant holders, with a few tea light holders and a couple of vases. Oh, and some cards. Here’s an overview of the things I made.
PLANT POTS AND VASES
First I made four plant pot covers from merino wool and silk pre-felt and incorporating different pieces of vintage lace
Strips of vintage lace laid verticallyVintage lace flowersTatted flowers from a vintage dressing table setA broad strip of vintage lace with textured flowersPlant pot covers with different types of recycled vintage lace
Next a couple of vases, also with a pre-felt base
Strip of broad vintage laceRecycled crochet pansiesThe left-hand one works both as a vase and a large tea light holder. For the vase on the right, I attached the pansies to the felt by felting over the strings that joined the flowers. I had to add a couple of stitches to the flowers on either end to secure them as there wasn’t any string to work with
On to some plant pot holders. When cutting the resist out of the vessel, I use the smallest hole I can that will allow me to fit the plant and its pot inside. All of these have a water proof plant pot holder inside, plus the plastic pot with drainage holes that the plants are supplied in. I like to start by looking at a plant and ‘asking’ it what sort of pot cover it might like.
A festive plant pot holder with green merino and red locks reflecting the leaf coloursA large nuno felted plant pot holderLayout of the under-side of the vesselLayout of the top of the vesselTop view finished pot holderSide view of finished plant pot holderRecycled silk from a very sheer silk beach dress I found in a £1 charity shop bargain binNesting bowls inside each otherNesting bowls separated out
These nesting bowls were made using a carded merino and silk batt and are very lightweight
A display of my work in Creek Creative gallery, Faversham
One of the galleries where my work was part of a month-long Christmas local makers market
PICTURES
Now we’re into the new year and I really have to focus on making some pictures. I mentioned at the end of my last blog that I’m delighted to have the opportunity to fill the walls of a lovely local Michelin starred pub / restaurant (The Sportsman in Seasalter) with felt pictures for 6 weeks in April / May this year. The ‘fill’ bit is something of a challenge. I tend to make enough work as I go along for my normal sales and exhibitions. Making an extra 35 to 40 wet felted pictures for this exhibition will take a lot of work. I’m finding the prospect of making all those pictures both exciting and rather daunting.
In preparation for the picture making, in November I ordered 2 batches of solid beach handmade frames from my lovely local frame maker: 10 at 63 x 63cm (approximately 25 x 25 inches) and 10 at 35 x 35 cm (approximately 14 x 14 ins). I will have to order more soon but I thought this would give me a good start. I had some serious studio-tidying to do last week before I set about the pictures… and finally I was ready to start. Where to begin?
First I made a ‘big wave’ picture for one of the larger frames. I say ‘big wave’ in inverted commas as the waves round where I live are generally very small so we’re not talking surfing potential. I’m endlessly intrigued by wave and sea patterns and have made this type of picture several times before. They always end up looking very different. I’ve taken lots of reference photos such as this one……
Example of a wave reference photo
…..that I use as a starting point.
Here’s the layout using lots of colours of (mostly) merino wool for the water; merino and kid mohair top, silk hankies, mohair and sheep locks and some vintage lace scraps for the wave; and hand-made pre-felt cut into pebble shapes for the beach. These were laid on 4 layers of merino for the base. I’m not really sure why I did 4 layers – it makes a lovely firm base but it’s a lot harder work to felt than 2 layers and as this is going behind glass, it was a bit over-kill. I’ll try not to do that again.
Once it was felted and dry, I used a small metal tool to pick up some sections of wave, to make it more 3D. Here’s the final picture and the picture sitting on top of its frame, waiting for me to get round to framing it.
Finished picture ‘ blue sea, big wave’Picture lying on top of its frame
I’ve worked on this for more than 12 hours spread over 4 days, not including making and cutting the pre-felt pebbles, which must have taken another couple of hours, and I’ve still got the framing to do. I’m very conscious of how many pictures I’ve got to make, so I decided to go smaller and quicker for the next 3.
One of the ways I can speed things up is to use recycled silk fabric to provide the pattern (and texture) for the water and the beach. As an avid buyer of silk scarves from charity shops, I have 2 huge bins of material to rummage through and upcycle.
Picture two – which I’ll call leopard print – I chose a sheer leopard print scarf for the beach and a small blue striped one for the water. Because the blue scarf is not very wide, I have to join two pieces of fabric. To reduce the visibility of the join, I first cut into one of the pieces so that the join would be staggered. You can see it in the layout but hardly at all by the time it’s fully felted.
Joining the silk picture layoutfinished picture finished picture sitting in its framePicture two – leopard print wave
I’m reasonably happy with this, though I think the wave is a bit too solid-looking.
Picture three – ‘dark blue sea’ – I go with a rather lovely dark blue patterned scarf for the water and a pale patterned beige one for the beach.
layoutfinished picture Picture three – dark blue sea wave
Again, reasonably happy with this. I like the sea effect and the less solid wave but the blue cobweb felt strip I put in front of the wave to look like the remains of a previous wave is a bit dense and straight.
Picture four – ‘reversible silk’ – I’m rummaging around for a different piece of silk to use for the water. I find one I like but I’m not sure quite how it will felt. It’s also reversible and I’m not sure which side to use. I decided to make a very small sample to see how it felts and it occurs to me also to see what happens if I cut strips to alternate the two sides of the fabric.
Here’s the sample layout. I’ve run out of merino wool in this pewter colour but fortunately have some Corriedale. I felted it very quickly and forgot to take a picture of the finished sample but it was enough for me to conclude it felted well and it was worth trying the reversed strips thing.
Quick sample layout to test the silk and laying out in strips
The beach fabric is also a little different – with a bigger and higher contrast pattern.
Here’s the layout and near-final picture. I say near-final as I only finished fulling it yesterday afternoon. It’s still damp (I think the silk will become a little lighter and shinier when fully dry) and I haven’t yet picked up any of the fibres in the wave.
Reversible silk sea big wave layoutReversible silk big wave near final picture – not quite dry
This is my favourite actual wave so far – I definitely like the variation in colour and greater impression of transparency. I’m pleased with the way the cut up silk worked for the water too. I’m not yet decided about the beach pattern – interesting or too much?
And finally, a photo of the large and a small picture side-by-side, so you can get some idea of scale
I’m framing the three small ones without glass and the large one with. People react differently to this. Some like to see (and feel) the texture and not have the reflections you get with glass. Others worry about dust. A few (me included) worry about moths. Most of the pictures will be behind glass but a few won’t. I’ll review this as I go along
By the time I write again in March, I should have lots more pictures made. Wish me luck! I will be making some large ones with sea birds but these take so long, I’ve decided to make some less complex ones first to see how long I’ve got to spend on the most time-consuming ones. I’m having to step-up my levels of planning and organising to try to make sure I have enough work to fill the venue.
Happy new year everyone. I hope it’s full of joy, peace and creativity.
September has been a busy and exciting month in contemporary textile art (specifically felting art) in Ireland so I thought I would feature what I got up to, I will call it my September Adventures.
Weather wise, the month started as we hoped it would continue (it didn’t by the way) with a return to fine warm weather – something we had not seen since last June. So I took the opportunity to visit our National Botanical Gardens (https://www.botanicgardens.ie/) which are situated on Dublin’s north side. The gardens (there’s free entry, if you ever visit Dublin, Ireland) opened in 1800 and are an oasis of calm with restored glass houses, magnificent specimens, bee hives and, of course, a tea room. There’s also a pedestrian access to the historical cemetery next door which I suspect is not seen too often. Glasnevin Cemetery also houses a genealogical archive for anyone wishing to trace their Irish ancestors (https://www.dctrust.ie/genealogy/home.html).
But, I digress. Let’s go back to the gardens. My visit coincided with their annual exhibition ‘Sculpture in Context’. The exhibits feature artworks in various media including ceramics, wood, metal. I decided to focus purely on the textile element of the exhibition and to photograph any pieces I came across as I wandered around. I was aware that some of the members of Feltmakers Ireland had pieces accepted for the exhibition; Clare Merry (http://www.merryland.ie/index.htm) an exceptional artist who quietly creates her pieces was featured. If you would like to see some of Clare’s work please check out her website, which, she tells me, is not really up to date, or Google her and feast over the images; Fiona Leech(https://www.instagram.com/feltathome/?hl=en) had three beautiful pots which were originally housed in the cactus house. Annoyingly two of the three pots were stolen within a matter of hours of their arrival and the remaining one was moved to a safer spot in the garden’s gallery. I thought I would show you the three pots as they were originally grouped together.
Fiona Leech’s three pots (source: Fiona’s Instagram page)
I searched but could not find Leiko Uchiyama’s beautiful work but here is a link to her website if you would like to check her out: https://www.leikofelt.com/my-felt-work/ I found two other exhibits from members of the guild. Their featured work while not through the medium of felt were equally stunning. Congratulations Mel Bradley (https://melbradleysilks.ie/) and Mette Sophie Roche (https://metteroche.com/)
I put together a slideshow of my textile finds in the gardens which I hope you enjoy.
Mette Sophie Roche; The vital matter of Fungi
Mette Sophie Roche; The vital matter of Fungi (detail)
Mette Sophie Roche; The vital matter of Fungi (detail)
Fiona Leech; Drought
Fiona Leech; Drought (detail)
Frances Crowe; Terrain
Frances Crowe; Terrain (detail)
Frances Crowe; Terrain (detail)
Claire Merry; Floral Path
Claire Merry; Floral Path
Ella Quinn; It’s nothing but a dead fish
Niamh O’Connell; Cocoon
Mel Bradley; Grasses
Mel Bradley; Grasses
We had our first meeting after summer in Feltmakers Ireland and as usual the committee put an incredible amount of preparatory work into making it successful. It was a busy morning as everyone beavered away felting flowers to create a tapestry as part of the 20th anniversary celebration for the guild. Much to everyone’s delight, the guild’s founder Elizabeth Bonnar joined us. I thought I would feature Elizabeth here as without her it is doubtful that there would be such a vibrant community of feltmakers today. Here she is with her granddaughter and with the committee.
Feltmakers Ireland founder Elizabeth Bonnar and her granddaughter
Feltmakers Ireland committee with founder Elizabeth Bonnar (3rd from left)
Here are some photos taken on the day.
Feltmakers hard at work
Breda and Elizabeth hard at work!
Lots of flowers were made that morning by members
Suzanne, Breda, Deirdre and Elizabeth catching up
The finished tapestry was revealed at Feltmakers Ireland ‘Bountiful’ juried exhibition which opened on 30th September.
Feltmakers Ireland members: The Floral Tapestry to celebrate 20 years.
The exhibition also saw the launch of the new book “Exploring Irish Wool for Feltmaking” The book is the product of a collaboration between many members of Feltmakers Ireland guild, sheep farmers, shepherds, shearers and suppliers and not forgetting the various washers and carders who took the raw fleeces, converting them into usable fibres for testing. I think this approach was quite unique and it will certainly be a worthwhile and useable addition to any textile maker’s reference library. Understandably it was a huge project so congratulations are due to all, especially Annika (Berglund), Breda (Fay) and Sinead (Doyle) who collated all of the findings into an invaluable resource on Irish wool. It’s so full of well written practical advice and it was made extra special by the presence of one of our Government Ministers, Pippa Hackett an ardent supporter of the project, who officially launched the book and the exhibition . Here is a quick look at the contents page to give you an idea of the scope of the book:
Exploring Irish Wool Contents page
An added bonus is that feltmakers/wool artists can now make direct contact with numerous artisanal suppliers so there is no excuse for any of us not buying closer to source and of course for anyone overseas who wishes to use Irish wool fibre in their work purchasing from source.
I hope you have enjoyed my September adventures. It has been an exciting month. Once again I would like to thank Feltmakers Ireland and their hard working committee who work tirelessly to maintain this vibrant community – it makes such a difference that, as textile artists, we can gather together and create regularly. I take my hat off to Elizabeth Bonnar and her decision to found Feltmakers Ireland twenty years ago; the catalyst for lifelong friendships, masterclasses, collaborations, exhibitions, networks and travel.
To complete September’s birthday celebrations, I thought I would produce a slideshow of the Bountiful exhibition which is running for the month of October in Phoenix Park, Dublin Ireland. I took photos on the day so I apologise where the light may be shining on the artwork. There are over 30 pieces of art and it will give you an indication of where Ireland’s vibrant felting community is at in its journey. I hope you enjoy it!
Annika Berglund: Variations on a Green Theme II
Astrid Tomrop-Hofman: Positive Vibes
Deirdre Crofts: A good Day’s Catch
Clare Brophy: Share the Bounty!
Helene Dooley: Visualizing the beauty of the Sunflower Field
I had another wonderful day teaching some ladies to nuno felt scarves.
I was busy ( talking) and didn’t take as many pictures as I would have liked at the beginning. So no pictures of the starting silk. I dye the blanks myself using the scrunch method of low-immersion MX dying. I learned how to form Paula Burches All about hand dyeing site. It is an amazing site. Don’t go unless you have some time to explore, there is so much information. http://www.pburch.net/dyeing.shtml
If you click any of the pictures they should open up larger in a new tab.
Back to the class, here are the layouts just before we wet them down.
and then everyone got rubbing. This is the time it’s great to have a chatty group. It makes the work go faster. And I don’t have to do all the talking.
Sorry, no rolling pictures. The problem with a chatty group is I love to chat too and forget to take pictures.
But I do have some pictures of the finished scarves once all the fulling was done.
here’s a nice group shot from the end of the class.
One of the ladies went home and dried her scarf so she could wear it right away. Doesn’t Kim look great? The colours really suit her.
Denice also sent me a picture of hers when it was dry. I love the silk flowers.
It was a fun day for everyone.
I taught a short sheep class the other day. They were young people so just one picture of the finished sheep.
Some of the first felt objects I made were vases: made around a flat u-shaped resist that I designed to try to get a good even layer of felt on the base (wobbly bases not being good for vases). Every so often I get the urge to make a few vases, so I thought I’d show you some I’ve made recently.
My felt pictures are often inspired by my coastal environment. So, I thought I’d make some coast-inspired vases.
Silk laid out ready to prefeltPrefelt pebbles cut outVase layout ready for feltingFinished vase (with glass inside)
I prefelted some recycled silk scarf pieces to make pebbles then added pebble shapes to the lower section. The sea area had a pewter-coloured merino base with blue and green wisps of wool plus some silky fibre for the sea foam. The wave was a combination of some sort of knitted yarn I’d also found in a charity shop, with added mohair and the same silky fibre (I’m not completely sure what it was, it was just hanging around and looked suitable!)
2 more coastal vases – in the wild
I made 3 in total – here are the other 2.
Sometimes it’s the materials themselves that suggest pieces rather than the local scenery. I put some beautiful bright coral-coloured dyed locks against contrasting duck egg blue and teal merino and thought that might be interesting
‘Locks’ vase
Continuing my vase-making spree: I’d dyed some merino for a workshop last year and I thought it might be a good idea to use up some of the hand-dyed wool on vases.
Purple 18.5 micron merinoBlue / green 18.5 micron merinoRed / orange 21 micron merino The purple vase with hyacinthsRed / orange vase with roses
Now enter stage left the plant pot. A friend who’d previously bought a plant pot holder from me asked about making one specifically to suit a plant she had. I wrote a blog a while ago about my love / hate relationship with commissions but that was about pictures – I felt much happier about a plant pot as it’s not such a big commitment.
I was keen to include her in the design so I did a couple of very quick potential design sketches and consulted her on the fibre colour choices. As the plant was only in a plastic pot with holes in the bottom, I scoured my local charity shops and found a beer bucket to make the plant pot water-tight.
We decided to go for coral / pink / burgundy colours to highlight the under-sides of the leaves and an overall texture rather than a leaf-shape pattern.
Inner 2 wool layersOuter 2 wool layers
I decided to do the top of the inner 2 layers green so it would show when you look down at the pot. With hindsight I should have done the whole of the inner layers green but I wasn’t sure I had enough of the green so did the lower section white. I carded together various colours of merino and silk fibre rather than use the fibre labelled ‘carded’ on the fibre picture – but keep and eye on that as it comes back later on….. Then laid locks on top.
And here’s the plant in its personal designer pot. My friend was very pleased with it.
Then it was back to the vases but with a twist. I recently found in a charity shop an old chemistry lab heavy glass 3 neck flask and, as ever, I thought….I wonder how that would work with felt. There’s a little corner of my brain that is devoted entirely to felting possibilities and it kicks into play whenever I’m mooching about charity shops, which is often!
On the same day I found some interesting yarn in another charity shop so I splashed out a further 20p and thought I’d bring these 2 finds together.
I was clearly wearing my sensible head that day as I made a sample with the yarn to make sure it would felt and see how it came out. Even more sensibly, I used it on both sides of my sample (I wish I always remembered to do that) so I could decide which effect I liked best
Interesting yarn – cotton?Sample side 1Sample side 2
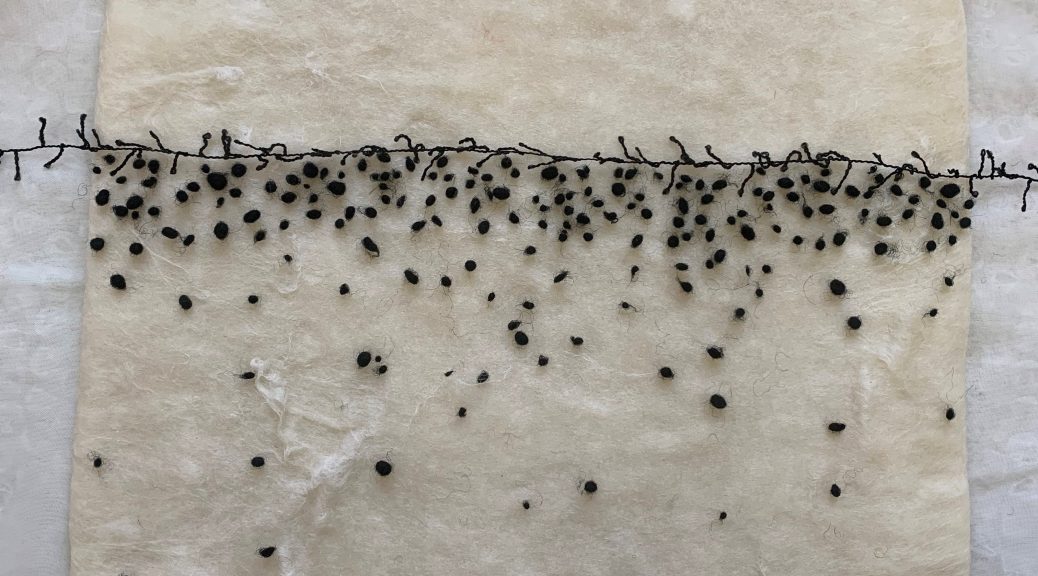
I stared to ponder the engineering challenge of the 3 neck vase and decided I’d have to have a hole underneath. Usually my vase covers are solid on the under side and the glass slips into the top. With this I wanted the felt to fit tightly round the necks so I’d have the glass entry point on the base. I carefully measured and calculated at least 40% shrinkage then made my resist. This time an upside-down U-shape
I laid 4 layers of natural white merino over both sides of the resist then ran a single strip of the yarn around. I then added single black nepps below the yarn line, more densely near the yarn and just a few further down the shape. This seemed like a good idea but it took absolutely ages to separate out individual nepps, pick out only round ones and of a similar size, and then place them where I wanted them to sit. One of those decisions you regret before you’re half-way through but can’t bear not to finish as you’ve already invested so much time in it!
Anyway, here’s the finished vase. Actually, I’m pleased with the pattern, although I’d intended the yarn to sit a bit further up the flask. I’d not properly taken into account how much of the felt would be underneath.
3 neck vase – with & without tulips
I thought I’d find some more old 3 necked lab flasks. Having consulted both EBay and Google it rapidly became clear that they are not to be had. I have not found a single similar 3 neck flask (there are new ones which are much thinner and tend to have domed bases, no good for vases). The nearest I could find was a similar heavy glass 2 necked flask which is on EBay for £40. £40! I now feel I can’t sell my vase as I don’t want someone to buy it for the flask and rip off the felt! So, that one is staying with me, at least for the time being.
And finally we come back to the pre-mixed fibre I mentioned (labelled ‘carded’). If you’re ever lucky enough to visit World of Wool in Yorkshire, you’ll see they have two huge skip-type bins full of ends of lines and wooly remnants (one with coloured fibres and one just cream /white). There’s a low fixed-price per weight for the content of each bin and you can ferret out all sorts of hidden gems. I can spend a long time almost falling into those bins. This mystery fibre-mix was one such find.
I thought I’d make a vase using that plus a piece of a pink silk scarf I’d just found in a charity shop. That day, alas, I was not wearing my sensible head and didn’t think to make a sample: partly because I didn’t have a lot of the fibre and partly, well, because I just didn’t think about it.
I laid out 2 layers of a matching pre-dyed merino, 2 layers of the mystery fibre and a strip of silk and set about felting. Fairly soon my error became clear. The mystery fibre was not felting at all. I persisted. It still didn’t felt. I persisted. And persisted. In the end it did felt, presumably with help from the 2 inner layers of merino. It shrank more than I’d expected and the fibre hadn’t been all that keen on pushing through the silk, which means the silk ruching is rather loose in places. But it’s fixed completely round the edges and anyway, I like a bit of loose ruching.
Fibres being laid outVase with tulips‘Raspberry Ripple’ Vase
So, here are my recent adventures in vase-making, with a little diversion via a plant pot. I hope you’ve enjoyed them. Do you have a favourite?
Here’s a photo of the scarf and a close up. If you look on the mid to lower right hand side of the right hand photo you can see the weave. (click on photos to enlarge)
The fabric has a fun pattern and I decided to use blue green for the wool color. I wanted to use a minimal amount of wool so the scarf stayed light weight and I wanted to avoid shrinkage of the length of the fabric as it was already fairly short. I had some blue green short fiber merino in batt form that I decided to use.
I decided to use blue tape to outline the fabric so I would have a pattern for laying out the wool. I could have turned the fabric over and laid out the wool on to the fabric but didn’t feel like turning it over after layout. (Being lazy again)
So I laid out a very thin layer of wool laying the fibers at a right angle to the length of the scarf. Then I put the fabric back on top of the fiber, wet it down and began rubbing on the fabric side. I usually always recommend doing a sample first to make sure the fiber will migrate through the fabric but since this was such an open weave, I didn’t think it would be an issue. And, luckily, I was correct in that assumption. The fiber migrated very quickly and I ended up just rubbing the scarf with soapy hands, rubbing the scarf with fabric side down on a rubber ridged surface and it held together very quickly. Then I did some fulling holding the scarf in my hands and accordion (sort of) style folding and stretching lengthwise to full.
Here’s the scarf after felting and fulling. As you can see, it shrank more than 50% of it’s width but minimally lengthwise. The scarf is very lightweight and still long enough to wear as a scarf instead of a cowl.
So now I have a new scarf just in time for 6 inches of snow and 1 degree F cold that dropped on us this past weekend.
This is a throwback post. We had a very busy first day at the farmers market. The busiest day we have ever had. We had what we thought was a 3-week supply of Pasties and sold all but 2 of them. So there will be no felting this week while I restock 4 flavours of pasties for next week and hopefully enough to last more than one week. So, I hope you enjoy this post from a few years ago.
The museum store wanted some shawls that are more “springy”. This is the first one.
It is a pastel pink and blue silk with pale pink wool on 2/3 of it. I then added some silk hanky flowers and leaves at each end and in the middle. It was to plane so I added some more leaves down the length. At this point, I remembered to take some pictures.
The pink wool is in a very thin layer so it will be very lightweight for spring. The finished piece is about 15 inches wide so it can be a small shawl or a wide scarf.
I like doing shawls with a silk section left to float as you walk.
The pictures are in my studio, taken hastily as my turn to blog snuck up on me. Everyone seems to be complaining about it being too dull outside to take pictures. I have the opposite problem. The sky is blue, the sun is shining and the ground is covered in white highly reflective snow. It is blinding out there.
Are you thinking about spring things with soft colours or are you still in hibernation with warms cozy colours?
I’m still playing around with Ponderosa pine bark samples. This time I wanted to play with colors and add some nuno felted silk to the top layer. I wanted to see how neutralized the colors would become with fiber migration in the felt. You can see my first bark sample here.
So I started with blue green and red orange, complementary colors on the opposite sides of the color wheel. When you mix these type of colors with paint, you will get a neutralized color leaning towards brown or black. So what would happen with felt with the fiber migration? I didn’t have a true blue green so I used a layer of darker green leaning towards blue and then added turquoise on top of that. Then the red orange on top since the Ponderosa pine bark leans toward more red orange. I used a herringbone style layout.
Then at the last minute, I decided I wanted to add more texture and decided to use the left over pieces of pre felt from my poppy vase I showed you last week. It wasn’t even really felted at all, just laid out and wet down. I put it underneath the layers of laid out wool as you can see in the photo on the right. I should have used harder felt as you will see later.
I then wet it all down. You can see the back in the middle photo. On the right, I added some cut pieces of hand dyed 5mm silk that Paula gave me. (Thanks Paula!) These were cut in the shapes of the bark after it falls off the tree and I just randomly applied them. There are two layers of silk in some places.
Here is the piece after felting. We have been having a discussion over on the forum about rubbing vs rolling and I was thinking about everyone’s replies when I was felting this piece. It seems everyone has different ways of felting. Check out the discussion here. We’d love to have your input too! If you want to know how this piece was felted, I use a ribbed mat underneath and mainly rub, apply pressure and gently vibrate with my hands.
And here’s the piece after fulling. I fulled this piece very hard as I wanted a lot of fiber migration and mixing of colors. I did that by rolling the felt against itself on the ribbed mat, throwing, and scrunching between my hands. I will definitely have to play with mixing colors more this way because I love the end result. I think I will try making some batts with these colors and then felting them to see the difference in color mixing. I didn’t like the end result of the use of prefelt to add more depth to the piece. The prefelt just squashed out and felted into a sort of small hill. The already hardened felt in my first bark sample was much more defined as you would expect.
I am planning on adding some free motion machine stitching to get more definition in the depth. I may also add more fabric applique but haven’t decided yet. What do you think it needs?