Hi All It seems I forgot I had to post today so I am late. I am reposting a post showing some of the past Holiday Exchange Cards that we have done. I did remove the links to sign up for this exchange.
Hi all, for those who may not know we also run an interactive forum for felting and fiber folks. It’s a great place to share your work, ask questions and help each other out. http://feltandfiberstudio.proboards.com/
Each year we have a holiday exchange. You make a small felted postcard or similar size card with some felt on it.
Here’s the timeline:
October 4-Nov 9: people sign up
November 10 partners are announced.
November: Make your card, contact your partner for an address
December 1: Mail your card
Here are some of the cards from our past exchange, there has been lots of variety.
For the studio holiday card exchange, I had Tesi’s name. I was in a bit of a hurry to get it finished so I chose a simple design, a holiday decorated tree.
Looking through my stash, I found a couple pieces of nuno felt, a screen printed piece of felt in green and a tree trunk that was already stitched! I love when a plan comes together this easily re-using bits and pieces from my horde of “stuff”.
This was the beginnings of the idea. I had some “wads’ of white wool that I thought I could use for snow and the background looks kinda snowy.
So I stitched down the tree and added some circles from the multicolored nuno felt. Then I wanted to add a garland. As I was looking at what I had, I remembered my goldwork supplies. That would definitely add sparkle!
So I added some yellow felt padding at the top of the tree to give a raised effect. Then I could cover it with cut purl.
I used Gilt Bright Check Purl for the garland stitched down in “stem” stitch. The photos aren’t the best as the felt and the shiny gold make the camera confused and unfocused.
Now on to the tree topper. The hardest part in “cut purl work” is getting the sizes correct so that they fit correctly over the padding. I used Gilt Rough Purl for the tree topper. I decided against using the snow at the bottom of the tree as originally planned. I thought it was unnecessary. I glued the entire thing down to a blank greeting card and sent it off to Tesi in the mail and it arrived safely. Yay!
When Ann first invited us all to take part in a holiday card swap it was mentioned that our theme could be anything, it didn’t have to be particularly Christmassy…..and so mine wasn’t. I have to say that as more and more of the cards are now being shown, a part of me wishes I had gone with a Christmas theme, but it’s only a small part! My partner in the swap, Caterina, got in first with her card to me which I love and I felt that gave me permission to do what I really fancied doing! I won’t show Caterina’s card in case she’s going to do a post about it but let’s just say we were thinking along very similar lines.
I decided to make a mini Autumn/Winter forest floor mounted on to a 5” x 7” card. Starting with an off cut of Lutrador I used acrylics and Inktense to paint it grey with hints of green, or so I thought! Once I started to distress the Lutradur with the heat gun, what had looked very grey suddenly became very green as the green Inktense intensified. Rather than start again I decided to go with the flow and add more grey where needed later.
What was grey became very green!
Next I got out my box of Tyvek and Lutradur samples to see if there were any pieces of bark or leaves already made which I could use for this project.
The leaves were all too large apart from the one on the luggage label
All of the leaves turned out to be too large for the scale of the card apart from a small one attached to the luggage label on one of my workshop samples. This was the ideal shape and size so I used it as my template for the leaf to go on the card.
I had more luck with the tree bark as I found a few workshop samples, one of which hadn’t been painted and was the perfect size.
The barks been painted and I’m starting to audition pieces for the card
I can spend ages arranging and rearranging the parts, distressing the smallest pieces of Lutradur to get pleasing shapes and checking I’ve made enough to cover the background. Once I was happy with the amount of pieces I had the bark was embroidered and everything stitched down to a piece of brown cotton fabric.
And this is the finished card complete with Colonial Knots, felt pebbles and the little leaf. OK, it doesn’t scream “Christmas” but, as a keepsake, I hope it will remind Caterina of the friendships she’s formed with the F&F group and of happy Christmas 2023 memories.
Once I’d got Caterina’s card in the post I caved in and made a reindeer themed “Christmassy” card for my local textile group swap. After trying, and failing miserably, to draw a simple reindeer I turned to clip art and found this cute reindeer pose.
I’d recently seen images of beautiful little birds online that had been made from scrap fabrics and free motion stitch and these inspired me to do something similar with the reindeer.
I had so much fun making this one that I tried another pose, got carried away and went in to production!
These have been cut from fabric scraps and free motion stitched on to patterned card (which makes a great stabiliser!) I figured the antlers and legs would be a bit fiddly in fabric so I simply used a marker pen for those.
Cards have never really interested me in the past but these were such fun to make, I can see myself creating more to put aside for next year!
I hope all our readers have had a peaceful Christmas and here’s to a healthy, happy and creative 2024 for all of us!
I was getting a bit concerned about the card that I sent to Janet in Canada. I sent it out on November 4th and she didn’t receive it until November 27th. That is one of the reasons that we have people send their cards early so it has more time to arrive safely during the busy holiday season. But at last, she got it! So now I can tell you how I made the card.
Here’s the layout. I used a piece of white prefelt for the background and then added short fiber merino in blue green for the sky. I left patches very thin to make it look more snowy. I used “white” mixed 56’s for the snow but it wasn’t very white so I added a bit of white cashmere fiber that I have been saving. It was very white. Then I added silk noil to create a more snow like effect on the ground and in the sky. Finally over top of this, I added white prefelt tree trunks. I started with only one layer of prefelt but decided to add another layer over the trunks in the sky section as I felt that the blue green was going to bleed through too much.
Here it is after felting. I liked how the tree trunks overlapped on the top so I left them for awhile.
Next up was to add a little free motion machine stitching. I used an off white thread to give a slight shadow and more texture on the trunks. It’s kind of hard to see here but you can click on the photo to enlarge it.
Then I added a dark grey thread to give the characteristic birch tree look. I don’t use black for this because it feels much too stark. I think the grey looks more natural. Then I had to decide whether to crop or leave it as is. I finally decided on the cropping because it was just slightly too big to fit on my 5″ x 7″ card. I trimmed it up with a rotary cutter and attached it to a greeting card to send to Janet.
So here it is. I do think it looks very wintery which was the goal. I am going to have to make some more of these to sell as small art pieces.
And this is the wonderful card that I received from Janet. This is Janet’s first attempt at making a fiber/felt card and didn’t she do an awesome job? Thanks Janet for this beautiful card.
Annie and Lyn recently posted the Fourth Quarter Challenge. I thought I would take a look at what holiday decorations and cards I had created in the past. It’s always easy for me to forget about pieces I have created so it’s nice to walk down memory lane and I thought I would share what I found.
Here’s a set of cards that I made in 2017 for the Holiday Card exchange that we have on the forum. I used some samples that I had made for the Nuno Felting with Paper Fabric Lamination online class.
This is the card that I made last year.
And another card made in 2018.
Here’s the 2016 cards that I created.
And these are a few different ornaments that I created over the years.
In 2013, I stitched a bunch of these bowls to give to people filled with candy.
I just found another card from 2016. I’m not sure why I made so many different cards that year.
And just for fun, here I am with Deb and Nanci at Christmas Stroll at The Purple Pomegranate.
We did make some Ukraninan eggs one year (not exactly fiber but still holiday!)
And another just for fun photo of me as a baby by the tree.
Here’s a basket I made as a Christmas gift. I’m not much of a weaver but it turned out OK.
And I thought you might like to see a bit of winter decoration from Mother Nature.
That was a fun trip down memory lane. Now I need to get started on this year’s holiday card. If you would like to join in the forum’s Holiday Card Exchange, sign up here.
Or, if you have some holiday creations that you’d like to share, you can post them here.
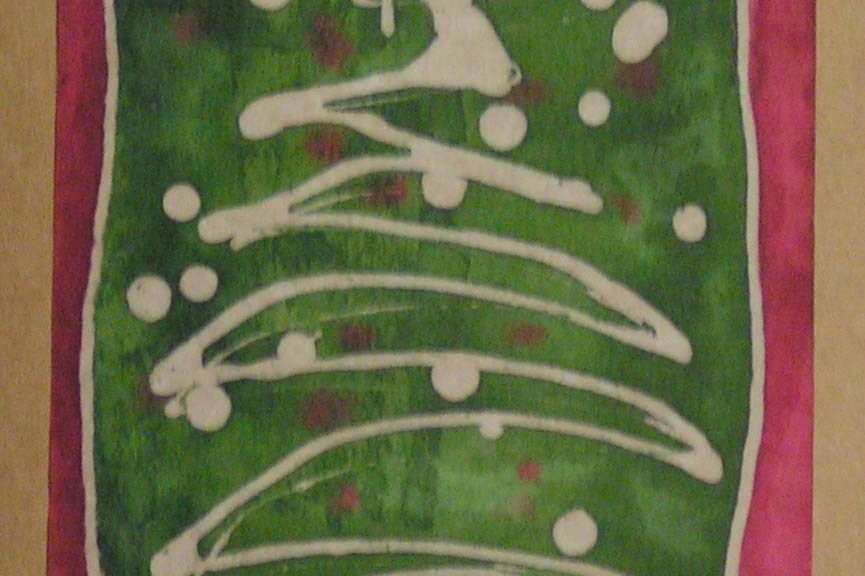
My local art group met in December and we created artwork on paper using batik techniques. Batik uses wax to apply the design and then the piece is dyed in multiple layers. Usually this is done on fabric. We were trying an idea we had seen in Cloth, Paper, Scissors to apply the wax to paper with tjanting tools and then paint with ink.
Here is everyone getting started.
And a little closer look. We all did a variety of designs.
This is where Paula was setting up some ink to paint her designs. I didn’t get any photos after that because I got too involved in the process. I was working on some small Christmas designs so I would have some cards to give people. When I was creating them, I decided they would have to be like ugly Christmas sweaters because they were pretty ugly. The tjanting tool I was using was quite large and the wax came out very quickly so the details were lost. And I was pretty messy with the wax. After the wax dries on the paper, the ink is applied. Once the ink dries, the paper is placed between newsprint and ironed to remove the wax. We used soy wax so it melts easily and at a lower temperature than beeswax.
And here are the results after ironing and cropping. I used the type of cards that the design fits into a small frame except for one tree which I didn’t want to trim down. I actually like the ones that look more abstract where the detail was lost. And they weren’t as ugly as I thought they were going to be. I have used them all up and perhaps, I will try this again to make more cards. It was a fairly quick process.
Do you make your own holiday cards? We’d love to see if you do. You can share them over on our free forum.
Every year we have a card exchange on the Felting and Fiber Studio forum. Whoever wants to participate signs up, we choose partners and those partners exchange a hand made card. This year I had two partners as we had an odd number of people, so I made two cards. I like to do more of a winter card rather than a specific holiday card. So this year’s card was all about snow and snowflakes.
I started with a piece of felt that I had stamped with the spiral stamp shown above and then drawn on with thickened dye. I attempted to over dye the felt but it wouldn’t take any more dye. The photo on the left shows the back side of this piece of felt. (I forgot to take a photo before I fused the sheer fabric on the front.) I decided that I would stitch snowflakes over the stamped spirals with the lines in between stitched to look like frost or jagged ice. But the color wasn’t too good so I looked in my stash and found some sheer fabric in blues and purples that already had fusible on the back.
So I fused the sheer fabric down. I have started the free motion machine stitching in the photo above. I found the easiest way to stitch the snowflakes was to get the 6 or 12 radiating lines down first and then add the rest of the structure. You can see that the one on the left that didn’t have the radiating lines turned out really wonky. But this didn’t really matter as it will be covered in the next step. This piece of felt is big enough for two cards so it will be cut down to size in a later step.
Here’s the piece after I stitched all the snowflakes. I was a little sad to cover these up. They do show through but not really giving you the full scope of the stitching.
Then I found some more small bits of sheer fabric that I added over the stitching to give more color.
This is hard to see but there is a very sheer, shiny “fabric” that I stamped with acrylic paint. I am not sure what this fabric is, it looks a little like Lutradur but is more shiny and more open “weave” than the other Lutradur I have. I can’t remember where I got it. That is why I need to use stuff up. It’s bad when you have no idea what the stuff is, where you got it or what it’s original use was. So use stuff up!
I then fused the top layer over the variety of colored sheers and then cut the cards down to size. I machine stitched around the printed snowflake for the top layer and then zig zag stitched around the edges of the card.
I only had brown card blanks and I didn’t like the look of the snowflakes against the brown background. So I used two of my numerous colored papers that worked with the colors in the pieces. I glued the fabric card down to the paper and then fused the paper to the card blanks. I mailed these two cards off to Ann and Diane. Hopefully, they will like them. Unfortunately, there is a postal strike in Canada and it may be a while before the cards arrive.
Do you make your own cards? We’d love to hear about it over on the forum if you do!
Here’s wishing all of you, (no matter what part of the world, or what holiday you prefer to celebrate), a wonderful holiday season. I find it hard to believe that we are already through 2017 and on to 2018. Time really seems to speed up at the end of the year for me.
Earlier this month, I showed you the beginnings of these three cards. I picked the card on the left to send to Tracey for our forum holiday card exchange. It’s been machine stitched and then I painted the berries. I did the same with the center card and I painted those berries too but somehow forgot to take a photo before I sent it off to my mom. And the last one is hand stitched. I actually liked how they all turned out and Tracey was very kind in her comments about the one which she received.
This is the card that I received from Tracey. Isn’t it beautiful? It looks like my neck of the woods and we probably have at least that much snow or more. The cabin looks so warm and cozy all lit up for the holidays. Thanks Tracey, I love it!
It’s cold and snowy here, the temperature was three degrees F when hubby took Symphony for a walk. She started out on the leash, here she is when she got back!
Thanks for visiting us throughout the year, we appreciate all of our followers and would love to hear from more of you. Please leave us a comment if you have the time. Or if you have an idea of what we should post about, we’d love to hear your thoughts. All the best from The Felting and Fiber Studio!


