This year we all decided to do a Christmas card exchange within the Felting and Fibre Studio group. It is just so lovely to make for another creative! It’s a bit frightening too as I wanted to give it my all. I also thought it might be a nice time to try something new and experiment – no personal pressure at all! I was so excited to be partnered with Leonor who I know has received her card at this point.
So, I put my thinking cap on. My first attempt was, and I am being perfectly honest here, an unmitigated disaster and the memory is probably best confined to the bin in which it quickly landed. So it was time to move on and put the thinking cap back on.
Okay so, by way of background. I had a poinsettia plant which I managed by some miracle to keep alive for about 5 years. I will quickly add that this had nothing to do with green fingers, it just liked its position in my sun room with my orchids as companions (again the orchids like the room). This summer the poinsettia developed a honey fungal disease which is a total disaster if it hits orchids so we had to part ways. I managed to stem the spread of the disease and the orchids are safe for now.
As a tribute to that most beautiful poinsettia, I thought it could be my focus for the card exchange. I wanted mixed media so I felted each petal, then I did some free motion embroidery on each one. I hand sewed it onto a felted backing and added hand dyed stamens to the centre. It was then mounted on the Christmas card. It was a little too big for the card so I decided to mount it in a frame before posting it off. The postal service can be a bit dodgy but I am pleased it worked on this occasion. From Leonor’s message to me, I think she likes her card and I have made more since.
Here is a little slide show of the highlights of my process. Sorry, I forgot to photograph the hand sewing so you will have to use your imagination for that part. Some of the photos are slightly distorted so apologies for that too.
I laid out merino and viscose for the petals
Wetting down the petals
The rolling stage for the petals
I dried the petals on a baking rack
I prepared the petals for free motion embroidery. I started with tear away stabiliser but it was proving difficult to get all the bits of paper out of the sewing!
I changed across to Solvy for the machine embroidery
It only takes a few seconds to dissolve the Solvy
Dissolving the solvy
Nearly there!
The template was actually a circle. The photo is distorted
The base, again a circle
Here is the finished Poinsettia after I hand sewed it onto the base
As the finished flower was a bit too big for the card, I mounted both in a frame.
Here’s a close up of the stitching and the stamens which I hand painted
This was a fun make with a bit of learning thrown in for good measure. You might like to make some too. If you do, I would love to see it! Also if you have any questions on the making just pop them in the comments section and I will be glad to answer them!
Wishing you peace, love good health and happiness and, of course lots of creativity over the Festive Season and for 2024!
The last twelve months have, as my Irish granny would have said ‘put manners on me’. Cataracts, which were a ‘by the way’ diagnoses in my late 40s finally and quickly caught up with me. Eight increments of sight deterioration over a three month period! No more night driving, reading became a challenge and my creative curiosity disappeared. And so, the waiting game began. I am currently recovering from surgery on eye number 2. What a difference it has made and while it will be some time before I get my new glasses, I can function without them for the first time ever! Also, life in all its facets is so beautifully colourful.
So why do I mention it in my post. It feels awkward mentioning it as I am a very private person. Awkward, but necessary. Many of us go through times in life where we lose our creative mojo. Initially, I found myself angst ridden and questioning my abilities. The feeling never really went away but I had to find a way to go with the flow and tap away at bits and pieces for a while.
So now that the eyes are fixed I have started playing. Nothing too serious (well except for my last piece but more of that later). I am now a week and a half after the operation and here is what I have made over the past week.
Sample 1:
First up, a bit of a back story. I have committed to a felt swap later in the year. The theme is brooches so I thought I should start thinking about this. I used to like felting with basic resist shapes and distorting them so I thought this might be a starting point for this experiment.
First of all, I cut a 15cm square resist and rounded the corners. Then I covered both sides of the resist in eight thin layers. I started and finished with a rich orange colour and sandwiched in between were two layers of mustard and two layers of green. I used 16 micron merino which I purchased from Leiko Uchiyama https://www.leikofelt.com/merino/. Leiko’s fibre is hand dyed and the colours are sublime. She is based in Ireland and ships worldwide.
Sample 1 fibres laid out and wet down 8 thin layers
I made a prefelt in the usual way. I wanted the prefelt to be strong so I kept working it until it started to distort the resist.
solid pre-felt shrinkage has started
Then I made a small incision on one side of the resist, extracted the resist and sewed the raw edges back together with some nylon thread:
Sample 1: repairing the hole which was cut to remove resist
Then it was time to play with the square shape. I brought the edges of the square to the front of the piece and I started playing and shaping it. Once I was happy with the shape I handsewed them to hold them in position. Then I worked hard at felting the edges together and to the flat back side of the piece.
Sample 1: working on manipulating the shape
Sample 1: working on a pleasing shape
Sample 1: Shape has been secured with stitching and fulling begins
Once it was felted, fulled and rinsed, I removed the threads and started cutting. Lots of cutting!
Sample is fully felted, stitches are removed and cutting has started
I got a bit scissor happy! I sliced through a little at a time
Here is the finished piece. I have popped it on top of its original resist to give it perspective:
Sample 1 finished piece laid on original resist for size comparison
Here is a close up of the piece. The inch ruler underneath gives some perspective on size. Do you think it would make a suitable brooch?
Sample 1: close up of finished piece
Sample 2
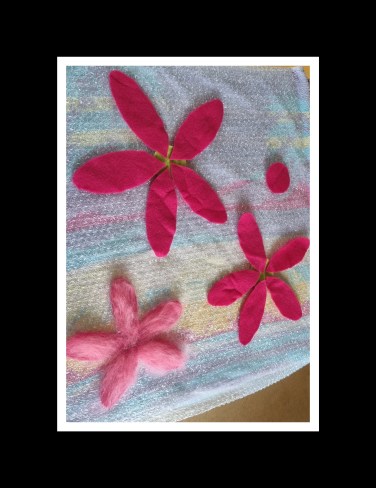
Next up, a flower. This year sees the 20th anniversary of the founding of the Irish felting group Feltmakers Ireland, by our esteemed member and incredibly creative Elizabeth Bonnar. There is a celebration planned for later in the year where members will focus on making pink flowers. I thought I might take this down time to make at least one. But I wanted to play and not produce my usual style of flower. I wanted to make a three layered flower but I also wanted to do some free motion embroidery on each petal. I decided to make the three layers separate, felt them to my satisfaction then attack them with the sewing machine. I cut out a template for the petals (small, medium, large) and then cut these shapes from prefelt as a foundation. I laid different tints of pink merino on top and finished it off with some tints of pink viscose. Once this was wet felted and fulled, my work with the sewing machine began as I did free motion stitching on each petal. After that, I needle felted the layers together and added a central yellow disk which I needle felted and then cut back the fibre until I was happy with the dome shape. Here are some photos I took of my progress. I was really getting into it so forgot to take photos as I went along (maybe the mojo is returning):
Sample 2: prefelted flower petals and the start of the layering of the lighter colour pinks
Sample 2 is ready for wetting down
Sample 2 has now been fulled
Sample 2 dried and ready for free motion embroidery
Sample 2 with free motion embroidery completed
Sample 2 Layers are joined together and central disk has been needle felted into the flower
Sample 2: view of finished flower (still damp so not fully shaped).
Sample 2: view of finished flower (still damp so not fully shaped).
Sample 2: view of finished flower (still damp so not fully shaped).
Sample 3
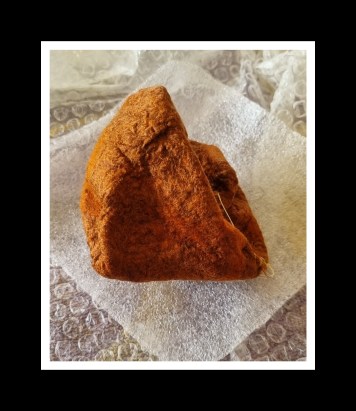
My last piece this week is a personal piece I felt a compelling urge to complete. When I left the hospital I was given instructions and bits and pieces to help the eyes heal. Among these were non woven swabs which I found were really soft and well aerated. I have no idea what they are made from but I reckoned they would work nicely on felt and I had lots left over. So I made a bowl using two layers of undyed merino. I wet this down, and then placed the non woven fabric on top, cut the pieces to size so that they fitted around the curves. I then felted it in the normal way. I cut a hole in the piece and removed the resist. Then I sealed the raw edges. When it came to fulling the pot I threw it quite energetically as I wanted to get additional texture on it. Then I dried it. There was nothing particularly spectacular about the result except that it was really soft and tactile. I did not take any photos of this process as it was just the result of some personal urgency. Using the 3cm hole at the back of the pot as an access point, I did some free motion embroidery stitching on my sewing machine. It was as close as I will ever come to performing keyhole surgery! It was challenging but I am pretty pleased with the result, Again, the ruler at the bottom of the photo gives size perspective:
Sample three: small bowl covered with free motion machine embroidery
Sample 3 rear view featuring 3cm hole through which the embroidery was worked
Back to the question of creative block. I don’t know if it is lifted but I think two things are helping me at the moment. The first is making that commitment, whether it is to a person or a project, the second is keeping things small and manageable, that way I can handle complexities if a notion hits me on how I might enhance a piece. Oh yes something else too, I have started to consciously seek not to be too precious about these pieces. I have thrown paint and ink on pieces and woven stuff through them. Not always producing happy little results (to paraphrase the artist, the late Bob Ross) but the process is freeing.
Have you had issues with creative block? I appreciate that it is a personal journey to find what will work to free yourself up. What may work for me may not necessarily work for someone else but if you would like to share your journey I would love to hear from you. Together, we may be able to help others free themselves up and immerse themselves once again in this beautifully creative world we occupy.
Last time I posted, I showed you a piece of driftwood that I had covered in green felt to represent moss. It definitely needed more work to achieve the natural look that I desired.
I took a small pair of sharp scissors and cut out some holes as well as making the ends not so uniform and straight. I then decided to use the left over cut out pieces as padding for stitching. I added the left over pieces in a couple of places and hand stitched them down.
I then decided to try adding more texture with needle felting. I had a pile of little wet felted scraps which you can see on the left and I needle felted those down. Then I added some wool from my carded batts that I had left over after wet felting. I needled those down but not too firmly. I still wanted the texture of moss, which you can see in the right photo.
Here’s what it looked like after I finished the lower layered bits. I left hanging threads as this will be the “grassy” looking bits sticking up between the moss.
Next was looking for different green threads. Here’s what I came up with. You can also just see on the left side that I found some of my photos of moss and printed those out for reference.
I then started adding some hand stitching. These are “wonky” French knots with hand dyed lace weight wool thread. This is going to take a while. I have another “slow” stitch project on my hands.
Next up was to try some machine stitching. I made a sandwich of the threads on the left between two layers of water soluble fabric. I then machine stitched a random branching pattern. The photo on the right shows the result after washing out the soluble fabric.
Here’s a small piece of the machine stitched moss by the French knot section. I haven’t stitched it in place as I think I will do more of the hand stitching first. I’m loving all the different greens as that is definitely what you find in nature. I will keep you updated on my progress.
I had showed you this background a couple of post ago and was planning on free motion machine stitching a meadow scene.
I started with some background grasses in a couple of rows. If I do this again, I think I would stitch only one row and make the grasses longer.
Then I began couching down some different yarns with machine stitching.
I decided I should go ahead and stitch in the main focal flowers now so I wouldn’t fill up their space with grass. I couched down the green yarn for stems and then stitched heavily over a piece of purple felt for the flowers.
I decided the piece needed some more skinnier lines and some darker values. So I stitched the weedy bits in dark brown. These would have been easier if they were stitched before the larger grasses.
I then added some dark green weedy bits to the left hand side and couched some lighter green yarn down across the foreground. As you can see, I started looking at the piece in a “frame” since that was how it would be presented. What else did I need?
I decided the flowers needed some leaves so I used more of the same green yarn and pulled it apart a bit to get more width for the leaves. Was it finished? There was something bothering me on the right hand side. Do you see the brown grasses forming an ellipse? It seemed to draw my eye too much. So a bit of unstitching was necessary.
Now here it is after a bit of grass removal. Is it finished? I will leave it hanging on my design board for a few days to decide. I think I will add a bit of darkness to a couple of stems just right of center. Probably with a marker or a bit of paint.
I am feverishly working away trying to finish up some landscapes and get them to the framer. I suddenly realized that it’s November and I needed more work to sell for the holiday season. I have always had good intentions of finishing pieces, getting them sewn to the backing fabric and laced to a board when I complete the piece. But somehow, those good intentions are paving the road to procrastination. Here I am again, finishing all the landscapes at once.
I went to the fabric store and found some fat quarters that worked with the various colors. I then hand stitch the nuno piece down to the fabric and lace it around a piece of matte board. Here is “Twilight” on it’s backing board ready to be framed.
This one I chose black fabric for the matting and laced it on to the matte board with a very minimal edge. I only want a tiny bit of black to show. This one is called “Serviceberry” at the moment unless I come up with a better name.
Believe it or not, I have finally decided that my slow stitch project is complete. I stitched it down to some brown fabric but I haven’t gotten this one laced on to the matte board yet. This one is called Autumn Impressions.
For those of you who wanted to see what the original fabric looked like, here it is. Definitely a bit of a change!
The last one is the green nuno felt that I showed you recently. I finished stitching and decided it was complete. I have it on a dark green fabric background but haven’t stitched it down yet. Hopefully, I will get these finished up this week and get them to the framers by Friday. That’s the plan, anyways.
And here’s a close up of the bottom so you can see the stitching around the poppies. I still haven’t decided what to call this one yet. Several suggestions were made last time and I decided I had to research whether the plant I was thinking of was really Queen Anne’s Lace or whether it was Hemlock. It could be either. So then I kept thinking of titles such as Lethal Serenity, Poisonous or Peaceful?, Deadly Tranquility etc. So I will keep thinking on what it should be called as I finish stitching it down and lacing it.
I showed you earlier the nuno backgrounds that I had created. I decided to try using the idea of the layered photos that I created in Photoshop Elements.
So instead of going with what the background suggested (pine trees), I thought I would try some fused machine applique over the nuno felt.
I printed out my service berry photo and got out my light box, tracing paper and a pencil. I completely ignored the background in the photo and just concentrated on the branch with berries and leaves. I simplified the design as I went.
Here’s the traced design that I came up with for my applique. Now I needed to choose a piece of fabric, get out my fusible (Wonder Under) and transfer the design to the fabric.
Here’s the piece of fabric that I chose on top of the nuno felt. The photo is not the best as the nuno felt looks black. I fused the Wonder Under to the back of the green fabric with my iron. It’s easy to do but if you haven’t used fusible before, make sure to read the instruction of the type that you have. All of them are a bit different.
Once I had the fusible in place, I transferred the pattern to the paper on the back of the fabric. I had to remember that the pattern would be reversed when cut out and applied to the background. I used the tracing paper to do this by flipping my drawing over on to the fusible paper and drawing on the backside of the tracing paper to transfer the pencil line. This works best if you enhance the original pencil line with a softer lead pencil, I used a 7B. Once the pattern was transferred, I cut it out with a pair of short, sharp scissors. I left the paper in place until after everything was cut out.
Then I applied the cut out fabric to the background by ironing it in place. The fusible melts and holds the fabric in place so that it’s easy to stitch down and add details.
Before I started stitching, I decided to add a little thickened water color to get a bit more definition and shading in the leaves and berries. Then on to the sewing machine.
Here it is after stitching (free motion) on the machine. I used three different greens and a couple of reddish brown threads. It’s hard to get an accurate color representation in the photos as the dark red seems to throw the camera off very easily. This was a fun project and different than most of my other nuno landscapes. Now to figure out what to do with the other backgrounds. More to come!
After doing lots of machine stitching on the last landscape that I showed you, I decided to try a more minimalist approach.
This is the starting point after nuno felting.
I then machine stitched the distant mountains as well as the lines on the water. I considered stitching heavily again to get the variety of colors in the mountains but thought, why not use paint? I hadn’t tried much painting on nuno felt but I decided to just go for it. I used Dye-Na-Flow paint that I already had. I watered it down a bit as it turns kind of plastic looking when dry used straight out of the bottle.
Here is it after painting. I had to be careful applying the paint as it had a tendency to spread so I carefully brushed it on and didn’t get very close to the edges of the stitching. Now it looks more like mountains and a lake. What to put in the foreground? I searched online for photos of Flathead Lake at sunset and found some that I liked and the photos helped with the foreground choice. Add trees, now why didn’t I think of that?
So I stitched in the outlines of the trees.
Then added the paint. I am still deciding if it is finished. I might add some hand stitching to the trees to give a bit more texture and variation in color. What do you think? Does it need more?
I showed you the start for this landscape last week. It’s based on a photo of the trees in winter on the Whitefish river. I really like the way the orange branches look against the sky and in the reflections in the water.
Here’s the photo I took and then the layout of the felt on the right. I used what silk I already had to represent the sky and the water and then added a little wool for the land and for the large tree trunk on the left. The felted piece ended up about 8″ x 11″.
I then started stitching the most distant background features. I forgot to add any support behind the felt at this point but later on added a heavy weight Pellon interfacing to support some of the heavier machine stitching.
Now to add some sheer orange fabric for the trees. I also stitched in dark brown along the edge of the river and the shore.
Then on to adding in the trees along the shoreline. I did baste down the orange sheer fabric to hold it in place while stitching. I added more stitching for the reflections of the trees.
I cut back some of the orange in the trees to show the sky in places and added a second layer of sheer orange over some of the branches. I then stitched more branches in orange thread. I did the same for the reflected trees.
Now on to the large foreground tree. I added some bark details with my darkest brown thread.
And then stitched in the large foreground branches. I started from the top dark branches and moved downward. I added one layer of sheer fabric over the yellow in the bottom left hand corner by the trunk to tone it down just a little. After looking at this for a while, I decided to make a few small changes. The right hand corner was drawing my attention to much with the background trees. There was too much contrast between the white clouds and the dark branches. Also, the shoreline wasn’t quite right.
Lighter brown stitching was added to the background trees and to the shoreline. I used a small amount of oil pastel to make a shoreline reflection in the water. And it was finished. Or at least finished for now. I will need to find a background cotton fabric for it’s matte and then get it framed. On to the next landscape!
For those of you who wanted to see the end result of Penny Peters 25 Million Stitches piece, here it is. You can read more about it here.
We have also started writing a monthly newsletter and already sent the first one out last week. If you’d like to receive the newsletter, click on the link in the prior sentence and scroll down to the end of the newsletter. There is a link to click there to submit your email address. Or you can sign up on the right side bar here. Thanks!
Before I show you my new colorscape, I am excited to announce our three UK prize winners! The winners were drawn by a random number generator. The prize winner are:
AdventuresInFelt says:
Thank you for this lovely giveaway! I would be happy with any of the bundles as I have been doing a lot of wet felting lately. I see a scarf in there somewhere! Or a hat! or handwarmers! 🙂
Arlene
Lovely giveaway! I’d love to get prize 3, but any would be great – I’d use it to play with 2D needle felting, something I’ve been toying with but haven’t properly started yet 🙂
Any prize would be amazing, I love all things wool! I’m currently designing and sampling ideas for mothers day gifts, hands, figures, mother and child images. I enjoy creating human stories with my favourite animal’s fibre. Thank you to the humble, but brilliant, sheep. Xx
Rae Bell
I will contact you for a snail mail address by email. Lyn of Rosiepink will be mailing your prize and it will be mailed after Christmas. Congratulations to our winners!
I decided to try another colorscape and went with one of my assignments for color studies in my stitch class. This one is blue-green, yellow, red-orange and violet. I used some short fiber merino that Paula gave me, thanks Paula! I didn’t worry about the edges because I was planning on cropping and trimming the piece at completion.
I then added a layer of Mistyfuse to fuse the top layers of sheer fabric down to the felt. I realize that I could have nunofelted these in place but I wanted a less textured surface.
I then layered some hand dyed silk organza over the top and fiddled around with the small pieces until I like the result. Then I fused it in place with an iron on a cool setting. This isn’t a very good photo but the best I could get.
Then I free motion machine stitched over the silk organza, cropped the edges and cut the organic edges off. You can click on the photo to enlarge it to see the stitching a little better.
For all felt purists out there, I took a photo of the back that is just felt and stitching without being covered up. Perhaps I can make it a reversible piece!
Here’s the next edition of my progress on the fabric collage landscape I have been working on.
In the photos from left to right, I worked on texturing the middle ground green area. I used a mixture of chopped up pieces of fabric, thread and yarn. I worked small areas at a time since the fabric mixture was easily shifted around as I machine stitched it. Using a wooden skewer to hold things in place definitely helps and protects wayward fingers. Once the green was all stitched in place, I noticed that the water on the left didn’t look exactly right. The portion of water going into the distance towards the left should have been shadowed by the hill behind it and not had any pink reflection. I needed to fix that.
So I covered that piece of water on the left with more of the blue green water fabric, stitched it down and then stitched along the edge of the shore and into the pink reflection to integrate it into the area better. I also added a few more fingers of purple sheer fabric into the water on the left in front of the peninsula. Then on to more stitching details along the shoreline.
You probably can’t see a lot of difference in the photo on the left but I added black stitching along the shore line to give a bit of shadow at the water’s edge. Then in the right photo, I used a dark green thread to add some details including tree shadows into the water and little “island” bits and tree shapes on the peninsula portions.
Next I checked the green foreground again to see if I needed to fix anything else in the completed parts before I started the foreground. Another water error was definitely in evidence. Water should look like it is lying horizontally to the horizon line. My water was falling down the front because of the pink lines that were diagonal instead of horizontal. My stitching lines should have been more horizontal as well but they didn’t show as much as those pink fingers. Those needed fixing!
I used some scraps of the red sheer fabric and filled in the areas so the diagonal pink fingers were disguised. This looked much better and I was satisfied with the background and mid ground so now to move on to the foreground. Stay tuned for the next edition!


Thank you for this lovely giveaway! I would be happy with any of the bundles as I have been doing a lot of wet felting lately. I see a scarf in there somewhere! Or a hat! or handwarmers! 🙂
Arlene