Browsed by
Tag: experiments

Bubble Texture

Bubble Texture

My best-laid plans have gone awry, so I am going to show you a short piece I did back in 2012. Texture seems to be a popular topic so this should fit right in. Although this is an older post if you want to comment or ask about it you can.

People seem to be interested in how to make bubbles in felt. I know there is more than one way but this is how I did it. This is the storey of my bubble hat. I had made a renaissance hat form Chad Alice Hagen’s hat book. I t was to show a group of ladies that were taking a hat class with me. It is a big hat made on a resist that is shaped like a big droopy mushroom. When you finish it you make wrinkles in it and clothespin them till it dries. The problem is it looks great if you push it all forward and take a picture but from the back, it doesn’t look very good. I am sorry I don’t have a picture of it at that point.

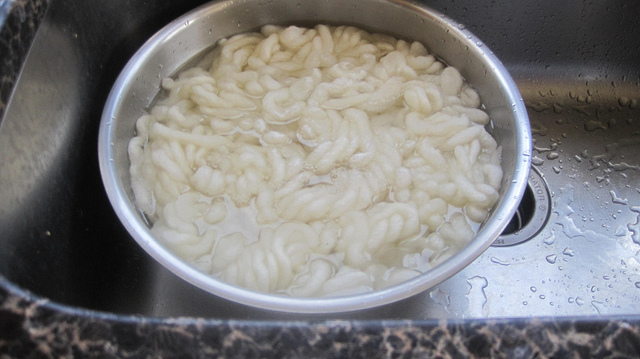
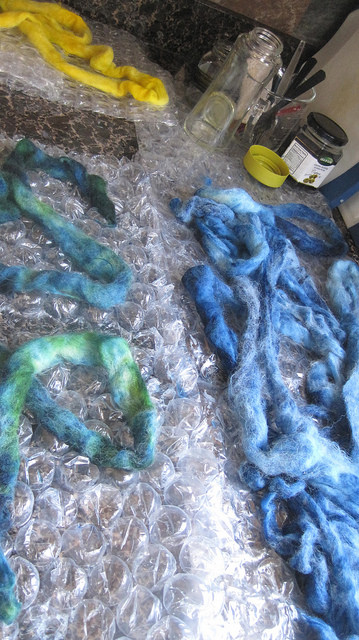
What I did was use a shibori dying technique. I used felt balls but marbles or crumple tinfoil will work the same. I started in the middle. You pull the felt around the ball and tie it off as tight as you can. Move out from there repeating the wrap and tie. When it was all done I dropped it in a simmering dye bath. I let it boil for about an hour. When using this as a dye technique it is usually done on a non-felting fabric so you open it up later and flatten it out you have a die pattern. When you do it to felt at a boil it felts more and the bubble shapes stay in. Making bubbles takes a lot of felt. The hat would fit my dog now. If you put your hands in like a puppet it makes s great Muppet monster.

Pandagirl’s Year in Review

Pandagirl’s Year in Review

I know I’m late to the party, but I’ve been traveling and have several family affairs looming that need my attention.

I started out in 2014 as a forum member and then in March I was a Global Moderator!  This past year has brought many challenges and delightful learning and wonderful outcomes in terms of felting.

My year started with experiments in dyeing.

2014-01-24 16.29.52

I shared my venture into encaustics.

2014-01-16 11.13.59

Tried my hand at painting with wool.

2014-01-12 12.05.33

Experimented with different wools.

2014-02-07 14.53.01

Participated in the quarterly challenges.

Jackson Pollock - Marilyn

Stewart Stephenson - Marilyn
Stewart Stephenson – Marilyn


Monet 2 after felting
Monet 3rd quarter


2014-10-19 13
Land Art 4th Quarter


Tried framing methods.

burlap 2

I broke down to drum carder envy and began my foray into making batts.  Woo hoo!

2014-11-14 15.15

Cathy and I tried indigo dyeing.

silk and thick n thinMy marketing blogs…

addiction biz cards wool side


I know it’s been awhile, but its more fun felting than marketing…  Sorry.


I taught a felting  class.

Toni
Toni and her placemat


There was a period of obsession with pods and vessels.

After rinsing

I ventured into free motion stitching.

moy layout

Then I experimented with embellishments and making a book cover.

finished front

Designing and making a handbag was a huge accomplishment for me.

hanging

I  experimented with 3D felting – grapes and flowers.

finished 2

2014-10-29 12.29


I learned a lot of new techniques in Fiona Duthie’s class.

2014-06-03 11.07.12

It was a busy year visiting farms, mills and fairs.

susan democarder back


I made scarves including a cobweb scarf.

2014-10-17 13.45

A big project was a 3D free motion stitched bowl, oh my!

2014-10-28 12.12

Felting a rooster, I learned to combine wet and needle felting.

2014-11-10 16.24

Our holiday exchange was an experiment of combining beading and felting.

2014-10-29 11.47.04

All in all, it’s been a very productive and inspiring year felting. Of course, there were many more projects that were completed.  It has been a wonderful year.  I want to thank all of you for teaching, inspiring me and encouraging me to do and try more.  Thank you!  A special thanks to my fellow moderators and Luvswool (Cathy),  Leonor at Felt Buddies and Nada for pitching in and contributing to the blog.  It’s been a terrific, fun journey.  I can’t wait to see what 2015 brings and what I learn and try!


The Base Makes a Difference

The Base Makes a Difference

In my Monet Challenge blog post this past quarter, I pointed out I had used a Domestic 56 base without pre-felting it. The domestic fiber is coarser than merino, approximately a 29.5 micron compared to a 19 of the merino. I had a lot of hairiness migrate through the merino and had to shave the piece a couple of times.  I wanted to try a pre-felted base with the same fiber. So, I set out to do another Monet.

I chose Monet’s Water Lillies 3.  Water lillys conjur wonderful memories for me from my childhood summers at my Grandmother’s cottage on a channel off a lake.

Water-Lilies13

Using two layers for the base, I wet felted it and let it dry. I was surprised at the shrinkage even though I did light rolling in all directions before drying. A rectangle turned into a square.

I laid out my design.  I wasn’t terribly happy with it.  I did some needle felting to give the lilly pads more definition.  Here it is before wet felting.

monet 2 before

After wet felting it, I still wasn’t enamored  with it.  I did some more needle felting and it seemed to take on a better life.

Monet 2 layout

The one thing I did learn was that using a pre-felted base of the Domestic 56 made it less hairy.  I didn’t need to shave it at all.  Even though I fulled it the same way I did the first Monet, it wasn’t as stiff.  Both methods had advantages. So, I will continue to experiment depending on the results I want to achieve.

What is your experience with using a pre-felted base of a coarser fiber?

Dyeing Fabric and Fibres – Guest Post

Dyeing Fabric and Fibres – Guest Post

Today we have another guest post from Cathy Wycliff (luvswool) who has recently been experimenting with different dyes.

***

Dyeing is one of the popular topics on the Felt & Fiber Forum, but I admit I was very reluctant to give it a try.  I read about the chemicals involved, the need for rubber gloves and a face mask, and I admit that scared me away.  But after I ordered 10 pounds of white wool (Domestic 56s), I realized I needed to do something, so–being the chicken that I am when it concerns “dangerous chemicals,” I opted for food colors, which are non-toxic and “easy to use.”  The Wilson icing gels I used met both of those criteria, so I happily dyed my wool in the microwave.  However, once I started wet-felting with the wool, I realized the colors bleed, even though I had followed the instructions (vinegar rinse).
That’s what led me to acid dyes, as I witnessed the beautiful results Forum members achieved through their use of acid dyes.  I went ahead and ordered Dharma yellow and blue (figuring I could make my own green), and began my dyeing journey.  I gathered my materials using Ruth Lane’s book “Complete Photo Guide to Felting,” even though Dharma offers instructions on their website.  I just do better with photos. Not pictured are the rubber gloves and mask I wore throughout the process.

5549Preparing to dye, I soaked the wool and silk according to the instructions.

5550While the wool was soaking I laid out the plastic as protection for my kitchen countertops.

5551I mixed the acid dyes according to Dharma instructions on the labels, double-checking with Ruth’s instructions.  I used glass jars, which are fine, but I have since ordered those squirt bottles for easier and more direct application of the liquid dyes.

5554 Here you see the wet wool and silk, ready to be dyed and steamed.

5555I poured the dyes on the wool and silk, first batch, and then repeated for two other colors, mixing the blue and yellow to make green).

5556Each different color of wool was wrapped separately in plastic wrap and stacked in a stainless steel vegetable steamer. Here you see my designated stainless steel large pot, never to be used again for pasta!  I put in an inch of water in the pot and covered.

5557I steamed according to instructions, used a soaking solution again …

5559… and rinsed well — and there you see my first packet of wool (green) laid out on plastic to cool.

5561bI continued the process with the blue and yellow packets of wool.

5563bHere you see all of the dyed, wet wool laid out to dry.

5564Here you see the beautiful blue habotai silk scarf stretched to dry…

5569… and the larger green silk habotai shawl as well.

5570bI now have a good supply of green, blue and yellow standard wool roving and pencil roving, along with a couple of silk pieces ready to be nuno-felted.  Would I do this again?  Absolutely!
Just received my new colors of Dharma dyes, ready to go again!

%d bloggers like this: