Browsed by
Tag: drum carded batts

Drum carding to blend and mix

Drum carding to blend and mix

The spring destash was going to provide me with a lot of winter combings from spinning projects.  I comb long locks and keep the residuals for this purpose.  I also have left over bits of prepped wool that wouldn’t fit on the bobbin, plus samples and other miscellaneous interesting fibers. These are set aside and kept in the black hole loving referred to as ‘the safe place’ only to be discovered once a year during cleaning.

The weather was absolutely gorgeous and it was time to take full advantage of what spring can be to drum card outside after what was a disastrous weekend for so many people in this area.

I pick through the different colours and group them in ways that work together.  I liked the way the green, purple and blue shimmered in the sun, so started working with that blend first. 

Once through the drum leaves clear definition of colour and texture of some of the locks.

There is extreme inconsistency between the two batts and they need to be divided and put through the drum carder again to even out the blend.  I weighed them and was pleased to find they weighed 36.5 gm and 37 gm, so splitting them would work perfectly.  I split them and reweighed the bundles and found they now weighed 38 gm each.  Think I might need a new scale, but close enough for right now.


Twice through the drum and the blending is a bit more consistent, but not so much that the locks are getting taken apart.  I can still see one or two bits in the blend, so that’s good for these batts.  They are an overall single colour, but you can still see the individual bits that go to make the whole picture.

I tried to use two different terms here, mix and blend.  For me a mix is a thorough incorporation of the different fibers into one homogeneous mass. A blend is a more gentle suggestion that the fibers and colours work together, but remain individual.

The next batt was a mix of red, blue and purple.  This had bits of different breeds of wool; some merino, some suffolk, some unknown, as well as some silk in red and purple which will give a slight shimmer.  I really wanted to thoroughly mix the colours the way I would mix a dye to get a homogenous result.  Sounds easy enough, but it’s not.

This is the first pass through the drum to show how the colours stand out from each other.  The purple is gone, but the blue and red are clearly defined, some of the silk is blended, but some was very difficult to mix in.

After five passes through the drum carder I had to take a break and modify my standards; this is not the result I wanted, but it will have to do.  I enjoy seeing the colours that compose the overall result, but I wanted a thorough mix just to be able to say I did it.  The wisp of fiber in the center is for contrast to show the before and after of mixing.

There were also several bits of noils and knots some roving that was left.  It was piled into the drum and run through just to see if anything interesting would pop up.  This is really bottom of the sink sort of colours.  I was really pleased with the result!

Reminded me of the Prairies in the spring with crisp blue skies, dry grass, pink clouds.  I might need to take a class from Ann on how to do landscapes in felt.


Color Mixing with Drum Carder

Color Mixing with Drum Carder

Experimenting with color mixing by drum carder was on my list of to do’s and I got around to that this past week. I created a sample with similar colors when color mixing by felting alone in this post.

First off, I had to get the drum carder out and find a space for it on my studio table. The chosen colors were blue green and red orange. I wanted to see how the drum carder mixing differentiated from the felted layers of the same colors. I used the same proportions of colors that I used in the prior sample, which was about 3 to 1 red orange to blue green.

Here is the batt that I created with those colors. The photo on the left is one run through on the drum carder and the photo on the right is two runs through the carder. I then tore the batt in half as I didn’t need that big of a felt sample. So I still have another sample I can make in these colors.

I wanted to try a different way to texture the bark so I used some cut up pieces of heavy interfacing (Pellon). It’s probably about a quarter of an inch thick. I peeled apart a layer of the batt, put the interfacing pieces down and covered with the rest of the batt. After felting, I should have split the batt into two equal pieces, that would have worked better than a thinner layer on the bottom.

The front is shown on the left and the back on the right after felting. As you can see, the interfacing came through the ends as I didn’t have enough wool covering the ends. And the back shows that I had too thin a layer under the interfacing pieces. But it was easier to see the interfacing to stitch around. The interfacing was not thick enough to feel through the wool and didn’t give a good texture. (Doesn’t the photo on the left remind you of a short rib?)

I then added some free motion machine stitching so the texture was more evident from the interfacing pieces. I also trimmed off the ends that were showing and did a little needle felting repair in those areas.

Here are the two pieces side by side. The one on the right does have silk nuno felted on the top too. Which do you think works better? The carded sample is more homogeneous in neutralized red orange but I do like the mottled appearance of the layered color mixing on the right. The carded sample definitely needs more value contrast than what it has now. How do you mix your colors of wool? We’d love to hear about over on the forum.


Pandagirl’s 2017 3rd Quarter Challenge Part 1

Pandagirl’s 2017 3rd Quarter Challenge Part 1

It took me a while to decide what I wanted to do for the challenge of the Edo period in Japan.  I was drawn to the simple scrolls with flowers and branches.

https://feltingandfiberstudio.com/2017/07/07/3rd-quarter-challenge-2017/

I scoured the museum sites and Pinterest.  I’ve been to Japan during Sakura (Cherry Blossom) season and particularly love the trees and flowers so it wasn’t too hard to narrow it down.

Since the scrolls seemed to be pale yellow, I made a batt backing then made another light batt using the Osage hand dyed merino and corriedale as a background. I added some darker fibers randomly to give the effect of lines in a scroll.

I had some left over merino/silk scraps from a scarf I had made for my son years ago.  They were supposed to be tassels, but I didn’t like them and cut them off and saved them.  But they make perfect tree branches.  Here is my first layout.

But something was off.  It didn’t feel right to me.  So, I rearranged the branches.

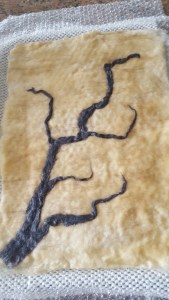
Next was to make white prefelt for the flowers (commercial wasn’t white enough) and cutting out the shapes in several sizes.  This was not an easy process. Here it is a wet look. The neat thing about the layout is that the branch can be down or up.

I didn’t want to felt it too hard.  But I may have to steam it before or after I add either hand or machine embroidery for details.

Actually the photo shows more texture than with the naked eye.

How do you like the branch, down or up?


A Different Easter Basket

A Different Easter Basket

We were recently in California for our Granddaughter Lisa’s first birthday.  I had intended to make an Easter basket before we left but it didn’t happen.  So, when I returned home I decided to make more of a bowl using the colors from her party.

20160313_120239

I made a batt using a light turquoise with touches of pink, purple and blue.

20160320_154113 Then I embellished the bowl with pink and gold mohair yarn and mulberry silk. (She likes bling.)

I used a resist thinking I could stretch it out on a ball to smooth, but it was a bit too small for the balls I had.  I tried blowing up a punch ball, but that didn’t work either.

So, I ended up stuffing it with plastic bags and it turned out nicely shaped.

20160321_123854 20160321_123859

I was pleased with it when it was dry.

20160322_113050 20160322_113003

Here is a closeup.

20160322_113011

Lisa’s favorite snack is what her parents call “puffs.”  Those nuggets that melt in the   babies mouth.  So, I stocked up, stuffed some in plastic eggs and sent the rest in the package along with a stuffed bunny.

20160322_113655When she gets a little older, I’ll make her a proper basket.

The basket arrived in time, I’m just a little late posting. She did enjoy her puffs and playing with the bunny and eggs.


Brighter Cat Toys and Making a Few Batts

Brighter Cat Toys and Making a Few Batts

Last week I showed you the roving I dyed with Rit dyes and this week, I made them into cat toys as I needed some brighter colors. I have shown how I made the cat toys here.

New Brighter Cat Toys

These definitely fit into the “brighter” category. I always think it is funny when people are choosing what color they want and they have a discussion on which color they think their cat will like. Really?

Blue Green Merino Fleece

I had also dyed some merino fleece so I decided a little drum carding was in order.

Set Up for Carding

Here’s my set up on the coffee table in front of the television. It’s a good activity at night when I’m zoning out in front of the “boob tube”. My mom used to call it that. You can see the dyed fiber on the far left. I picked and teased it apart by hand and ran it through the carder. I got two batts out of it.

Drum Carder

This is a slightly closer view of the carder. My hubbie got it for me for Christmas one year which was a big hit as you can imagine. It’s from Strauch Fiber Company and is very sturdy.

Olive Green Batts

I had some left over green mixed breed fiber so I decided to combine them to make them a bit more interesting. They are both in the olive-green shades although the one on the left is much more yellow.

Close Up of Batt

Here is a closer view of the mix of colors in one of the batts. I am trying to use up bits and pieces of wool so that I will use them so blending them into batts makes them much more interesting.


Batts, a Rainbow and a Scarf

Batts, a Rainbow and a Scarf

Firstly, I’d just like to say thanks to everyone who took the time to comment and offer their suggestions on my last post, they were all really appreciated and have given me lots of ideas for the future.  After a lot of thought about Social Media, especially after Leonor‘s comment and advice, I caved in and made a Facebook page   https://www.facebook.com/pages/Felt-by-Zed/867287306648868  There’s nothing there yet, I’m still trying to work out how to follow people etc, so if you have any tips, helpful hints etc, they are very welcome. Also, what’s the ‘etiquette’ on groups, can you just ‘join’ ones you like, or follow or whatever it is, or should you be invited?

I wanted something soothing and relaxing which didn’t require much looking after doing lots of sewing, so I thought I’d make some batts. I made them all a bit different, some with just different shades of Merino and some matching fibres, some had a lot of texturey wools blended in and I made a couple with lots of different fibres , shades and textures.

OLYMPUS DIGITAL CAMERAI also made some single colour textured batts to use on rainbow pieces, these didn’t photograph very well because there wasn’t much colour difference and it’s been really dark here the last couple of days. I did use them on this piece though, I’m going to add a little more green to where the yellow blends into the green, I don’t think the band is quite so defined in real life, but it does look like it needs more green on this photo.

OLYMPUS DIGITAL CAMERAI finally got around to making a scarf yesterday. It took all week to ‘prepare’ for it as I had to do it on the hall floor, so cleaning the hall floor, working out shrinkage, drawing out the template, etc. When I did get around to it, I was regretting it an hour in. 2 hours in I was regretting ordering 4 more packs of 18mic Merino last week thinking I’d get into scarves for a bit. 3 hours in I just wanted to curl up on the pillow I was using for my knees and have a nap. Today, every time I look over at my scarf and think ‘Ooh, it was worth it though’ every muscle in my body disagrees 🙂  I do like it though. I couldn’t get a very good photo, I’m afraid. Like I said, it’s really dark here, and the blue and purple are quite dark, and my camera seemed dazzled by the shininess of the silk. So, this will have to do for now:

OLYMPUS DIGITAL CAMERAI started with a template 25 cm wide and 200cm long (roughly 10 x 79 inches). I did alternate sections of purple and blue for the first layer, then the opposite colours on top for the second layer. I then added some matching colours of silk to the top, then contrasting colours:

OLYMPUS DIGITAL CAMERAIt finished up being  19 x 176cm or 7.5 x 69 inches.

%d bloggers like this: