I actually remembered to take photos at the wet felting class again last week! The first one is Linda’s piece that she made the week before. She embellished it with beads, buttons and ribbons when it was dry. She was asking about displaying it/mounting it on canvas, I said she could use invisible thread, but I know lots of people do various things, what do you think would look good?
There were loads of us last week, even my dad called in for a nosey, the loose ‘theme’ was landscape/garden. I got a photo of the table and as Leonor pointed out in her blog post recently, you can tell it’s the UK from the mugs of tea π
I can’t remember the name of who was laying out this piece, she was new last week, tilt your head to the right a bit:
I know this was Linda’s (tilt head to the left!):
And I know I shouldn’t have favourites, but I just loved this one by Pearline who was also new (both Pearline and her friend whose name I’ve forgotten were a bit late and missed the laying out demo, so just watched others and picked it up) she’d almost finished felting it here:
We had so many people that there wasn’t space for me to felt my demo layout piece and I just haven’t managed to do it yet, but it should be interesting as I showed a few techniques for clouds and streaky skies with plastic, nylon, cotton and blends, so it might look like I went over the top a bit π
I suppose my ‘Year end round up’ wouldn’t be complete without me saying I didn’t get half as much done as I’d have liked! Or that I’m surprised I got as much done as I did π
One of the biggest things of this year for the 4 of us was starting our online College of Felt and Fiber Arts with the ‘Wet Felting for Beginners’ course. We got some brilliant feed back for that and so many requests and enquiries about classes that we decided to have it on-going continuously.
I tried out a lot of ‘new’ wools earlier this year which I’d discovered on the wollknoll site. This is one listed as ‘Arctic Fox’, I never did find out what it actually is, though it was quite soft and similar to Bluefaced Leicester. I tried a variety of fibres with it, along the top is Soy top, below that is black Bamboo top (L) and Milk Protein (R), then some Hemp fibre, and at the bottom is Viscose top:
This was ‘Russian Camelhair’, which I guessed was camel coloured Romanov. I used Ramie fibre with it:
In May, I finally finished an e-book I’d first had an idea for and started working on about 8 years ago. ‘The Right Fibre‘ is (like it says on the ‘cover’) a guide to using embellishment fibres in wet felting.
I tried over 20 different embellishment fibres (some didn’t make the final edit) and made lots of control samples and felting techniques to see the kind of things which affect the outcome of how the fibres look. It was hard, playing with wool and fibres, but someone had to do it πΒ Actually that was the fun part, it was having to keep leaving it alone to stew for a while until the ideas of how to organise the sections and how to format it fell into place. Luckily, as with other e-books and tutorials I’ve written, I had lots of help from studio site and forum members and my poor non felting girlfriend who now has an unusually large range of knowledge and understanding of all things wool, felt, fabric and fibre, despite never having felted in her life π
In August I did ‘MakeFest’ at the Science and Industry museum, helped by my sister. It was hectic and overwhelming at first until we got some order and organisation. I learned that it’s possible to make a nice piece of felt on your first try at any age, and even the worst lumpy, clumpy layouts will turn out pretty good. We had lots of nice people having a go, this was the layout by Annabelle, who did it all by herself and was only 5:
And just last week I told you about the Start2 website which has lots of activities designed to get you creating and improve your well-being. I had quite a lot of fibres left over from MakeFest, so I did a fair bit of dyeing last year. This is dyed viscose:
Some dyed Bamboo staple:
And Silk Carrier rods:
Another highlight of the year was getting lots of gorgeous Swedish wool and Gotland Locks from Zara:
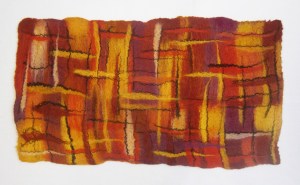
I did manage to do some felting this year! This was my favourite piece, inspired by plaid:
I hope everyone has had a good year with lots of felt and fibres π
If you look at the forum, you’ll have seen my thread talking about an online Creative Well-Being site called Start2. It’s an online resource which has lots of exercises and activities designed to enhance your well being and improve your health and life. They can explain it better than me, so if you want to learn more, there’s a short video here: http://www.start2.co.uk/about-start2
You don’t have to register with the site, you can access it all without that, but registering gives you the advantage of uploading your work, saving your favourite activities and downloading exercises. You can keep all your work private or share it in the various galleries. The site has lots of categories with activities focusing on things like stress-busting and brain boosting, but you can also ‘search by subject‘ to find an activity for the creative mood you’re in.
One of the activities I started recently is the ‘Stitch Memory Journal‘. There are 3 exercises, each one a little more ‘advanced’ than the next, in a very simple way. You don’t need lots of supplies, just some scraps of fabric or felt, and some embroidery threads. Each exercise guides you through the activity with really clear explanations. What I found really interesting about these activities is that they get you to think the opposite to how you usually would, and really get your observational skills working.
The first one I did was a teasel. It sort of fits somewhere between Exercise 1 and 2 because I only used one stitch, but I also used a few small pieces of organza for the background and though you can’t see it, a small piece of brown felt for the centre of the teasel.
The second piece I did is probably my favourite, because it looks like what it’s meant to be, but was very simple to do. It’s my representation of Silver Birch:
When I was going through the park taking photos for this activity, I hadn’t realised just how much it would really get me thinking. Instead of focusing on cramming in lots of detail, it gets you to think how you can simplify something. One of my favourite plants there is this ivy bush:
I used a nuno felt sample offcut for the background, then cut lots of discs from some green patterned fabric and various greeny shades of organza, then overlapped to build up the picture:
I started planning my next piece. It’s only at the early stages of trying to get myself to not overthink it! There’s quite a bit of bright red dogwood (Cornus) in the park which I thought would make a good stitched piece. I played around with some photos in Photoshop. I used the Median filter to get some very simple areas of basic background colours:
And I used the Cut-Out filter to simplify the details to give me some ideas for stitches to use. This is one of them, but it needs a bit more thought til I can start:
If, like me, you spend more time trawling through the site than finding an activity π they have a facebook page where they give suggested activities: https://www.facebook.com/start2art/
We had a go at making nuno felted flowers yesterday at the well-being centre. I made a few samples to take in for ideas. Of course, I forgot to take photos, but I found one of them hiding in the middle of a photo, so apologies for blurriness:
It was made with a square piece of cotton gauze with wisps of Merino on top,Β I cut it around the prefelt stage and stuck the little leftover bits onto what would become the middle piece. I layered it up and put a little piece of organza at the back, a button in the middle and sewed it together. We had a good selection of fabric to choose from, I’d dyed some scrim and cotton gauze, and so had Joyce who runs the craft group.Β Lyn, Teri and Judith sent lots of fabric too.
We mostly stuck to reds, pinks, and purples for the wool, you can see a couple of the blends I carded from donated wool at the front:
There aren’t too many of the blends left now, they’re always the first to get chosen! Starting off laying out:
Everyone was doing something different, some people had a couple of medium sized pieces, some had a few smaller pieces, the red pieces are Jo’s, she made a poppy, and the smaller pieces are Louise’s:
Shirley put a lot of thought into choosing some gauze and a piece of a mustardy viscose scarf I think Lyn sent.
Some people made larger pieces to cut out later. I think that’s fabric from Teri:
And wetting it down:
You can see which piece will be the top of Jo’s poppy:
Shirley picked different wool shades to match her fabric for her different layers:
I’ll have to show you in a few weeks how they turned out. This is one of the pieces from week 1, they have a machine embellisher at the craft group, so extra detail was being added:
And lastly, here’s a piece made by Barbara from our first nuno week:
It was the 3rd week of the wet felting group at the well-being centre on Wednesday just gone.
We’re going to put small sample pieces together to make up a larger wall hanging, adding to it as we go along. For the first samples we decided on a red/orange/yellow colour scheme for the felt background, and everyone had a bag of similar embellishments with a strip of silk, strip of scrim, and some cotton gauze pieces, then one type of fibre in various colours for everyone to use how they liked. The slideshow has some of the finished pieces, though they are all still wet. Even though it was the 3rd week some of these pieces were made by people who hadn’t been to the other classes, so it was their first attempt.
This slideshow requires JavaScript.
Shirley, who’s been every week brought back the piece she made last week. She really liked a batt I’d made with lots of tiny bits of odds, ends and scraps. She embellished the felt with sequins at home, this is it with some beads she’s adding trying to decide what to use:
I did get around to felting the two knitted samples I made. The piece I made with the hand blended and handspun yarn doesn’t look too much different, but it is duller and fluffier:
The pencil roving knitted piece was much nicer and easier to felt. It grew quite a bit and flattened out quite a lot:
It was quite chunky before, this is after felting, looking over the surface:
It didn’t lose all its texture
And, a closer look:
It felted really neatly, but I’m not sure I’ll find a use for felted knitted pencil roving. The weird thing was, both pieces felt itchy afterwards too. I wet felted them both by hand, nit in a washer.
A while ago, I was telling you about an art therapy wet felting workshop I was going to be involved with, and showed you some of the wool, fabrics and fibres which were generously donated for it. The first workshop was on Wednesday and was really busy and popular. There are two rooms we can use, so we can have a separate dry laying out area and not have to worry about anything getting wet, we stuck to one room for the first week, this photo is during tea break, but quite a few people stayed to carry on:
I think everybody enjoyed themselves making their pieces of felt, I got quite a few of the blended batts out because they’re looser and easier for beginners to use, and they were very popular. I’m afraid the photos don’t do the felt pieces justice, we’re in the basement with fluorescent lights. Here are some of the pieces made, apologies if yours isn’t shown, some didn’t come out.
This slideshow requires JavaScript.
On my last post I showed a photo of some of the roving I’d made myself with a diz and a drum carded batt, I’m not sure how much there was altogether, about 25g, I think. I spun it up one night on a drop spindle:
I didn’t do anything to it, just left it on overnight, or maybe two. When I unwound it, it was soft and loose, and not as thick as the pencil roving, I knitted it into a rectangle with the intention of wet felting it so I’ll show that next time:
Due to popular demand our next online Wet Felting Class starts on September 18th.
It runs for 3 weeks, with an additional 2 weeks of tutor support, so don’t worry if you think you won’t be able to do it because you have other commitments. You can work at your own pace, and we’re there to answer questions and give support and advice for the whole 5 weeks no matter how far behind you are, and you can download and keep the coursework to refer back to as often as you need π You can find full details on the Class information page HERE, including details of the course content, the supplies you’ll need and also the ‘equipment’ you’ll need. Have a look at our Gallery page to see what some of the previous students made, and we also have some really nice feedback from previous students too.
Edit: I completely forgot to say that last day for signing up for the class is 16th September!
I mentioned on the Forum a few weeks ago that I’m going to be doing some wet felting as art therapy at a well-being centre in about a month or two. The budget for supplies isn’t huge and will mostly go on wool tops, so I asked if any of our UK felters had any spare bits of wool or fibres they could donate so we had a nice variety of supplies. I was looking for anything really, especially those last little bits of wool tops that end up a half felted at the bottom of a bag. Teri, Galina and Lyn all kindly said they had a few bits they could spare. They weren’t really telling the truth though, they had a lot to spare! In fact, they were so unbelievably generous, I just had to show everyone! There were a few small odds and ends of wool tops and I had a few small bits too, so I carded up a few colourful and variegated batts:
There were also some nice blended tops:
Lots of natural and neutral wool tops, some of which I carded into batts too:
Lots of gorgeous natural fleeces and locks:
And lots of beautifully dyed (by hand, I think) locks:
An unbelievable amount of embellishment fibres:
Lots of fabric:
And last, but not least, lots of yarn:
I was talking to the others involved about what direction the group may take long term after the initial learning and exploring and expressing stages. Maybe being part of some local or national project or initiative, or taking part in some kind of exhibition, something that would give the group a theme to work on and an aim. I don’t have any previous experience of anything like that, and don’t even know where to start looking, I see events ‘featuring local community art groups’ all the time, but never see the initial invitation for groups to take part, so if anyone has any info that might help, even if it’s just where or how to start looking, I’d be really grateful π You can contact me on the forum or using the Contact Form here, or even on Facebook. Thanks so much to Teri, Galina and Lyn for being so generous π